2018 MERCEDES-BENZ AMG GT COUPE change time
[x] Cancel search: change timePage 139 of 174
rupted and the CD or DVD mode menu will
appear. If another function, such as navigation,
is being operated, the media menu does not
change. Only the music from the last inserted
CD or DVD will be played.
Audio/video mode
Important safety notes
GWARNING
The CD/DVD drive is a class 1 laser product.
If you open the housing of the CD/DVD drive,
there is a risk of exposure to invisible laser
radiation. This laser radiation could damage
your retina. There is a risk of injury.
Never open the housing. Always have main-
tenance and repair work carried out at a quali- fied specialist workshop.
GWARNING
If you handle a disc while driving, you may be
distracted from the traffic situation. You could
also lose control of the vehicle. There is a risk of an accident.
Only handle a disc when the vehicle is sta-
tionary.
Bear in mind that at a speed of only 30 mph
(approximately 50 km/h), the vehicle covers a
distance of 44 ft (approximately 14 m)per sec-
ond.
Notes on audio/video mode
Permissible data carriers
RCD audio, CD-R and CD-RW
RDVD-R, DVD-V and DVD-RW
RSD card
RUSB storage device
Permissible file systems
RISO 9660/Joliet standard for CDs
RUDF for video DVDs
RFAT16, FAT32, exFAT and NTFS for SD card
and USB storage media
Multisession CDs
For multisession CDs, the content of the first
session determines how the multimedia system
processes the CD. The multimedia system plays
only one CD session and gives priority to CD
sessions with audio files.
File structure of a data carrier
When you create a disc with compressed music
files, the tracks can be organized in folders. A
folder may also contain subfolders. The disc
may contain no more than eight directory levels.
Files beyond the eighth level will not be recog-
nized by the system.
iThe multimedia system supports data carri-
ers with up to 50,000 files.
In the case of a data carrier with more than
64 GB of stored data, only files in folders with
the following names are supported: Music,
Pictures, Video.
Track and file names
When you create a disc with compressed music
files, you can assign names to the tracks and
folders.
If MP3 or WMA files are stored in the root direc- tory itself, the root directory will also be treated
as a folder.
You should observe the following when assign-
ing track names:
Rtrack names must have at least one character
Rtrack names must have an extension of a sup-
ported audio or video format, e.g. mp3, aac orm4v
Rthere must be a dot between the track name
and the extension
Example of a correct track name:
"Track1.mp3".
Permissible formats
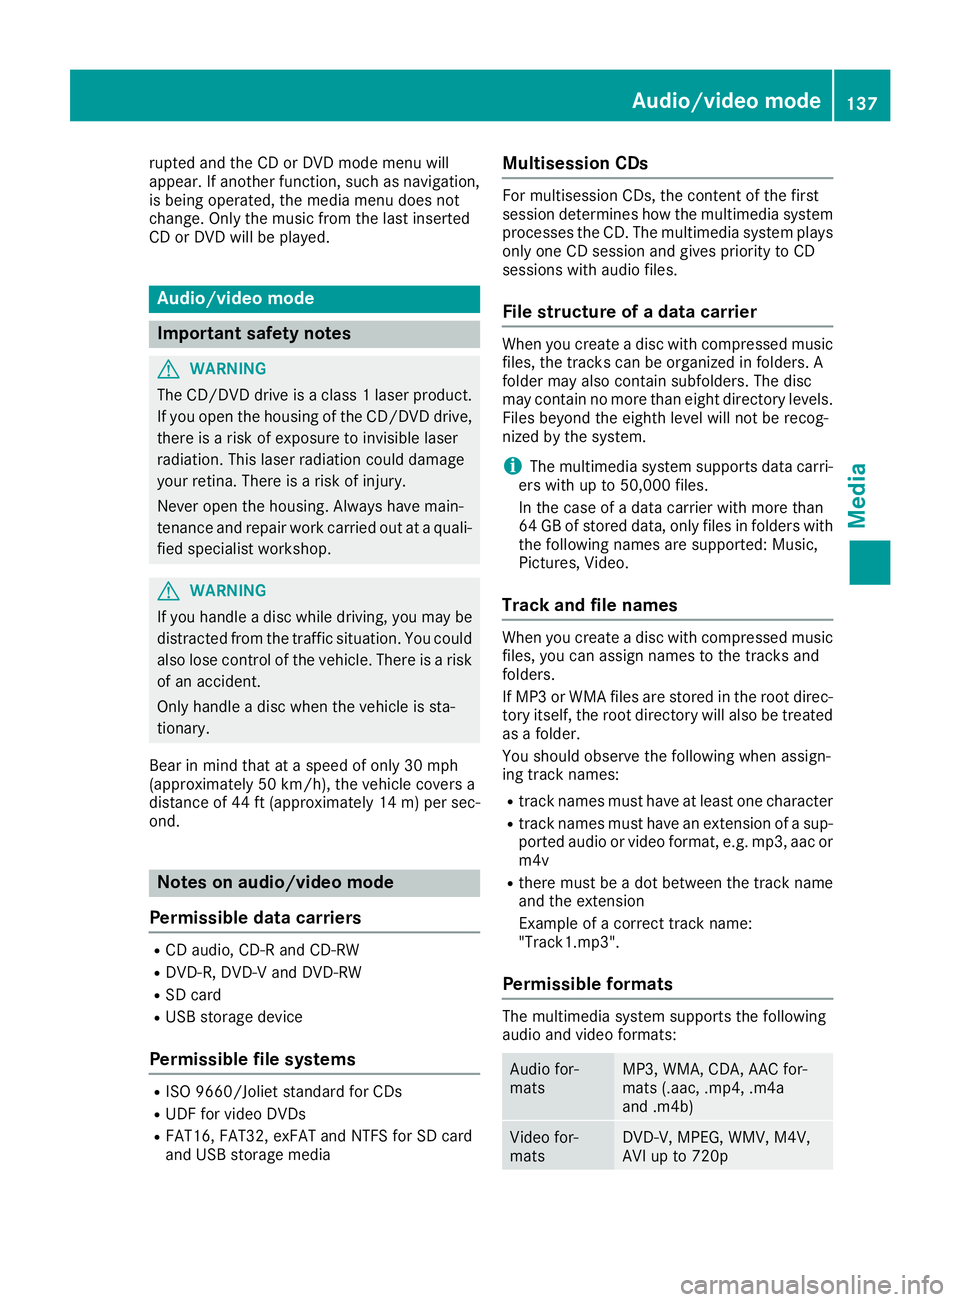
The multimedia system supports the following
audio and video formats:
Audio for-
matsMP3, WMA, CDA, AAC for-
mats (.aac, .mp4, .m4a
and .m4b)
Video for-
matsDVD-V, MPEG, WMV, M4V,
AVI up to 720p
Audio/video mode137
Media
Z
Page 141 of 174

AArtist and album
BNumerical time display
CGraphic time display
DCover view (if available)
Inserting and removing a disc from
the single CD/DVD drive
Before inserting or removing a CD or DVD,
ensure that the cup holder is empty.
Before removing a disc, be aware that the CD or
DVD can become hot.
Inserting
XInsert a disc into the disc slot with the printed
side facing up.
The drive closes and the disc is played.
If the CD or DVD is started in media mode, the
corresponding media menu is shown. If the
CD or DVD is started from another application
(e.g. navigation), the display will not change.
iThe drive may not be able to play discs with
copy protection.
Removing
XIn the CD mode menu, slide 6the control-
ler.
XTo select þ: turn and press the controller.
The drive ejects the disc. If you do not take the disc out of the slot, it is drawn in again auto-
matically after a short while.
or
XTo select Mediain media mode: slide 5and
press the controller.
XTo select Eject: turn and press the controller.
Inserting and removing an SD card
Important safety notes
GWARNING
SD cards are small parts. They can be swal-
lowed and cause choking. This poses an
increased risk of injury or even fatal injury.
Keep the SD card out of the reach of children. If a SD card is swallowed, seek medical atten-
tion immediately.
!If you are no longer using the SD card, you
should remove it and store it outside the vehi-
cle. High temperatures can damage the card.
The multimedia system supports the following
memory cards:
RSD cards ( SecureDigital)
RSDHC cards ( Secure Digital HighCapacity)
RSDXC cards (Secure Digital e Xtended Capac-
ity)
Inserting an SD card
XInsert the SD card into the SD card slot until
the SD card engages. The side with the con-
tacts must face down.
If the memory card has been selected as a
media source, the medium is played and the
files are loaded in the background. If there are
no supported audio or video files, you will see
a message to this effect.
iIf the SD card for navigation is inserted into
the SD card slot, you can still select the mem-
ory card as a media source. The No Playa‐
ble Filesmessage then appears.
Removing an SD card
XPress the SD card.
The SD card is ejected.
XRemove the SD card.
Connecting USB devices
There are two USB ports in the stowage space
under the armrest (Ypage 136).
XConnect the USB device to the USB port.
If the corresponding media menu is visible,
the medium is played and the files are loaded
in the background. If there are no supported
audio or video files, you will see a message to
this effect.
iMP3 players must support Media Transfer
Protocol (MTP).
Audio/video mode139
Media
Z
Page 143 of 174
Pausing/continuing playback
XTo pause playback:in audio or video mode,
slide 6the controller.
The media menu bar is shown.
XTo select Ëin the media menu bar: turn
and press the controller.
Playback is interrupted. The display changes
to Ì.
XTo continue playback: in audio or video
mode, slide 6the controller.
The media menu bar is shown.
XTo select Ìin the media menu bar: turn
and press the controller.
Playback is continued from the point of inter- ruption. The symbol changes to Ë.
Selecting a track
Selecting a track using the current
track list
XTo display the current track list: press the
controller in the media mode menu.
The category list appears.
XSelect the current track list.
XTo select a track: turn the controller and press
to confirm.
Selecting a track by skipping to a track
XTo skip forwards or backwards to a track: in
the media mode menu, turn or briefly slide
9 or8 the controller.
Entering a track number directly
XIn media mode, slide 6the controller.
XTo select Options: turn and press the con-
troller.
XTo select TrackNumber:: turn and press the
controller.
A menu appears.
XEnter the desired track number.
Searching for a track
XIn the media mode menu, slide 6the con-
troller.
The media menu bar is shown.
XTo select Search: turn and press the control-
ler.
The category list is shown.
XSelect a category, e.g. Genres.
Sub-categories appear with the selection of
the main category (depends on the multime-
dia system default settings and the music
tracks available).
XSelect a sub-category, for example Rock.
If the selected sub-category contains music
tracks, these will be displayed.
Gracenote®Media Database
General notes
This function is available in CD mode.
There is a version of
Gracenote
®music recognition technology,
Emeryville, California, USA on the multimedia
system hard disk. In media mode, you will rec-
ognize this by the logo in the bottom right-hand
corner of the display.
If the audio CD does not contain any CD text
information, the multimedia system can use the
Gracenote
®Media Database to identify
unknown audio tracks when in CD mode.
Carrying out an Internet update of met-
adata
The Updating Metadata Via Internetoption allows any missing metadata for an audio
CD (e.g. cover, track, album, artist) to be uploa-
ded retrospectively to the internal Gracenote
®
database.
An Internet connection is required for this
(
Ypage 122).
Audio/video mode141
Media
Z
Page 144 of 174
Selecting Internet update of metadata
XIn media mode, slide6the controller.
The media menu bar is shown.
XTo select Options: turn and press the con-
troller.
XSelect Updating Metadata Via Internetin the selection list.
A connection with the Gracenote®server is
established. The missing data is loaded,
saved and displayed in the main display field.
If there is no data found or there is no Internet
connection, a corresponding error message
will appear.
Switching the Gracenote®data display
on/off
XActivate CD mode (Ypage 136).
XTo select Gracenote Media Database: turn
and press the controller.
XTo switch the display off: select None.
In the CD mode menu, Track 1is shown, for
example, instead of the Gracenote®data.
XTo switch on the display: press the controller.
Media search
General notes
The multimedia system plays back files from the following data media:
RDisc (audio CD or DVD)
RMemory card
RMedia Register
RUSB storage device
RApple®devices (folder, year and photos are
not available)
The categories are displayed according to the
data available.
Starting the media search
XIn the media mode menu, slide 6the con-
troller.
The media menu bar is shown.
XTo select Search: turn and press the control-
ler.
The category list appears.
Category list
XIn the media mode menu, slide 6the con-
troller.
The media menu bar is shown.
XTo select Search: turn and press the control-
ler.
The category list is shown.
Depending on the connected media sources and
files, the following categories are listed:
RCurrent Tracklist
RFolder
RSelect By Cover
RKeyword Search
RPlaylists
RArtists
RAlbums
RTrack
RGenres
RYear
RComposers
RVideos
RPhotos
RPodcasts
RAudiobooks
iThe categories are available as soon as the
entire media content has been read and ana-
lyzed.
If the same device is reconnected with
unchanged media content, these categories
are available more quickly.
When connecting Apple
®devices, the cate-
gories “Folder”, “Year” and “Photos” are not
available.
Searching a track using the current
track list
XSelect Current Tracklistfrom the cate-
gory list (Ypage 142).
The selection list appears.
XSelect the required track.
Searching for a track via a folder
Playable files can be searched for in the active
data medium's directories.
142Media search
Media
Page 147 of 174
Once the copying procedure is complete, you
will hear the first track of the copied album.
You can now copy more files to the Media
Register.
XTo cancel copying:selectCancel.
Files are stored in the Media Register up until the point of cancellation.
iIt is possible to change to a different func-
tion (e.g. radio) during the copying procedure.
The copying procedure continues in the back-
ground. While the copying procedure is taking
place, this is shown by a symbol in the status bar.
Renaming/deleting files
XTo show the main function bar: slide 5the
controller.
XTo select Media: turn and press the controller.
A menu appears with the available media
sources.
XTo select the media source: turn the control-
ler and press to confirm.
XTo switch to the menu bar: slide 6the con-
troller.
XTo select Options: turn and press the con-
troller.
XSelect Manage Media Register.
XSelectRename / Delete Files.
The file list is displayed.
XTo highlight the file: turn and press the con-
troller.
XSlide 9the controller.
You can select between EditandDelete.
iOnly folders can be renamed.
Renaming a file
XTo select Edit: turn and press the controller.
An input field appears.
XRename folder.
XTo save changes with ¬: turn and press
the controller.
Renaming a folder only changes the file name.
Depending on whether or not the Show
Track Informationoption has been selec-
ted, this change may not be visible in the main
display field.
Deleting a file
XTo select Delete: turn and press the control-
ler.
Deleting all files
!
In order to prevent malfunctions, do not use
COMAND during this time.
This function deletes all files from the Media
Register.
XTo show the main function bar: slide 5the
controller.
XTo select Media: turn and press the controller.
A menu appears with the available media
sources.
XTo select the media source: turn the control-
ler and press to confirm.
XTo switch to the menu bar: slide 6the con-
troller.
XTo select Options: turn and press the con-
troller.
XSelect Manage Media Register.
XSelectDelete All Media Files.
A prompt appears.
XTo select Yes: turn and press the controller.
All files are deleted.
Calling up memory space info
XTo show the main function bar: slide 5the
controller.
XTo select Media: turn and press the controller.
A menu appears with the available media
sources.
XTo select the media source: turn the control-
ler and press to confirm.
XTo switch to the menu bar: slide 6the con-
troller.
XTo select Options: turn and press the con-
troller.
XSelect Manage Media Register.
XSelectMemory Info.
Media Register145
Media
Z
Page 148 of 174

Selecting a playback mode
The following options are available:
RNormal Track Sequence: the tracks are
played in the normal order (e.g. track 1, 2, 3
etc.).
RRandom Medium: all tracks on the data
medium are played in random order (e.g.
track 3, 8, 5 etc.).
RRandomTrackList: the current track list is
played in random order (e.g. 3, 8, 5 etc.).
XTo show the main function bar: slide 5the
controller.
XTo select Media: turn and press the controller.
A menu appears with the available media
sources.
XTo select the media source: turn the control-
ler and press to confirm.
XTo switch to the menu bar: slide 6the con-
troller.
XTo select Options: turn and press the con-
troller.
XSelect Playback Mode.
The options list appears. The #dot indicates
the current setting.
XSelect the desired option.
The option is switched on. For all options
except Normal Track Sequence
, you will
see a corresponding icon in the main display.
iThe Normal Track Sequenceoption is
automatically selected when you change the
disc you are currently listening to or when you
select a different medium. If an option is
selected, it remains selected after the multi-
media system is switched on or off.
Bluetooth®audio mode
Requirements
The Bluetooth®function must be activated in
the multimedia system (Ypage 38).
Bluetooth®audio mode requires a Bluetooth®-
capable audio device.
Check your Bluetooth
®audio device for the fol-
lowing; see the manufacturer's operating
instructions:
RBluetooth®audio profile The Bluetooth
®audio device must support
the A2DP and AVRCP Bluetooth®audio pro-
files.
RBluetooth®visibility
Certain Bluetooth®audio devices do not just
require activation of the Bluetooth®function.
In addition, your device must be made "visi-
ble" to other devices.
RBluetooth®device name
This device name is predetermined but can
usually be changed. For a clear selection of
the Bluetooth
®device, Mercedes-Benz rec-
ommends that you customize the device
name.
iA2DP ( Advanced AudioDistribution Profile):
Bluetooth®audio profile for audio data trans-
mission
AVRCP (Audio VideoRemote ControlProfile):
Bluetooth
®audio profile for audio data play-
back
iThe Bluetooth®device must be visible to the
multimedia system for authorization. After
authorization, the multimedia system even
finds the Bluetooth
®device when it is not
visible.
General notes
Before using your Bluetooth®audio device with
the multimedia system for the first time, you will
need to authorize it.
When you authorize a new Bluetooth
®audio
device, it is connected automatically. Connec-
tion involves first searching for a Bluetooth
®
audio device and then authorizing it.
You can authorize up to 15 Bluetooth®devices.
iIf you authorize a mobile phone that sup-
ports Bluetooth®audio, the A2DP and AVRCP
Bluetooth®audio profiles are connected
automatically.
The mobile phone is then entered:
Rin the Bluetooth®telephone list
(Ypage 92)
Rin the Bluetooth®device list
(Ypage 147)
Mercedes-Benz recommends authorizing a
mobile phone in Bluetooth
®telephony
(Ypage 92).
146Bluetooth®audio mode
Media
Page 154 of 174
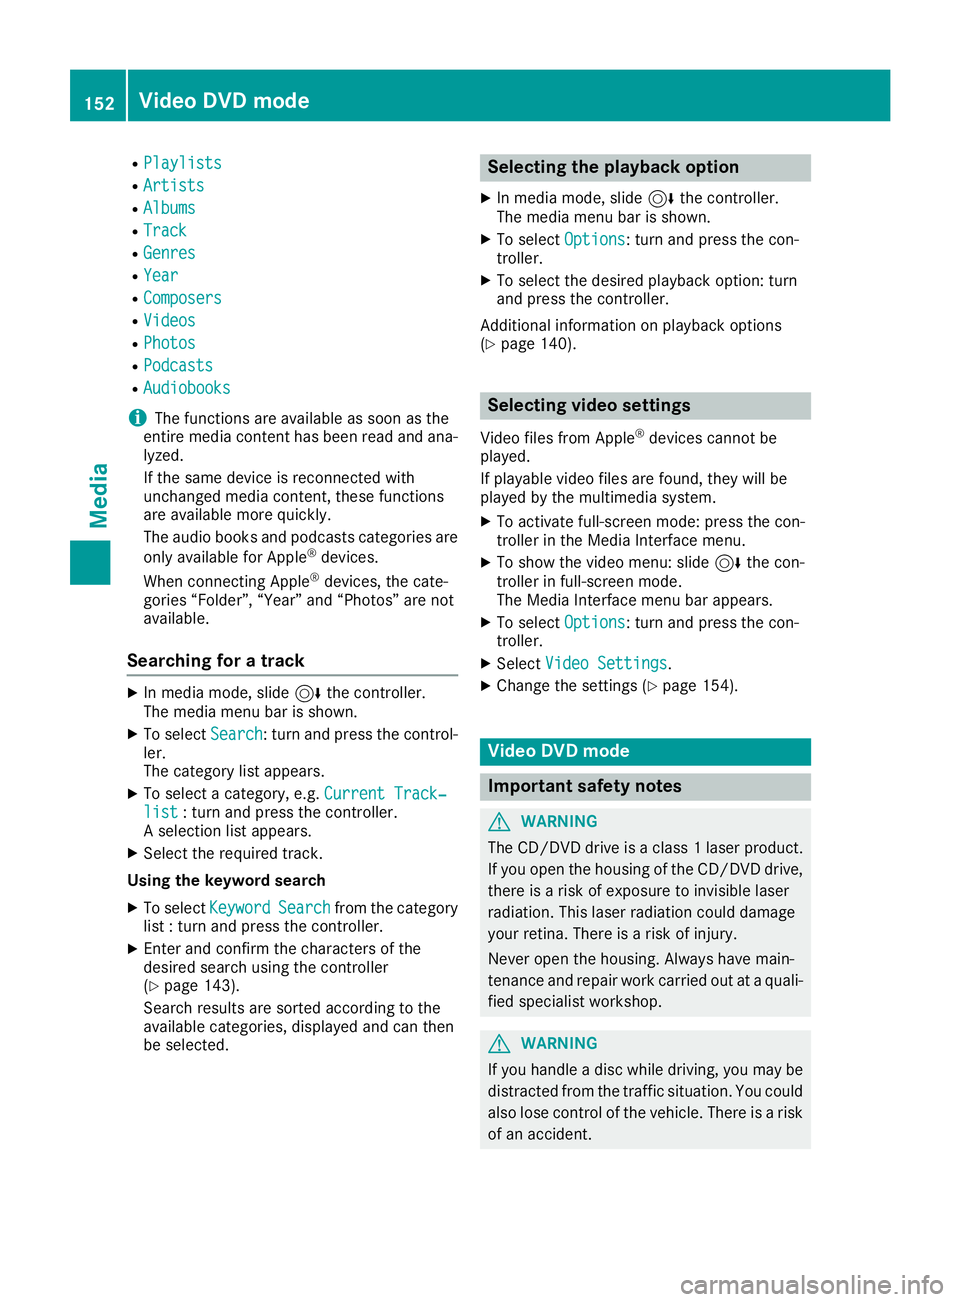
RPlaylists
RArtists
RAlbums
RTrack
RGenres
RYear
RComposers
RVideos
RPhotos
RPodcasts
RAudiobooks
iThe functions are available as soon as the
entire media content has been read and ana-
lyzed.
If the same device is reconnected with
unchanged media content, these functions
are available more quickly.
The audio books and podcasts categories are
only available for Apple
®devices.
When connecting Apple®devices, the cate-
gories “Folder”, “Year” and “Photos” are not
available.
Searching for a track
XIn media mode, slide 6the controller.
The media menu bar is shown.
XTo select Search: turn and press the control-
ler.
The category list appears.
XTo select a category, e.g. Current Track‐list: turn and press the controller.
A selection list appears.
XSelect the required track.
Using the keyword search
XTo select KeywordSearchfrom the category
list : turn and press the controller.
XEnter and confirm the characters of the
desired search using the controller
(
Ypage 143).
Search results are sorted according to the
available categories, displayed and can then
be selected.
Selecting the playback option
XIn media mode, slide 6the controller.
The media menu bar is shown.
XTo select Options: turn and press the con-
troller.
XTo select the desired playback option: turn
and press the controller.
Additional information on playback options
(
Ypage 140).
Selecting video settings
Video files from Apple®devices cannot be
played.
If playable video files are found, they will be
played by the multimedia system.
XTo activate full-screen mode: press the con-
troller in the Media Interface menu.
XTo show the video menu: slide 6the con-
troller in full-screen mode.
The Media Interface menu bar appears.
XTo select Options: turn and press the con-
troller.
XSelect Video Settings.
XChange the settings (Ypage 154).
Video DVD mode
Important safety notes
GWARNING
The CD/DVD drive is a class 1 laser product.
If you open the housing of the CD/DVD drive,
there is a risk of exposure to invisible laser
radiation. This laser radiation could damage
your retina. There is a risk of injury.
Never open the housing. Always have main-
tenance and repair work carried out at a quali- fied specialist workshop.
GWARNING
If you handle a disc while driving, you may be
distracted from the traffic situation. You could
also lose control of the vehicle. There is a risk of an accident.
152Video DVD mode
Media
Page 155 of 174
Only handle a disc when the vehicle is sta-
tionary.
Bear in mind that at a speed of only 30 mph
(approximately 50 km/h), the vehicle covers a
distance of 44 ft (approximately 14 m)per sec-
ond.
General notes
Notes on discs
!Do not affix stickers or labels to the discs.
They could peel off and damage the drive.
The drive is designed to receive EN 60908 standard discs. Therefore, you can
only use discs with a maximum thickness of
1.3 mm.
If you insert thicker discs, e.g. those that con-
tain data on both sides (DVD on one side and
audio data on the other), they cannot be ejec-
ted and can damage the drive.
Do not use discs with an 8 cm diameter, even
when using an adapter. Only use round discs
with a 12 cm diameter.
The variety of data media, burners and burn
software means there is no guarantee that the
system will be able to play discs that you have
copied yourself.
DVD playback conditions
The multimedia system can play back video
DVDs produced according to the following
standards:
RRegion code 1 or region code 0 (no region
code)
RPAL or NTSC standard
You will generally find the relevant details either
on the DVD itself or on the DVD case.
With DVDs that do not meet the standard
requirements, you may encounter playback
problems.
iObserve the following notes:
RIt is also possible to play video DVDs with a
different region code, provided that they
are produced in accordance with the PAL or
NTSC standard. If you insert a video DVD with a different region code, a message to
this effect appears.
RThe multimedia system is set to region
code 1 at the factory. This setting can be
changed at a qualified specialist workshop.
The region code can be changed up to five
times.
RIf a DVD cannot be played back according
to national color transfer methods (PAL or
NTSC standards), problems with the image,
sound or playback may occur.
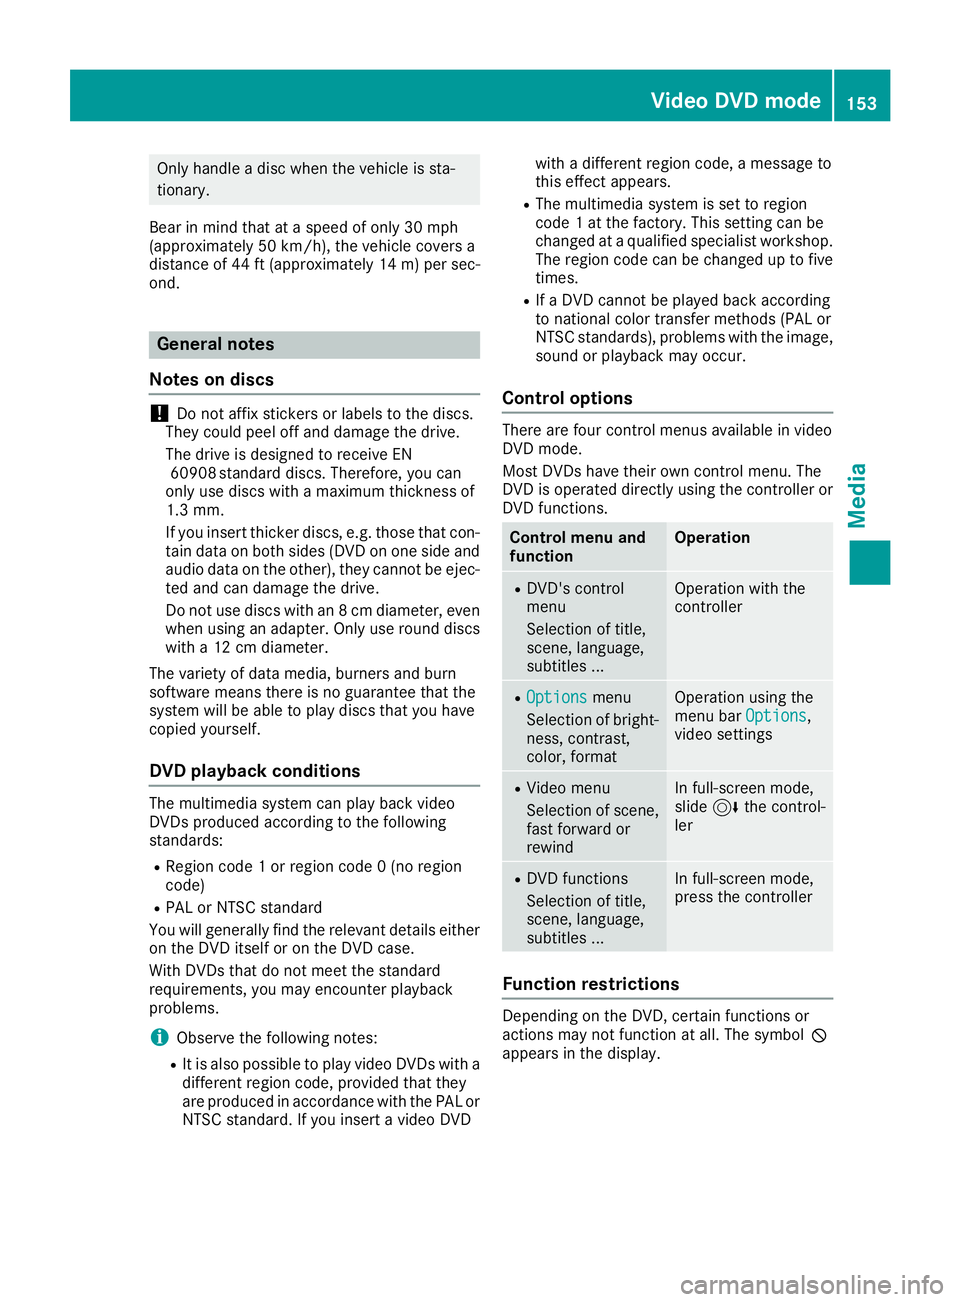
Control options
There are four control menus available in video
DVD mode.
Most DVDs have their own control menu. The
DVD is operated directly using the controller or DVD functions.
Control menu and
functionOperation
RDVD's control
menu
Selection of title,
scene, language,
subtitles ...Operation with the
controller
ROptionsmenu
Selection of bright-
ness, contrast,
color, formatOperation using the
menu bar Options,
video settings
RVideo menu
Selection of scene,
fast forward or
rewindIn full-screen mode,
slide 6the control-
ler
RDVD functions
Selection of title,
scene, language,
subtitles ...In full-screen mode,
press the controller
Function restrictions
Depending on the DVD, certain functions or
actions may not function at all. The symbol K
appears in the display.
Video DVD mode153
Media
Z