2018 MERCEDES-BENZ AMG GT COUPE turn signal
[x] Cancel search: turn signalPage 44 of 174
Your multimediasyste mequipment
These operatin ginstruction sdescribe all th e
standar dan doptional equipment of your multi-
media system, as available at th etime of going
to press. Country-specifi cdifference sare pos -
sible. Bear in min dthat your vehicle may no t
feature all function sdescribed here. Thi salso
applies to safety-relevan tsystems an dfunc-
tions.
Read th einformation on qualifie dspecialis t
workshop sin th evehicle Operator's Manual.
Important safet ynotes
GWARNING
If you operat emobile communication equip-
men twhen driving, you may be distracted
from th etraffic situation .You could also los e
contro lof th evehicle. There is aris kof an
accident.
Only operat ethis equipment when th evehicle
is stationary.
You mus tobserv eth elegal requirements fo rth e
country in whic hyou are currentl ydrivin gwhen
operatin gmobile communication sequipment in
th evehicle.
Vehicl esettings
Calling up vehicle settings
XPress Vehicl ein themain function bar .
The vehicle men uis displayed.
XTo selec tVehicle Settings:press th econ-
troller.
The Vehicl eSettings
men uis active .
XTo selectth edesire dvehicle setting :turn an d
press th econtroller .
The main are awit hth esetting elemen tis
active .
Selecting adifferent vehicle setting:
XTo activat eth emen ufo rselecting th evehicle
setting :slid e5 thecontroller .
Exiting th evehicle settings :
XTo select& :slid e6 andpress th econ-
troller.
Setting th eeas yentry an dexit feature
Thi sfunction makes getting in an dout of your
vehicle easier.
XCall up VehicleSettings(Ypage 42).
XTo selec tEasy Entry/Exit:turn an dpress
th econtroller .
The setting elemen tis active .
XTo change th esetting :press th econtroller .
You can fin dfurther information on th eeasy
entr yan dexit feature in th evehicle Operator's
Manual.
Activating/deactivating th eacoustic
locking verification signal
You can also set an audible signa lto confirm
that th evehicle has bee nlocked.
XCall up VehicleSettings(Ypage 42).
XTo selec tAcoustic Lock Feedback:turn
an dpress th econtroller .
The function switches on or off, dependin gon
th eprevious setting .
You can fin dfurther information on th elocking
feature in th evehicle Operator's Manual.
Switching th esea tbelt adjustment
on/of f
TheBeltAdjustmentfunction adjust sth edriv-
er' san dfront-passenger seat belt to th euppe r
bod yof th evehicle occupants .
XCall upVehicleSettings(Ypage 42).
XTo selec tBelt Adjustment:turn an dpress
th econtroller .
The function switches on or off, dependin gon
th eprevious setting .
You can fin dfurther information on seat belt
adjustmen tin th evehicle Operator's Manual.
Switching th eautomati cmirror fold-
ing function on/of f
Whenth eAutomati cMirror Foldin gfunc-
tion is activated, th eoutsid emirrors fold in auto-
matically as soo nas you loc kth evehicle from
th eoutside. The outsid emirrors fold out auto-
matically again as soo nas you unloc kth evehi-
cle.
42Vehicle settings
Vehicle functions
Page 77 of 174
XTo switch to navigation mode:slide5the
controller.
XTo select Navi: turn and press the controller.
The map displays the current vehicle position
or the navigation menu appears.
XIf the navigation menu appears, press the
controller.
The map shows the vehicle's current position.
XTo show the menu: slide6the controller.
XTo select Traffic: turn and press the con-
troller.
If satellite signals cannot be received or there
are no traffic reports, you will see a message
to this effect.
XTo close the report: press the controller.
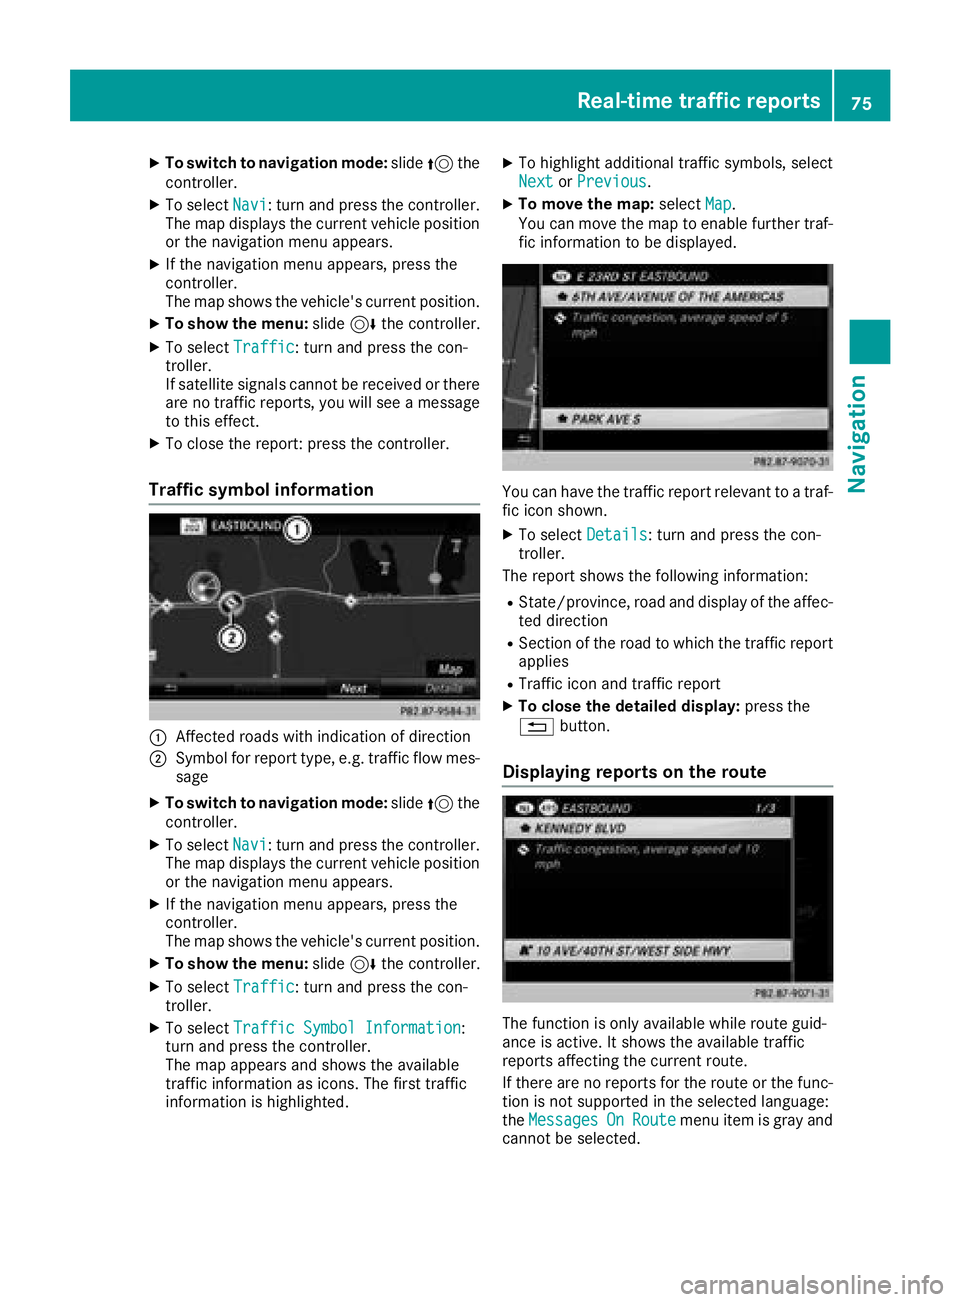
Traffic symbol information
:Affected roads with indication of direction
;Symbol for report type, e.g. traffic flow mes-
sage
XTo switch to navigation mode: slide5the
controller.
XTo select Navi: turn and press the controller.
The map displays the current vehicle position
or the navigation menu appears.
XIf the navigation menu appears, press the
controller.
The map shows the vehicle's current position.
XTo show the menu: slide6the controller.
XTo select Traffic: turn and press the con-
troller.
XTo select Traffic Symbol Information:
turn and press the controller.
The map appears and shows the available
traffic information as icons. The first traffic
information is highlighted.
XTo highlight additional traffic symbols, select
Nextor Previous.
XTo move the map: selectMap.
You can move the map to enable further traf-
fic information to be displayed.
You can have the traffic report relevant to a traf-
fic icon shown.
XTo select Details: turn and press the con-
troller.
The report shows the following information:
RState/province, road and display of the affec-
ted direction
RSection of the road to which the traffic report applies
RTraffic icon and traffic report
XTo close the detailed display: press the
% button.
Displaying reports on the route
The function is only available while route guid-
ance is active. It shows the available traffic
reports affecting the current route.
If there are no reports for the route or the func-
tion is not supported in the selected language:
theMessages
OnRoutemenu item is gray and
cannot be selected.
Real-time traffic reports75
Navigation
Z
Page 92 of 174
Operating options
You can operate the telephone by:
Rusing the controller by turning, pressing, slid-
ing1 or4
Rusing the touchpad (Ypage 22)
Rusing the 6or~ button on the multi-
function steering wheel
Rusing the Voice Control System (see the sep-
arate operating instructions)
Function restrictions
You may have to wait to use telephony via the
multimedia system in the following situations:
Rif the mobile phone is switched off
Rif Bluetooth®is switched off on the mobile
phone
Rif the mobile phone is not (or not yet) logged
into a mobile phone network
Rif the Bluetooth®function is switched off in
the multimedia system
The telephone automatically tries to log on to a
network. If no network is available, you may not
be able to make a " 911" emergency call. If you
attempt to make an outgoing call, the No Ser‐
vicemessage will appear for a short while.
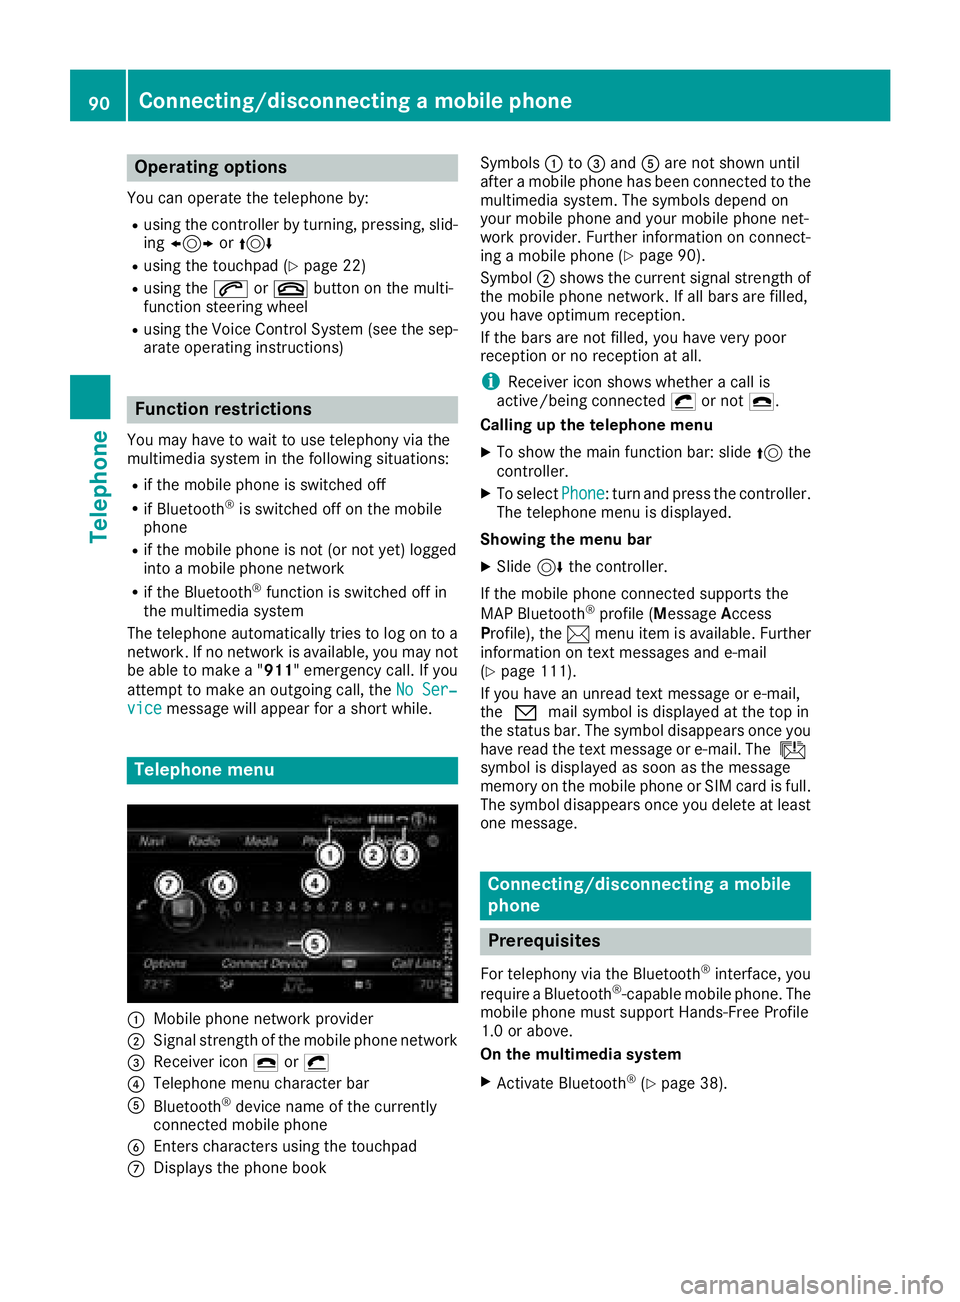
Telephone menu
:Mobile phone network provider
;Signal strength of the mobile phone network
=Receiver icon¢or¡
?Telephone menu character bar
ABluetooth®device name of the currently
connected mobile phone
BEnters characters using the touchpad
CDisplays the phone book Symbols
:to= and Aare not shown until
after a mobile phone has been connected to the
multimedia system. The symbols depend on
your mobile phone and your mobile phone net-
work provider. Further information on connect-
ing a mobile phone (
Ypage 90).
Symbol ;shows the current signal strength of
the mobile phone network. If all bars are filled,
you have optimum reception.
If the bars are not filled, you have very poor
reception or no reception at all.
iReceiver icon shows whether a call is
active/being connected ¡or not ¢.
Calling up the telephone menu
XTo show the main function bar: slide 5the
controller.
XTo select Phone: turn and press the controller.
The telephone menu is displayed.
Showing the menu bar
XSlide 6the controller.
If the mobile phone connected supports the
MAP Bluetooth
®profile (M essageAccess
Profile), the 1menu item is available. Further
information on text messages and e-mail
(
Ypage 111).
If you have an unread text message or e-mail,
the 0 mail symbol is displayed at the top in
the status bar. The symbol disappears once you
have read the text message or e-mail. The ú
symbol is displayed as soon as the message
memory on the mobile phone or SIM card is full.
The symbol disappears once you delete at least
one message.
Connecting/disconnecting a mobile
phone
Prerequisites
For telephony via the Bluetooth®interface, you
require a Bluetooth®-capable mobile phone. The
mobile phone must support Hands-Free Profile
1.0 or above.
On the multimedia system
XActivate Bluetooth®(Ypage 38).
90Connecting/disconnecting a mobile phone
Telephone
Page 113 of 174
XSelectSpeed Dial Preset List.
The speed dial list is displayed.
XTo select G: slide 9the controller.
XTo select Delete All Speed Dial Pre‐sets: turn and press the controller.
XTo selectYes: turn and press the controller.
All speed dials are deleted.
Messages
General notes
New messages are identified by the /sym-
bol in the display of the multimedia system and
an audible signal. Once you have read all the
messages, the symbol is no longer displayed.
The multimedia system displays the 100 newest
text messages and e-mails.
The ú symbol is displayed when the mobile
phone's message memory is full. The symbol is
no longer displayed if you delete messages on
the mobile phone.
Function restrictions
Text messages cannot be written while the vehi-
cle is in motion.
Requirements
To use the message functions, the connected
mobile phone must support the MAP Bluetooth®
profile. The prompt for the MAP Bluetooth®pro-
file may have to be confirmed on the mobile
phone.
With some mobile phones, some settings still
have to be made after connecting to the multi-
media system (see the manufacturer's operat-
ing instructions). The messages are then dis-
played the next time you connect to the multi-
media system.
An e-mail account must be set up on the mobile
phone for the e-mail function (see the manufac-
turer’s operating instructions).
To read and write e-mails in the multimedia sys- tem, the e-mail account first needs to be con-
figured (
Ypage 112). Some mobile phones with the MAP Bluetooth
®
profile:
Ronly show new text messages
Rdo not support the deleting or editing of text
messages
Rdo not support the drafts folder for text mes-
sages
Rdo not support the sending of text messages
Rdo not support the e-mail function
Rdo not send messages when in a locked sta-
tus
Not all mobile phones available on the market
are equally suitable. Further information about
settings and supported functions of Bluetooth
®-
capable mobile phones can be found on the
Internet at
http://www.mercedes-benz.com/connect .
Or call the Mercedes-Benz Customer Assistance
Center at 1-800-FOR-MERCedes
(1-800-367-6372) (
for the USA) or Customer
Relations at 1-800-387-0100 (for Canada).
Settings
Calling up the settings menu for mes-
sages
XTo show the main function bar: slide 5the
controller.
XTo select Phone: turn and press the controller.
The telephone menu is displayed.
XTo switch to the menu bar: slide 6the con-
troller.
XTo select 1: turn and press the controller.
The message menu is displayed.
XTo switch to the menu bar: slide 6the con-
troller.
XTo select Settings: turn and press the con-
troller.
The text message settings and the available e-
mail accounts of the connected mobile phone
will be displayed.
Configuring the text messages dis-
played
XCall up the settings menu for messages
(Ypage 111).
XTo highlight Text Message: turn the control-
ler.
Messages111
Telephone
Z
Page 125 of 174
Connection status
:Display of existing connection and signal
strength of the mobile phone network
In most cases, the current connection status is
then shown in the status bar when you switch to
another main function.
Detailed connection status
XCall up Internet functions (Ypage 122).
XTo switch to the menu bar: slide 6the con-
troller.
XTo select Settings: turn and press the con-
troller.
XTo select Connection Status: turn and
press the controller.
The following information is displayed:
Rthe volume of transferred data
Rconnection status
Rthe device name of the mobile phone
Ending the connection
USA: you cannot cancel the connection your-
self. The Internet connection is automatically
terminated if the system does not recognize any
user input within a five-minute time period.
Canada:
XCall up Internet functions (Ypage 122).
XTo switch to the menu bar: slide 6the con-
troller.
XTo select ©: turn and press the controller.
If the mobile phone Internet connection is can-
celed, the multimedia system tries to reconnect.
You should therefore always end the connection
in the multimedia system.
Mercedes-Benz Apps
General notes
To be able to use Mercedes-Benz Apps, you have
to register and confirm the terms and condi-
tions.
Calling up Mercedes-Benz Apps
XCall up Internet functions (Ypage 122).
XTo select Mercedes-Benz Apps: turn and
press the controller.
XTo call up the app: turn and press the con-
troller.
You can find further Mercedes-Benz Apps and
information under:
http://apps.mercedes-benz.com/apps/
iThe available features are country-depend-
ent.
License fees may be applicable.
Door-to-door navigation
Mercedes-Benz Companion
The Mercedes-Benz Companion app is available
in the USA.
Mercedes-Benz Companion enables door-to-
door navigation.
Door-to-door navigation means:
RThe current destination is transferred from
the vehicle's multimedia system to an exter-
nal device (mobile phone or smartwatch).
This enables you to continue navigating to a
destination which is in a pedestrian zone, for
example.
RConversely, a destination can be selected on
the external device and transferred to the
vehicle's multimedia system.
Other functions:
RNavigating to the vehicle's location
RDisplaying various information about the vehi- cle
More information on suitable mobile phones:
http://www.mercedes-benz.com/connect
Further information on Mercedes-Benz Com-
panion (see App Store description).
Door-to-door navigation123
Online and Internet functions
Z
Page 132 of 174
Station list
XIn radio mode, press the controller.
The station list appears with the stations cur-
rently available.
Saving a station
Storing current stations
XIn radio mode: slide6the controller.
The radio menu bar appears.
XTo select Preset: press the controller.
XTo select the SaveCurrentStation/Chan‐neloption: turn and press the controller.
XTo select the position of the required preset
entry: turn and press the controller.
The currently set station is stored in the selec-
ted preset position. A tone signals a success-
ful preset entry.
Storing a station using the controller
XSet the desired station in radio mode.
XPress and hold the controller until the preset
list appears.
XTo select the preset number: turn and press
the controller.
iFrequencies have already been stored in the
multimedia system. There are 100 preset
positions available.
Moving highlighted stations
XIn radio mode: slide 6the controller.
The radio menu bar appears.
XTo select Preset: press the controller.
XSelectEdit Station Preset.
XTo select the required preset entry: turn the
controller.
XSlide9the controller.
An additional menu appears.
XTo select Move Highlighted Station/Channel: turn and press the controller.
The list of stored stations appears again.
XTo move the highlighted station to the new
position: turn the controller and press to con-
firm.
Deleting highlighted stations
XIn radio mode: slide 6the controller.
The radio menu bar appears.
XTo select Preset: turn and press the control-
ler.
XSelect Edit Station Preset.
XTo select the required preset entry: turn the
controller.
XSlide9the controller.
XTo select Delete Highlighted Station/Channel: turn and press the controller.
XTo selectYes: turn and press the controller.
The highlighted station is deleted.
Activating/deactivating the station
presets display
You can use this function to change to the sta-
tion presets display.
Activating
XIn radio mode: slide 6the controller.
XTo select Preset: turn and press the control-
ler.
XTo select Station Preset View: On: turn
and press the controller.
The station preset display appears.
XTo switch between the stored stations: turn
the controller.
Deactivating
XIn radio mode: slide 6the controller.
XTo select Preset: turn and press the control-
ler.
XTo select StationPresetView:Off: turn
and press the controller.
The view of the last heard waveband appears.
Tagging music tracks
If an Apple®device is connected, the music
tracks and artist displayed in the radio text can be stored. You have the option of purchasing
this track using iTunes Store
®. Not all radio sta-
tions support this function.
130Tagging music tracks
Radio
Page 133 of 174

XIn radio mode: slide6the controller.
The radio menu bar appears.
XTo select Options: turn and press the con-
troller.
XSelect Tag This Track.
A message appears about storing the track
information.
Displaying station information
XIn radio mode: slide 6the controller.
The radio menu bar appears.
XTo select Options: turn and press the con-
troller.
XSwitch Show Station InformationonO
or off ª.
If the function is active, the artist, track or the
name of the station will be displayed in the
main display field.
Calling up sound settings
XIn radio mode: slide 6the controller.
The radio menu bar appears.
XTo select à: turn and press the controller.
The sound menu appears (Ypage 158).
Displaying information
This function is available in HD FM radio and HD
AM radio mode.
Reception is only possible if the radio stations
provide the relevant information.
XIn radio mode: slide 6the controller.
XTo select Info: turn and press the controller.
Information on the currently received pro-
gram is displayed.
If available, you will see:
Rthe track that is currently being played
Rthe artist of the track that is currently being
played
Rthe album name
Rthe channel abbreviation
Rthe logo of the station or Artist Experience®
Returning to the radio menu:
XTo select Info: slide6and press the con-
troller.
Satellite radio
General notes
The satellite radio mode requires satellite radio
equipment and registration with a satellite radio
provider.
Note that the categories and channels shown in
the illustrations depend on the program content
offered by the provider. The illustrations and
descriptions in these operating instructions may
therefore differ from the channels and catego-
ries offered by the provider.
Satellite radio mode may be temporarily unavail-
able or interrupted for a variety of reasons.
These include environmental or topographical
conditions as well as other factors beyond the
control of Mercedes-Benz USA, LLC. This means
operation may not be possible in certain areas.
These include:
Rtunnels
Rparking garages
Rlocations inside or next to buildings
Rlocations in the vicinity of other structures
Sirius XM®Satellite Radio offers more than 140
digital-quality radio channels, providing 100%
commercial-free music, sports, news and enter-
tainment.
Sirius XM
®Satellite Radio uses a fleet of high-
performance satellites to broadcast around the
clock throughout the USA and Canada.
The satellite radio program is available for a
monthly fee. Details are available from the SIR-
IUS XM
®Service Center and at
http://www.siriusxm.com (USA) or
http://www.siriusxm.ca (Canada).
Your new Mercedes-Benz vehicle comes with
Sirius XM
®Satellite Radio pre-installed at the
factory. This service is free for a six-month trial
period. About a month before the trial period
ends, information will be provided on how to
extend this subscription. An acoustic signal
sounds and a message is shown, describing how the subscription can be extended.
iSirius, XM and all related marks and logos
are trademarks of Sirius XM Radio Inc. and its
Satellite radio131
Radio
Page 134 of 174
subsidiaries. All other marks, channel names
and logos are the property of their respective
owners. All rights reserved.
Registering satellite radio
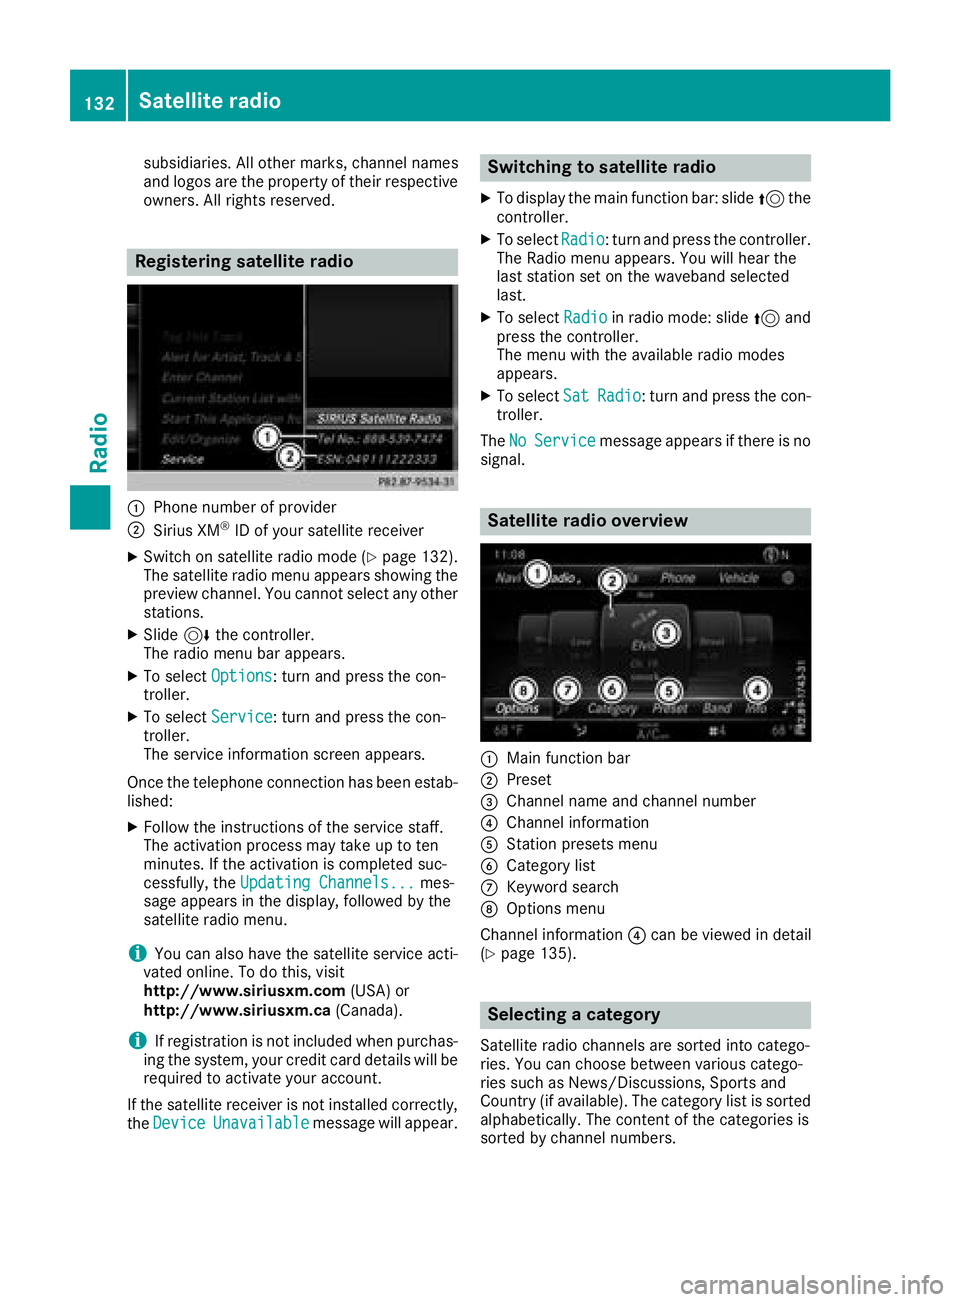
:Phone number of provider
;Sirius XM®ID of your satellite receiver
XSwitch on satellite radio mode (Ypage 132).
The satellite radio menu appears showing the
preview channel. You cannot select any other
stations.
XSlide 6the controller.
The radio menu bar appears.
XTo select Options: turn and press the con-
troller.
XTo select Service: turn and press the con-
troller.
The service information screen appears.
Once the telephone connection has been estab-
lished:
XFollow the instructions of the service staff.
The activation process may take up to ten
minutes. If the activation is completed suc-
cessfully, the Updating Channels...
mes-
sage appears in the display, followed by the
satellite radio menu.
iYou can also have the satellite service acti-
vated online. To do this, visit
http://www.siriusxm.com (USA) or
http://www.siriusxm.ca (Canada).
iIf registration is not included when purchas-
ing the system, your credit card details will be
required to activate your account.
If the satellite receiver is not installed correctly,
the Device
Unavailablemessage will appear.
Switching to satellite radio
XTo display the main function bar: slide 5the
controller.
XTo select Radio: turn and press the controller.
The Radio menu appears. You will hear the
last station set on the waveband selected
last.
XTo select Radioin radio mode: slide 5and
press the controller.
The menu with the available radio modes
appears.
XTo select SatRadio: turn and press the con-
troller.
The No
Servicemessage appears if there is no
signal.
Satellite radio overview
:Main function bar
;Preset
=Channel name and channel number
?Channel information
AStation presets menu
BCategory list
CKeyword search
DOptions menu
Channel information ?can be viewed in detail
(
Ypage 135).
Selecting a category
Satellite radio channels are sorted into catego-
ries. You can choose between various catego-
ries such as News/Discussions, Sports and
Country (if available). The category list is sorted alphabetically. The content of the categories is
sorted by channel numbers.
132Satellite radio
Radio