Page 143 of 615

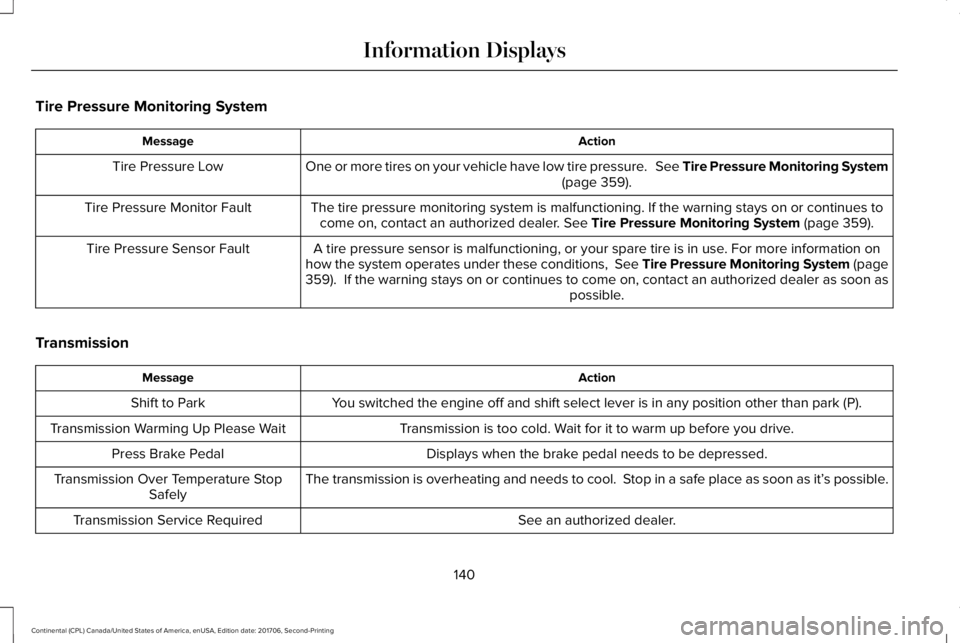
Tire Pressure Monitoring System
ActionMessage
One or more tires on your vehicle have low tire pressure. See Tire Pressure Monitoring System(page 359).Tire Pressure Low
The tire pressure monitoring system is malfunctioning. If the warning stays on or continues tocome on, contact an authorized dealer. See Tire Pressure Monitoring System (page 359).Tire Pressure Monitor Fault
A tire pressure sensor is malfunctioning, or your spare tire is in use. For more information onhow the system operates under these conditions, See Tire Pressure Monitoring System (page359). If the warning stays on or continues to come on, contact an authorized dealer as soon aspossible.
Tire Pressure Sensor Fault
Transmission
ActionMessage
You switched the engine off and shift select lever is in any position other than park (P).Shift to Park
Transmission is too cold. Wait for it to warm up before you drive.Transmission Warming Up Please Wait
Displays when the brake pedal needs to be depressed.Press Brake Pedal
The transmission is overheating and needs to cool. Stop in a safe place as soon as it’s possible.Transmission Over Temperature StopSafely
See an authorized dealer.Transmission Service Required
140
Continental (CPL) Canada/United States of America, enUSA, Edition date: 201706, Second-Printing
Information Displays
Page 146 of 615

Navigation Display Area.D
Status Bar.E
Speedometer Display Area.F
Signaling and Traffic Indication
Displays direction indicators, blind spotinformation (if direction indicators are active)and cross traffic alert.
Left Information Group
Displays incoming call information.
ADAS Display Area
Displays ACC and lane keeping systemstatus and warnings.
Navigation Display Area
Displays navigation next turn instructions.
Status Bar
Displays distance to empty (DTE), time andoutside air temperature. Next to DTE, thefuel gauge fill color changes to yellow in lowfuel conditions. You can switch off the statusbar in the HUD settings menu.
Speedometer Display Area
Displays current vehicle speed, speed limit(if available in the map database) and yourtransmission gear selection.
Configuring The Head Up Display
You can control the system's options throughthe information display by using the HUD,OK and arrow buttons on the right-hand sideof your steering wheel. See GeneralInformation (page 115). You can adjust thedisplay according to your height to makeviewing the content easier. You can alsoadjust what content displays and thebrightness of the content. The system'soptions appear in the instrument clusterwhile the updates happen in the HUD.
Note:If HUD On is unchecked, other optionsof the system are hidden.
Note:The HUD menu automatically closesafter a certain period of inactivity.
Note:The HUD image brightnessautomatically adjusts to the brightness ofthe ambient environment. You have theability to adjust the brightness furtheraccording to your preference.
Note:In some instances, sunlight can causesome reflections in and around the HUDimage.
143
Continental (CPL) Canada/United States of America, enUSA, Edition date: 201706, Second-Printing
Information Displays
Page 156 of 615

SITTING IN THE CORRECT
POSITION
WARNING: Sitting improperly, out ofposition or with the seatback reclined too farcan take weight off the seat cushion andaffect the decision of the passenger sensingsystem, resulting in serious injury or deathin the event of a crash. Always sit uprightagainst your seat back, with your feet on thefloor.
WARNING: Do not recline the seatbackas this can cause the occupant to slide underthe safety belt, resulting in serious injury inthe event of a crash.
WARNING: Do not place objects higherthan the seatback to reduce the risk ofserious injury in the event of a crash orduring heavy braking.
When you use them properly, the seat, headrestraint, safety belt and airbags will provideoptimum protection in the event of a crash.
We recommend that you follow theseguidelines:
•Sit in an upright position with the base ofyour spine as far back as possible.
•Do not recline the seatback more than30 degrees.
•Adjust the head restraint so that the topof it is level with the top of your head andas far forward as possible. Make sure thatyou remain comfortable.
•Keep sufficient distance betweenyourself and the steering wheel. Werecommend a minimum of 10 in (25 cm)between your breastbone and the airbagcover.
•Hold the steering wheel with your armsslightly bent.
•Bend your legs slightly so that you canpress the pedals fully.
•Position the shoulder strap of the safetybelt over the center of your shoulder andposition the lap strap tightly across yourhips.
Make sure that your driving position iscomfortable and that you can maintain fullcontrol of your vehicle.
153
Continental (CPL) Canada/United States of America, enUSA, Edition date: 201706, Second-Printing
SeatsE68595
Page 157 of 615

HEAD RESTRAINTS
WARNING: Fully adjust the headrestraint before you sit in or operate yourvehicle. This will help minimize the risk ofneck injury in the event of a crash. Do notadjust the head restraint when your vehicleis moving.
WARNING: The head restraint is asafety device. Whenever possible it shouldbe installed and properly adjusted when theseat is occupied. Failure to adjust the headrestraint properly could reduce itseffectiveness during certain impacts.
Note:Adjust the seatback to an uprightdriving position before adjusting the headrestraint. Adjust the head restraint so thatthe top of it is level with the top of your headand as far forward as possible. Make surethat you remain comfortable. If you areextremely tall, adjust the head restraint toits highest position.
Front seat manual head restraints (If
Equipped)
The front head restraints consist of:
An energy absorbing headrestraint.A
Two steel stems.B
Guide sleeve adjust and unlockbutton.C
Guide sleeve unlock and removebutton.D
Raising the Head Restraint
Pull the head restraint up.
Lowering the Head Restraint
1. Press and hold button C.
2. Push the head restraint down.
Removing the Head Restraint
1.Pull the head restraint up until it reachesits highest position.
2. Press and hold buttons C and D.
3. Pull the head restraint up.
Installing the Head Restraint
Align the steel stems into the guide sleevesand push the head restraint down until itlocks.
Tilting Manual Head Restraints
The front seat head restraints tilt for extracomfort. To tilt the head restraint, do thefollowing:
154
Continental (CPL) Canada/United States of America, enUSA, Edition date: 201706, Second-Printing
SeatsE138642
Page 160 of 615
POWER SEATS
WARNING: Do not adjust the driverseat or seat backrest when your vehicle ismoving. This may result in sudden seatmovement, causing the loss of control of yourvehicle.
WARNING: Do not place cargo or anyobjects behind the seatback before returningit to the original position.
The power seat controls are on the door.
30-Way Seat Controls
Memory Function.A
Head Restraints.B
Upper Seat Backrest.C
Multi-Contour.D
Seat Cushion Adjustment.E
Power Seats.F
Recline.G
157
Continental (CPL) Canada/United States of America, enUSA, Edition date: 201706, Second-Printing
SeatsE254492
Page 166 of 615

You can also adjust this feature through thetouchscreen.
Press the Menu Settings icon, thenVehicle. Choose Multi-ContourSeats.
When switched on, the system displaysdirections for you to adjust the lumbarsettings in your seat or to set the massagefunction.
To access and make adjustments to thelumbar setting:
1. Choose the desired seat to adjust.
2. Press the + or - to adjust the lumbarintensity.
To access and make adjustments to themassage setting:
1. Press the Menu Settings icon, thenVehicle. Choose Multi-Contour Seats.
2. Choose the desired seat to adjust.
3. Press OFF, Low or High.
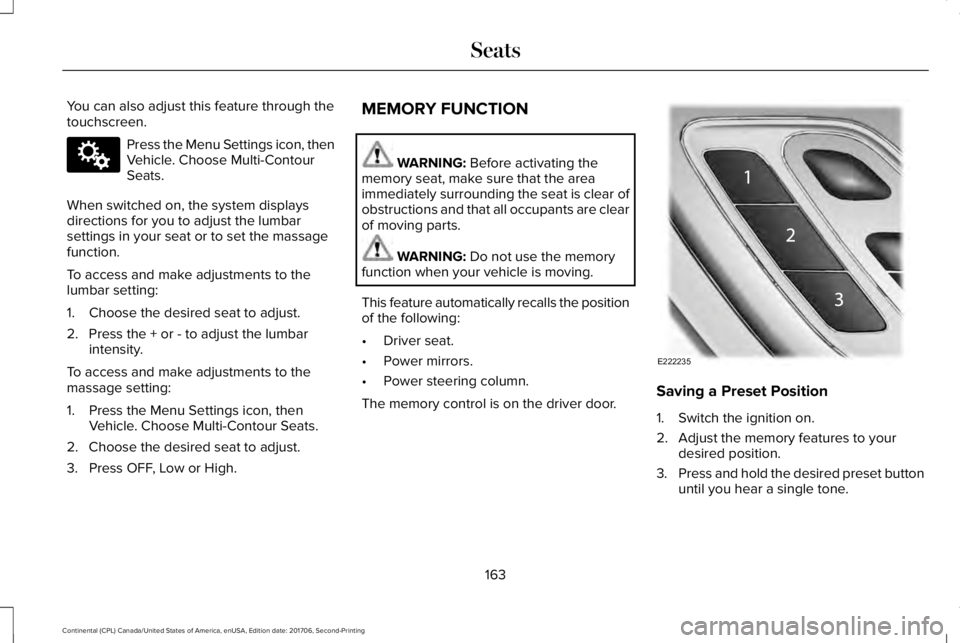
MEMORY FUNCTION
WARNING: Before activating thememory seat, make sure that the areaimmediately surrounding the seat is clear ofobstructions and that all occupants are clearof moving parts.
WARNING: Do not use the memoryfunction when your vehicle is moving.
This feature automatically recalls the positionof the following:
•Driver seat.
•Power mirrors.
•Power steering column.
The memory control is on the driver door.Saving a Preset Position
1. Switch the ignition on.
2. Adjust the memory features to yourdesired position.
3.Press and hold the desired preset buttonuntil you hear a single tone.
163
Continental (CPL) Canada/United States of America, enUSA, Edition date: 201706, Second-Printing
SeatsE142607 E222235
Page 168 of 615
REAR SEATS
Adjusting the Rear Seats
WARNING: To prevent possibledamage to the seat or seatbelts, make surethat the seatbelts are not fastened beforefolding the seatback.
Folding the Seatback (If Equipped)
With the seat empty, pull the lever to fold theseatback forward.
Unfolding the Seatback
Rotate the seatback upward until theseatback latches in the upright position. Theseatback clicks when it is locked intoposition.
165
Continental (CPL) Canada/United States of America, enUSA, Edition date: 201706, Second-Printing
SeatsE221061
Page 169 of 615

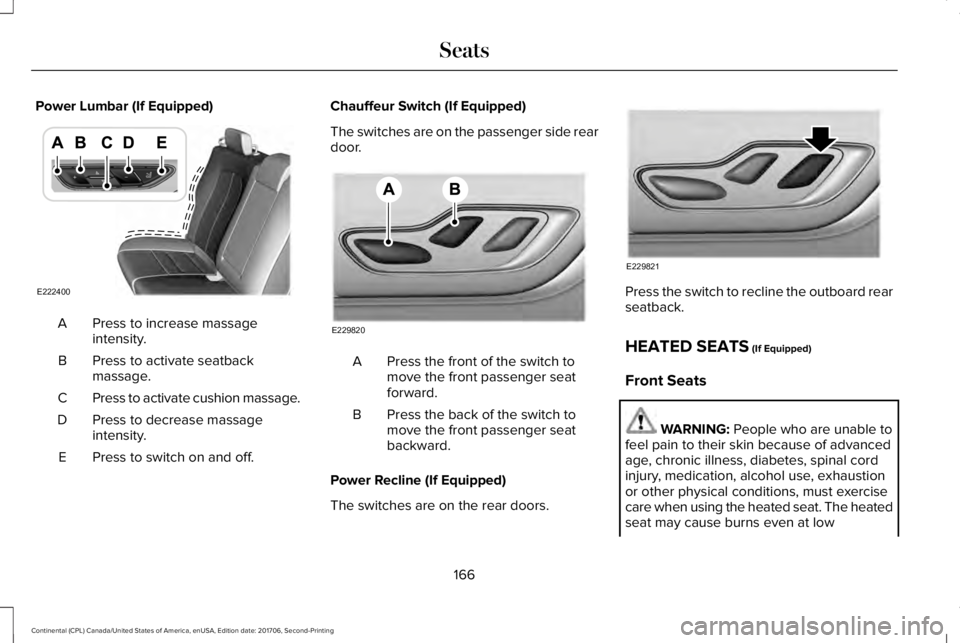
Power Lumbar (If Equipped)
Press to increase massageintensity.A
Press to activate seatbackmassage.B
Press to activate cushion massage.C
Press to decrease massageintensity.D
Press to switch on and off.E
Chauffeur Switch (If Equipped)
The switches are on the passenger side reardoor.
Press the front of the switch tomove the front passenger seatforward.
A
Press the back of the switch tomove the front passenger seatbackward.
B
Power Recline (If Equipped)
The switches are on the rear doors.
Press the switch to recline the outboard rearseatback.
HEATED SEATS (If Equipped)
Front Seats
WARNING: People who are unable tofeel pain to their skin because of advancedage, chronic illness, diabetes, spinal cordinjury, medication, alcohol use, exhaustionor other physical conditions, must exercisecare when using the heated seat. The heatedseat may cause burns even at low
166
Continental (CPL) Canada/United States of America, enUSA, Edition date: 201706, Second-Printing
SeatsE222400 E229820 E229821