Page 333 of 615

Front Direction Indicator
1. Switch all of the lamps and the ignitionoff.
2. Disconnect the electrical connector.
3. Turn the bulb holder counterclockwiseand remove it.
4.Remove the bulb by pulling it straight out.
LED Lamps
LED lamps are not serviceable items. See anauthorized dealer if they fail.
The following lamps are LED:
•Front parking lamps.
•Front side marker lamps.
•Side direction indicators.
•Rear side marker lamps.
•Brake and rear lamps.
•Central high mounted brake lamp.
•Rear direction indicators.
•Reversing lamps.
•License plate lamps.
BULB SPECIFICATION CHART
The specified replacement bulbs are in thechart below. Headlamp bulbs must bemarked with an authorized D.O.T.(Department of Transportation) for NorthAmerica to affirm lamp performance, lightbrightness and pattern and safe visibility. Thecorrect bulbs will not damage the lampassembly or void the lamp assembly warrantyand will provide quality bulb burn time.
Trade numberFunction
D3S* Headlamp (high intensity discharge) Low and High
LED* Sidemarker - front
LED* Park lamp - front
7444NA* Turn lamp - front
LED*Signal indicator mirror lamp
330
Continental (CPL) Canada/United States of America, enUSA, Edition date: 201706, Second-Printing
MaintenanceE163826
Page 340 of 615

•Do not allow wax to come in contact withany non-body (low-gloss black) coloredtrim. The wax will discolor or stain theparts over time.
•Roof racks.
•Bumpers.
•Grained door handles.
•Side moldings.
•Mirror housings.
•Windshield cowl area.
•Do not apply wax to glass areas.
•After waxing, your car's paint should feelsmooth, and be free of streaks andsmudges.
CLEANING THE ENGINE
Engines are more efficient when they areclean because grease and dirt buildup keepthe engine warmer than normal.
When washing:
•Take care when using a power washerto clean the engine. The high-pressurefluid could penetrate the sealed partsand cause damage.
•Do not spray a hot engine with cold waterto avoid cracking the engine block orother engine components.
•Spray Motorcraft Engine Shampoo andDegreaser on all parts that requirecleaning and pressure rinse clean. InCanada, use Motorcraft Engine Shampoo.
•Never wash or rinse the engine while itis hot or running; water in the runningengine may cause internal damage.
•Never wash or rinse any ignition coil,spark plug wire or spark plug well, or thearea in and around these locations.
•Cover the battery, power distribution box,and air filter assembly to prevent waterdamage when cleaning the engine.
CLEANING THE WINDOWS AND
WIPER BLADES
Car wash chemicals and environmentalfallout can result in windshield and wiperblade contamination. Dirty windshield andwipers will result in poor windshield wiperoperation. Keep the windshield and wiperblades clean to maintain windshield wiperperformance.
To clean the windshield and wiper blades:
•Clean the windshield with a non-abrasiveglass cleaner. When cleaning the interiorof the windshield, avoid getting any glasscleaner on the instrument panel or doorpanels. Wipe any glass cleaner off thesesurfaces immediately.
•For windshields contaminated with treesap, chemicals, wax or bugs, clean theentire windshield using steel wool (nogreater than 0000 grade) in a circularmotion and rinse with water.
•Clean the wiper blades with isopropylrubbing alcohol or windshield washerconcentrate.
337
Continental (CPL) Canada/United States of America, enUSA, Edition date: 201706, Second-Printing
Vehicle Care
Page 369 of 615

The usage of a full-size dissimilar sparewheel and tire assembly can lead toimpairment of the following:
•Handling, stability and brakingperformance.
•Comfort and noise.
•Ground clearance and parking at curbs.
•Winter weather driving capability.
•Wet weather driving capability.
•All-wheel driving capability.
When driving with the full-size dissimilarspare wheel and tire assembly additionalcaution should be given to:
•Towing a trailer.
•Driving vehicles equipped with a camperbody.
•Driving vehicles with a load on the cargorack.
Drive cautiously when using a full-sizedissimilar spare wheel and tire assembly andseek service as soon as possible.
Tire Change Procedure (If Equipped)
WARNING: The jack supplied with thisvehicle is only intended for changing wheels.Do not use the vehicle jack other than whenyou are changing a wheel in an emergency.
WARNING: The jack should be usedon level firm ground wherever possible.
WARNING: Check that the vehicle jackis not damaged or deformed and the threadis lubricated and clean.
WARNING: Never place anythingbetween the vehicle jack and the ground.
WARNING: Never place anythingbetween the vehicle jack and your vehicle.
WARNING: Use only the specifiedjacking points. If you use other positions, youmay damage the body, steering, suspension,engine, braking system or the fuel lines.
WARNING: To help prevent yourvehicle from moving when changing a wheel,shift the transmission into park (P), set theparking brake and use an appropriate blockor wheel chock to secure the wheeldiagonally opposite to the wheel beingchanged. For example, when changing thefront left wheel, place an appropriate blockor wheel chock on the right rear wheel.
WARNING: When one of the frontwheels is off the ground, the transmissionalone will not prevent the vehicle frommoving or slipping off the jack, even if thetransmission is in park (P).
WARNING: Do not get under a vehiclethat is only supported by a vehicle jack.
366
Continental (CPL) Canada/United States of America, enUSA, Edition date: 201706, Second-Printing
Wheels and Tires
Page 370 of 615

WARNING: Always use the jackprovided as original equipment with yourvehicle. If using a jack other than the oneprovided, make sure the jack capacity isadequate for the vehicle weight, includingany vehicle cargo or modifications. If you areunsure if the jack capacity is adequate,contact the authorized dealer.
Note:The jack does not requiremaintenance or additional lubrication overthe service life of your vehicle.
Note:Passengers should not remain in yourvehicle when the vehicle is being jacked.
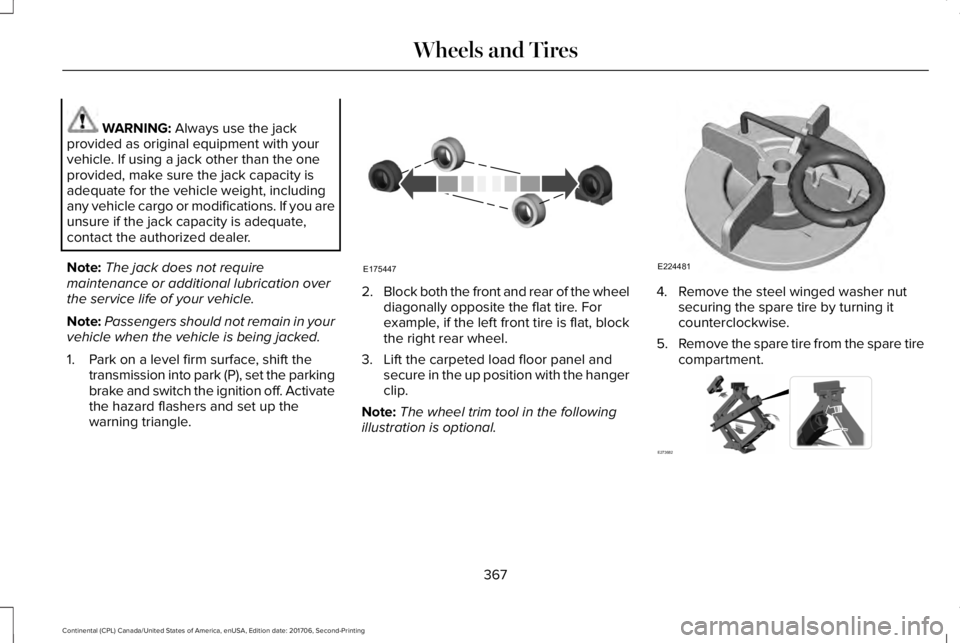
1. Park on a level firm surface, shift thetransmission into park (P), set the parkingbrake and switch the ignition off. Activatethe hazard flashers and set up thewarning triangle.
2.Block both the front and rear of the wheeldiagonally opposite the flat tire. Forexample, if the left front tire is flat, blockthe right rear wheel.
3. Lift the carpeted load floor panel andsecure in the up position with the hangerclip.
Note:The wheel trim tool in the followingillustration is optional.
4. Remove the steel winged washer nutsecuring the spare tire by turning itcounterclockwise.
5.Remove the spare tire from the spare tirecompartment.
367
Continental (CPL) Canada/United States of America, enUSA, Edition date: 201706, Second-Printing
Wheels and TiresE175447 E224481 E273682
Page 371 of 615
6. Remove plastic wing nut and jack andlug wrench assembly. Remove the strapfrom the jack. Turn the jack hex nut drivescrew counterclockwise and detach lugwrench from the jack.
7. If your vehicle has a wheel trim, use thetool supplied to remove it and access thelug nuts.
8.Loosen each wheel lug nut one-half turncounterclockwise, but do not removethem until the wheel is raised off theground.
9. The vehicle jacking points are shownabove, and are depicted on the yellowwarning label on the jack.
WARNING: Do not attempt to changea tire on the side of the vehicle close tomoving traffic. Pull far enough off the roadto avoid the danger of being hit whenoperating the jack or changing the wheel.
368
Continental (CPL) Canada/United States of America, enUSA, Edition date: 201706, Second-Printing
Wheels and TiresE181744 1
E181745
2 E145908 E166722
Page 372 of 615

10. Position the jack so that the vehicledownward flange rests in the jacksaddle. Use the lug wrench and turnthe jack nut clockwise. When the flattire is off the ground, remove the lugnuts with the lug wrench.
11.Replace the flat tire with the spare tire,making sure the valve stem is facingoutward. Reinstall the lug nuts until thewheel is snug against the hub. Do notfully tighten the lug nuts until the wheelhas been lowered.
12. Lower the wheel by turning the jackhandle counterclockwise.
13. Remove the jack and fully tighten thelug nuts in the order shown. SeeTechnical Specifications (page 370).
14.Fold up the wrench and re-attach to thejack. Re-attach the strap on the jack.Re-position the jack and wrenchassembly into the original vehicleposition and secure with the plasticwing nut. Securely fasten the jackbefore you drive.
15. Unblock the wheel and pick up thewarning triangle.
Stowing the flat tire
You cannot store the full-sized road wheelin the temporary spare tire well.
1. Find the flat tire retainer strap tuckedinside the jack channel. Lower thecarpeted load floor.
2.Stow the flat tire in the cargo area on theload floor with the wheel facing up.Secure the flat tire with the retainer strapby following the next steps.
369
Continental (CPL) Canada/United States of America, enUSA, Edition date: 201706, Second-Printing
Wheels and TiresE201100 12
3
4
5
E75442 E273683
Page 389 of 615
SpecificationName
YN-12-D
ESA-M1C75-BTransmission, parking brake linkage and pivots and brake pedal shift grease:Premium Long-Life GreaseXG-1-E1
ESB-M1C93-BMulti-purpose grease:Motorcraft® Multi-Purpose Grease SprayXL-5-A
-Lock cylinders (U.S.):Penetrating and Lock LubricantXL-1
-Lock cylinders (Canada):Penetrating FluidCXC-51-A
-Lock cylinders (Mexico):Penetrating and Lock LubricantMXL-1
386
Continental (CPL) Canada/United States of America, enUSA, Edition date: 201706, Second-Printing
Capacities and Specifications
Page 396 of 615
SpecificationName
ESB-M1C93-BMulti-purpose grease:Motorcraft® Multi-Purpose Grease SprayXL-5-A
-Lock cylinders (U.S. and Mexico):Penetrating and Lock LubricantXL-1
-Lock cylinders (Canada):Penetrating FluidCXC-51-A
If you use oil and fluids that do not meet thedefined specification and viscosity grade,this may lead to:
•Component damage which is notcovered by the vehicle warranty.
•Longer engine cranking periods.
•Increased emission levels.
•Reduced engine performance.
•Reduced fuel economy.
•Degraded brake performance.
We recommend Motorcraft® motor oil foryour vehicle. If Motorcraft® oil is notavailable, use motor oils of therecommended viscosity grade that meet APISN Plus requirements and display the APICertification Mark for gasoline engines.
393
Continental (CPL) Canada/United States of America, enUSA, Edition date: 201706, Second-Printing
Capacities and SpecificationsE142732