2018 LINCOLN CONTINENTAL lock
[x] Cancel search: lockPage 310 of 615

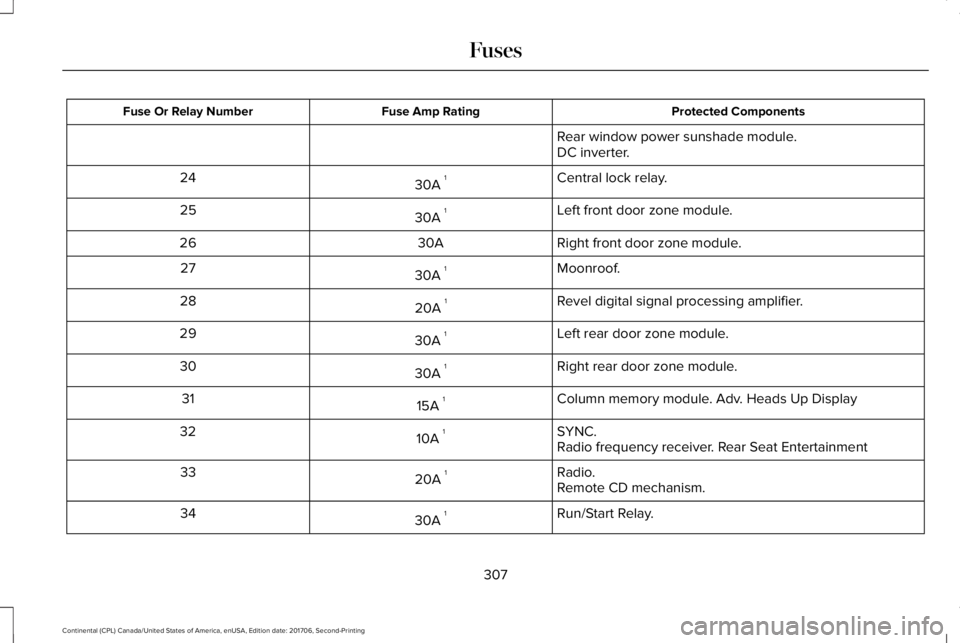
Protected ComponentsFuse Amp RatingFuse Or Relay Number
Rear window power sunshade module.DC inverter.
Central lock relay.30A 124
Left front door zone module.30A 125
Right front door zone module.30A26
Moonroof.30A 127
Revel digital signal processing amplifier.20A 128
Left rear door zone module.30A 129
Right rear door zone module.30A 130
Column memory module. Adv. Heads Up Display15A 131
SYNC.10A 132Radio frequency receiver. Rear Seat Entertainment
Radio.20A 133Remote CD mechanism.
Run/Start Relay.30A 134
307
Continental (CPL) Canada/United States of America, enUSA, Edition date: 201706, Second-Printing
Fuses
Page 315 of 615

GENERAL INFORMATION
Have your vehicle serviced regularly to helpmaintain its roadworthiness and resale value.There is a large network of authorizeddealers that are there to help you with theirprofessional servicing expertise. We believethat their specially trained technicians arebest qualified to service your vehicle properlyand expertly. They are supported by a widerange of highly specialized tools developedspecifically for servicing your vehicle.
If your vehicle requires professional service,an authorized dealer can provide thenecessary parts and service. Check yourwarranty information to find out which partsand services are covered.
Use only recommended fuels, lubricants,fluids and service parts conforming tospecifications. Motorcraft® parts aredesigned and built to provide the bestperformance in your vehicle.
Precautions
•Do not work on a hot engine.
•Make sure that nothing gets caught inmoving parts.
•Do not work on a vehicle with the enginerunning in an enclosed space, unless youare sure you have enough ventilation.
•Keep all open flames and other burningmaterial (such as cigarettes) away fromthe battery and all fuel related parts.
Working with the Engine Off
1. Set the parking brake and shift thetransmission to park (P).
2. Switch off the engine.
3. Block the wheels.
Working with the Engine On
WARNING: To reduce the risk ofvehicle damage and personal burn injuries,do not start your engine with the air cleanerremoved and do not remove it while theengine is running.
1. Set the parking brake and shift thetransmission to park (P).
2. Block the wheels.
OPENING AND CLOSING THE
HOOD
Opening the Hood
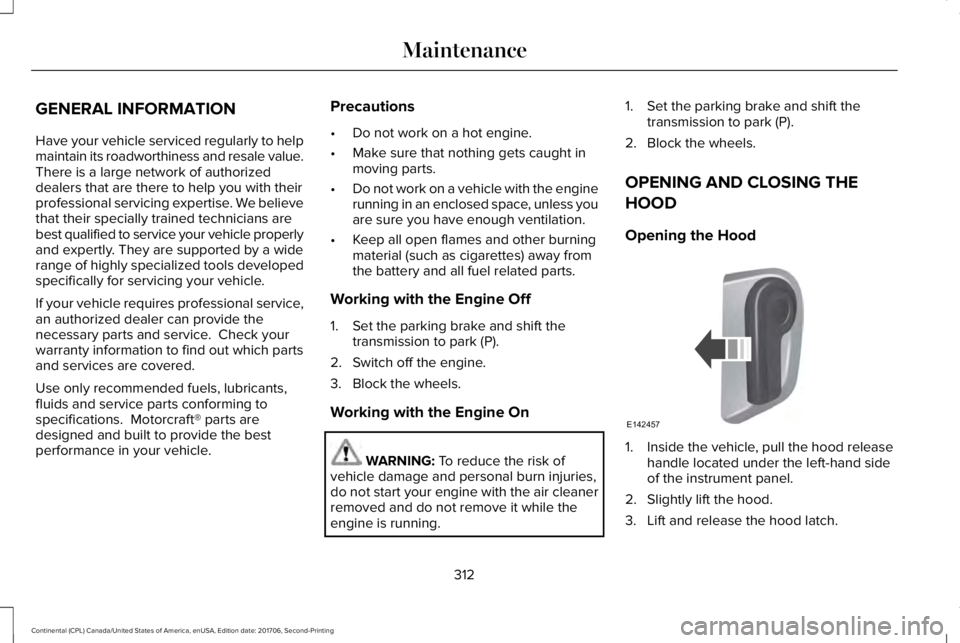
1. Inside the vehicle, pull the hood releasehandle located under the left-hand sideof the instrument panel.
2. Slightly lift the hood.
3. Lift and release the hood latch.
312
Continental (CPL) Canada/United States of America, enUSA, Edition date: 201706, Second-Printing
MaintenanceE142457
Page 321 of 615

Note:Do not remove the dipstick when theengine is running.
Note: If the oil level is between themaximum and minimum marks, the oil levelis acceptable. Do not add oil.
Note:The oil consumption of new enginesreaches its normal level after approximately3,000 mi (5,000 km).
Adding Engine Oil
WARNING: Do not remove the fillercap when the engine is running.
Do not use supplemental engine oil additivesbecause they are unnecessary and couldlead to engine damage that may not becovered by the vehicle Warranty.
Only use oils certified for gasoline enginesby the American Petroleum Institute (API). An oil with this trademark symbol conformsto the current engine and emission systemprotection standards and fuel economyrequirements of the International LubricantsSpecification Advisory Committee (ILSAC).
To top up the engine oil level do thefollowing:
1. Clean the area surrounding the engineoil filler cap before you remove it.
2. Remove the engine oil filler cap. SeeUnder Hood Overview (page 315). Turnit counterclockwise and remove it.
3. Add engine oil that meets ourspecifications. See Capacities andSpecifications (page 382). You may haveto use a funnel to pour the engine oil intothe opening.
4. Recheck the oil level.
5. If the oil level is correct, replace thedipstick and make sure it is fully seated.
6. Replace the engine oil filler cap. Turn itclockwise until you feel a strongresistance.
Note: Do not add oil further than themaximum mark. Oil levels above themaximum mark may cause engine damage.
Note:Make sure you install the oil filler capcorrectly.
Note:Soak up any spillage with anabsorbent cloth immediately.
OIL CHANGE INDICATOR RESET
Use the information display controls on thesteering wheel to reset the oil changeindicator.
318
Continental (CPL) Canada/United States of America, enUSA, Edition date: 201706, Second-Printing
MaintenanceE142732
Page 324 of 615

4. Replace the coolant reservoir cap, turnit clockwise until you feel a strongresistance.
5. Check the coolant level in the coolantreservoir the next few times you driveyour vehicle. If necessary, add enoughprediluted engine coolant to bring thecoolant level to the correct level.
If you have to add more than 1.1 qt (1 L) ofengine coolant per month, have your vehiclechecked as soon as possible. Operating anengine with a low level of coolant can resultin engine overheating and possible enginedamage.
Note:During normal vehicle operation, thecoolant may change color from orange topink or light red. As long as the coolant isclear and uncontaminated, this color changedoes not indicate the coolant has degradednor does it require the coolant to be drained,the system to be flushed, or the coolant tobe replaced.
In case of emergency, you can add a largeamount of water without engine coolant inorder to reach a vehicle service location. Inthis instance, qualified personnel:
1. Must drain the cooling system.
2. Chemically clean the coolant system.
3. Refill with engine coolant as soon aspossible.
Water alone, without engine coolant, cancause engine damage from corrosion,overheating or freezing.
Do not use the following as a coolantsubstitute:
•Alcohol.
•Methanol.
•Brine.
•Any coolant mixed with alcohol ormethanol antifreeze.
Alcohol and other liquids can cause enginedamage from overheating or freezing.
Do not add extra inhibitors or additives tothe coolant. These can be harmful andcompromise the corrosion protection of thecoolant.
Recycled Coolant
We do not recommend the use of recycledcoolant as an approved recycling process isnot yet available.
Dispose of used engine coolant in anappropriate manner. Follow yourcommunity's regulations and standards forrecycling and disposing of automotive fluids.
Severe Climates
If you drive in extremely cold climates:
•It may be necessary to increase thecoolant concentration above 50%.
•A coolant concentration of 60% providesimproved freeze point protection. Coolant concentrations above 60%decrease the overheat protectioncharacteristics of the coolant and maycause engine damage.
321
Continental (CPL) Canada/United States of America, enUSA, Edition date: 201706, Second-Printing
Maintenance
Page 329 of 615

WARNING: When lifting a plastic-casedbattery, excessive pressure on the end wallscould cause acid to flow through the ventcaps, resulting in personal injury and damageto the vehicle or battery. Lift the battery witha battery carrier or with your hands onopposite corners.
WARNING: Keep batteries out of reachof children. Batteries contain sulfuric acid.Avoid contact with skin, eyes or clothing.Shield your eyes when working near thebattery to protect against possible splashingof acid solution. In case of acid contact withskin or eyes, flush immediately with waterfor a minimum of 15 minutes and get promptmedical attention. If acid is swallowed, call aphysician immediately.
WARNING: Battery posts, terminalsand related accessories contain lead andlead compounds. Wash hands after handling.
WARNING: For vehicles withAuto-Start-Stop the battery requirement isdifferent. You must replace the battery withone of exactly the same specification.
Your vehicle is fitted with a Motorcraftmaintenance-free battery which normallydoes not require additional water.
When a battery replacement is required, youmust use a recommended replacementbattery that matches the electricalrequirements of the vehicle.
Note:If your vehicle has a battery cover,after cleaning or replacing the battery, makesure you reinstall it.
Note:See an authorized dealer for batteryaccess, testing, or replacement.
To make sure the battery managementsystem works correctly, do not connect anelectrical device ground connection directlyto the battery negative post. This can causeinaccurate measurements of the batterycondition and potential incorrect systemoperation.
Note:If you add electrical accessories orcomponents to the vehicle, it may adverselyaffect battery performance and durability.This may also affect the performance ofother electrical systems in the vehicle.
If you see any corrosion on the battery orterminals, remove the cables from theterminals and clean with a wire brush. Youcan neutralize the acid with a solution ofbaking soda and water.
Because your vehicle’s engine iselectronically-controlled by a computer,some engine control settings are maintainedby power from the battery. Some enginecomputer settings, like the idle trim and fueltrim strategy, optimize the driveability andperformance of the engine. The clock andradio station presets are also maintained inmemory by power from the low-voltagebattery. These settings are erased when atechnician disconnects and connects thelow-voltage battery.
To restore the settings, do the following:
326
Continental (CPL) Canada/United States of America, enUSA, Edition date: 201706, Second-Printing
Maintenance
Page 330 of 615

Note:Until you switch the ignition to the onposition, you will receive a message in yourinformation display stating that your vehicleis not in park.
1. Apply the parking brake.
2. Shift into park (P) or neutral (N).
3. Switch off all accessories.
4. Press the brake pedal and start yourvehicle.
5. Run the engine until it reaches normaloperating temperature. While the engineis warming up, complete the following:Reset the clock. See Audio Unit (page405). Reset the power windowsbounce-back feature. See PowerWindows (page 101). Reset the radiostation presets. See Audio Unit (page405).
6. Allow the engine to idle for at least oneminute.
7.Drive the vehicle at least 10 mi (16 km) tocompletely relearn the idle trim and fueltrim strategy.
Note:If you do not allow the engine torelearn the idle and fuel trim strategy, theidle quality of your vehicle may be adverselyaffected until the engine computereventually relearns the idle trim and fuel trimstrategy.
Note:Certain features may not operate ifthe battery monitor system is not reset witha scan tool following a jump start or batteryreplacement. Normal electrical accessoryoperation should resume after your vehicleis left undisturbed for 8 hours.
Make sure that you dispose of old batteriesin an environmentally friendly way. Seekadvice from your local authority aboutrecycling old batteries.
If storing your vehicle for more than 30 dayswithout recharging the battery, werecommend that you disconnect the batterycables to maintain battery charge for quickstarting.
CHECKING THE WIPER BLADES
Run the tip of your fingers over the edge ofthe blade to check for roughness.
Clean the wiper blades with washer fluid orwater applied with a soft sponge or cloth.
CHANGING THE WIPER BLADES
Replace the wiper blades at least annuallyfor optimum performance.
You can improve poor wiper quality bycleaning the wiper blades and thewindshield. See Cleaning the Windows andWiper Blades (page 337).
327
Continental (CPL) Canada/United States of America, enUSA, Edition date: 201706, Second-Printing
MaintenanceE142463
Page 331 of 615

Changing the Windshield Wiper Blades
Note:Do not hold the wiper blade whenlifting the wiper arm.
Note:Make sure that the wiper arm doesnot spring back against the glass when thewiper blade is not attached.
1. Lift the wiper arm and then press thewiper blade locking buttons together.
2. Slightly rotate the wiper blade.
3. Remove the wiper blade.
4. Install in the reverse order.
Note:Make sure that the wiper blade locksinto place.
ADJUSTING THE HEADLAMPS
Vertical Aim Adjustment
The headlamps on your vehicle are properlyaimed at the assembly plant. If your vehiclehas been in an accident, have the alignmentof your headlamps checked by yourauthorized dealer.
Headlamp Aiming Target
8 feet (2.4 meters)A
Center height of lamp to groundB
25 feet (7.6 meters)C
Horizontal reference lineD
Vertical Aim Adjustment
1.Park the vehicle directly in front of a wallor screen on a level surface,approximately 25 ft (7.6 m) away.
2. Measure the height from the center ofyour headlamp indicated by a 3.0millimeter circle on the lens to the groundand mark an 8 ft (2.4 m) horizontalreference line on the vertical wall orscreen at this height (a piece of maskingtape works well).
Note:To see a clearer light pattern foradjusting, you may want to block the lightfrom one headlamp while adjusting theother.
3. Turn on the low beam headlamps toilluminate the wall or screen and openthe hood. Cover one of the headlampsso no light hits the wall.
328
Continental (CPL) Canada/United States of America, enUSA, Edition date: 201706, Second-Printing
MaintenanceE129990
1
1 2 E142592
Page 332 of 615

4. There is a distinct cut-off (change fromlight to dark) in the left portion of thebeam pattern. Position the top edge ofthis cut-off 2 in (5 cm) below thehorizontal reference line.
5. Locate the vertical adjuster on eachheadlamp. Use a Phillips #2 screwdriverto turn the adjuster either clockwise orcounterclockwise to adjust the verticalaim of the headlamp. The horizontaledge of the brighter light should touchthe horizontal reference line.
6. Repeat Steps 3 through 7 to adjust theother headlamp.
7. Close the hood and turn off the lamps.
Horizontal Aim Adjustment
Horizontal aim is not required for this vehicleand is not adjustable.
CHANGING A BULB
WARNING: Bulbs can become hot. Letthe bulb cool down before removing it.Failure to do so could result in personalinjury.
WARNING: Switch the lamps and theignition off. Failure to follow this warningcould result in serious personal injury.
Use the correct specification bulb. See BulbSpecification Chart (page 330).
Install in the reverse order unless otherwisestated.
High-Intensity Discharge Headlamps
These lamps operate at a high voltage. Seean authorized dealer if they fail.
329
Continental (CPL) Canada/United States of America, enUSA, Edition date: 201706, Second-Printing
MaintenanceE142465 E277389