Page 5 of 102
5
ES300h_QG_OM33D51U_(U)
OverviewInstrument Panel
Windshield wiper and washer switch P.38
Multi-information display P.33
Headlight switch Turn signal lever
Fog light switch
*
P.35
P.32
Inside lock button P.89
Trunk opener P.93
Hood lock release lever*
Driving position memory switches∗ P.23
See P.8
See P.7 Window lock switch
P.90
Power window switches P.90
Door lock switch P.89
Tire pressure warning reset
switch
P.49
Fuel filler door opener P.92
Tilt and telescopic steering
lock release lever
∗*
Page 7 of 102
7
ES300h_QG_OM33D51U_(U)
OverviewInstrument Panel
Odometer/trip meter and trip meter reset button *
Instrument panel light control switches *
Outside rear view mirror switches P.25
Intuitive parking assist switch∗ P.46
BSM (Blind Spot Monitor) main switch∗
P.47
Automatic High Beam switch P.36
Page 15 of 102

15
ES300h_QG_OM33D51U_(U)
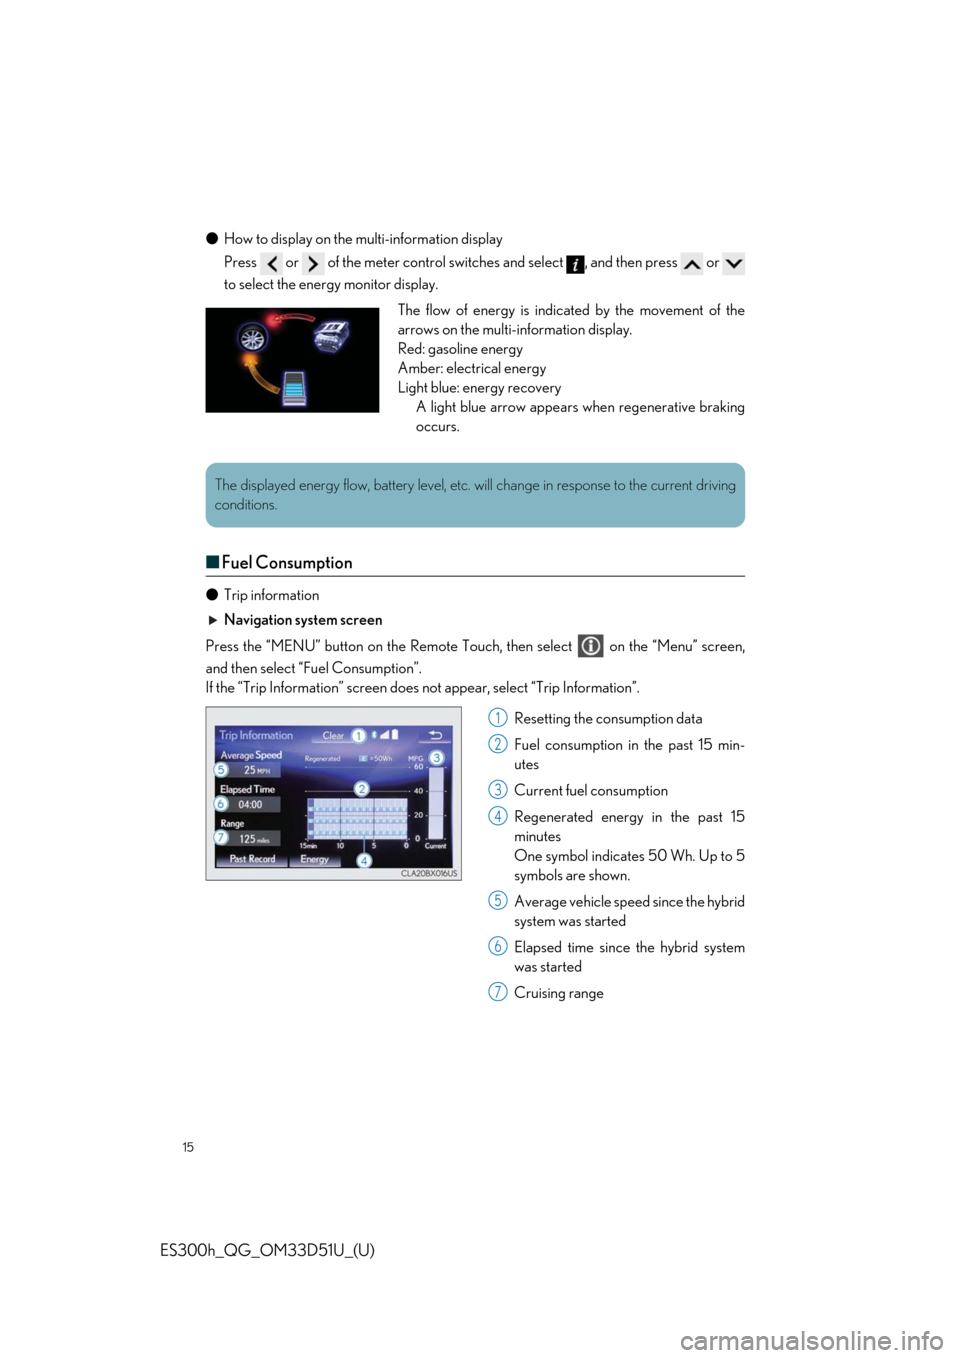
●How to display on the mu lti-information display
Press or of the meter control switch es and select , and then press or
to select the energy monitor display.
■ Fuel Consumption
● Trip information
Navigation system screen
Press the “MENU” button on the Remote Touch, then select on the “Menu” screen,
and then select “Fuel Consumption”.
If the “Trip Information” screen does not appear, select “Trip Information”.
Resetting the consumption data
Fuel consumption in the past 15 min-
utes
Current fuel consumption
Regenerated energy in the past 15
minutes
One symbol indicates 50 Wh. Up to 5
symbols are shown.
Average vehicle speed since the hybrid
system was started
Elapsed time since the hybrid system
was started
Cruising range
The flow of energy is indicated by the movement of the
arrows on the multi-information display.
Red: gasoline energy
Amber: electrical energy
Light blue: energy recovery A light blue arrow appears when regenerative braking
occurs.
The displayed energy flow, battery level, etc. wi ll change in response to the current driving
conditions.
1
2
3
4
5
6
7
Page 16 of 102

16
ES300h_QG_OM33D51U_(U)
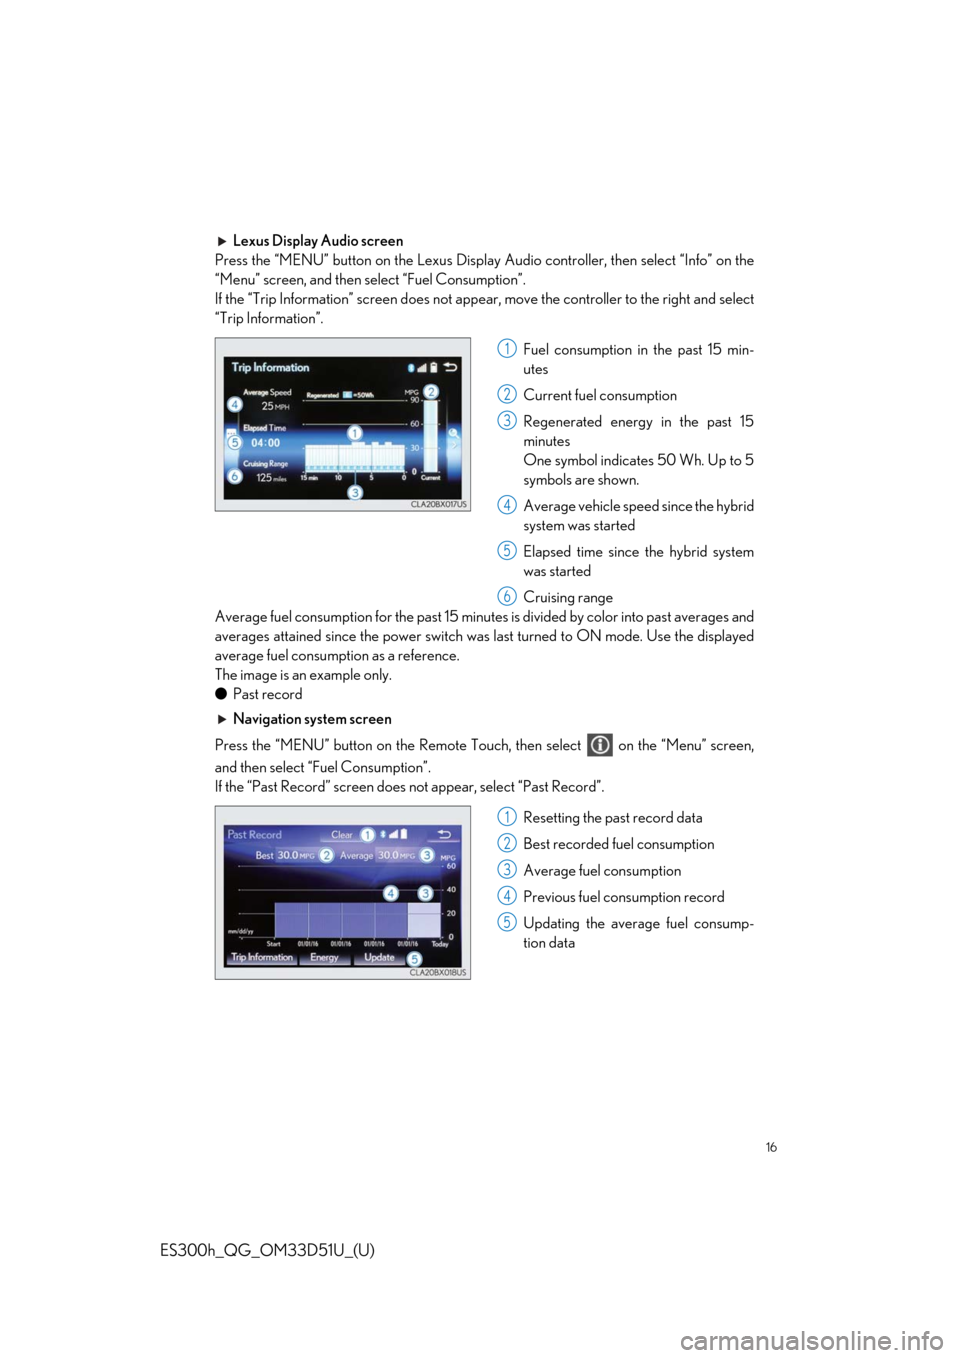
Lexus Display Audio screen
Press the “MENU” button on the Lexus Display Audio controller, then select “Info” on the
“Menu” screen, and then select “Fuel Consumption”.
If the “Trip Information” screen does not appe ar, move the controller to the right and select
“Trip Information”.
Fuel consumption in the past 15 min-
utes
Current fuel consumption
Regenerated energy in the past 15
minutes
One symbol indicates 50 Wh. Up to 5
symbols are shown.
Average vehicle speed since the hybrid
system was started
Elapsed time since the hybrid system
was started
Cruising range
Average fuel consumption for the past 15 minutes is divided by color into past averages and
averages attained since the power switch was last turned to ON mode. Use the displayed
average fuel consumption as a reference.
The image is an example only.
● Past record
Navigation system screen
Press the “MENU” button on the Remote Touch, then select on the “Menu” screen,
and then select “ Fuel Consumption”.
If the “Past Record” screen does not appear, select “Past Record”.
Resetting the past record data
Best recorded fuel consumption
Average fuel consumption
Previous fuel consumption record
Updating the average fuel consump-
tion data
1
2
3
4
5
6
1
2
3
4
5
Page 23 of 102
23
ES300h_QG_OM33D51U_(U)
Driving Position Memory (if equipped)
■Driving position memory
■
Recording procedure
Check that the shif t lever is in P.
Turn the power switch to ON mode.
Adjust the driver’s seat, steering wheel, and outside rear view mirrors to the desired
positions. While pressing the “SET” button, or within 3
seconds after the “SET” button is pressed,
press button “1”, “2” or “3” until the buzzer
sounds.If the selected button has already been
preset, the previously recorded position
will be overwritten.
■Recall procedure
Check that the shif t lever is in P.
Turn the power switch to ON mode. Press one of the buttons for the driving
position you want to recall until the buzzer
sounds.
This feature automatically adjusts the front se ats, steering wheel (power adjustment type)
and outside rear view mirrors to suit your preferences.
1
2
3
4
1
2
3
Page 43 of 102
43
ES300h_QG_OM33D51U_(U)
■Adjusting the set speed
Increases the speed
Decreases the speed
Fine adjustment: Momentarily move
the lever in the desired direction.
Large adjustment: Hold the lever up or
down to change the speed, and release
when the desired speed is reached.
■Changing the vehicle-to-vehicle distance (vehicle-to-vehicle distance con-
trol mode)
Pressing the switch changes the vehicle-to-
vehicle distance as follows:
Long
Medium
Short
The vehicle-to-vehicle distance is set
automatically to long mode when the
power switch is turned to ON mode.
If a vehicle is running ahead of you, the
preceding vehicle mark will also be dis-
played.
1
2
Preceding
vehicle mark
1
2
3
The vehicle-to-vehicle distance control mode maintains the preset cruising speed as long
as no vehicle is detected ahead.
Page 49 of 102
49
ES300h_QG_OM33D51U_(U)
Tire Pressure Warning System
■The tire inflation pressure display function
The tire pressure detected by the tire pres-
sure warning system can be displayed on
the multi-information display. ( →P.33)
The illustration used is intended as an exam-
ple, and may differ from the image that is
actually displayed on the multi-information
display.
■ Initializing the tire pressure warning system
Press and hold the ti re pressure warning
reset switch until the tire pressure warning
light blinks slowly 3 times.
Your vehicle is equipped with a tire pressure warning system that uses tire pressure warn-
ing valves and transmitters to detect low ti re inflation pressure before serious problems
arise.
Page 60 of 102
60
ES300h_QG_OM33D51U_(U)
■Basic operation
Display the audio source selection
screen
Display the sound setting screen
Adjust volume
Turn the audio system on/off
Select a radio/media mode
Play/Pause
Turn mute on/off
■Radio
Display the cache radio operation but-
tons
Display the radio preset buttons
Scan for receivable stations/channels
Select to store artist and song title
information
Display a list of re ceivable stations
Select a preset station/channel
Seek for a station/channel
Step up/down frequencies/channels
Move up/down the list
■Entering station/channel presets
Select the desired station/ch annel by using the tune, the seek or the scan function.
Select “Presets”.
Select one of the screen button s and hold it until a beep is heard, indicating that the sta-
tion/channel has been set.
1
2
3
4
5
1
2
3
4
5
6
7
1
2
3