Page 329 of 616

Audio system
530(2) Add to Favorites: Add a down-
loaded phone number to favorites.
(3) Delete: Delete a saved favorite.
✽
✽ NOTICE
• Up to 20 favorites can be saved for
each connected Bluetooth®
Wireless Technology device.
• Favorites can be accessed when the Bluetooth
®Wireless Technology
device they were paired from is
connected.
• The audio system does not down- load favorites from Bluetooth
®
Wireless Technology devices.
Favorites must be newly saved
before use.
• To add to favorites, contacts must be downloaded first.
• Saved favorites are not updated even if the contacts of the connected
Bluetooth
®Wireless Technology
device are changed. In this case,
favorites need to be deleted and
added again.
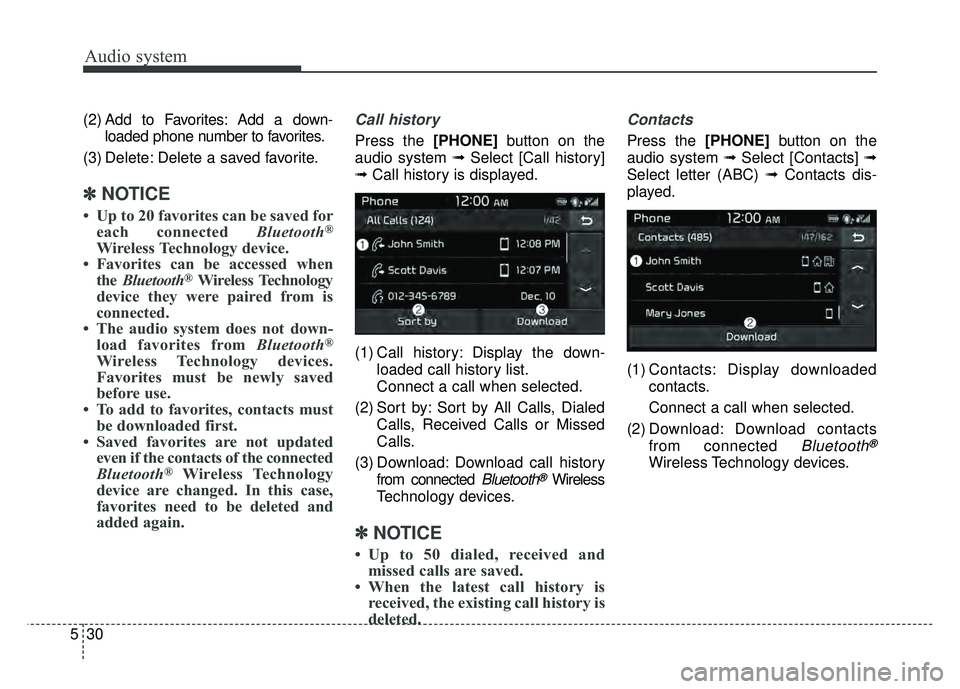
Call history
Press the [PHONE] button on the
audio system ➟ Select [Call history]
➟ Call history is displayed.
(1) Call history: Display the down- loaded call history list.
Connect a call when selected.
(2) Sort by: Sort by All Calls, Dialed Calls, Received Calls or Missed
Calls.
(3) Download: Download call history from connected
Bluetooth®Wireless
Technology devices.
✽ ✽ NOTICE
• Up to 50 dialed, received and
missed calls are saved.
• When the latest call history is received, the existing call history is
deleted.
Contacts
Press the [PHONE] button on the
audio system ➟ Select [Contacts] ➟
Select letter (ABC) ➟ Contacts dis-
played.
(1) Contacts: Display downloaded contacts.
Connect a call when selected.
(2) Download: Download contacts from connected
Bluetooth®
Wireless Technology devices.
Page 330 of 616

Audio system
31
5
✽
✽
NOTICE
• Only supported contacts format
can be downloaded and displayed
from the Bluetooth
®Wireless
Technology device, contacts from
some applications will not be
included.
• Up to 2,000 contacts can be saved.
• In some cases, additional confir- mation from your Bluetooth
®
Wireless Technology device is nec-
essary when downloading con-
tacts. If downloading of contacts
unsuccessful, consult your
Bluetooth
®Wireless Technology
device’s settings or the audio
screen to approve the download.
• Contacts without phone numbers are not displayed.
Dial
Press the [PHONE] button on the
audio system ➟ Select [Dial].
(1) Phone number entry window: The phone number entered using the
keypad is displayed.
(2) Clear - Select to delete individual digits.
- Press and hold to delete theentire phone number.
(3) Keypad: Enter phone number.
(4)
Bluetooth®Wireless Technology
phone name
- The name of the connected
Bluetooth®Wireless Technology
device is displayed.
- Contacts matching the keypad number/letter input are displayed.(5) Call
- Enter and select a phone num-ber to call.
- Select without entering a phone number to see the most recent
dialed call.
Connections
Press the [PHONE] button on the
audio system ➟ Select [Connections].
- For connections setting, refer to Setup ➟Select [Bluetooth] ➟
Select [Connections] page.
Setup
Press the [PHONE] button on the
audio system ➟ Select [Settings].
- For more details, refer to Setup ➟ Bluetooth page.
Page 331 of 616
![KIA NIRO PLUG-IN HYBRID 2018 Owners Manual Audio system
532
Setup
Access Display, Sound, Date/Time,
Bluetooth, System, Screen Saver
and Display Off settings.
Press the [SETUP]button on the
audio system.
Display
Press the [SETUP] button on the KIA NIRO PLUG-IN HYBRID 2018 Owners Manual Audio system
532
Setup
Access Display, Sound, Date/Time,
Bluetooth, System, Screen Saver
and Display Off settings.
Press the [SETUP]button on the
audio system.
Display
Press the [SETUP] button on the](/manual-img/2/57962/w960_57962-330.png)
Audio system
532
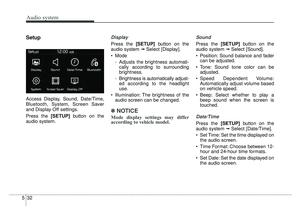
Setup
Access Display, Sound, Date/Time,
Bluetooth, System, Screen Saver
and Display Off settings.
Press the [SETUP]button on the
audio system.
Display
Press the [SETUP] button on the
audio system ➟ Select [Display].
Mode - Adjusts the brightness automati-cally according to surrounding
brightness.
- Brightness is automatically adjust- ed according to the headlight
use.
Illumination: The brightness of the audio screen can be changed.
✽ ✽ NOTICE
Mode display settings may differ
according to vehicle model.
Sound
Press the [SETUP] button on the
audio system ➟ Select [Sound].
Position: Sound balance and fader can be adjusted.
Tone: Sound tone color can be adjusted.
Speed Dependent Volume: Automatically adjust volume based
on vehicle speed.
Beep: Select whether to play a beep sound when the screen is
touched.
Date/Time
Press the [SETUP] button on the
audio system ➟ Select [Date/Time].
Set Time: Set the time displayed on the audio screen.
Time Format: Choose between 12- hour and 24-hour time formats.
Set Date: Set the date displayed on the audio screen.
Page 332 of 616
![KIA NIRO PLUG-IN HYBRID 2018 Owners Manual Audio system
33
5
Bluetooth
Press the [SETUP] button on the
audio system ➟ Select [Bluetooth].
Connections: Control pairing, dele- tion, connection and disconnection
of
Bluetooth®Wireless Technol KIA NIRO PLUG-IN HYBRID 2018 Owners Manual Audio system
33
5
Bluetooth
Press the [SETUP] button on the
audio system ➟ Select [Bluetooth].
Connections: Control pairing, dele- tion, connection and disconnection
of
Bluetooth®Wireless Technol](/manual-img/2/57962/w960_57962-331.png)
Audio system
33
5
Bluetooth
Press the [SETUP] button on the
audio system ➟ Select [Bluetooth].
Connections: Control pairing, dele- tion, connection and disconnection
of
Bluetooth®Wireless Technology
devices.
Auto Connection Priority: Set the connection priority of
Bluetooth®
Wireless Technology devices when
the vehicle is started.
Download Contacts: Contacts can be downloaded from connected
Bluetooth®Wireless Technology
devices.
Bluetooth Voice Prompts: Play or mute voice prompts for
Bluetooth®
Wireless Technology device pair-
ing, connection and errors.
✽ ✽ NOTICE
• When paired devices are deleted,
the call history and contacts of the
device saved to the audio system
are deleted.
• For Bluetooth
®Wireless Technology
connections with low connection pri-
ority, some time may be required for
the connection to be established.
• Contacts can be downloaded only from the currently connected
Bluetooth
®Wireless Technology
device.
If no Bluetooth
®Wireless Technology
device is connected, the Download
Contacts button is disabled.
WARNING -Date/Time
Setting Distraction
Adjusting the date/time setting
while driving can result in a loss
of vehicle control that may lead
to an accident, severe personal
injury, and death.
Page 333 of 616
![KIA NIRO PLUG-IN HYBRID 2018 Owners Manual Audio system
534
System
Press the [SETUP]button on the
audio system ➟ Select [System].
Memory Information: View My Music memory usage.
Language: Change the user lan- guage.
Default: Reset the aud KIA NIRO PLUG-IN HYBRID 2018 Owners Manual Audio system
534
System
Press the [SETUP]button on the
audio system ➟ Select [System].
Memory Information: View My Music memory usage.
Language: Change the user lan- guage.
Default: Reset the aud](/manual-img/2/57962/w960_57962-332.png)
Audio system
534
System
Press the [SETUP]button on the
audio system ➟ Select [System].
Memory Information: View My Music memory usage.
Language: Change the user lan- guage.
Default: Reset the audio system.
System Information: At the System Information screen, Software version
information, updates are available.
- System Update: At the System Information screen, insert the
USB memory with the latest file
downloaded, and then select the
[Update] to begin updating. The
system with then reboot auto-
matically.
✽ ✽ NOTICE
• The system resets to the default
values, and all saved data and set-
tings are lost.
• This product needs supplemented software updates and additional
functions, which collectively may
take some time to complete,
depending on the amount of data.
• If the Power is disconnected or the USB is removed during an update,
the data might be damaged. Please
wait until the update is complete
while engine is on.
Screen Saver
Set the information displayed when
the audio system is switched off or
the screen is turned off.
Press the [SETUP] button on the
audio system ➟ Select [Screen
Saver].
Analog: An analog clock is dis- played.
Digital: A digital clock is displayed.
None: No information is displayed.
Display Off
To prevent glare, the screen can be
turned off with the audio system in
operation.
Press the [SETUP] button on the
audio system ➟ Select [Display Off].
✽ ✽
NOTICE
Use ‘Screen Saver’ to set the Notice
to be displayed when the screen is
turned off.
Page 334 of 616

Audio system
35
5
FCC
This equipment has been tested and found to comply with the limits for a Class B digital device, pursuant to part 15
of the FCC Rules. These limits are designed to provide reasonable protection against harmful interference in a resi-
dential installation.
This equipment generates, uses and can radiate radio frequency energy and, if not installed and used in accordance
with the instructions, may cause harmful interference to radio communications. However, there is no guarantee that
interference will not occur in a particular installation. If this equipment does cause harmful interference to radio or tel-
evision reception, which can be determined by turning the equipment off and on, the user is encouraged to try to cor-
rect the interference by one or more of the following measures:
Reorient or relocate the receiving antenna.
Increase the separation between the equipment and receiver.
Connect the equipment into an outlet on a circuit different from that to which the receiver is connected.
Consult the dealer or an experienced radio/TV technician for help
This device complies with part 15 of the FCC Rules. Operation is subject to the following two conditions: (1) This
device may not cause harmful interference, and (2) this device must accept any interference received, including inter-
ference that may cause undesired operation.
Caution: Any changes or modifications to this device not expressly approved by the party responsible for compliance
could void your authority to operate the equipment.
This equipment complies with FCC radiation exposure limits set forth for an uncontrolled environment.
This equipment should be installed and operated with minimum 20 cm between the radiator and your body. This trans-
mitter must not be collocated or operating in conjunction with any other antenna or transmitter unless authorized to
do so by the FCC.
Page 335 of 616

Driving your vehicle
Before driving . . . . . . . . . . . . . . . . . . . . . . . . . . . . . . 6-4
Before entering vehicle . . . . . . . . . . . . . . . . . . . . . . . . . 6-4
Necessary inspections . . . . . . . . . . . . . . . . . . . . . . . . . . 6-4
Before starting . . . . . . . . . . . . . . . . . . . . . . . . . . . . . . . . 6-4
Key positions . . . . . . . . . . . . . . . . . . . . . . . . . . . . . . . 6-6
Illuminated ignition switch . . . . . . . . . . . . . . . . . . . . . . 6-6
Ignition switch position . . . . . . . . . . . . . . . . . . . . . . . . . 6-6
Starting the hybrid system . . . . . . . . . . . . . . . . . . . . . . 6-7
Engine start/stop button . . . . . . . . . . . . . . . . . . . . . 6-9
Illuminated engine start/stop button . . . . . . . . . . . . . . 6-9
Engine start/stop button position. . . . . . . . . . . . . . . . . 6-9
Starting the hybrid system . . . . . . . . . . . . . . . . . . . . . 6-11
Dual Clutch Transmission (DCT) . . . . . . . . . . . . . 6-14
Dual clutch transmission operation . . . . . . . . . . . . . . 6-14
Good driving practices . . . . . . . . . . . . . . . . . . . . . . . . 6-21
Brake system . . . . . . . . . . . . . . . . . . . . . . . . . . . . . . 6-23
Power brakes . . . . . . . . . . . . . . . . . . . . . . . . . . . . . . . . 6-23
Parking brake – Foot type . . . . . . . . . . . . . . . . . . . . . 6-25
Anti-lock Brake System (ABS) . . . . . . . . . . . . . . . . . . 6-27
Electronic Stability Control (ESC) . . . . . . . . . . . . . . 6-29
Vehicle Stability Management (VSM) . . . . . . . . . . . . 6-32
Hill-start Assist Control (HAC) . . . . . . . . . . . . . . . . . 6-34
Good braking practices. . . . . . . . . . . . . . . . . . . . . . . . 6-34
Autonomous Emergency Braking (AEB) . . . . . . . 6-36
System setting and activation . . . . . . . . . . . . . . . . . . . 6-36
AEB warning message and system control . . . . . . . . 6-39
Brake operation . . . . . . . . . . . . . . . . . . . . . . . . . . . . . . 6-40
Sensor to detect the distance from the vehicle in front (Front radar) . . . . . . . . . . . . . . . . . . . . . . . . . . . . . . . 6-41
System malfunction . . . . . . . . . . . . . . . . . . . . . . . . . . . 6-42
Limitation of the system . . . . . . . . . . . . . . . . . . . . . . . 6-43
Cruise control system. . . . . . . . . . . . . . . . . . . . . . . 6-47
To set cruise control speed . . . . . . . . . . . . . . . . . . . . . 6-48
To increase cruise control set speed . . . . . . . . . . . . . . 6-48
To decrease the cruising speed . . . . . . . . . . . . . . . . . . 6-49
To temporarily accelerate with the cruise control on . 6-49
To cancel cruise control, do one of the following . . . 6-49
To resume cruising speed at more than approximately 20 mph (30 km/h) . . . . . . . . . . . . . . . . . . . . . . . . . . . 6-50
To turn cruise control off, do one of the following . . 6-50
Smart Cruise Control system (SCC) . . . . . . . . . . 6-51
Speed setting (SCC). . . . . . . . . . . . . . . . . . . . . . . . . . . 6-52
Vehicle to vehicle distance setting (SCC) . . . . . . . . . 6-57
To adjust the sensitivity of smart cruise control . . . 6-60
To convert to cruise control mode . . . . . . . . . . . . . . . 6-60
Limitations of the system . . . . . . . . . . . . . . . . . . . . . . 6-61
6
Page 336 of 616

Blind Spot Detection system (BSD) . . . . . . . . . . . 6-66
BSD (Blind Spot Detection)/LCA (Lane Change Assist) . . . . . . . . . . . . . . . . . . . . 6-67
RCTA (Rear Cross Traffic Alert). . . . . . . . . . . . . . . . 6-70
Limitations condition . . . . . . . . . . . . . . . . . . . . . . . . . 6-72
Lane Keeping Assist System (LKAS) . . . . . . . . . . 6-74
LKAS operation. . . . . . . . . . . . . . . . . . . . . . . . . . . . . . 6-75
Warning light and message. . . . . . . . . . . . . . . . . . . . . 6-78
Driver's attention. . . . . . . . . . . . . . . . . . . . . . . . . . . . . 6-80
LKAS function change . . . . . . . . . . . . . . . . . . . . . . . . 6-81
Driver Attention Alert system (DAA) . . . . . . . . . . 6-82
System setting and activation . . . . . . . . . . . . . . . . . . . 6-82
Resetting the system . . . . . . . . . . . . . . . . . . . . . . . . . . 6-84
System disabled . . . . . . . . . . . . . . . . . . . . . . . . . . . . . . 6-84
System malfunction . . . . . . . . . . . . . . . . . . . . . . . . . . . 6-84
Economical operation . . . . . . . . . . . . . . . . . . . . . . 6-87
Special driving conditions . . . . . . . . . . . . . . . . . . . 6-89
Hazardous driving conditions . . . . . . . . . . . . . . . . . . 6-89
Reducing the risk of a rollover. . . . . . . . . . . . . . . . . . 6-89
Rocking the vehicle . . . . . . . . . . . . . . . . . . . . . . . . . . . 6-91
Smooth cornering . . . . . . . . . . . . . . . . . . . . . . . . . . . . 6-91
Driving at night . . . . . . . . . . . . . . . . . . . . . . . . . . . . . . 6-92
Driving in the rain . . . . . . . . . . . . . . . . . . . . . . . . . . . . 6-92
Driving in flooded areas . . . . . . . . . . . . . . . . . . . . . . . 6-93 Driving off-road . . . . . . . . . . . . . . . . . . . . . . . . . . . . . . 6-93
Highway driving . . . . . . . . . . . . . . . . . . . . . . . . . . . . . 6-93
Winter driving . . . . . . . . . . . . . . . . . . . . . . . . . . . . 6-94
Snowy or icy conditions . . . . . . . . . . . . . . . . . . . . . . . 6-94
Use high quality ethylene glycol coolant . . . . . . . . . . 6-96
Check battery and cables . . . . . . . . . . . . . . . . . . . . . . 6-96
Change to "winter weight" oil if necessary . . . . . . . 6-96
Check spark plugs and ignition system. . . . . . . . . . . 6-96
To keep locks from freezing . . . . . . . . . . . . . . . . . . . . 6-97
Use approved window washer anti-freeze in system. 6-97 Don’t let your parking brake freeze . . . . . . . . . . . . . 6-97
Don't let ice and snow accumulate underneath . . . . 6-97
Carry emergency equipment . . . . . . . . . . . . . . . . . . . 6-97
Trailer towing . . . . . . . . . . . . . . . . . . . . . . . . . . . . . 6-97
Vehicle load limit . . . . . . . . . . . . . . . . . . . . . . . . . . 6-98
Tire and loading information label . . . . . . . . . . . . . . 6-98
Certification label . . . . . . . . . . . . . . . . . . . . . . . . . . . 6-101
Vehicle weight . . . . . . . . . . . . . . . . . . . . . . . . . . . . 6-102
Base curb weight . . . . . . . . . . . . . . . . . . . . . . . . . . . . 6-102
Vehicle curb weight . . . . . . . . . . . . . . . . . . . . . . . . . . 6-102
Cargo weight . . . . . . . . . . . . . . . . . . . . . . . . . . . . . . . 6-102
GAW (Gross Axle Weight) . . . . . . . . . . . . . . . . . . . . 6-102
GAWR (Gross Axle Weight Rating) . . . . . . . . . . . . 6-102
GVW (Gross Vehicle Weight) . . . . . . . . . . . . . . . . . . 6-102
GVWR (Gross Vehicle Weight Rating) . . . . . . . . . . 6-102
6