Page 322 of 544

Driving your vehicle
5
5-57
SMART MODE
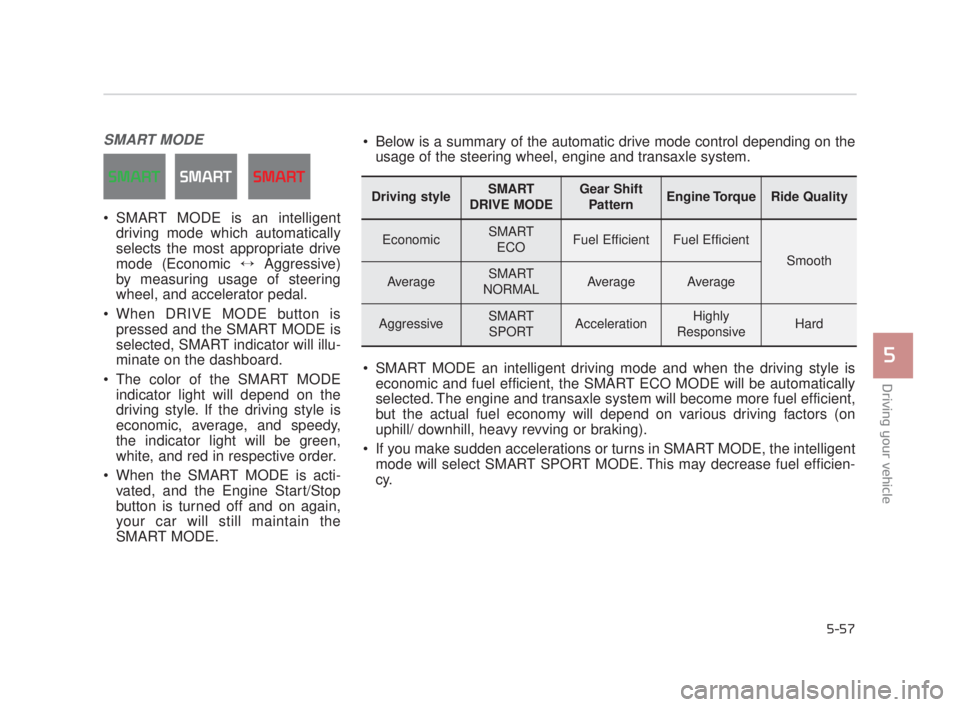
SMART MODE is an intelligentdriving mode which automatically
selects the most appropriate drive
mode (Economic ↔ Aggressive)
by measuring usage of steering
wheel, and accelerator pedal.
When DRIVE MODE button is pressed and the SMART MODE is
selected, SMART indicator will illu-
minate on the dashboard.
The color of the SMART MODE indicator light will depend on the
driving style. If the driving style is
economic, average, and speedy,
the indicator light will be green,
white, and red in respective order.
When the SMART MODE is acti- vated, and the Engine Start/Stop
button is turned off and on again,
your car will still maintain the
SMART MODE.
Driving styleSMART
DRIVE MODEGear Shift PatternEngine TorqueRide Quality
EconomicSMART ECOFuel EfficientFuel Efficient
Smooth
AverageSMART
NORMALAverageAverage
AggressiveSMART SPORTAccelerationHighly
ResponsiveHard
Below is a summary of the automatic drive mode control depending on the usage of the steering wheel, engine and transaxle system.
SMART MODE an intelligent driving mode and when the driving style is economic and fuel efficient, the SMART ECO MODE will be automatically
selected. The engine and transaxle system will become more fuel efficient,
but the actual fuel economy will depend on various driving factors (on
uphill/ downhill, heavy revving or braking).
If you make sudden accelerations or turns in SMART MODE, the intelligent mode will select SMART SPORT MODE. This may decrease fuel efficien-
cy.
KH USA 5:2018 4/12/2017 10:00 AM Page 57
Page 398 of 544

What to do in an emergency
6
6-23
11. To reinstall the wheel, hold it onthe studs, put the wheel nuts on
the studs and tighten them finger
tight. The nuts should be installed
with their tapered small diameter
ends directed inward. Jiggle the
tire to be sure it is completely
seated, then tighten the nuts as
much as possible with your fin-
gers again.
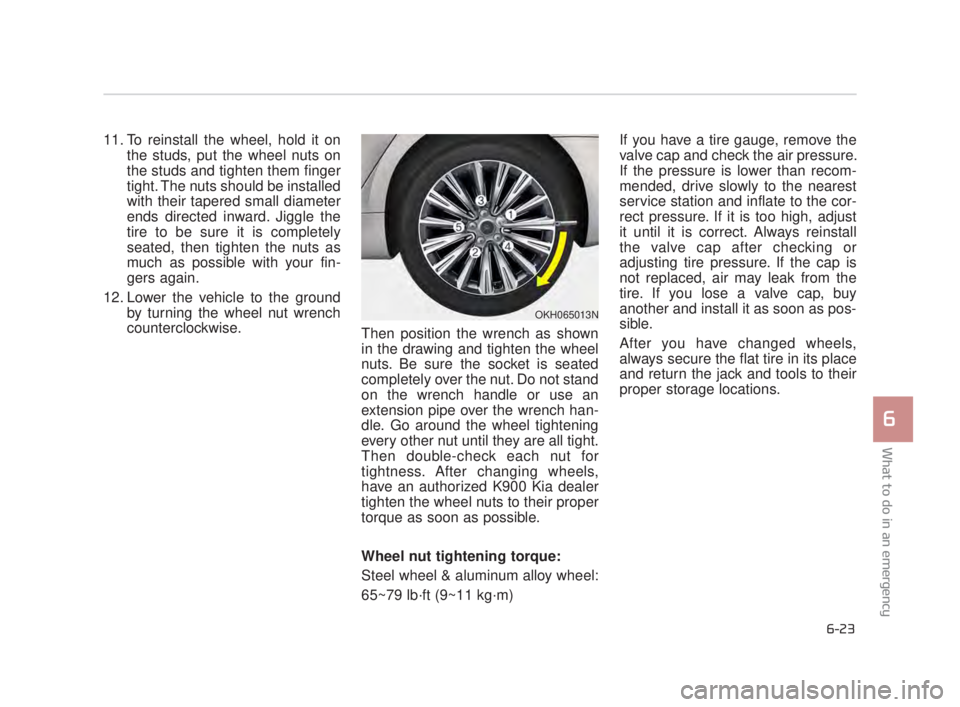
12. Lower the vehicle to the ground by turning the wheel nut wrench
counterclockwise. Then position the wrench as shown
in the drawing and tighten the wheel
nuts. Be sure the socket is seated
completely over the nut. Do not stand
on the wrench handle or use an
extension pipe over the wrench han-
dle. Go around the wheel tightening
every other nut until they are all tight.
Then double-check each nut for
tightness. After changing wheels,
have an authorized K900 Kia dealer
tighten the wheel nuts to their proper
torque as soon as possible.
Wheel nut tightening torque:
Steel wheel & aluminum alloy wheel:
65~79 lb·ft (9~11 kg·m) If you have a tire gauge, remove the
valve cap and check the air pressure.
If the pressure is lower than recom-
mended, drive slowly to the nearest
service station and inflate to the cor-
rect pressure. If it is too high, adjust
it until it is correct. Always reinstall
the valve cap after checking or
adjusting tire pressure. If the cap is
not replaced, air may leak from the
tire. If you lose a valve cap, buy
another and install it as soon as pos-
sible.
After you have changed wheels,
always secure the flat tire in its place
and return the jack and tools to their
proper storage locations.
OKH065013N
KH USA 6:2018 4/12/2017 10:22 AM Page 23
Page 401 of 544
6-26
What to do in an emergency
The compact spare tire should notbe used on any other wheels, nor
should standard tires, snow tires,
wheel covers or trim rings be used
with the compact spare wheel. If
such use is attempted, damage to
these items or other car compo-
nents may occur.
Do not use more than one compact spare tire at a time.
Do not tow a trailer while the com- pact spare tire is installed.
When the original tire and wheel are repaired and reinstalled on the
vehicle, the wheel nut torque must
be set correctly to prevent wheel
vibration. The correct wheel nut
tightening torque is 65~79 lb-ft
(9~11 kg.m).
KH USA 6:2018 4/12/2017 10:22 AM Page 26
Page 439 of 544

Maintenance
7
7-31
(Continued)
NHTSA urges vehicle owners to take
the following steps to prevent corro-
sion:
1. Wash the undercarriage of yourvehicle regularly throughout the
winter and do a thorough washing
in the spring to remove road salt
and other de-icing chemicals.
2.Monitor the brake system for signs of corrosion by having regu-
lar professional inspections and
watching for signs of problems,
including loss of brake fluid,
unusual leaks and soft or spongy
feel in the brake pedal.
3.Replace the entire brake pipe assembly if you find severe corro-
sion that causes scaling or flaking
of brake components.
Brake fluid
Check brake fluid level in the brake
fluid reservoir. The level should be
between “MIN” and “MAX” marks on
the side of the reservoir. Use only
hydraulic brake fluid conforming to
DOT 3 or DOT 4 specification.
Brake discs, pads, calipers
and rotors
Check the pads for excessive wear,
discs for run out and wear, and
calipers for fluid leakage.
For more information on checking
the pads or lining wear limit, we rec-
ommend you to refer to the Kia web-
site.
(http://www.kia-hotline.com)
Exhaust pipe and muffler
Visually inspect the exhaust pipes,
muffler and hangers for cracks, dete-
rioration, or damage. Start the
engine and listen carefully for any
exhaust gas leakage. Tighten con-
nections or replace parts as neces-
sary.
Suspension mounting bolts
Check the suspension connections
for looseness or damage. Retighten
to the specified torque.
Steering gear box, linkage &
boots/lower arm ball joint
With the vehicle stopped and engine
off, check for excessive free-play in
the steering wheel.
Check the linkage for bends or dam-
age. Check the dust boots and ball
joints for deterioration, cracks, or
damage. Replace any damaged
parts.
Drive shafts and boots
Check the drive shafts, boots and
clamps for cracks, deterioration, or
damage. Replace any damaged
parts and, if necessary, repack the
grease.
Air conditioning refrigerant
Check the air conditioning lines and
connections for leakage and dam-
age.
KH USA 7:2018 4/14/2017 6:37 PM Page 31
Page 521 of 544

Specifications, Consumer information and Reporting safety defects
8
8-5
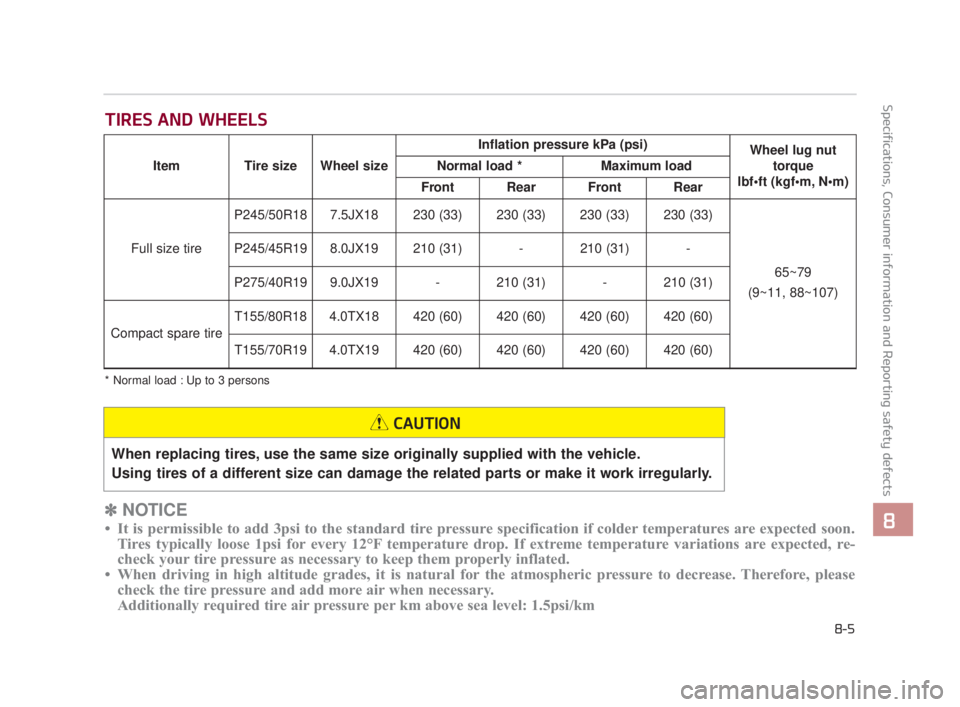
TIRES AND WHEELS
✽NOTICE
• It is permissible to add 3psi to the standard tire pressure specification if colder temperatures are expected soon.
Tires typically loose 1psi for every 12°F temperature drop. If extreme temperature variations are expected, re-
check your tire pressure as necessary to keep them properly inflated.
• When driving in high altitude grades, it is natural for the atmospheric pressure to decrease. Therefore, please check the tire pressure and add more air when necessary.
Additionally required tire air pressure per km above sea level: 1.5psi/km
* Normal load : Up to 3 persons
Item Tire size Wheel size Inflation pressure kPa (psi)
Wheel lug nut
torque
Normal load *
Maximum load
Front Rear Front Rear
Full size tire
P245/50R187.5JX18230 (33)230 (33)230 (33)230 (33)
65~79
(9~11, 88~107)
P245/45R19 8.0JX19 210 (31) - 210 (31) -
P275/40R19 9.0JX19 - 210 (31) - 210 (31)
Compact spare tire
T155/80R184.0TX18420 (60)420 (60)420 (60)420 (60)
T155/70R194.0TX19420 (60)420 (60)420 (60)420 (60)
When replacing tires, use the same size originally supplied with the vehicle.
Using tires of a different size can damage the related parts or make it work irregularly.
CAUTION
KH USA 8:2018 4/14/2017 6:44 PM Page 5