Page 369 of 544
5-104
Driving your vehicle
Carry emergency equipment
Depending on the severity of the
weather you should carry appropri-
ate emergency equipment. Some of
the items you may want to carry
include tire chains, tow straps or
chains, flashlight, emergency flares,
sand, a shovel, jumper cables, a win-
dow scraper, gloves, ground cloth,
coveralls, a blanket, etc.We do not recommend using this
vehicle for trailer towing.
TRAILER TOWING
KH USA 5:2018 4/12/2017 10:02 AM Page 104
Page 377 of 544
ROAD WARNING
Hazard warning flasher
The hazard warning flasher serves as
a warning to other drivers to exercise
extreme caution when approaching,
overtaking, or passing your vehicle. It should be used whenever emer-
gency repairs are being made or
when the vehicle is stopped near the
edge of a roadway.
Depress the flasher switch with the
Engine Start/Stop button in any posi-
tion. The flasher switch is located in
the center console switch panel. All
turn signal lights will flash simultane-
ously.
The hazard warning flasher oper-
ates whether your vehicle is run-
ning or not.
The turn signals do not work when the hazard flasher is on.
Care must be taken when using the hazard warning flasher while
the vehicle is being towed.
6-2
What to do in an emergency
OKH045186N
KH USA 6:2018 4/12/2017 10:21 AM Page 2
Page 379 of 544

IF THE ENGINE WILL NOT START
If engine doesn't turn over or
turns over slowly
1.Be sure the shift lever is in N(Neutral) or P (Park) and the emer-
gency brake is set.
2.Check the battery connections to be sure they are clean and tight.
3.Turn on the interior light. If the light dims or goes out when you operate
the starter, the battery is dis-
charged.
4.Check the starter connections to be sure they are securely tight-
ened.
5.Do not push or pull the vehicle to start it. See instructions for "Jump
starting".
If engine turns over normally
but does not start
1.Check fuel level.
2.With the Engine Start/Stop Buttonin the OFF position, check all con-
nectors at ignition coils and spark
plugs. Reconnect any that may be
disconnected or loose.
3.If the engine still does not start, call an authorized K900 Kia dealer or
Kia Roadside Assistance.
6-4
What to do in an emergency
Push/Pull start
Do not push or pull the vehicle
to start it. Push or pull starting
may cause the catalytic con-
verter to overload and create a
fire hazard.
WARNING
KH USA 6:2018 4/12/2017 10:21 AM Page 4
Page 388 of 544

What to do in an emergency
6
6-13
Low tire pressure telltale
Low tire pressure position tell-
tale
When the tire pressure monitoring
system warning indicators are illumi-
nated and warning message dis-
played on the cluster LCD display,
one or more of your tires is signifi-
cantly under-inflated. The low tire
pressure position telltale light will
indicate which tire is significantly
under-inflated by illuminating the cor-
responding position light.If either telltale illuminates, immedi-
ately reduce your speed, avoid hard
cornering and anticipate increased
stopping distances. You should stop
and check your tires as soon as pos-
sible. Inflate the tires to the proper
pressure as indicated on the vehi-
cle’s placard or tire inflation pressure
label located on the driver’s side cen-
ter pillar outer panel.
If you cannot reach a service station
or if the tire cannot hold the newly
added air, replace the low pressure
tire with the spare tire.
If you drive the vehicle for about 20
minutes at speeds above 15 mph (25
km/h) after replacing the low pres-
sure tire with the spare tire, the
below will happen:
The TPMS malfunction indicator
may blink for approximately 1 minute
and then remain continuously illumi-
nated because the TPMS sensor is
not mounted on the spare wheel.
✽ NOTICE
The spare tire is not equipped with a
tire pressure sensor.
In winter or cold weather, the low
tire pressure telltale may be illumi-
nated if the tire pressure was
adjusted to the recommended tire
inflation pressure in warm weather.
It does not mean your TPMS is
malfunctioning because the
decreased temperature leads to a
proportional lowering of tire pres-
sure.
When you drive your vehicle from a warm area to a cold area or from a
cold area to a warm area, or the
outside temperature is greatly
higher or lower, you should check
the tire inflation pressure and
adjust the tires to the recommend-
ed tire inflation pressure.
When filling tires with more air, conditions to turn off the low tire
pressure telltale may not be met.
This is because a tire inflator has a
margin of error in performance.
The low tire pressure telltale will be
turned off if the tire pressure is
above the recommended tire infla-
tion pressure.
OKH043415N
■Type A■Type B
KH USA 6:2018 4/12/2017 10:21 AM Page 13
Page 391 of 544

6-16
What to do in an emergency
✽ NOTICE
Tampering with, modifying, or dis-
abling the Tire Pressure Monitoring
System (TPMS) components may
interfere with the system's ability to
warn the driver of low tire pressure
conditions and/or TPMS malfunc-
tions. Tampering with, modifying, or
disabling the Tire Pressure
Monitoring System (TPMS) compo-
nents may void the warranty for that
portion of the vehicle.
Pursuant to Code of Federal
Regulations, Title 47, Part 15
("FCC Rules").
Operation is subject to the following
two conditions:
1.This device may not cause harmful
interference, and
2.This device must accept any inter- ference received, including inter-
ference that may cause undesired
operation.
✽ NOTICE
Changes or modifications not
expressly approved by the party
responsible for compliance could
void the user’s authority to operate
the equipment.
TPMS
The TPMS cannot alert you to
severe and sudden tire dam-
age caused by external factors
such as nails or road debris.
If you feel any vehicle instabil- ity, immediately take your foot
off the accelerator, apply the
brakes gradually with light
force, and slowly move to a
safe position off the road.
WARNING
KH USA 6:2018 4/12/2017 10:21 AM Page 16
Page 397 of 544

6-22
What to do in an emergency
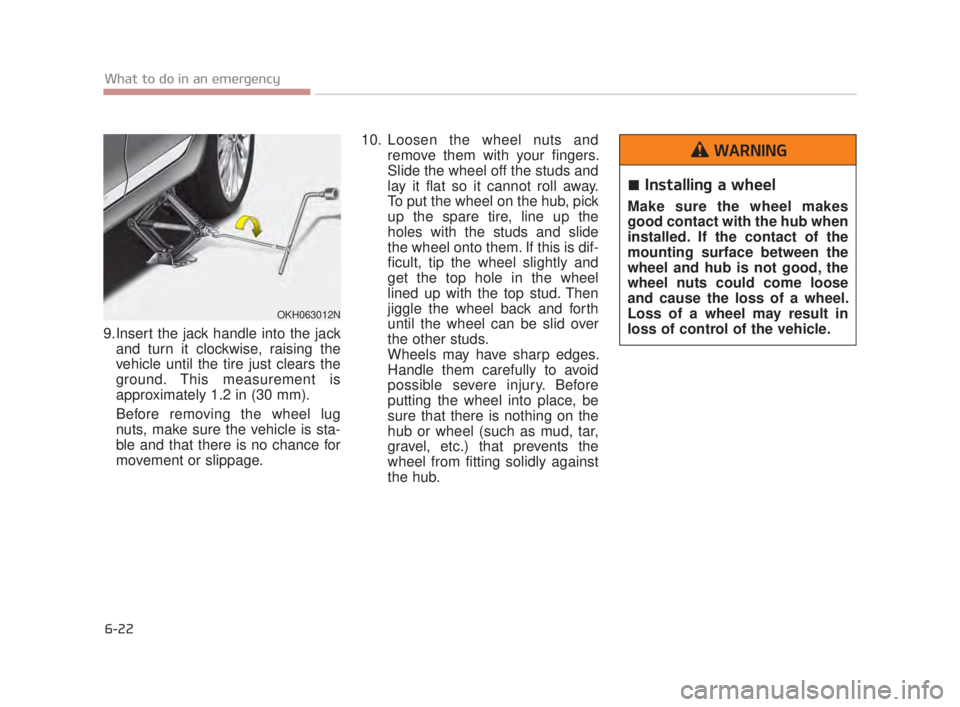
9.Insert the jack handle into the jackand turn it clockwise, raising the
vehicle until the tire just clears the
ground. This measurement is
approximately 1.2 in (30 mm).
Before removing the wheel lug
nuts, make sure the vehicle is sta-
ble and that there is no chance for
movement or slippage. 10. Loosen the wheel nuts and
remove them with your fingers.
Slide the wheel off the studs and
lay it flat so it cannot roll away.
To put the wheel on the hub, pick
up the spare tire, line up the
holes with the studs and slide
the wheel onto them. If this is dif-
ficult, tip the wheel slightly and
get the top hole in the wheel
lined up with the top stud. Then
jiggle the wheel back and forth
until the wheel can be slid over
the other studs.
Wheels may have sharp edges.
Handle them carefully to avoid
possible severe injury. Before
putting the wheel into place, be
sure that there is nothing on the
hub or wheel (such as mud, tar,
gravel, etc.) that prevents the
wheel from fitting solidly against
the hub.
OKH063012N
Installing a wheel
Make sure the wheel makes
good contact with the hub when
installed. If the contact of the
mounting surface between the
wheel and hub is not good, the
wheel nuts could come loose
and cause the loss of a wheel.
Loss of a wheel may result in
loss of control of the vehicle.
WARNING
KH USA 6:2018 4/12/2017 10:21 AM Page 22
Page 410 of 544
7
............................7-65
........................................................7-67
.............................................................7-68
......................................................7-69
Fuses ................................................................7-70
................7-73
.................................7-76
Light bulbs ........................................................7-90
...................7-93
........................................7-94
...........................7-94
...............................7-95
Appearance care ..............................................7-96
..........................................................7-96
.........................................................7-102
Emission control system .................................7-104
Onboard refueling vapor recovery) system......7-104
California perchlorate notice ...........................7-108
KH USA 7:2018 4/14/2017 6:36 PM Page 2
Page 416 of 544

7-8
Maintenance
OWNER MAINTENANCE
The following lists are vehicle checks
and inspections that should be per-
formed by the owner or an author-
ized K900 Kia dealer at the frequen-
cies indicated to help ensure safe,
dependable operation of your vehi-
cle.
Any adverse conditions should be
brought to the attention of your deal-
er as soon as possible.
These Owner Maintenance Checks
are generally not covered by war-
ranties and you may be charged for
labor, parts and lubricants used. Owner maintenance schedule
When you stop for fuel:
Check the engine oil level.
Check coolant level in coolantreservoir.
Check the windshield washer fluid level.
Look for low or under-inflated tires.
While operating your vehicle:
Note any changes in the sound of the exhaust or any smell of
exhaust fumes in the vehicle.
Check for vibrations in the steering wheel. Notice any increased steer-
ing effort or looseness in the steer-
ing wheel, or change in its straight-
ahead position.
Notice if your vehicle constantly turns slightly or “pulls” to one side
when traveling on smooth, level
road.
When stopping, listen and check for unusual sounds, pulling to one
side, increased brake pedal travel
or “hard-to-push” brake pedal.
If any slipping or changes in the operation of your transmission
occurs, check the transmission
fluid level.
Check automatic transmission P (Park) function.
Check parking brake.
Check for fluid leaks under your vehicle (water dripping from the air
conditioning system during or after
use is normal).
Hot Coolant
Be careful when checking your
engine coolant level when the
engine is hot. Scalding hot
coolant and steam may blow
out under pressure. This could
cause burns or other serious
injury.
WARNING
KH USA 7:2018 4/14/2017 6:37 PM Page 8