Page 201 of 368

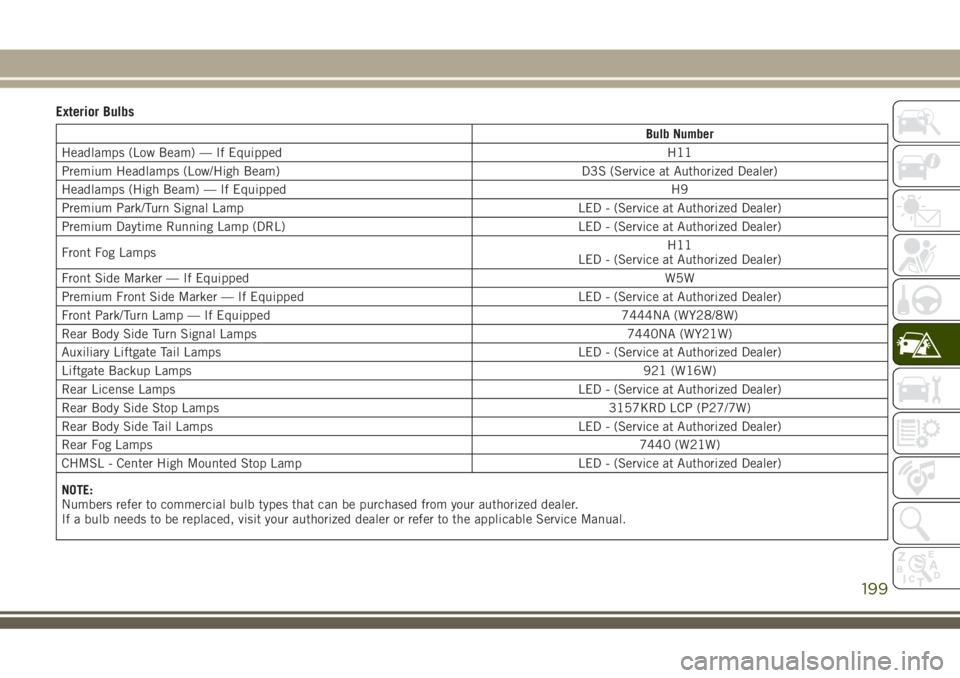
Exterior Bulbs
Bulb Number
Headlamps (Low Beam) — If Equipped H11
Premium Headlamps (Low/High Beam) D3S (Service at Authorized Dealer)
Headlamps (High Beam) — If Equipped H9
Premium Park/Turn Signal Lamp LED - (Service at Authorized Dealer)
Premium Daytime Running Lamp (DRL) LED - (Service at Authorized Dealer)
Front Fog LampsH11
LED - (Service at Authorized Dealer)
Front Side Marker — If EquippedW5W
Premium Front Side Marker — If Equipped LED - (Service at Authorized Dealer)
Front Park/Turn Lamp — If Equipped 7444NA (WY28/8W)
Rear Body Side Turn Signal Lamps 7440NA (WY21W)
Auxiliary Liftgate Tail Lamps LED - (Service at Authorized Dealer)
Liftgate Backup Lamps921 (W16W)
Rear License Lamps LED - (Service at Authorized Dealer)
Rear Body Side Stop Lamps 3157KRD LCP (P27/7W)
Rear Body Side Tail Lamps LED - (Service at Authorized Dealer)
Rear Fog Lamps7440 (W21W)
CHMSL - Center High Mounted Stop Lamp LED - (Service at Authorized Dealer)
NOTE:
Numbers refer to commercial bulb types that can be purchased from your authorized dealer.
If a bulb needs to be replaced, visit your authorized dealer or refer to the applicable Service Manual.
199
Page 202 of 368

Bulb Replacement
High Intensity Discharge Headlamps (HID)
— If Equipped
The headlamps are a type of high voltage
discharge tube. High voltage can remain in
the circuit even with the headlamp switch off
and the key removed.Because of this, you
should not attempt to service a headlamp bulb
yourself. If a headlamp bulb fails, take your
vehicle to an authorized dealer for service.
WARNING!
A transient high voltage occurs at the bulb
sockets of High Intensity Discharge (HID)
headlamps when the headlamp switch is
turned ON. It may cause serious electrical
shock or electrocution if not serviced prop-
erly. See your authorized dealer for ser-
vice.NOTE:
On vehicles equipped with High Intensity
Discharge (HID) headlamps, when the head-
lamps are turned on, there is a blue hue to
the lamps. This diminishes and becomes
more white after approximately 10 seconds,
as the system charges.
Halogen Headlamps — If Equipped
NOTE:
Lens fogging can occur under certain atmo-
spheric conditions. This will usually clear as
atmospheric conditions change to allow the
condensation to change back to vapor. Turn-
ing the lamps on will usually accelerate the
clearing process.
1. Open the hood.
2. Access the back of the headlamp.
NOTE:
• The air filter housing must be removed.
• The windshield washer reservoir may
need to be rotated out of the way by
removing the fastener.
• Coolant reservoir (if equipped) will
need to be repositioned by removingthe fasteners, and moving the unit out
of the way.
3. To access the low beam bulb you must
remove the rubber boot seal from back-
side of the lamp housing.
NOTE:
Ensure the rubber boot is properly rein-
stalled to prevent water and moisture from
entering the lamp.
CAUTION!
•Do not contaminate the bulb glass by
touching it with your fingers or by allow-
ing it to contact other oily surfaces.
Shortened bulb life will result.
• Always use the correct bulb size and type
for replacement. An incorrect bulb size
or type may overheat and cause damage
to the lamp, the bulb socket, or the lamp
wiring.
4. Turn the low or high beam bulb one–
quarter turn counterclockwise to remove
from housing.
5. Disconnect the electrical connector and
replace the bulb.IN CASE OF EMERGENCY
200
Page 203 of 368

Front Turn Signal Lamp
The front turn signal lamps are LEDs. See
your authorized dealer for service.
1. Open the hood.
2. Access the back of the headlamp.
NOTE:
• The air filter housing must be removed.
• The windshield washer reservoir may
need to be rotated out of the way by
removing the fastener.
• Coolant reservoir (if equipped) will
need to be repositioned by removing the
fasteners, and moving the unit out of
the way.
3. Turn the turn signal bulb one–quarter turn
counterclockwise to remove from housing.
4. Disconnect the electrical connector and
replace the bulb.CAUTION!
Do not touch the new bulb with your fin-
gers. Oil contamination will severely
shorten bulb life. If the bulb comes in
contact with any oily surface, clean the
bulb with rubbing alcohol.
Front Fog Lamps
Please see your authorized dealer for service.
Rear Tail, Stop, and Turn Signal Lamps
1. Raise the liftgate.
2. Remove the two push-pins from the tail
lamp housing.
3. Grasp the tail lamp and pull firmly rear-
ward to disengage the lamp from the ap-
erture panel.
4. Twist socket counter clockwise and re-
move from lamp.
Tail Lamp Push Pins
201
Page 204 of 368
5. Pull the bulb to remove it from the socket.
6. Replace the bulb, reinstall the socket,
and reattach the lamp assembly.
Rear Liftgate Mounted Tail Lamp
1. Raise the liftgate.
2. Use a suitable tool to pry the lower trim
from the liftgate.3. Continue removing the trim.
4. Disconnect the two trim panel lights.
5. Tail lamps are now visible. Rotate sock-
et(s) counter clockwise.
Rear Of Tail Lamp
1 — Rear Stop Bulb Socket
2 — LED Tail Connector – Do Not Re-
move
3 — Rear Turn Signal Bulb SocketRear Liftgate Tail Lamps
Liftgate Lower Trim
IN CASE OF EMERGENCY
202
Page 205 of 368
6. Remove/replace bulb(s).
7. Reinstall the socket(s).
8. Reverse process to reinstall the liftgate
trim.
Rear Fascia Mounted Fog Lamp
1. Using a fiber stick or flat blade screw
driver, gently pry between the inboard
edge of the lamp and the fascia.
2. Remove lamp from fascia opening.
3. Twist socket counter clockwise.
4. Replace bulb.
5. Reinstall the socket.
6. Hook inboard side of the lamp into the
fascia pocket.
7. Rotate lamp forward in car until lamp
snaps back into the opening.
Center High-Mounted Stop Lamp (CHMSL)
The center high mounted stop lamp is an
LED. Service at an authorized dealer.
Rear License Lamp
The rear license lamps are LEDs. See your
authorized dealer for service.
Rear Of Liftgate Tail Lamp
1 — Auxiliary LED Tail Connector – Do
Not Remove
2 — Backup Bulb SocketRear Fog Lamps
Center High-Mounted Stop Lamp
203
Page 206 of 368

FUSES
WARNING!
• When replacing a blown fuse, always use
an appropriate replacement fuse with
the same amp rating as the original fuse.
Never replace a fuse with another fuse of
higher amp rating. Never replace a
blown fuse with metal wires or any other
material. Do not place a fuse inside a
circuit breaker cavity or vice versa. Fail-
ure to use proper fuses may result in
serious personal injury, fire and/or prop-
erty damage.
• Before replacing a fuse, make sure that
the ignition is off and that all the other
services are switched off and/or disen-
gaged.
• If the replaced fuse blows again, contact
an authorized dealer.
• If a general protection fuse for safety
systems (air bag system, braking sys-
WARNING!
tem), power unit systems (engine sys-
tem, transmission system) or steering
system blows, contact an authorized
dealer.
General Information
The fuses protect electrical systems against
excessive current.
When a device does not work, you must check
the fuse element inside the blade fuse for a
break/melt.
Also, please be aware that when using power
outlets for extended periods of time with the
engine off may result in vehicle battery dis-
charge.
Underhood Fuses
The Power Distribution Center is located in
the engine compartment near the battery.
This center contains cartridge fuses, microfuses, relays, and circuit breakers. A descrip-
tion of each fuse and component may be
stamped on the inside cover, otherwise the
cavity number of each fuse is stamped on the
inside cover that corresponds to the following
chart.Power Distribution Center
IN CASE OF EMERGENCY
204
Page 207 of 368

Cavity Cartridge Fuse Micro Fuse Description
F03 60 Amp Yellow – Radiator Fan
F05 40 Amp Green – Compressor for Air Suspension — If Equipped
F06 40 Amp Green – Anti-lock Brakes/Electronic Stability Control Pump
F07 30 Amp Pink – Starter Solenoid
F09 30 Amp Pink – Diesel Fuel Heater (Diesel Engine Only)/Brake Vacuum
Pump
F10 40 Amp Green – Body Controller/Exterior Lighting #2
F11 30 Amp Pink – Trailer Tow Electric Brake — If Equipped
F12 40 Amp Green – Body Controller #3/Power Locks
F13 40 Amp Green – Blower Motor Front
F14 40 Amp Green – Body Controller #4/Exterior Lighting #1
F15 40 Amp Green – LTR (Low Temperature Radiator) Engine Cooling Pump
F17 30 Amp Pink – Headlamp Washer — If Equipped
F19 20 Amp Blue – Headrest Solenoid — If Equipped
F20 30 Amp Pink – Passenger Door Module
F22 20 Amp Blue – Engine Control Module
F23 30 Amp Pink – Interior Lights #1
F24 30 Amp Pink – Driver Door Module
F25 30 Amp Pink – Front Wipers
F26 30 Amp Pink – Anti-lock Brakes/Stability Control Module/Valves
F28 20 Amp Blue – Trailer Tow Backup Lights — If Equipped
F29 20 Amp Blue – Trailer Tow Parking Lights — If Equipped
F30 30 Amp Pink – Trailer Tow Receptacle — If Equipped
205
Page 208 of 368

Cavity Cartridge Fuse Micro Fuse Description
F32 30 Amp Pink – Drive Train Control Module
F34 30 Amp Pink – Slip Differential Control
F35 30 Amp Pink – Sunroof - If Equipped
F36 30 Amp Pink – Rear Defroster
F37 25 Amp Clear – Rear Blower Motor — If Equipped
F38 30 Amp Pink – Power Inverter 115V AC — If Equipped
F39 30 Amp Pink – Power Liftgate — If Equipped
F40 – 10 Amp Red Daytime Running Lights/Headlamp Leveling
F42 – 20 Amp Yellow Horn
F44 – 10 Amp Red Diagnostic Port
F45 – 5 Amp Tan Cyber Security Gateway
F49 – 10 Amp Red Integrated Central Stack/Climate Control
F50 – 20 Amp Yellow Air Suspension Control Module/Slip Differential - If
Equipped
F51 – 15 Amp Blue Ignition Node Module/Keyless Ignition/Steering Column
Lock
F53 – 20 Amp Yellow Trailer Tow – Left Turn/Stop Lights — If Equipped
F56 – 15 Amp Blue Additional Content (Diesel engine only)
F57 – 20 Amp Yellow NOX Sensor
F58 – 15 Amp Blue HID Headlamps LH — If Equipped
F59 – 10 Amp Red Purging Pump (Diesel engine only)
F60 – 15 Amp Blue Transmission Control Module
F61 – 10 Amp Red Transmission Control Module/PM Sensor (Diesel engine
only)
IN CASE OF EMERGENCY
206