Page 257 of 312

volume level indicator. This alters the auto-
matic adjustment of the audio volume with
variation to vehicle speed.
Drag & Drop Menu Bar
The Uconnect features and services in the
main menu bar are easily changed for your
convenience. Simply follow these steps:
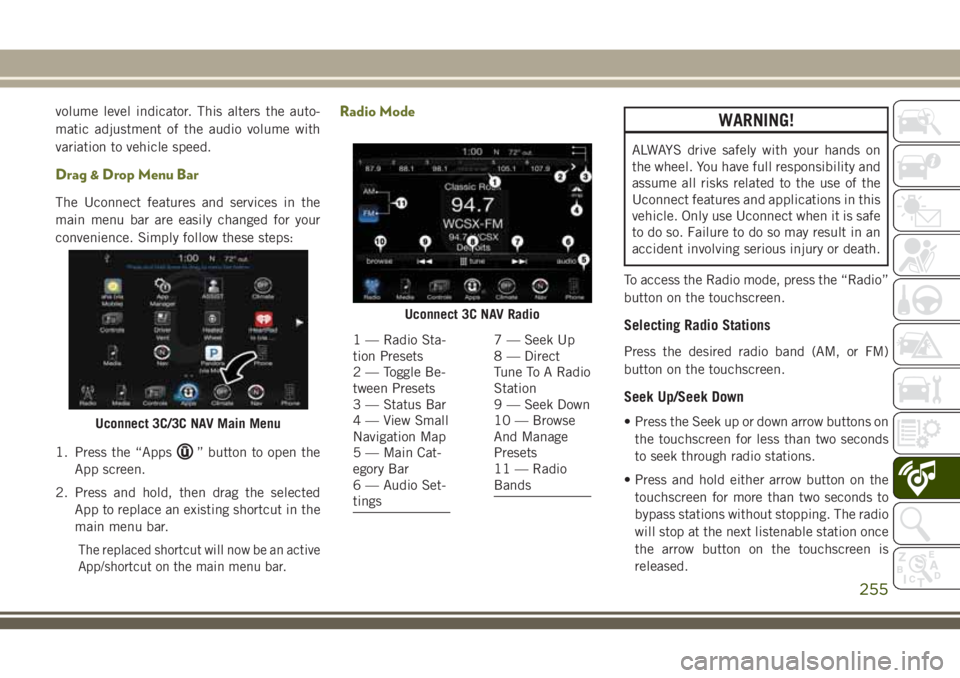
1. Press the “Apps
” button to open the
App screen.
2. Press and hold, then drag the selected App to replace an existing shortcut in the
main menu bar.
The replaced shortcut will now be an active
App/shortcut on the main menu bar.
Radio ModeWARNING!
ALWAYS drive safely with your hands on
the wheel. You have full responsibility and
assume all risks related to the use of the
Uconnect features and applications in this
vehicle. Only use Uconnect when it is safe
to do so. Failure to do so may result in an
accident involving serious injury or death.
To access the Radio mode, press the “Radio”
button on the touchscreen.
Selecting Radio Stations
Press the desired radio band (AM, or FM)
button on the touchscreen.
Seek Up/Seek Down
• Press the Seek up or down arrow buttons on the touchscreen for less than two seconds
to seek through radio stations.
• Press and hold either arrow button on the touchscreen for more than two seconds to
bypass stations without stopping. The radio
will stop at the next listenable station once
the arrow button on the touchscreen is
released.Uconnect 3C/3C NAV Main Menu
Uconnect 3C NAV Radio
1 — Radio Sta-
tion Presets
2 — Toggle Be-
tween Presets
3 — Status Bar
4 — View Small
Navigation Map
5 — Main Cat-
egory Bar
6 — Audio Set-
tings7 — Seek Up
8 — Direct
Tune To A Radio
Station
9 — Seek Down
10 — Browse
And Manage
Presets
11 — Radio
Bands
255
Page 258 of 312

Direct Tune
• Tune directly to a radio station by pressingthe “Tune” button on the screen, and en-
tering the desired station number.
Store Radio Presets Manually
Your radio can store 24 total preset stations,
12 presets per band (AM, and FM). They are
shown at the top of your radio screen. To see
the 12 preset stations per band, press the
arrow button on the touchscreen at the top
right of the screen to toggle between the two
sets of six presets.
To store a radio preset manually, follow the
steps below:
1. Tune to the desired station.
2. Press and hold the desired numbered but-
ton on the touchscreen for more than two
seconds or until you hear a confirmation
beep.
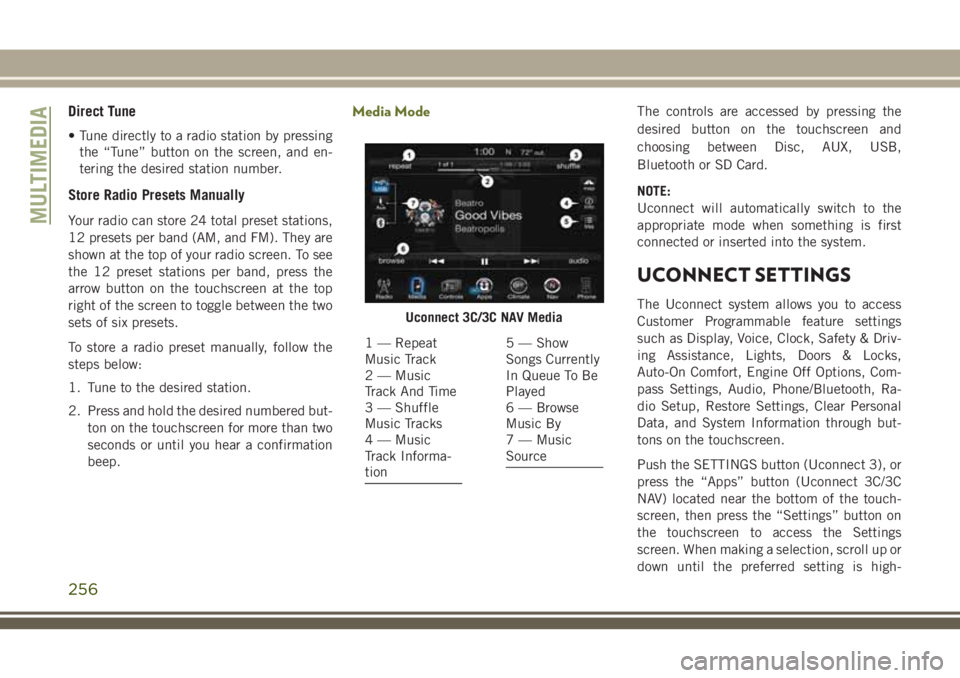
Media ModeThe controls are accessed by pressing the
desired button on the touchscreen and
choosing between Disc, AUX, USB,
Bluetooth or SD Card.
NOTE:
Uconnect will automatically switch to the
appropriate mode when something is first
connected or inserted into the system.
UCONNECT SETTINGS
The Uconnect system allows you to access
Customer Programmable feature settings
such as Display, Voice, Clock, Safety & Driv-
ing Assistance, Lights, Doors & Locks,
Auto-On Comfort, Engine Off Options, Com-
pass Settings, Audio, Phone/Bluetooth, Ra-
dio Setup, Restore Settings, Clear Personal
Data, and System Information through but-
tons on the touchscreen.
Push the SETTINGS button (Uconnect 3), or
press the “Apps” button (Uconnect 3C/3C
NAV) located near the bottom of the touch-
screen, then press the “Settings” button on
the touchscreen to access the Settings
screen. When making a selection, scroll up or
down until the preferred setting is high-Uconnect 3C/3C NAV Media
1 — Repeat
Music Track
2 — Music
Track And Time
3 — Shuffle
Music Tracks
4 — Music
Track Informa-
tion5 — Show
Songs Currently
In Queue To Be
Played
6 — Browse
Music By
7 — Music
Source
MULTIMEDIA
256
Page 259 of 312

lighted, then press the preferred setting until
a check-mark appears next to the setting,
showing that setting has been selected. The
following feature settings are available:
• Display• Engine Off Options
• Voice • Audio
• Clock • Phone/Bluetooth
• Safety & Driving
Assistance • Radio Setup
• Lights • Restore Settings
• Doors & Locks • Clear Personal Data
• Auto-On Comfort • System Information
• Compass
(Uconnect 3)
NOTE:
Depending on the vehicles options, feature
settings may vary.
Refer to “Uconnect Settings” in “Multime-
dia” in the Owner’s Manual for further infor-
mation.
IPOD/USB/SD CARD/MEDIA
PLAYER CONTROL
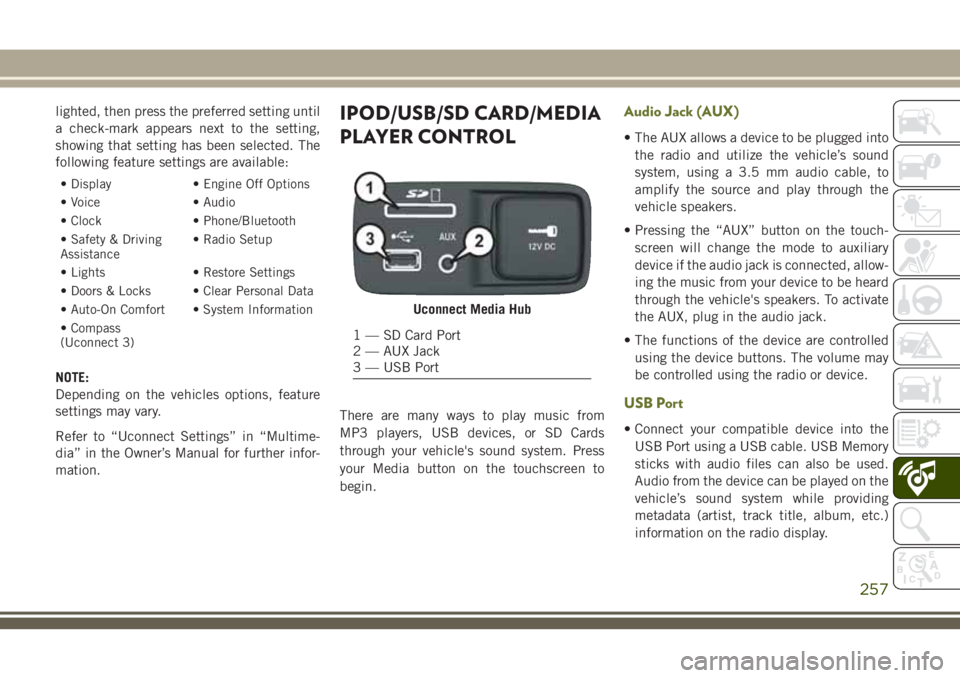
There are many ways to play music from
MP3 players, USB devices, or SD Cards
through your vehicle's sound system. Press
your Media button on the touchscreen to
begin.
Audio Jack (AUX)
• The AUX allows a device to be plugged into the radio and utilize the vehicle’s sound
system, using a 3.5 mm audio cable, to
amplify the source and play through the
vehicle speakers.
• Pressing the “AUX” button on the touch- screen will change the mode to auxiliary
device if the audio jack is connected, allow-
ing the music from your device to be heard
through the vehicle's speakers. To activate
the AUX, plug in the audio jack.
• The functions of the device are controlled using the device buttons. The volume may
be controlled using the radio or device.
USB Port
• Connect your compatible device into theUSB Port using a USB cable. USB Memory
sticks with audio files can also be used.
Audio from the device can be played on the
vehicle’s sound system while providing
metadata (artist, track title, album, etc.)
information on the radio display.
Uconnect Media Hub
1 — SD Card Port
2 — AUX Jack
3 — USB Port
257
Page 260 of 312

• When connected, the compatible USB de-vice can be controlled using the radio or
Steering Wheel Audio Controls to play, skip
to the next or previous track, browse, and
list the contents.
• The battery charges when plugged into the USB port (if supported by the specific de-
vice).
• To route the USB cable out of the center console, use the access cut out.
NOTE:
When connecting your device for the first
time, the system may take several minutes to
read your music, depending on the number of
files. For example, the system will take ap-
proximately five minutes for every
1,000 songs loaded on the device. Also dur-
ing the reading process, the Shuffle and
Browse functions will be disabled. This pro-
cess is needed to ensure the full use of your
features and only happens the first time it is
connected. After the first time, the reading
process of your device will take considerably
less time unless changes are made or new
songs are added to the playlist.SD Card
• Play songs stored on an SD card inserted into the SD card slot.
• Song playback can be controlled using the radio or Steering Wheel Audio Controls to
play, skip to the next or previous track,
browse, and list the contents.
Bluetooth Streaming Audio
If using a Bluetooth equipped device you may
also be able to stream music to your vehicle's
sound system. Your connected device must
be Bluetooth compatible and paired with
your system (see Uconnect Phone for pairing
instructions). You can access the music from
your connected Bluetooth device by pressing
the Bluetooth button on the touchscreen
while in Media mode.
NAVIGATION
• The information in the section below is onlyapplicable if you have the 3C NAV system
or the Navigation has been activated on
your 3C system.
• If you have a Uconnect 3C system your radio is “Navigation-Ready,” and can be
equipped with Navigation at an extra cost.
Please see your dealer for details.
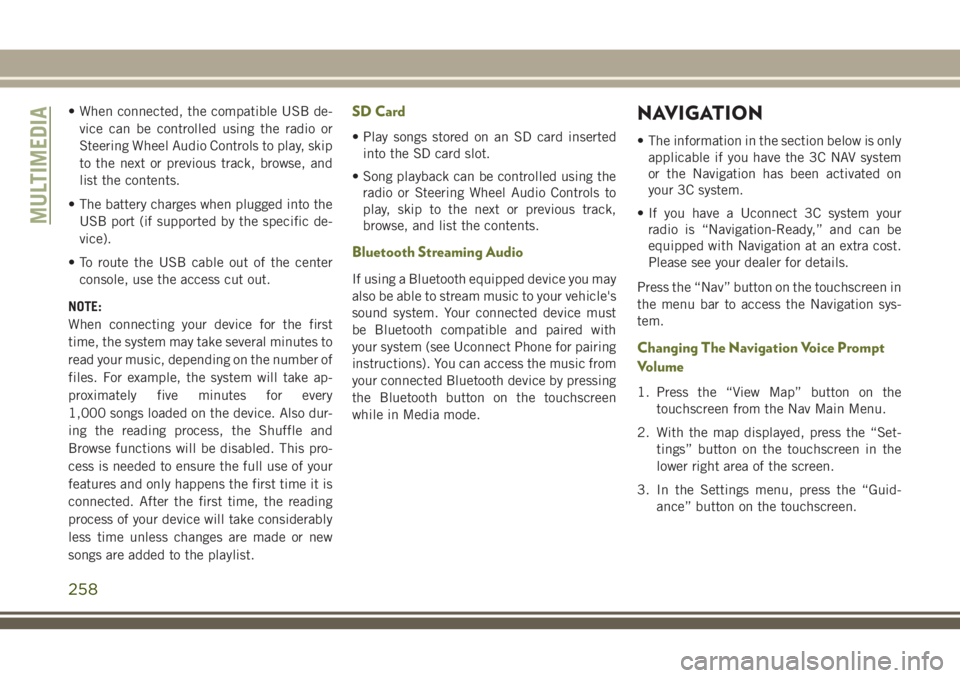
Press the “Nav” button on the touchscreen in
the menu bar to access the Navigation sys-
tem.
Changing The Navigation Voice Prompt
Volume
1. Press the “View Map” button on the touchscreen from the Nav Main Menu.
2. With the map displayed, press the “Set- tings” button on the touchscreen in the
lower right area of the screen.
3. In the Settings menu, press the “Guid- ance” button on the touchscreen.
MULTIMEDIA
258
Page 261 of 312

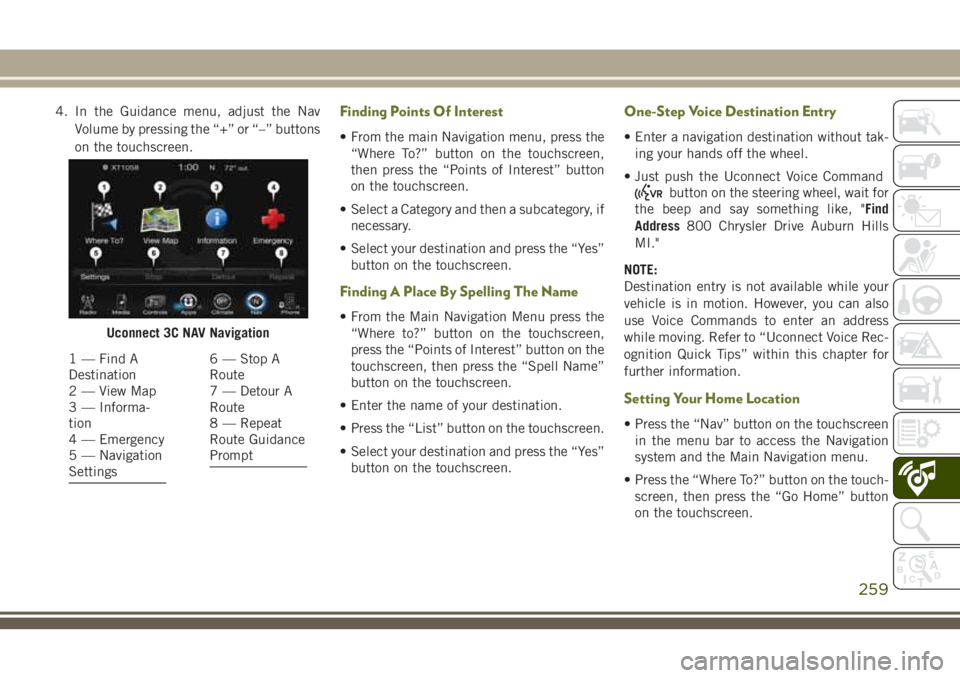
4. In the Guidance menu, adjust the NavVolume by pressing the “+” or “–” buttons
on the touchscreen.Finding Points Of Interest
• From the main Navigation menu, press the“Where To?” button on the touchscreen,
then press the “Points of Interest” button
on the touchscreen.
• Select a Category and then a subcategory, if necessary.
• Select your destination and press the “Yes” button on the touchscreen.
Finding A Place By Spelling The Name
• From the Main Navigation Menu press the“Where to?” button on the touchscreen,
press the “Points of Interest” button on the
touchscreen, then press the “Spell Name”
button on the touchscreen.
• Enter the name of your destination.
• Press the “List” button on the touchscreen.
• Select your destination and press the “Yes” button on the touchscreen.
One-Step Voice Destination Entry
• Enter a navigation destination without tak-ing your hands off the wheel.
• Just push the Uconnect Voice Command
button on the steering wheel, wait for
the beep and say something like, "Find
Address 800 Chrysler Drive Auburn Hills
MI."
NOTE:
Destination entry is not available while your
vehicle is in motion. However, you can also
use Voice Commands to enter an address
while moving. Refer to “Uconnect Voice Rec-
ognition Quick Tips” within this chapter for
further information.
Setting Your Home Location
• Press the “Nav” button on the touchscreen in the menu bar to access the Navigation
system and the Main Navigation menu.
• Press the “Where To?” button on the touch- screen, then press the “Go Home” button
on the touchscreen.
Uconnect 3C NAV Navigation
1 — Find A
Destination
2 — View Map
3 — Informa-
tion
4 — Emergency
5 — Navigation
Settings6 — Stop A
Route
7 — Detour A
Route
8 — Repeat
Route Guidance
Prompt
259
Page 262 of 312

• You may enter your address directly, useyour current location as your home address,
or choose from recently found locations.
• To delete your Home location (or other saved locations) so you can save a new
Home location, press the “Where To?” but-
ton on the touchscreen from the Main Navi-
gation menu, then press the “Go Home”
button on the touchscreen, and in the Yes
screen press the “Options” button on the
touchscreen. In the Options menu press
the “Clear Home” button on the touch-
screen. Set a new Home location by follow-
ing the previous instructions.
Go Home
• A Home location must be saved in thesystem. From the Main Navigation menu,
press the “Where To?” button on the touch-
screen, then press the “Go Home” button
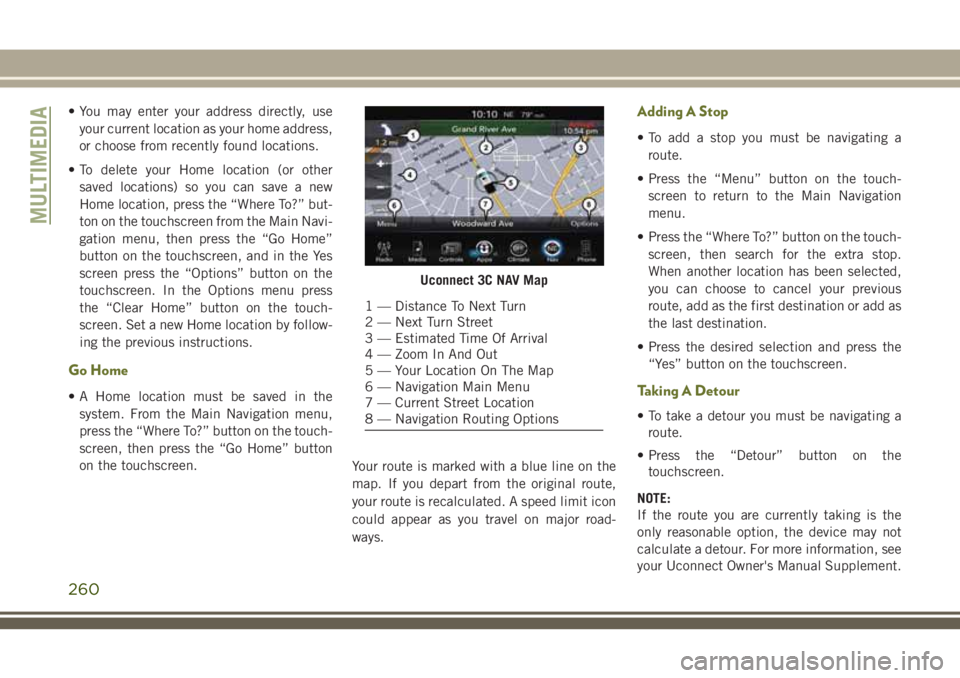
on the touchscreen. Your route is marked with a blue line on the
map. If you depart from the original route,
your route is recalculated. A speed limit icon
could appear as you travel on major road-
ways.
Adding A Stop
• To add a stop you must be navigating a
route.
• Press the “Menu” button on the touch- screen to return to the Main Navigation
menu.
• Press the “Where To?” button on the touch- screen, then search for the extra stop.
When another location has been selected,
you can choose to cancel your previous
route, add as the first destination or add as
the last destination.
• Press the desired selection and press the “Yes” button on the touchscreen.
Taking A Detour
• To take a detour you must be navigating aroute.
• Press the “Detour” button on the touchscreen.
NOTE:
If the route you are currently taking is the
only reasonable option, the device may not
calculate a detour. For more information, see
your Uconnect Owner's Manual Supplement.
Uconnect 3C NAV Map
1 — Distance To Next Turn
2 — Next Turn Street
3 — Estimated Time Of Arrival
4 — Zoom In And Out
5 — Your Location On The Map
6 — Navigation Main Menu
7 — Current Street Location
8 — Navigation Routing Options
MULTIMEDIA
260
Page 263 of 312
UCONNECT PHONE
Operation
Uconnect 3 Phone Menu
1 — Call/Redial/Hold
2 — Mobile Phone Signal Strength
3 — Currently Paired Mobile Phone
4 — Mobile Phone Battery Life
5 — Mute Microphone
6 — Transfer To/From Uconnect System7 — Uconnect Phone Settings Menu
8 — Text Messaging
9 — Direct Dial Pad
10 — Recent Call Log
11 — Browse Phone Book
12 — End Call
261
Page 264 of 312
Uconnect 3C/3C NAV Phone Menu
1 — Favorite Contacts
2 — Mobile Phone Battery Life
3 — Currently Paired Mobile Phone
4 — Mobile Phone Signal Strength
5 — Mute Microphone
6 — Transfer To/From Uconnect System
7 — Conference Call*
8 — Uconnect Phone Settings Menu
9 — Text Messaging**
10 — Direct Dial Pad11 — Recent Call Log
12 — Browse Phone Book Entries
13 — End Call
14 — Call/Redial/Hold
15 — Do Not Disturb
16 — Reply with Text Message
* — Conference call feature only available on GSM mobile devices
** — Text messaging feature not available on all mobile phones (requires
Bluetooth MAP profile)
MULTIMEDIA
262