2018 Hyundai Kona ESP
[x] Cancel search: ESPPage 359 of 497
5-110
Driving your vehicle
Driving on hills
Reduce speed and shift to a lower
gear before you start down a long or
steep downgrade. If you don’t shift
down, you might have to use your
brakes so much that they would get
overheated and may not operate effi-
ciently.
On a long uphill grade, shift down
and reduce your speed to around 45
mph (70 km/h) to reduce the possi-
bility of engine and transmission
overheating.If your trailer weighs more than the
maximum trailer weight without trail-
er brakes and you have a dual clutch
transmission, you should drive in D
(Drive) when towing a trailer.
Operating your vehicle in D (Drive)
when towing a trailer will minimise
heat build-up and extend the life of
your transmission.
To prevent engine and/or trans-
mission overheating:
• When towing a trailer on steep
grades (in excess of 6%) pay
close attention to the engine
coolant temperature gauge to
ensure the engine does not
overheat. If the needle of the
coolant temperature gauge
moves towards "130", pull over
and stop as soon as it is safe to
do so, and allow the engine to
idle until it cools down. You may
proceed once the engine has
cooled sufficiently. • If you tow a trailer with the max-
imum gross vehicle weight and
maximum trailer weight, it can
cause the engine or transmis-
sion to overheat. When driving
in such conditions, allow the
engine to idle until it cools
down. You may proceed once the
engine or transmission has
cooled sufficiently.
• When towing a trailer, your vehi- cle speed may be much slower
than the general flow of traffic,
especially when climbing an
uphill grade. Use the right hand
lane when towing a trailer on an
uphill grade. Choose your vehi-
cle speed according to the max-
imum posted speed limit for
vehicles with trailers, the steep-
ness of the grade, and your trail-
er weight.
• Vehicles equipped with a dual clutch transmission when tow-
ing a trailer on steep grades,
need to be aware that the clutch
in the transmission could over-
heat.
NOTICE
Do not connect a trailer lighting
system directly to your vehi-
cle’s lighting system. Use an
approved trailer wiring harness.
Failure to do so could result in
damage to the vehicle electrical
system and/or personal injury.
Consult a HYUNDAI authorised
repairer for assistance.
WARNING
Page 371 of 497
6-9
What to do in an emergency
6
6. If you cannot find the cause of theoverheating, wait until the engine
temperature has returned to nor-
mal. Then, if coolant has been
lost, carefully add coolant to the
reservoir to bring the fluid level in
the reservoir up to the halfway
mark.
7. Proceed with caution, keeping alert for further signs of overheat-
ing. If overheating happens again,
we recommend that you call a
HYUNDAI authorised repairer for
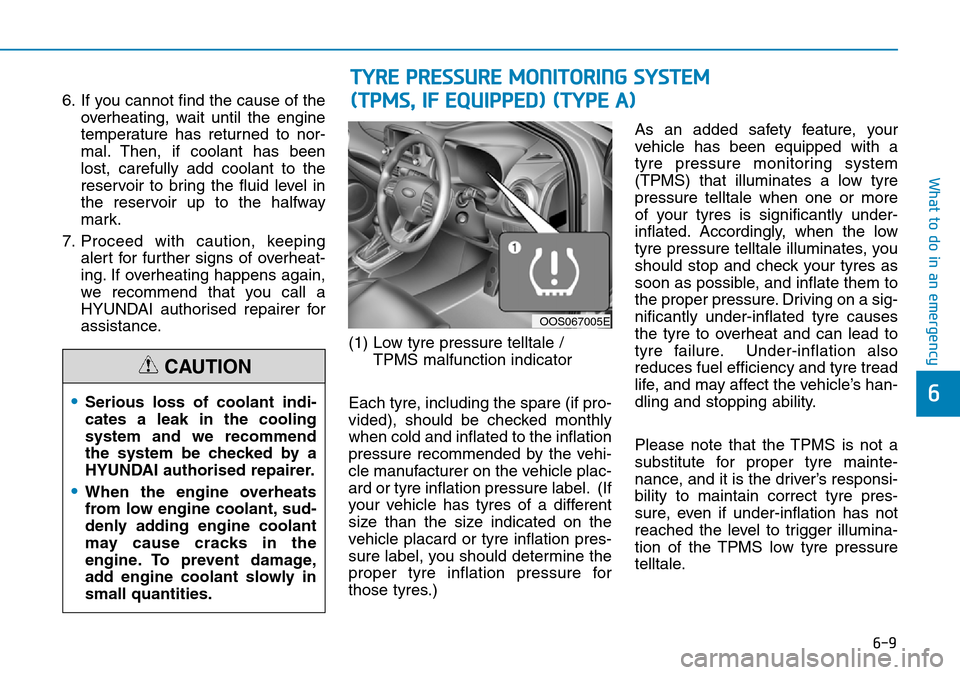
assistance. (1) Low tyre pressure telltale /
TPMS malfunction indicator
Each tyre, including the spare (if pro-
vided), should be checked monthly
when cold and inflated to the inflation
pressure recommended by the vehi-
cle manufacturer on the vehicle plac-
ard or tyre inflation pressure label. (If
your vehicle has tyres of a different
size than the size indicated on the
vehicle placard or tyre inflation pres-
sure label, you should determine the
proper tyre inflation pressure for
those tyres.) As an added safety feature, your
vehicle has been equipped with a
tyre pressure monitoring system
(TPMS) that illuminates a low tyre
pressure telltale when one or more
of your tyres is significantly under-
inflated. Accordingly, when the low
tyre pressure telltale illuminates, you
should stop and check your tyres as
soon as possible, and inflate them to
the proper pressure. Driving on a sig-
nificantly under-inflated tyre causes
the tyre to overheat and can lead to
tyre failure. Under-inflation also
reduces fuel efficiency and tyre tread
life, and may affect the vehicle’s han-
dling and stopping ability.
Please note that the TPMS is not a
substitute for proper tyre mainte-
nance, and it is the driver’s responsi-
bility to maintain correct tyre pres-
sure, even if under-inflation has not
reached the level to trigger illumina-
tion of the TPMS low tyre pressure
telltale.
•Serious loss of coolant indi-
cates a leak in the cooling
system and we recommend
the system be checked by a
HYUNDAI authorised repairer.
•When the engine overheats
from low engine coolant, sud-
denly adding engine coolant
may cause cracks in the
engine. To prevent damage,
add engine coolant slowly in
small quantities.
CAUTION
OOS067005E
TYRE PRESSURE MONITORING SYSTEM
(TPMS, IF EQUIPPED) (TYPE A)
Page 377 of 497
6-15
What to do in an emergency
6
Tyre pressure monitoring sys-
tem
Each tyre, including the spare (if pro-
vided), should be checked monthly
when cold and inflated to the inflation
pressure recommended by the vehi-
cle manufacturer on the vehicle plac-
ard or tyre inflation pressure label. (If
your vehicle has tyres of a different
size than the size indicated on the
vehicle placard or tyre inflation pres-
sure label, you should determine the
proper tyre inflation pressure for
those tyres.)As an added safety feature, your
vehicle has been equipped with a
tyre pressure monitoring system
(TPMS) that illuminates a low tyre
pressure telltale when one or more
of your tyres is significantly under-
inflated. Accordingly, when the low
tyre pressure telltale illuminates, you
should stop and check your tyres as
soon as possible, and inflate them to
the proper pressure. Driving on a sig-
nificantly under-inflated tyre causes
the tyre to overheat and can lead to
tyre failure. Under-inflation also
reduces fuel efficiency and tyre tread
life, and may affect the vehicle’s han-
dling and stopping ability.
Please note that the TPMS is not a
substitute for proper tyre mainte-
nance, and it is the driver’s responsi-
bility to maintain correct tyre pres-
sure, even if under-inflation has not
reached the level to trigger illumina-
tion of the TPMS low tyre pressure
telltale.Your vehicle has also been equipped
with a TPMS malfunction indicator to
indicate when the system is not
operating properly. The TPMS mal-
function indicator is combined with
the low tyre pressure telltale. When
the system detects a malfunction,
the telltale will flash for approximate-
ly one minute and then remain con-
tinuously illuminated. This sequence
will continue upon subsequent vehi-
cle start-ups as long as the malfunc-
tion exists. When the malfunction
indicator is illuminated, the system
may not be able to detect or signal
low tyre pressure as intended.
TPMS malfunctions may occur for a
variety of reasons, including the
installation of replacement or alter-
nate tyres or wheels on the vehicle
that prevent the TPMS from function-
ing properly. Always check the TPMS
malfunction telltale after replacing
one or more tyres or wheels on your
vehicle to ensure that the replace-
ment or alternate tyres and wheels
allow the TPMS to continue to func-
tion properly.
Over-inflation or under-inflation
can reduce tyre life, adversely
affect vehicle handling, and
lead to sudden tyre failure that
may cause loss of vehicle con-
trol resulting in an accident.
WARNING
Page 387 of 497
6-25
What to do in an emergency
6
When driving with the compact spare
tyre mounted to your vehicle:
• Check the tyre pressure afterinstalling the compact spare tyre.
The compact spare tyre should be
inflated to 420 kPa (60 psi).
• Do not take this vehicle through an automatic car wash whilst the com-
pact spare tyre is installed.
• Do not use the compact spare tyre on any other vehicle because this
tyre has been designed especially
for your vehicle.
• The compact spare tyre’s tread life is shorter than a regular tyre.
Inspect your compact spare tyre
regularly and replace worn compact
spare tyres with the same size and
design, mounted on the same
wheel.
• Do not use more than one compact spare tyre at a time.
• Do not tow a trailer whilst the com- pact spare tyre is installed. When the original tyre and wheel
are repaired and reinstalled on the
vehicle, the lug nut torque must be
set correctly. The correct lug nut
tightening torque is 11~13 kgf·m
(79~94 lbf·ft).NOTICE
To prevent damaging the com-
pact spare tyre and your vehi-
cle:
•Drive slowly enough for the
road conditions to avoid all
hazards, such as a potholes
or debris.
•Avoid driving over obstacles.
The compact spare tyre diam-
eter is smaller than the diame-
ter of a conventional tyre and
reduces the ground clearance
approximately 25 mm (1 inch).
•Do not use tyre chains on the
compact spare tyre. Because
of the smaller size, a tyre
chain will not fit properly.
•Do not use the compact spare
tyre on any other wheels, nor
should standard tyres, snow
tyres, wheel covers or trim
rings be used with the com-
pact spare wheel.
CAUTION
Page 390 of 497
6-28
What to do in an emergency
For safe operation, carefully read
and follow the instructions in this
manual before use.
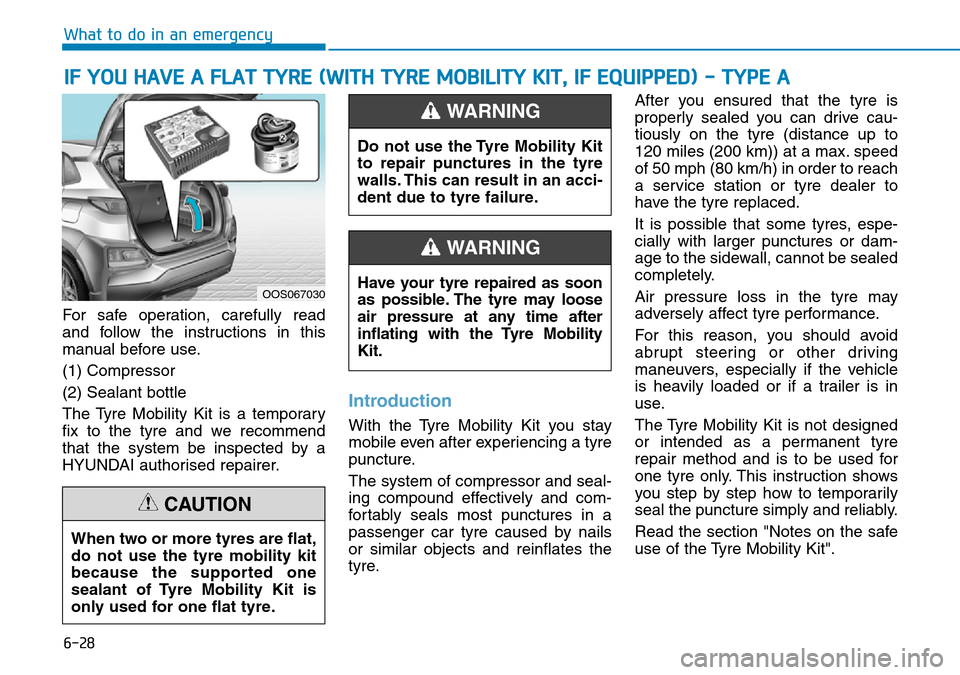
(1) Compressor
(2) Sealant bottle
The Tyre Mobility Kit is a temporary
fix to the tyre and we recommend
that the system be inspected by a
HYUNDAI authorised repairer.
Introduction
With the Tyre Mobility Kit you stay
mobile even after experiencing a tyre
puncture.
The system of compressor and seal-
ing compound effectively and com-
fortably seals most punctures in a
passenger car tyre caused by nails
or similar objects and reinflates the
tyre. After you ensured that the tyre is
properly sealed you can drive cau-
tiously on the tyre (distance up to
120 miles (200 km)) at a max. speed
of 50 mph (80 km/h) in order to reach
a service station or tyre dealer to
have the tyre replaced.
It is possible that some tyres, espe-
cially with larger punctures or dam-
age to the sidewall, cannot be sealed
completely.
Air pressure loss in the tyre may
adversely affect tyre performance.
For this reason, you should avoid
abrupt steering or other driving
maneuvers, especially if the vehicle
is heavily loaded or if a trailer is in
use.
The Tyre Mobility Kit is not designed
or intended as a permanent tyre
repair method and is to be used for
one tyre only. This instruction shows
you step by step how to temporarily
seal the puncture simply and reliably.
Read the section "Notes on the safe
use of the Tyre Mobility Kit".
IF YOU HAVE A FLAT TYRE (WITH TYRE MOBILITY KIT, IF EQUIPPED) - TYPE A
Do not use the Tyre Mobility Kit
to repair punctures in the tyre
walls. This can result in an acci-
dent due to tyre failure.
WARNING
Have your tyre repaired as soon
as possible. The tyre may loose
air pressure at any time after
inflating with the Tyre Mobility
Kit.
WARNING
When two or more tyres are flat,
do not use the tyre mobility kit
because the supported one
sealant of Tyre Mobility Kit is
only used for one flat tyre.
CAUTION
OOS067030
Page 397 of 497
6-35
What to do in an emergency
6
IF YOU HAVE A FLAT TYRE (WITH TYRE MOBILITY KIT, IF EQUIPPED) - TYPE B
For safe operation, carefully read
and follow the instructions in this
manual before use.
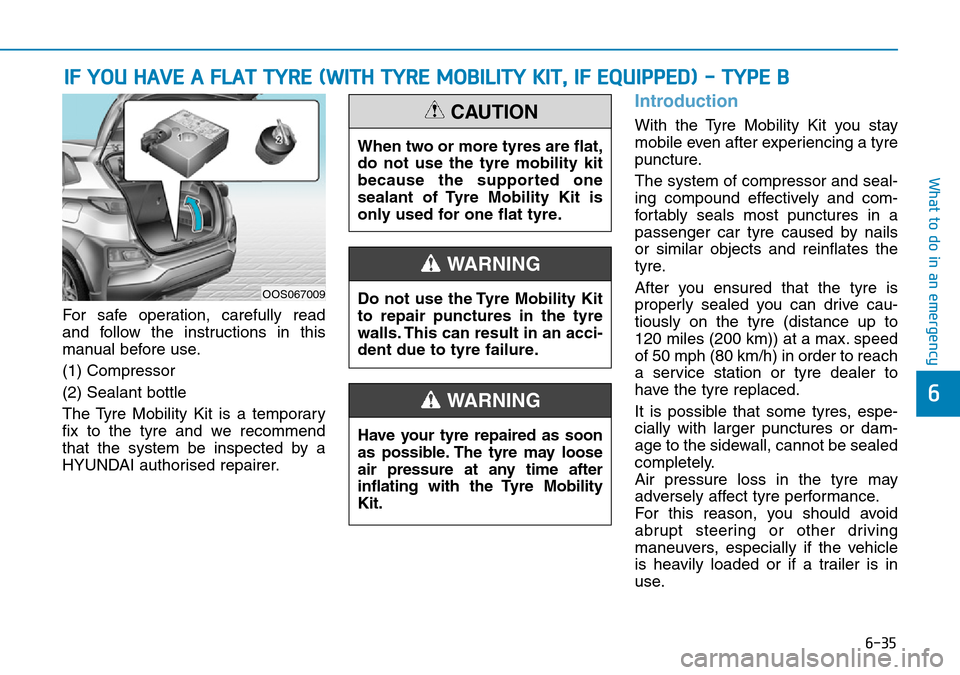
(1) Compressor
(2) Sealant bottle
The Tyre Mobility Kit is a temporary
fix to the tyre and we recommend
that the system be inspected by a
HYUNDAI authorised repairer.
Introduction
With the Tyre Mobility Kit you stay
mobile even after experiencing a tyre
puncture.
The system of compressor and seal-
ing compound effectively and com-
fortably seals most punctures in a
passenger car tyre caused by nails
or similar objects and reinflates the
tyre.
After you ensured that the tyre is
properly sealed you can drive cau-
tiously on the tyre (distance up to
120 miles (200 km)) at a max. speed
of 50 mph (80 km/h) in order to reach
a service station or tyre dealer to
have the tyre replaced.
It is possible that some tyres, espe-
cially with larger punctures or dam-
age to the sidewall, cannot be sealed
completely.
Air pressure loss in the tyre may
adversely affect tyre performance.
For this reason, you should avoid
abrupt steering or other driving
maneuvers, especially if the vehicle
is heavily loaded or if a trailer is in
use.
Do not use the Tyre Mobility Kit
to repair punctures in the tyre
walls. This can result in an acci-
dent due to tyre failure.
WARNING
Have your tyre repaired as soon
as possible. The tyre may loose
air pressure at any time after
inflating with the Tyre Mobility
Kit.
WARNING
When two or more tyres are flat,
do not use the tyre mobility kit
because the supported one
sealant of Tyre Mobility Kit is
only used for one flat tyre.
CAUTION
OOS067009
Page 407 of 497
6-45
What to do in an emergency
6
Your vehicle is equipped with emer-
gency commodities to help you
respond to emergency situation.
Fire extinguisher
If there is small fire and you know
how to use the fire extinguisher, fol-
low these steps carefully.
1. Pull out the safety pin at the top ofthe extinguisher that keeps the
handle from being accidentally
pressed.
2. Aim the nozzle towards the base of the fire.
3. Stand approximately 2.5 m (8 ft) away from the fire and squeeze
the handle to discharge the extin-
guisher. If you release the handle,
the discharge will stop.
4. Sweep the nozzle back and forth at the base of the fire. After the fire
appears to be out, watch carefully
since it may re-ignite.
First aid kit
Supplies for use in giving first aid
such as scissors, bandage and
adhesive tape, etc. are provided.
Triangle reflector
Place the triangle reflector on the
road to warn oncoming vehicles dur-
ing emergencies, such as when the
vehicle is parked by the roadside due
to problems.
Tyre pressure gauge
(if equipped)
Tyres normally lose some air in day-
to-day use, and you may have to add
a air periodically and usually it is not
a sign of a leaking tyre, but of normal
wear. Always check tyre pressure
when the tyres are cold because tyre
pressure increases with tempera-
ture. To check the tyre pressure, take the
following steps:
1. Unscrew the inflation valve cap
that is located on the rim of the
tyre.
2. Press and hold the gauge against the tyre valve. Some air will leak
as you begin and more will leak if
you don't press the gauge in firm-
ly.
3. A firm non-leaking push will acti- vate the gauge.
4. Read the tyre pressure on the gauge to see whether the tyre
pressure is low or high.
5. Adjust the tyre pressure to the specified pressure. Refer to "Tyres
and Wheels" in chapter 8.
6. Reinstall the inflation valve cap.
EMERGENCY COMMODITY (IF EQUIPPED)
Page 408 of 497
7
Maintenance
7
Maintenance
Engine compartment .............................................7-3
Maintenance services ...........................................7-4
Owner's responsibility ......................................................7-4
Owner maintenance precautions ................................7-4
Owner maintenance ...............................................7-5
Owner maintenance schedule ........................................7-5
Scheduled maintenance services.........................7-7
Explanation of scheduled maintenance items ...7-8
Engine oil ..............................................................7-11
Checking the engine oil level .......................................7-11
Checking the engine oil and filter ..............................7-12
Engine coolant......................................................7-13
Checking the engine coolant level..............................7-13
Changing the engine coolant .......................................7-15
Brake/clutch fluid ...............................................7-16
Checking the brake/clutch fluid level ........................7-16
Washer fluid .........................................................7-17
Checking the washer fluid level ...............................7-17
Parking brake .......................................................7-17
Checking the parking brake .........................................7-17
Air cleaner ............................................................7-18
Filter replacement ...........................................................7-18
Climate control air filter .....................................7-19
Filter inspection ...............................................................7-19
Filter replacement ...........................................................7-19
Wiper blades .........................................................7-21
Blade inspection ..............................................................7-21
Blade replacement ..........................................................7-21
Battery...................................................................7-23
For best battery service................................................7-24
Battery capacity label ...................................................7-25
Battery recharging .........................................................7-25
Reset items .......................................................................7\
-26
Tyres and wheels .................................................7-27
Tyre care ........................................................................\
...7-27
Recommended cold tyre inflation pressures ..........7-28
Check tyre inflation pressure ......................................7-29
Tyre rotation ....................................................................7-29\
Wheel alignment and tyre balance.............................7-30
Tyre replacement ...........................................................7-31
Wheel replacement .........................................................7-32
Tyre traction ...................................................................7-32
Tyre maintenance ...........................................................7-32
Tyre sidewall labelling ....................................................7-32
Low aspect ratio tyres...................................................7-36
7