2018 Hyundai Kona mirror
[x] Cancel search: mirrorPage 12 of 497
1-2
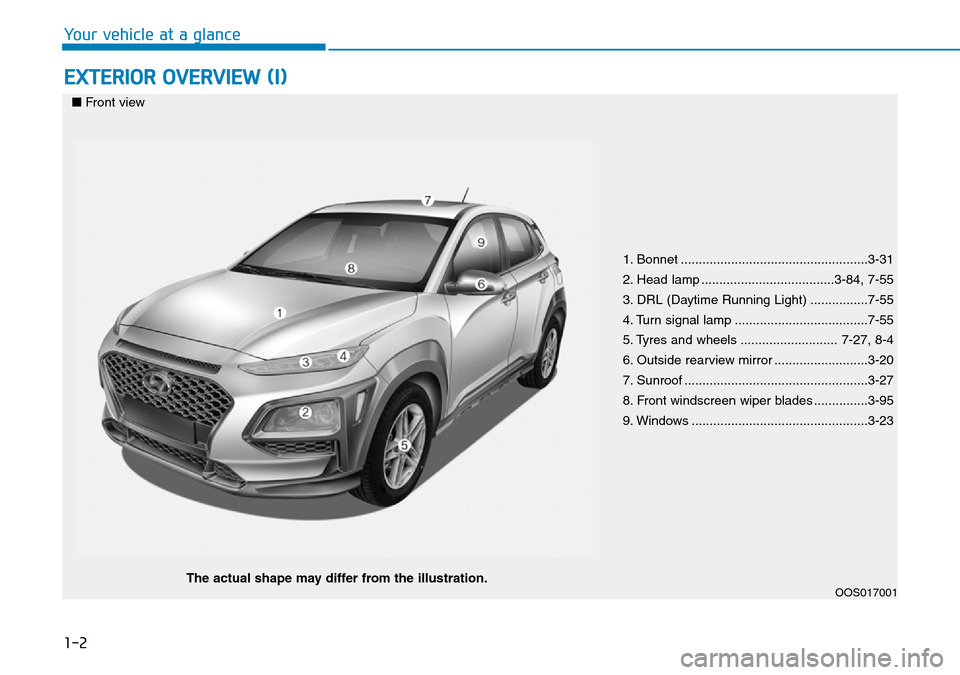
EXTERIOR OVERVIEW (I)
Your vehicle at a glance
1. Bonnet ....................................................3-31
2. Head lamp .....................................3-84, 7-55
3. DRL (Daytime Running Light) ................7-55
4. Turn signal lamp .....................................7-55
5. Tyres and wheels ........................... 7-27, 8-4
6. Outside rearview mirror ..........................3-20
7. Sunroof ...................................................3-27
8. Front windscreen wiper blades ...............3-95
9. Windows .................................................3-23
OOS017001
■Front view
The actual shape may differ from the illustration.
Page 14 of 497
1-4
Your vehicle at a glance
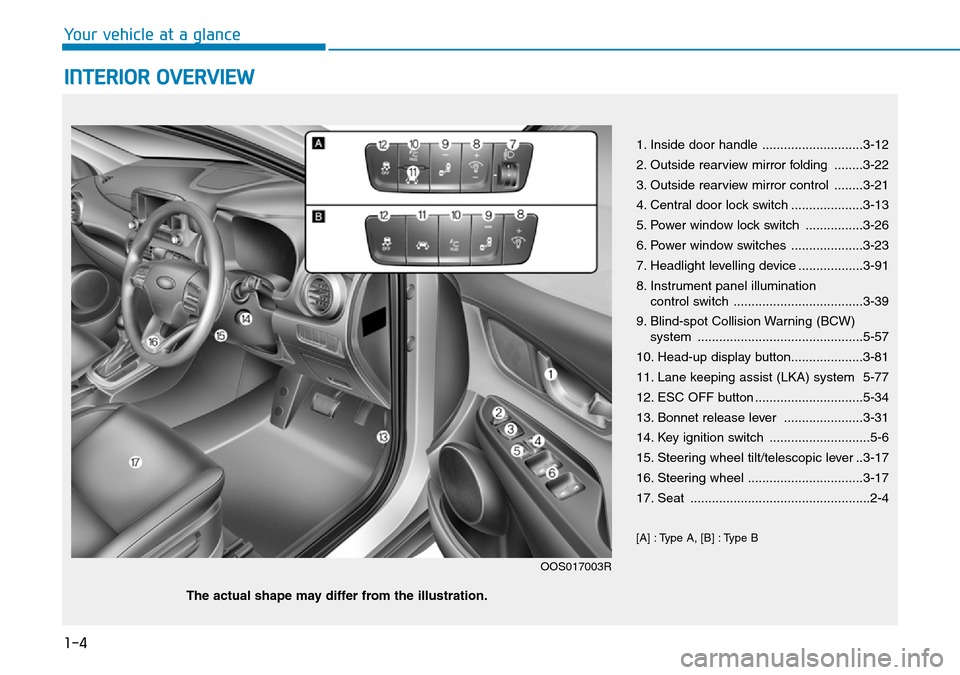
INTERIOR OVERVIEW
1. Inside door handle ............................3-12
2. Outside rearview mirror folding ........3-22
3. Outside rearview mirror control ........3-21
4. Central door lock switch ....................3-13
5. Power window lock switch ................3-26
6. Power window switches ....................3-23
7. Headlight levelling device ..................3-91
8. Instrument panel illuminationcontrol switch ....................................3-39
9. Blind-spot Collision Warning (BCW) system ..............................................5-57
10. Head-up display button....................3-81
11. Lane keeping assist (LKA) system 5-77
12. ESC OFF button ..............................5-34
13. Bonnet release lever ......................3-31
14. Key ignition switch ............................5-6
15. Steering wheel tilt/telescopic lever ..3-17
16. Steering wheel ................................3-17
17. Seat ..................................................2-4
[A] : Type A, [B] : Type B
OOS017003R
The actual shape may differ from the illustration.
Page 63 of 497
2-47
Safety system of your vehicle
2
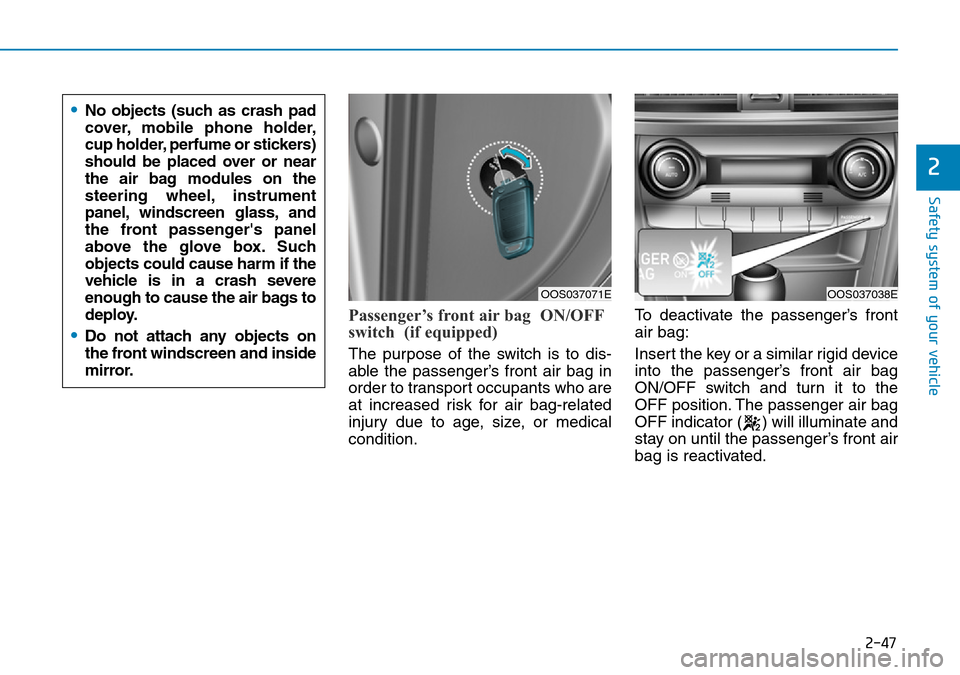
Passenger’s front air bag ON/OFF
switch (if equipped)
The purpose of the switch is to dis-
able the passenger’s front air bag in
order to transport occupants who are
at increased risk for air bag-related
injury due to age, size, or medical
condition.To deactivate the passenger’s front
air bag:
Insert the key or a similar rigid device
into the passenger’s front air bag
ON/OFF switch and turn it to the
OFF position. The passenger air bag
OFF indicator ( ) will illuminate and
stay on until the passenger’s front air
bag is reactivated.
OOS037071EOOS037038E
•No objects (such as crash pad
cover, mobile phone holder,
cup holder, perfume or stickers)
should be placed over or near
the air bag modules on the
steering wheel, instrument
panel, windscreen glass, and
the front passenger's panel
above the glove box. Such
objects could cause harm if the
vehicle is in a crash severe
enough to cause the air bags to
deploy.
•Do not attach any objects on
the front windscreen and inside
mirror.
Page 79 of 497
Convenient features of your vehicle
Accessing your vehicle .........................................3-3
Remote key ........................................................................\
.3-3
Smart key ........................................................................\
....3-6
Immobiliser system .........................................................3-10
Door locks .............................................................3-11
Operating door locks from outside the vehicle ......3-11
Operating door locks from inside the vehicle .........3-12
Deadlocks ........................................................................\
..3-14
Auto door lock/unlock features..................................3-15
Child-protector rear door locks ..................................3-15
Theft-alarm system.............................................3-16
Steering wheel......................................................3-17
Electric power steering (EPS) ......................................3-17
Tilt steering/Telescopic steering.................................3-17
Heated steering wheel ...................................................3-18
Horn ........................................................................\
............3-19
Mirrors ...................................................................3-19
Inside rearview mirror....................................................3-19
Outside rearview mirror ................................................3-20
Windows ................................................................3-23
Power windows................................................................3-23
Sunroof..................................................................3-27
Sunroof opening and closing .......................................3-28
Sliding the sunroof .........................................................3-28
Tilting the sunroof ..........................................................3-29
Sunshade ........................................................................\
...3-29Resetting the sunroof ....................................................3-30
Sunroof open warning ...................................................3-30
Exterior features .................................................3-31
Bonnet........................................................................\
........3-31
Tailgate.....................................................................\
..........3-32
Fuel filler door .................................................................3-34
Instrument cluster................................................3-38
Instrument cluster control ............................................3-39
Gauges and meters .........................................................3-39
Icy Road Warning Light .................................................3-42
Transmission shift indicator .........................................3-43
Manual transmission shift indicator ...........................3-43
Warning and indicator lights ........................................3-45
LCD display messages ..................................................3-58
LCD display (Cluster Type B,C) ..........................3-64
LCD display control.........................................................3-64
LCD display modes ..........................................................3-65
Trip computer and service reminder
(For cluster Type A) ............................................3-72
Trip computer ...................................................................3-72
Service reminder .............................................................3-75
Trip computer (Type B, Type C).........................3-77
Trip modes ........................................................................\
3-77
Head up display (HUD)........................................3-80
Lighting..................................................................3-83
Exterior lights ..................................................................3-83
3
Page 81 of 497
3-3
Convenient features of your vehicle
3
Remote key (if equipped)
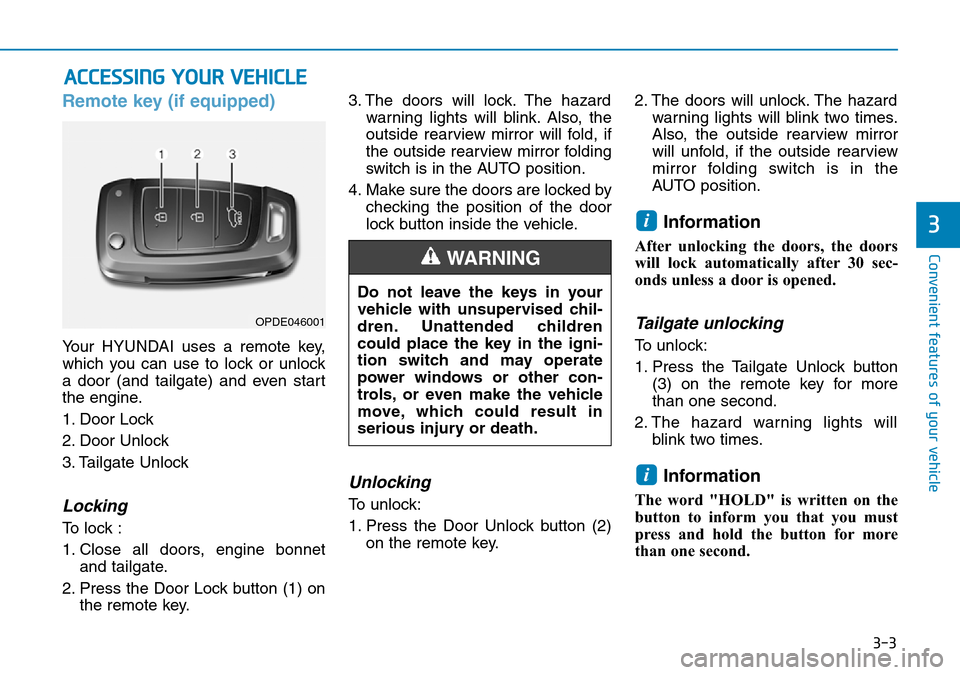
Your HYUNDAI uses a remote key,
which you can use to lock or unlock
a door (and tailgate) and even start
the engine.
1. Door Lock
2. Door Unlock
3. Tailgate Unlock
Locking
To lock :
1. Close all doors, engine bonnetand tailgate.
2. Press the Door Lock button (1) on the remote key. 3. The doors will lock. The hazard
warning lights will blink. Also, the
outside rearview mirror will fold, if
the outside rearview mirror folding
switch is in the AUTO position.
4. Make sure the doors are locked by checking the position of the door
lock button inside the vehicle.
Unlocking
To unlock:
1. Press the Door Unlock button (2)on the remote key. 2. The doors will unlock. The hazard
warning lights will blink two times.
Also, the outside rearview mirror
will unfold, if the outside rearview
mirror folding switch is in the
AUTO position.
Information
After unlocking the doors, the doors
will lock automatically after 30 sec-
onds unless a door is opened.
Tailgate unlocking
To unlock:
1. Press the Tailgate Unlock button(3) on the remote key for more
than one second.
2. The hazard warning lights will blink two times.
Information
The word "HOLD" is written on the
button to inform you that you must
press and hold the button for more
than one second.
i
i
ACCESSING YOUR VEHICLE
Do not leave the keys in your
vehicle with unsupervised chil-
dren. Unattended children
could place the key in the igni-
tion switch and may operate
power windows or other con-
trols, or even make the vehicle
move, which could result in
serious injury or death.
WARNING
OPDE046001
Page 84 of 497
3-6
Convenient features of your vehicle
Smart key (if equipped)
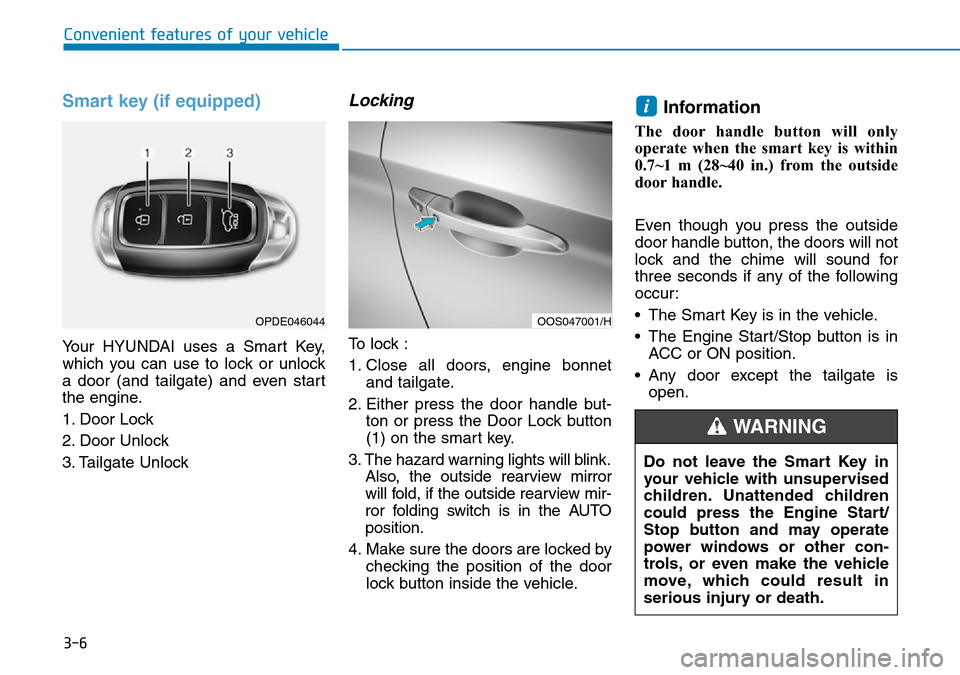
Your HYUNDAI uses a Smart Key,
which you can use to lock or unlock
a door (and tailgate) and even start
the engine.
1. Door Lock
2. Door Unlock
3. Tailgate Unlock
Locking
To lock :
1. Close all doors, engine bonnetand tailgate.
2. Either press the door handle but- ton or press the Door Lock button
(1) on the smart key.
3. The hazard warning lights will blink. Also, the outside rearview mirror
will fold, if the outside rearview mir-
ror folding switch is in the AUTO
position.
4. Make sure the doors are locked by checking the position of the door
lock button inside the vehicle.
Information
The door handle button will only
operate when the smart key is within
0.7~1 m (28~40 in.) from the outside
door handle.
Even though you press the outside
door handle button, the doors will not
lock and the chime will sound for
three seconds if any of the following
occur:
• The Smart Key is in the vehicle.
• The Engine Start/Stop button is inACC or ON position.
• Any door except the tailgate is open.
i
OPDE046044OOS047001/H
Do not leave the Smart Key in
your vehicle with unsupervised
children. Unattended children
could press the Engine Start/
Stop button and may operate
power windows or other con-
trols, or even make the vehicle
move, which could result in
serious injury or death.
WARNING
Page 97 of 497
3-19
Convenient features of your vehicle
3
Horn
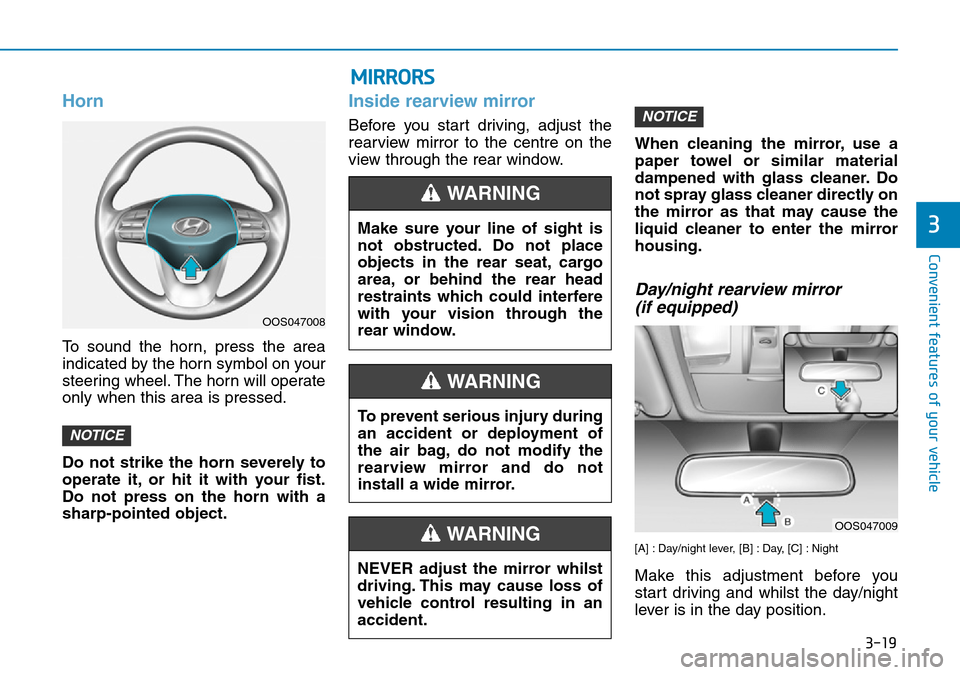
To sound the horn, press the area
indicated by the horn symbol on your
steering wheel. The horn will operate
only when this area is pressed.
Do not strike the horn severely to
operate it, or hit it with your fist.
Do not press on the horn with a
sharp-pointed object.
Inside rearview mirror
Before you start driving, adjust the
rearview mirror to the centre on the
view through the rear window.When cleaning the mirror, use a
paper towel or similar material
dampened with glass cleaner. Do
not spray glass cleaner directly on
the mirror as that may cause the
liquid cleaner to enter the mirror
housing.
Day/night rearview mirror
(if equipped)
[A] : Day/night lever, [B] : Day, [C] : Night
Make this adjustment before you
start driving and whilst the day/night
lever is in the day position.
NOTICE
NOTICE
OOS047008
NEVER adjust the mirror whilst
driving. This may cause loss of
vehicle control resulting in an
accident.
WARNING
MIRRORS
Make sure your line of sight is
not obstructed. Do not place
objects in the rear seat, cargo
area, or behind the rear head
restraints which could interfere
with your vision through the
rear window.
WARNING
To prevent serious injury during
an accident or deployment of
the air bag, do not modify the
rearview mirror and do not
install a wide mirror.
WARNING
OOS047009
Page 98 of 497
3-20
Convenient features of your vehicle
Pull the day/night lever towards you
to reduce glare from the headlamps
of the vehicles behind you during
night driving.
Remember that you lose some rearview clarity in the night position.
Electric Chromic Mirror (ECM) (if equipped)
The electric rearview mirror automati-
cally controls the glare from the head-
lamp of the vehicle behind you in
nighttime or low light driving condi-
tions.
When the engine is running, the
glare is automatically controlled by
the sensor mounted in the rearview
mirror. The sensor detects the light
level around the vehicle, and auto-
matically adjusts to control the head-
lamp glare from vehicles behind you.
Whenever the shift lever is placed in
R (Reverse), the mirror will automat-
ically go to the brightest setting in
order to improve the driver’s view
behind the vehicle.
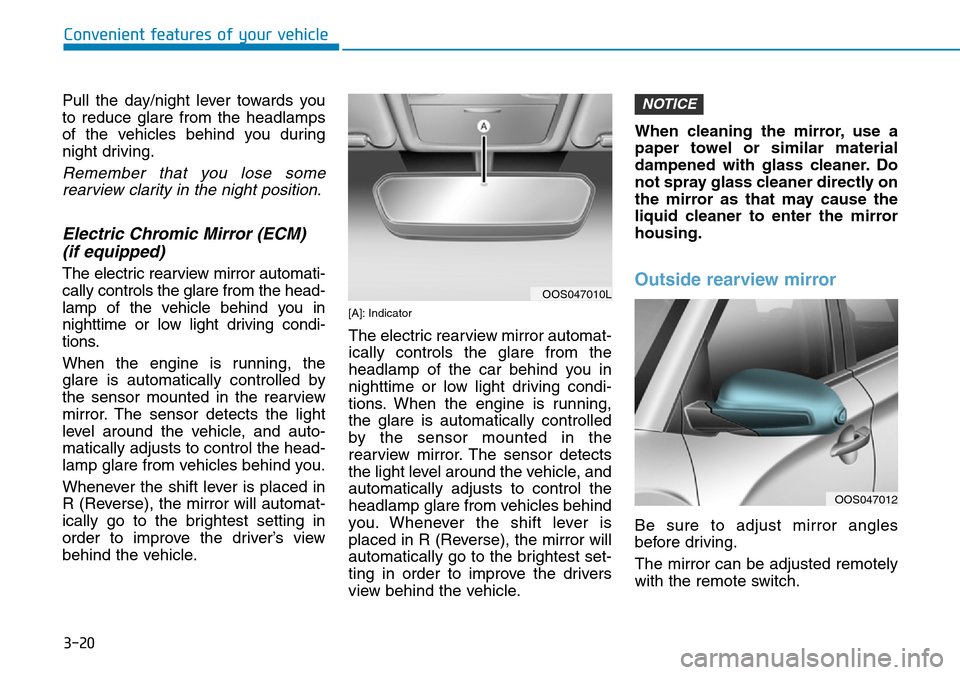
[A]: Indicator
The electric rearview mirror automat-
ically controls the glare from the
headlamp of the car behind you in
nighttime or low light driving condi-
tions. When the engine is running,
the glare is automatically controlled
by the sensor mounted in the
rearview mirror. The sensor detects
the light level around the vehicle, and
automatically adjusts to control the
headlamp glare from vehicles behind
you. Whenever the shift lever is
placed in R (Reverse), the mirror will
automatically go to the brightest set-
ting in order to improve the drivers
view behind the vehicle. When cleaning the mirror, use a
paper towel or similar material
dampened with glass cleaner. Do
not spray glass cleaner directly on
the mirror as that may cause the
liquid cleaner to enter the mirror
housing.
Outside rearview mirror
Be sure to adjust mirror angles
before driving.
The mirror can be adjusted remotely
with the remote switch.
NOTICE
OOS047010L
OOS047012