2018 Hyundai Kona engine
[x] Cancel search: enginePage 86 of 497
3-8
Convenient features of your vehicle
Start-up
You can start the engine without
inserting the key.For detailed infor-
mation refer to the Engine
Start/Stop button in chapter 5.
To prevent damaging the smart
key:
• Keep the smart key away from water or any liquid and fire. If the
inside of the smart key gets
damp (due to drinks or moisture),
or is heated, internal circuit may
malfunction and may void the
vehicle warranty.
• Avoid dropping or throwing the smart key.
• Protect the smart key from extreme temperatures.
Mechanical key
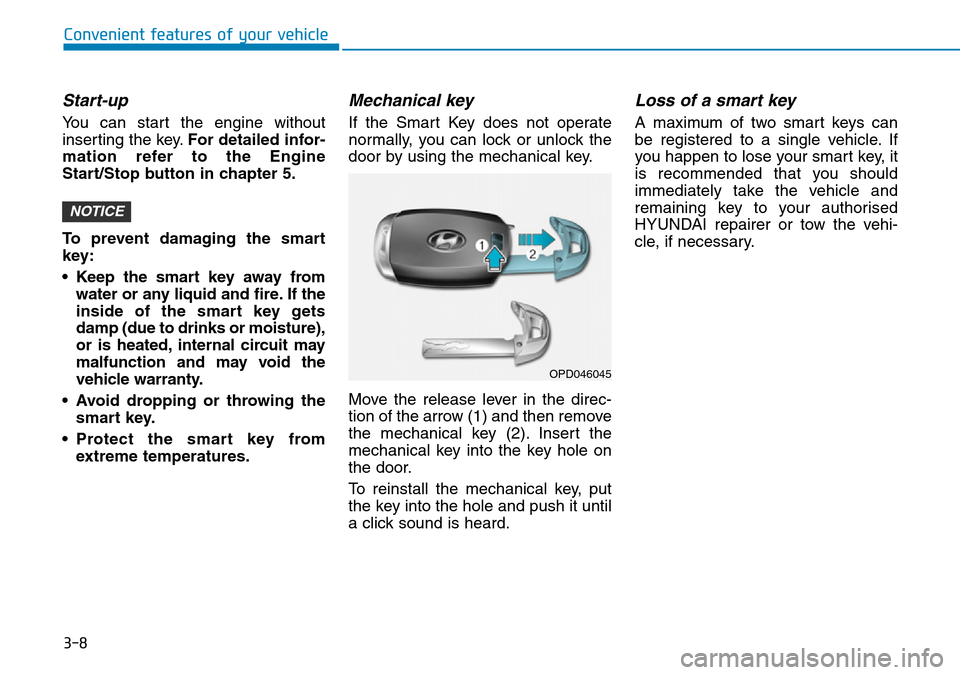
If the Smart Key does not operate
normally, you can lock or unlock the
door by using the mechanical key.
Move the release lever in the direc-
tion of the arrow (1) and then remove
the mechanical key (2). Insert the
mechanical key into the key hole on
the door.
To reinstall the mechanical key, put
the key into the hole and push it until
a click sound is heard.
Loss of a smart key
A maximum of two smart keys can
be registered to a single vehicle. If
you happen to lose your smart key, it
is recommended that you should
immediately take the vehicle and
remaining key to your authorised
HYUNDAI repairer or tow the vehi-
cle, if necessary.
NOTICE
OPD046045
Page 88 of 497
3-10
Convenient features of your vehicle
If you suspect your smart key might
have sustained some damage, or
you feel your smart key is not work-
ing correctly, it is recommended that
you contact a HYUNDAI authorised
repairer.
Information
An inappropriately disposed battery can be harmful to the
environment and human
health. Dispose of the battery
according to your local law(s)
or regulations.
Immobiliser system
(if equipped)
The immobiliser system protects your
vehicle from theft. If an improperly
coded key (or other device) is used,
the engine’s fuel system is disabled.
When the ignition switch is placed in
the ON position, the immobiliser sys-
tem indicator should come on briefly,
then go off. If the indicator starts to
blink, the system does not recognise
the coding of the key.
Place the ignition switch to the
LOCK/OFF position, then place the
ignition switch to the ON position
again.
The system may not recognise your
key’s coding if another immobiliser
key or other metal object (i.e., key
chain) is near the key. The engine
may not start because the metal may
interrupt the transponder signal from
transmitting normally.
If the system repeatedly does not
recognise the coding of the key, it is
recommended that you contact a
authorised HYUNDAI repairer. Do not attempt to alter this system or
add other devices to it. Electrical
problems could result that may make
your vehicle inoperable.
The transponder in your key is an
important part of the immobiliser
system. It is designed to give
years of trouble-free service, how-
ever you should avoid exposure to
moisture, static electricity and
rough handling. Immobiliser sys-
tem malfunction could occur.
NOTICE
iIn order to prevent theft of your
vehicle, do not leave spare keys
anywhere in your vehicle. Your
immobiliser password is a cus-
tomer unique password and
should be kept confidential.
WARNING
Page 94 of 497
3-16
Convenient features of your vehicle
This system helps to protect your
vehicle and valuables. The horn will
sound and the hazard warning lights
will blink continuously if any of the
following occur:
- A door is opened without using the remote key or smart key.
- The tailgate is opened without using the remote key or smart key.
- The engine bonnet is opened.
The alarm continues for 30 seconds,
then the system resets. To turn off
the alarm, unlock the doors with the
remote key or smart key.
The Theft Alarm System automati-
cally sets 30 seconds after you lock
the doors and the tailgate. For the
system to activate, you must lock the
doors and the tailgate from outside
the vehicle with the remote key or
smart key or by pressing the button
on the outside of the door handles
with the smart key in your posses-
sion.
The hazard warning lights will blink
and the chime will sound once to
indicate the system is armed. Once the security system is set, open-
ing any door, the tailgate, or the bon-
net without using the remote key or
smart key will cause the alarm to acti-
vate.
The Theft Alarm System will not set if
the bonnet, the tailgate, or any door
is not fully closed. If the system will
not set, check the bonnet, the tail-
gate, or the doors are fully closed.
Do not attempt to alter this system or
add other devices to it.
Information
• Do not lock the doors until all pas-
sengers have left the vehicle. If the
remaining passenger leaves the
vehicle when the system is armed,
the alarm will be activated.
• If the vehicle is not disarmed with the remote key or smart key, open
the doors by using the mechanical
key and place the ignition switch in
the ON position (for remote key) or
start the engine (for smart key) and
wait for 30 seconds.
• When the system is disarmed but a door or tailgate is not opened within 30
seconds, the system will be rearmed.
Information
Vehicles equipped with a theft alarm
system will have a label attached to
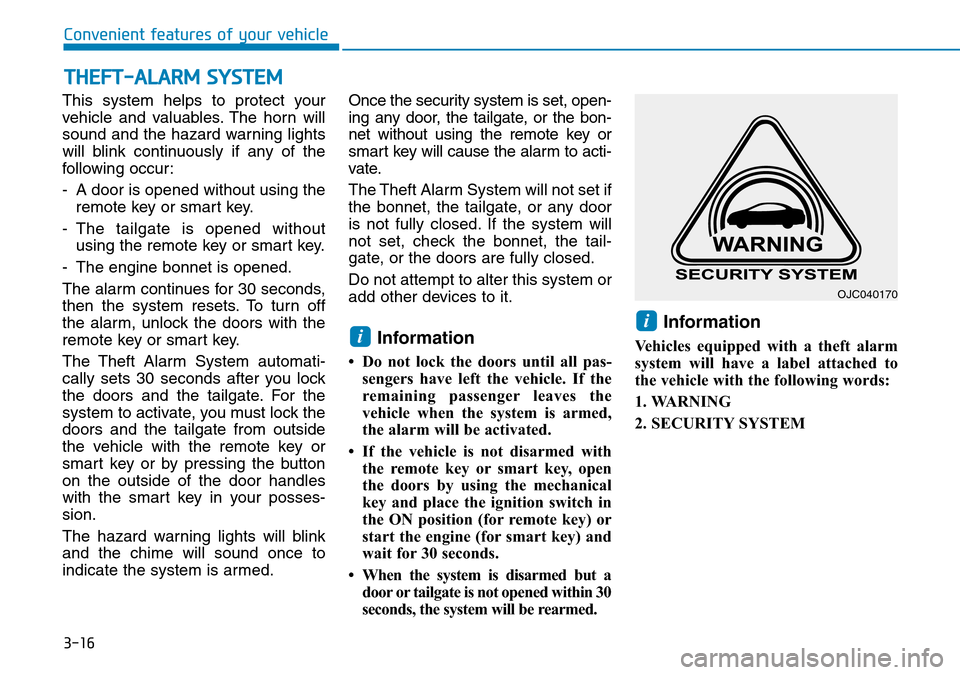
the vehicle with the following words:
1. WARNING
2. SECURITY SYSTEM
ii
THEFT-ALARM SYSTEM
OJC040170
Page 95 of 497
3-17
Convenient features of your vehicle
3
Electric power steering (EPS)
The system assists you with steering
the vehicle. If the engine is off or if
the power steering system becomes
inoperative, the vehicle may still be
steered, but it will require increased
steering effort.
Also, the steering effort becomes
heavier as the vehicle’s speed
increases and becomes lighter as
the vehicle’s speed decreases for
better control of the steering wheel.
Should you notice any change in the
effort required to steer during normal
vehicle operation, we recommend
that the system be checked by a
HYUNDAI authorised repairer.
• If the Electric Power SteeringSystem does not operate nor-
mally, the warning light ( ) will
illuminate or blink on the instru-
ment cluster. The steering wheel
may become difficult to control
or operate. Take your vehicle to a
HYUNDAI authorised repairer
and have the system checked as
soon as possible. • When abnormality is detected in
the electric power steering sys-
tem, to prevent a deadly acci-
dent, the steering assist function
will stop. At this time, the warn-
ing light turns on or blinks on
the cluster. The steering wheel
may become difficult to control
or operate. Have your vehicle
checked immediately, after mov-
ing the vehicle to a safe zone.
Information
The following symptoms may occur
during normal vehicle operation:
• The steering effort may be highimmediately after placing the igni-
tion switch in the ON position.
This happens as the system per-
forms the EPS system diagnostics.
When the diagnostics are complet-
ed, the steering wheel will return to
its normal condition.
• A click noise may be heard from the EPS relay after the ignition switch is
placed in the ON or LOCK/OFF
position.
• Motor noise may be heard when the vehicle is at a stop or at a low driv-
ing speed. • When you operate the steering
wheel in low temperatures, abnor-
mal noise may occur. If the temper-
ature rises, the noise will disappear.
This is a normal condition.
• When the vehicle is stationary, if you turn the steering wheel all the
way to the left or right continuously,
the steering wheel effort increases.
This is not a system malfunction. As
time passes, the steering wheel
effort will return to its normal con-
dition.
Tilt steering / Telescopic steering
i
NOTICE
STEERING WHEEL
Never adjust the steering wheel
whilst driving. You may lose
steering control and cause
severe personal injury, death or
accidents.
WARNING
Page 96 of 497
3-18
Convenient features of your vehicle
Information
After adjustment, sometimes the lock-
release lever may not lock the steering
wheel.
It is not a malfunction. This occurs
when two gears are not engaged cor-
rectly. In this case, adjust the steering
wheel again and then lock the steering
wheel.
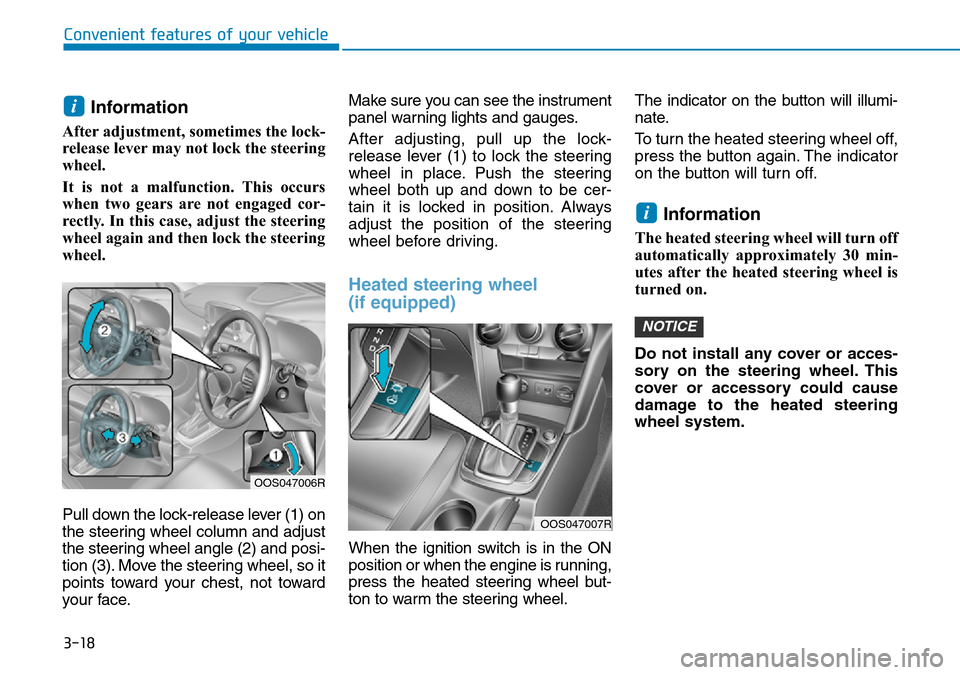
Pull down the lock-release lever (1) on
the steering wheel column and adjust
the steering wheel angle (2) and posi-
tion (3). Move the steering wheel, so it
points toward your chest, not toward
your face.Make sure you can see the instrument
panel warning lights and gauges.
After adjusting, pull up the lock-
release lever (1) to lock the steering
wheel in place. Push the steering
wheel both up and down to be cer-
tain it is locked in position. Always
adjust the position of the steering
wheel before driving.
Heated steering wheel
(if equipped)
When the ignition switch is in the ON
position or when the engine is running,
press the heated steering wheel but-
ton to warm the steering wheel.
The indicator on the button will illumi-
nate.
To turn the heated steering wheel off,
press the button again. The indicator
on the button will turn off.
Information
The heated steering wheel will turn off
automatically approximately 30 min-
utes after the heated steering wheel is
turned on.
Do not install any cover or acces-
sory on the steering wheel. This
cover or accessory could cause
damage to the heated steering
wheel system.
NOTICE
i
i
OOS047006R
OOS047007R
Page 98 of 497
3-20
Convenient features of your vehicle
Pull the day/night lever towards you
to reduce glare from the headlamps
of the vehicles behind you during
night driving.
Remember that you lose some rearview clarity in the night position.
Electric Chromic Mirror (ECM) (if equipped)
The electric rearview mirror automati-
cally controls the glare from the head-
lamp of the vehicle behind you in
nighttime or low light driving condi-
tions.
When the engine is running, the
glare is automatically controlled by
the sensor mounted in the rearview
mirror. The sensor detects the light
level around the vehicle, and auto-
matically adjusts to control the head-
lamp glare from vehicles behind you.
Whenever the shift lever is placed in
R (Reverse), the mirror will automat-
ically go to the brightest setting in
order to improve the driver’s view
behind the vehicle.
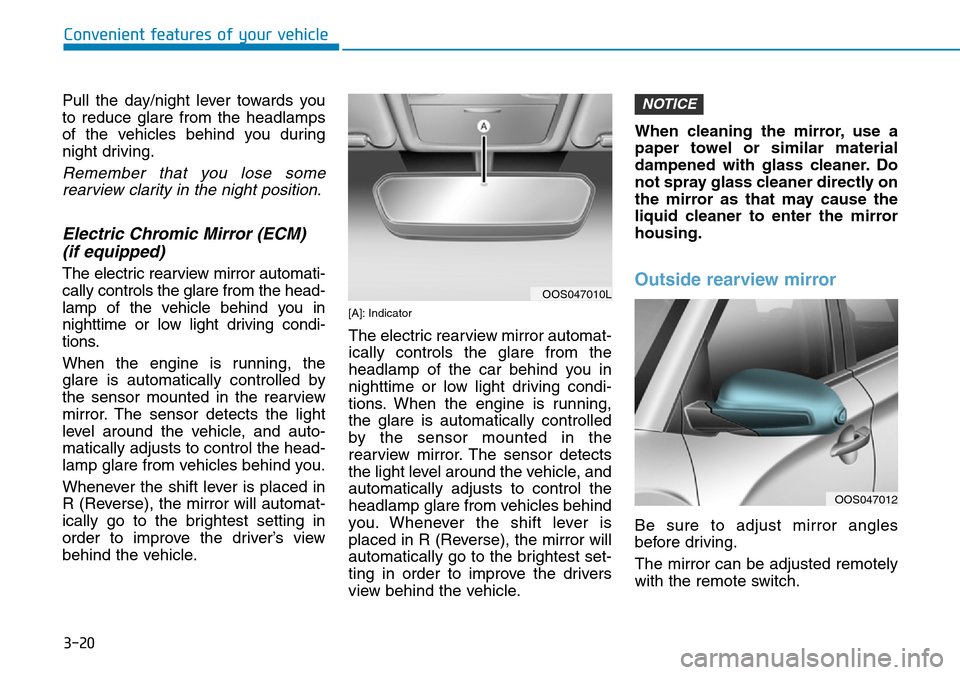
[A]: Indicator
The electric rearview mirror automat-
ically controls the glare from the
headlamp of the car behind you in
nighttime or low light driving condi-
tions. When the engine is running,
the glare is automatically controlled
by the sensor mounted in the
rearview mirror. The sensor detects
the light level around the vehicle, and
automatically adjusts to control the
headlamp glare from vehicles behind
you. Whenever the shift lever is
placed in R (Reverse), the mirror will
automatically go to the brightest set-
ting in order to improve the drivers
view behind the vehicle. When cleaning the mirror, use a
paper towel or similar material
dampened with glass cleaner. Do
not spray glass cleaner directly on
the mirror as that may cause the
liquid cleaner to enter the mirror
housing.
Outside rearview mirror
Be sure to adjust mirror angles
before driving.
The mirror can be adjusted remotely
with the remote switch.
NOTICE
OOS047010L
OOS047012
Page 100 of 497
3-22
Convenient features of your vehicle
• The mirrors stop moving when they reach the maximum adjust-
ing angles, but the motor contin-
ues to operate whilst the switch
is pressed. Do not press the
switch longer than necessary,
the motor may be damaged.
• Do not attempt to adjust the out- side rearview mirror by hand
otherwise the motor may be
damaged.
Folding the outside rearviewmirror
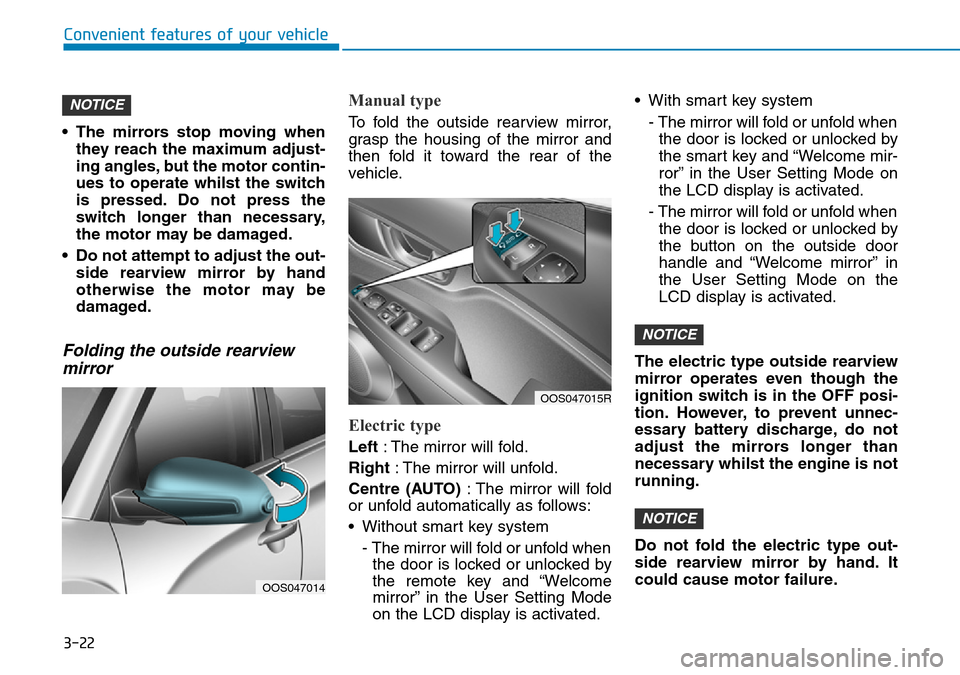
Manual type
To fold the outside rearview mirror,
grasp the housing of the mirror and
then fold it toward the rear of the
vehicle.
Electric type
Left : The mirror will fold.
Right : The mirror will unfold.
Centre (AUTO) : The mirror will fold
or unfold automatically as follows:
• Without smart key system
- The mirror will fold or unfold whenthe door is locked or unlocked by
the remote key and “Welcome
mirror” in the User Setting Mode
on the LCD display is activated. • With smart key system
- The mirror will fold or unfold whenthe door is locked or unlocked by
the smart key and “Welcome mir-
ror” in the User Setting Mode on
the LCD display is activated.
- The mirror will fold or unfold when the door is locked or unlocked by
the button on the outside door
handle and “Welcome mirror” in
the User Setting Mode on the
LCD display is activated.
The electric type outside rearview
mirror operates even though the
ignition switch is in the OFF posi-
tion. However, to prevent unnec-
essary battery discharge, do not
adjust the mirrors longer than
necessary whilst the engine is not
running.
Do not fold the electric type out-
side rearview mirror by hand. It
could cause motor failure.
NOTICE
NOTICE
NOTICE
OOS047014
OOS047015R
Page 104 of 497
3-26
Convenient features of your vehicle
Power window lock switch
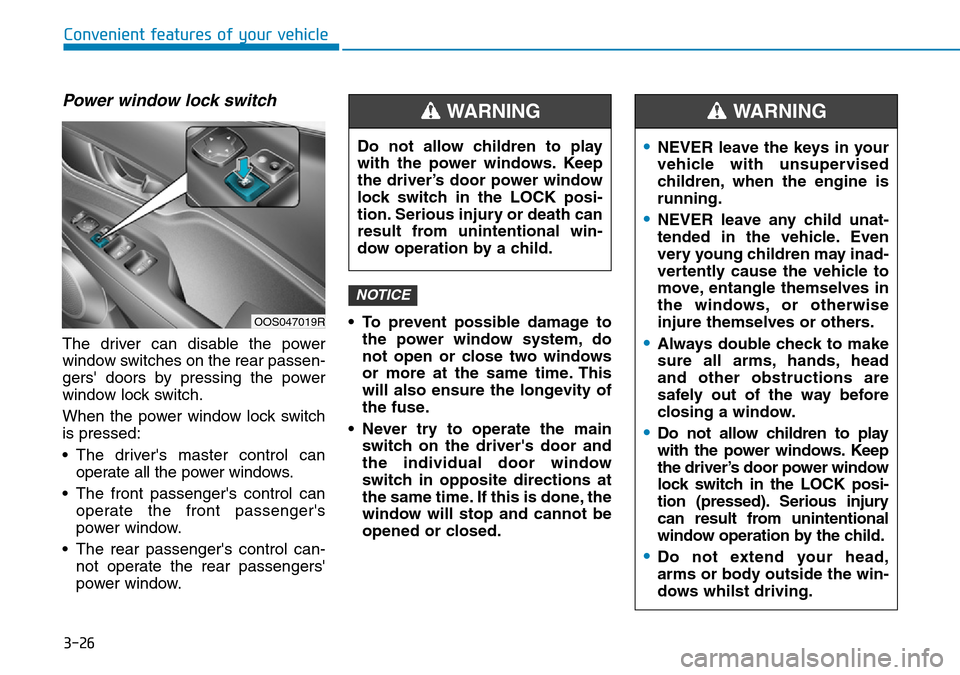
The driver can disable the power
window switches on the rear passen-
gers' doors by pressing the power
window lock switch.
When the power window lock switch
is pressed:
• The driver's master control canoperate all the power windows.
• The front passenger's control can operate the front passenger's
power window.
• The rear passenger's control can- not operate the rear passengers'
power window. • To prevent possible damage to
the power window system, do
not open or close two windows
or more at the same time. This
will also ensure the longevity of
the fuse.
• Never try to operate the main switch on the driver's door and
the individual door window
switch in opposite directions at
the same time. If this is done, the
window will stop and cannot be
opened or closed.
NOTICE
Do not allow children to play
with the power windows. Keep
the driver’s door power window
lock switch in the LOCK posi-
tion. Serious injury or death can
result from unintentional win-
dow operation by a child.
WARNING
OOS047019R
•NEVER leave the keys in your
vehicle with unsupervised
children, when the engine is
running.
•NEVER leave any child unat-
tended in the vehicle. Even
very young children may inad-
vertently cause the vehicle to
move, entangle themselves in
the windows, or otherwise
injure themselves or others.
•Always double check to make
sure all arms, hands, head
and other obstructions are
safely out of the way before
closing a window.
•Do not allow children to play
with the power windows. Keep
the driver’s door power window
lock switch in the LOCK posi-
tion (pressed). Serious injury
can result from unintentional
window operation by the child.
•Do not extend your head,
arms or body outside the win-
dows whilst driving.
WARNING