2018 Hyundai Elantra ECU
[x] Cancel search: ECUPage 435 of 526

7-17
7
Maintenance
E
EX
X P
PL
LA
A N
N A
AT
TI
IO
O N
N
O
O F
F
S
S C
C H
H E
ED
D U
U L
LE
E D
D
M
M A
AI
IN
N T
TE
EN
N A
AN
N C
CE
E
I
IT
T E
EM
M S
S
Engine Oil and Filter
The engine oil and filter should be
changed at the intervals specified in the
maintenance schedule. If the car is being
driven in severe conditions, more fre-
quent oil and filter changes are required.
Drive Belts
Inspect all drive belts for evidence of
cuts, cracks, excessive wear or oil satu-
ration and replace if necessary. Drive
belts should be checked periodically for
proper tension and adjusted as neces-
sary.
Fuel Filter
A clogged-up fuel filter may limit the vehi-
cle driving speed, damage the emission
system, and cause the hard starting.
When a considerable amount of foreign
substances are accumulated in the fuel
tank, the fuel filter should be replaced.
Upon installing a new fuel filter, operate
the engine for several minutes, and
check the connections for any leakages.
Fuel filters should be installed by an
authorized HYUNDAI dealer.
Fuel Lines, Fuel Hoses and
Connections
Check the fuel lines, fuel hoses and con-
nections for leakage and damage. Have
an authorized HYUNDAI dealer replace
any damaged or leaking parts immedi-
ately.
Vapor Hose and Fuel Filler
Cap
The vapor hose and fuel filler cap should
be inspected at those intervals specified
in the maintenance schedule. Make sure
a new vapor hose or fuel filler cap is cor-
rectly replaced.
Vacuum Crankcase Ventilation
Hoses (if equipped)
Inspect the surface of hoses for evidence
of heat and/or mechanical damage. Hard
and brittle rubber, cracking, tears, cuts,
abrasions, and excessive swelling indi-
cate deterioration. Particular attention
should be paid to examine those hose
surfaces nearest to high heat sources,
such as the exhaust manifold.
Inspect the hose routing to assure that
the hoses do not come in contact with
any heat source, sharp edges or moving
component which might cause heat dam-
age or mechanical wear. Inspect all hose connections, such as
clamps and couplings, to make sure they
are secure, and that no leaks are pres-
ent. Hoses should be replaced immedi-
ately if there is any evidence of deterio-
ration or damage.
Air Cleaner Filter
A genuine HYUNDAI air cleaner filter is
recommended when the filter is
replaced.
Spark Plugs
Make sure to install new spark plugs of
the correct heat range.
Cooling System
Check cooling system components, such
as radiator, coolant reservoir, hoses and
connections for leakage and damage.
Replace any damaged parts.
Engine Coolant
The coolant should be changed at the
intervals specified in the maintenance
schedule.
Page 443 of 526

7-25
7
Maintenance
A
AI
IR
R
C
C L
LE
E A
A N
N E
ER
R
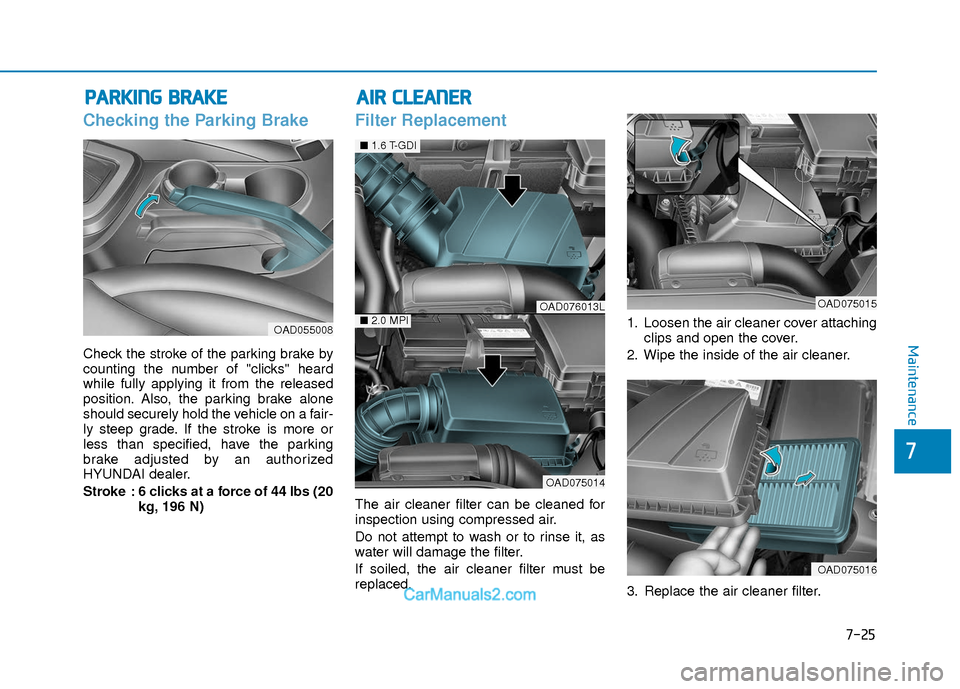
Checking the Parking Brake
Check the stroke of the parking brake by
counting the number of "clicks" heard
while fully applying it from the released
position. Also, the parking brake alone
should securely hold the vehicle on a fair-
ly steep grade. If the stroke is more or
less than specified, have the parking
brake adjusted by an authorized
HYUNDAI dealer.
Stroke : 6 clicks at a force of 44 lbs (20
kg, 196 N)
Filter Replacement
The air cleaner filter can be cleaned for
inspection using compressed air.
Do not attempt to wash or to rinse it, as
water will damage the filter.
If soiled, the air cleaner filter must be
replaced. 1. Loosen the air cleaner cover attaching
clips and open the cover.
2. Wipe the inside of the air cleaner.
3. Replace the air cleaner filter.
OAD055008
P
P A
A R
RK
K I
IN
N G
G
B
B R
RA
A K
KE
E
OAD075015OAD076013L
OAD075014
■ 1.6 T-GDI
■2.0 MPI
OAD075016
Page 449 of 526

7-31
7
Maintenance
When you do not use the vehicle fora long time in a low temperature
area, disconnect the battery and
keep it indoors.
Always charge the battery fully to prevent battery case damage in low
temperature areas.
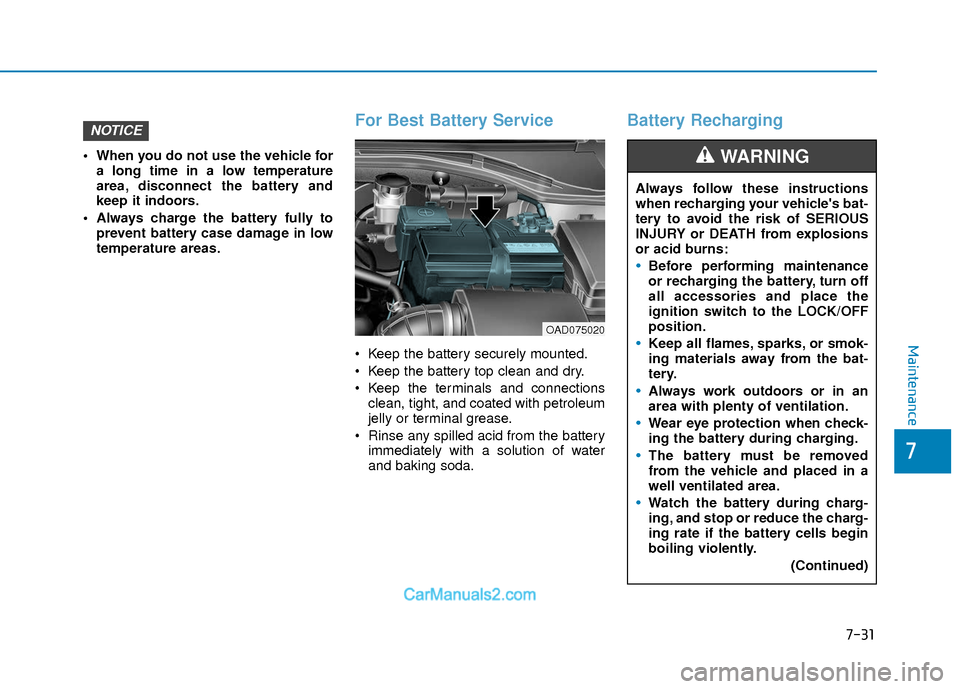
For Best Battery Service
Keep the battery securely mounted.
Keep the battery top clean and dry.
Keep the terminals and connectionsclean, tight, and coated with petroleum
jelly or terminal grease.
Rinse any spilled acid from the battery immediately with a solution of water
and baking soda.
Battery RechargingNOTICE
Always follow these instructions
when recharging your vehicle's bat-
tery to avoid the risk of SERIOUS
INJURY or DEATH from explosions
or acid burns:
Before performing maintenance
or recharging the battery, turn off
all accessories and place the
ignition switch to the LOCK/OFF
position.
Keep all flames, sparks, or smok-
ing materials away from the bat-
tery.
Always work outdoors or in an
area with plenty of ventilation.
Wear eye protection when check-
ing the battery during charging.
The battery must be removed
from the vehicle and placed in a
well ventilated area.
Watch the battery during charg-
ing, and stop or reduce the charg-
ing rate if the battery cells begin
boiling violently.
(Continued)
WARNING
OAD075020
Page 469 of 526

7-51
7
Maintenance
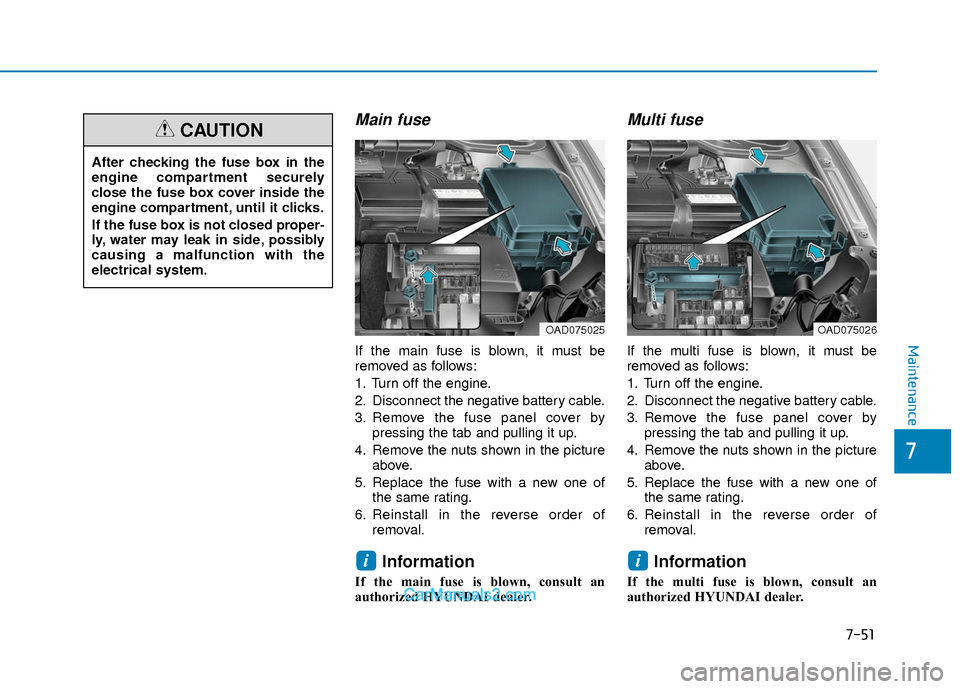
Main fuse
If the main fuse is blown, it must be
removed as follows:
1. Turn off the engine.
2. Disconnect the negative battery cable.
3. Remove the fuse panel cover bypressing the tab and pulling it up.
4. Remove the nuts shown in the picture above.
5. Replace the fuse with a new one of the same rating.
6. Reinstall in the reverse order of removal.
Information
If the main fuse is blown, consult an
authorized HYUNDAI dealer.
Multi fuse
If the multi fuse is blown, it must be
removed as follows:
1. Turn off the engine.
2. Disconnect the negative battery cable.
3. Remove the fuse panel cover bypressing the tab and pulling it up.
4. Remove the nuts shown in the picture above.
5. Replace the fuse with a new one of the same rating.
6. Reinstall in the reverse order of removal.
Information
If the multi fuse is blown, consult an
authorized HYUNDAI dealer.
ii
After checking the fuse box in the
engine compartment securely
close the fuse box cover inside the
engine compartment, until it clicks.
If the fuse box is not closed proper-
ly, water may leak in side, possibly
causing a malfunction with the
electrical system.
CAUTION
OAD075025OAD075026
Page 473 of 526

7-55
7
Maintenance
Fuse Name Fuse rating Protected Component
PDM 2 7.5A Smart Key Control Module, Immobilizer Module
START 7.5A W/O Smart Key : Ignition Switch, Transmission Range Switch, Ignition Lock Switch
With Smart Key :Transmission Range Switch, Smart Key Control Module, PCM
A/CON 1 7.5A Ionizer, A/C Control Module, E/R Junction Block (A/Con Relay, Blower Relay)
AIR BAG 15A SRS Control Module, Passenger Occupant Detection Sensor
MODULE 3 10A Stop Lamp Switch, BCM, Sport Mode Switch, Driver/Passenger Door Module
IG1 25A PCB Block (Fuse : ABS3, ECU5, TCU2)
PDM 1 15A Smart Key Control Module
HEATED STEERING 15A BCM
MODULE 6 7.5A BCM, Smart Key Control Module
MODULE 5 10A Crash Pad Switch, Electro Chromic Mirror, A/T Shift Lever Indicator, A/V & Navigation Head Unit,
Audio, A/C Control Module, Console Switch LH/RH, Head Lamp LH/RH, Front Seat Warmer Control
Module, Rear Seat Warmer Control Module, Driver IMS Module
AEB 10A AEB Module
A/CON 2 10A E/R Junction Block (Blower Relay), Blower Motor, Blower Resistor, A/C Control Module
WIPER 1 25A Wiper Motor, PCB Block (Front Wiper (Low) Relay)
WASHER 15A Multifunction Switch
MODULE 4 10A DBL Unit, Lane Departure Warning System, Parking Assist Buzzer, BCM, Blind Spot Detection Radar
LH/RH
SPARE 2 10A -
MODULE 2 10A E/R Junction Block (Power Outlet Relay), USB Charging Connector, Smart Key Control Module,
BCM, Audio, A/V & Navigation Head Unit, CD Player, Power Outside Mirror Switch, AMP
Page 475 of 526

7-57
7
Maintenance
Fuse NameFuse rating Protected Component
MULTI
FUSE-1 MAIN 180A Fuse : ABS1, ABS2, B/ALARM HORN, POWER OUTLET
MDPS 80A MDPS Unit
MULTI
FUSE-2
B+5 60A PCB Block (Fuse : ECU3, ECU4, HORN, FUEL PUMP, ENGINE CONTROL RELAY)
B+2 60A Smart Junction Block (Fuse : S/HEATER FRT, ARISU)
B+3 60A Smart Junction Block (Fuse : ARISU, IPS)
B+4 50A Smart Junction Block (Fuse : S/HEATER FRT, P/WINDOW LH, P/WINDOW RH, TRUNK,
SUNROOF, AMP, P/SEAT DRV)
COOLING FAN 1 60A Not Used
REAR HEATED 50A Rear Heated Relay
BLOWER 40A Blower Relay
IG1 40A Ignition Switch, E/R Junction Block (PDM #2, #3 (ACC/IG1) Relay)
IG2 40A Ignition Switch, E/R Junction Block (PDM #4 (IG2) Relay, START Relay)
FUSE
B/UP LAMP 10A Electro Chromic Mirror, Rear Combination Lamp (IN) LH/RH, Smart Junction Block (IPS
Control Module)
POWER OUTLET 3 20A Cigarette Lighter
POWER OUTLET 2 20A Front Power Outlet
H/LAMP HI 10A Not Used
TCU 1 15A Not Used
VACUUM PUMP 1 20A Not Used
A/CON 10A A/Con Relay
COOLING FAN 2 40A Cooling Fan 1/2 Relay
B+1 40A Smart Junction Block (Leak Current Autocut Device, Fuse : BRAKE SWITCH, MODULE 1,
DR LOCK, PDM 1, PDM 2)
DCT1 40A Not Used
Page 476 of 526

7-58
Maintenance
Fuse NameFuse rating Protected Component
FUSE
DCT2 40A Not Used
B/ALARM HORN 10A B/Alarm Horn Relay
S/FUEL PUPMP 15A Not Used
ABS 1 40A ESC Module, Multipurpose Check Connector
ABS 2 30A ESC Module, Multipurpose Check Connector
POWER OUTLET 1 40A Power Outlet Relay
Fuse Name Fuse rating Protected Component
ECU 5 10A PCM
VACUUM PUMP 15A Not Used
SPARE 20A -
ABS 3 10A ESC Module, Multipurpose Check Connector
TCU 2 15A Transmission Range Switch, E/R Junction Block (Fuse : B/UP LAMP)
ECU 4 15A PCM
ECU 3 15A PCM
FUEL PUMP 20A Fuel Pump Relay
SENAOR 2 10A Canister Close Valve, Purge Control Solenoid Valve, Variable Intake Solenoid Valve, E/R Junction
Block (Cooling Fan 1/2 Relay)
ECU2 10A Not Used
ECU1 20A PCM
INJECTOR 15A Injector #1/#2/#3/#4
SENSOR 1 15A Oxygen Sensor (UP/DOWN)
IGN COIL 20A Ignition Coil #1/#2/#3/#4
SENSOR 3 10A Oil Control Valve #1/#2/#3, Electronic Thermo Sensor, Fuel Pump Relay
HORN 20A Horn Relay