2018 HONDA ODYSSEY buttons
[x] Cancel search: buttonsPage 524 of 763
522
Features
CabinTalkTM *
Your audio system allows you or the front passenger voices to be broadcast to the
second and third row seat’s passengers using the rear speakers and/or headphones.
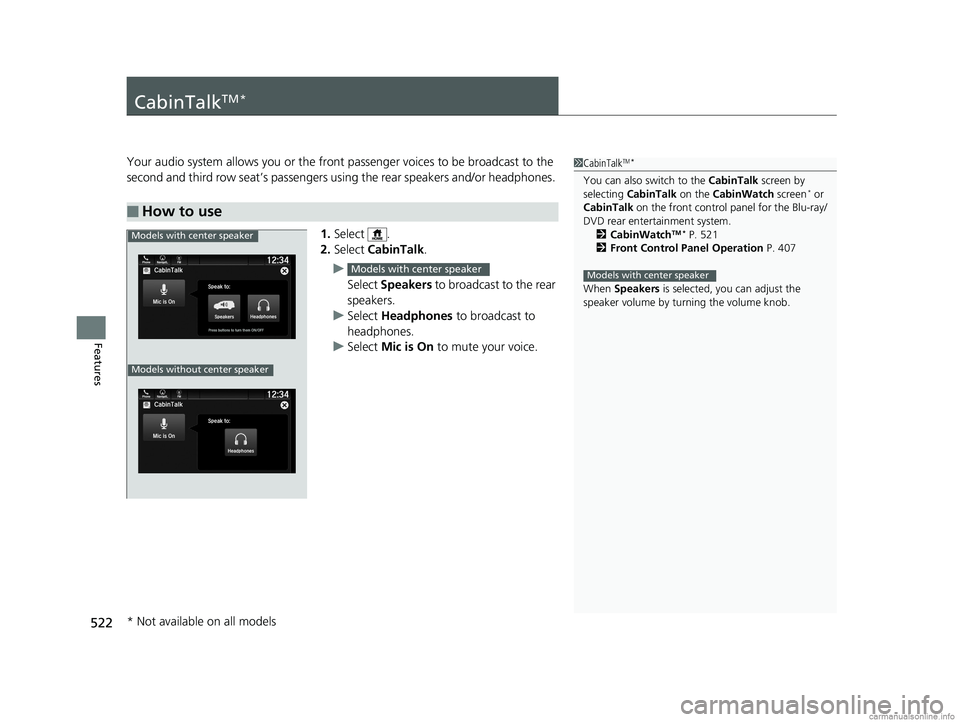
1. Select .
2. Select CabinTalk .
u Select Speakers to broadcast to the rear
speakers.
u Select Headphones to broadcast to
headphones.
u Select Mic is On to mute your voice.
■How to use
1CabinTalkTM *
You can also switch to the CabinTalk screen by
selecting CabinTalk on the CabinWatch screen* or
CabinTalk on the front control panel for the Blu-ray/
DVD rear entertainment system. 2 CabinWatch
TM * P. 521
2 Front Control Panel Operation P. 407
When Speakers is selected, you can adjust the
speaker volume by tu rning the volume knob.
Models with center speaker
Models with center speaker
Phone FMCabinTalk
Mic is On
Speak to:
HeadphonesPress buttons to turn them ON/OFF
12:34Navigati..
Models without center speaker
Models with center speaker
* Not available on all models
18 US ODYSSEY-31THR6010.book 522 ページ 2018年12月6日 木曜日 午後4時18分
Page 546 of 763
544
uuWhen Driving uShifting
Driving
Shifting
Change the gear position in acco rdance with your driving needs.
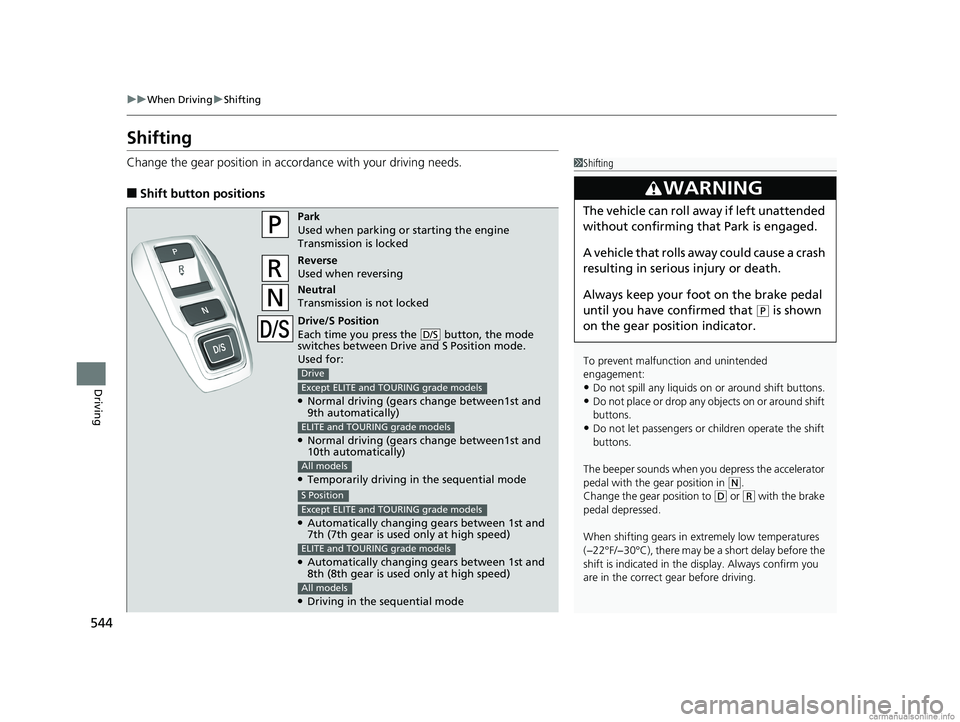
■Shift button positions
1Shifting
To prevent malfunc tion and unintended
engagement:
•Do not spill any liquids on or around shift buttons.
•Do not place or drop any objects on or around shift
buttons.
•Do not let passengers or ch ildren operate the shift
buttons.
The beeper sounds when you depress the accelerator
pedal with the gear position in
( N.
Change the gear position to ( D or (R with the brake
pedal depressed.
When shifting gears in extremely low temperatures
(−22°F/−30°C), there may be a short delay before the
shift is indicated in the di splay. Always confirm you
are in the correct gear before driving.
3WARNING
The vehicle can roll aw ay if left unattended
without confirming that Park is engaged.
A vehicle that rolls away could cause a crash
resulting in serious injury or death.
Always keep your foot on the brake pedal
until you have confirmed that
( P is shown
on the gear position indicator.
Park
Used when parking or starting the engine
Transmission is locked
Reverse
Used when reversing
Neutral
Transmission is not locked
Drive/S Position
Each time you press the button, the mode
switches between Drive and S Position mode.
Used for:
●Normal driving (gears change between1st and
9th automatically)
●Normal driving (gears change between1st and
10th automatically)
●Temporarily driving in the sequential mode
D/S
Drive
Except ELITE and TOURING grade models
ELITE and TOURING grade models
All models
●Automatically changing gears between 1st and
7th (7th gear is used only at high speed)
●Automatically changing gears between 1st and
8th (8th gear is used only at high speed)
●Driving in the sequential mode
S Position
Except ELITE and TOURING grade models
ELITE and TOURING grade models
All models
18 US ODYSSEY-31THR6010.book 544 ページ 2018年12月6日 木曜日 午後4時18分
Page 573 of 763
Continued571
uuWhen Driving uAdaptive Cruise Control (ACC)*
Driving
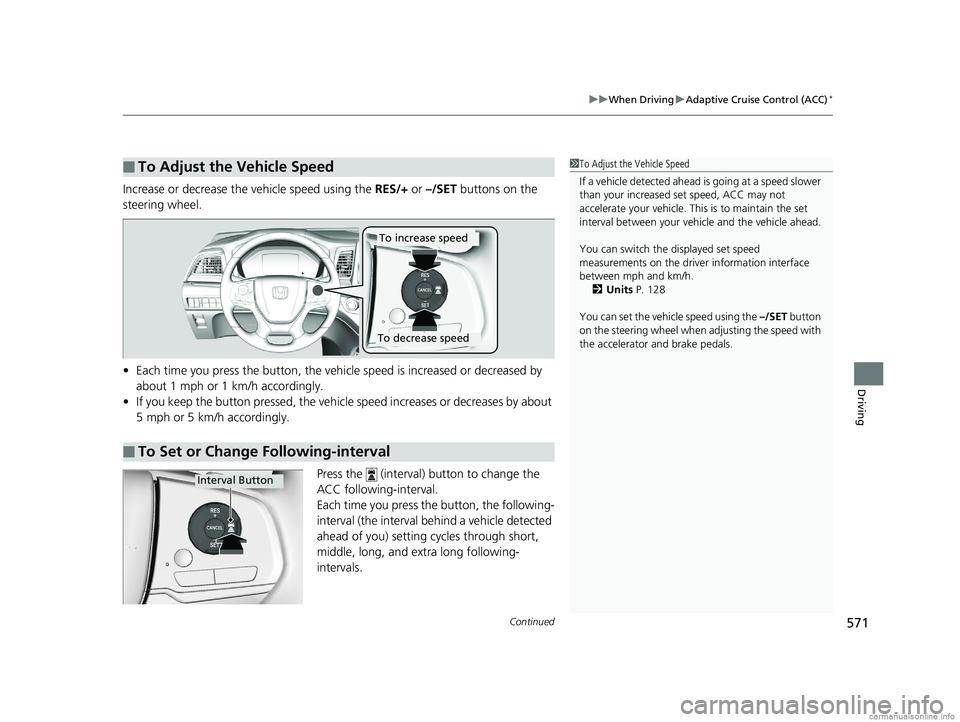
Increase or decrease the vehicle speed using the RES/+ or –/SET buttons on the
steering wheel.
• Each time you press the button, the vehicl e speed is increased or decreased by
about 1 mph or 1 km/h accordingly.
• If you keep the button pressed, the vehicle speed increases or decreases by about
5 mph or 5 km/h accordingly.
Press the (interval) button to change the
ACC following-interval.
Each time you press the button, the following-
interval (the interval behind a vehicle detected
ahead of you) setting cycles through short,
middle, long, and extra long following-
intervals.
■To Adjust the Vehicle Speed1 To Adjust the Vehicle Speed
If a vehicle detected ahead is going at a speed slower
than your increased set speed, ACC may not
accelerate your vehicle. This is to maintain the set
interval between your vehi cle and the vehicle ahead.
You can switch the displayed set speed
measurements on the driver information interface
between mph and km/h. 2 Units P. 128
You can set the vehicle speed using the –/SET button
on the steering wheel when adjusting the speed with
the accelerator and brake pedals.
■To Set or Change Following-interval
To increase speed
To decrease speed
Interval Button
18 US ODYSSEY-31THR6010.book 571 ページ 2018年12月6日 木曜日 午後4時18分
Page 595 of 763

593
uuWhen Driving uTire Pressure Monitoring System (TPMS) with Tire Fill Assist
Driving
To select the tire pressure monitor, please
follow the following st eps using the buttons
on the steering wheel.
1. Set the power mode to ON.
2. Press the (home) button.
3. Press the / button repeatedly until
Maintenance appears.
4. Press the ENTER button and select Tire
Pressure by pressing the / button.
5. Press the ENTER button and the tire
pressure appears on th e driver information
interface.
The pressure for each tire is displayed in psi.
Tire Pressures Low is displayed when a tire
has significantly low pressure. The specific tire
is displayed on the screen.
■Tire Pressure Monitor1 Tire Pressure Monitor
The pressure displayed on the driver information
interface can be slightly different from the actual
pressure as measured by a gauge. If there is a
significant di fference between the two values, or if
the Low Tire Pressure/TPMS indicator and the
message on the driver info rmation interface do not
go off after you have inflated the tire to the specified
pressure, have the system checked by a dealer.
Tire Pressure Monitor Problem may appear if you
drive with the compact spare tire, or there is a
problem with the TPMS.
34
34
18 US ODYSSEY-31THR6010.book 593 ページ 2018年12月6日 木曜日 午後4時18分
Page 686 of 763
684
Maintenance
Remote Transmitter Care
Replacing the Button Battery
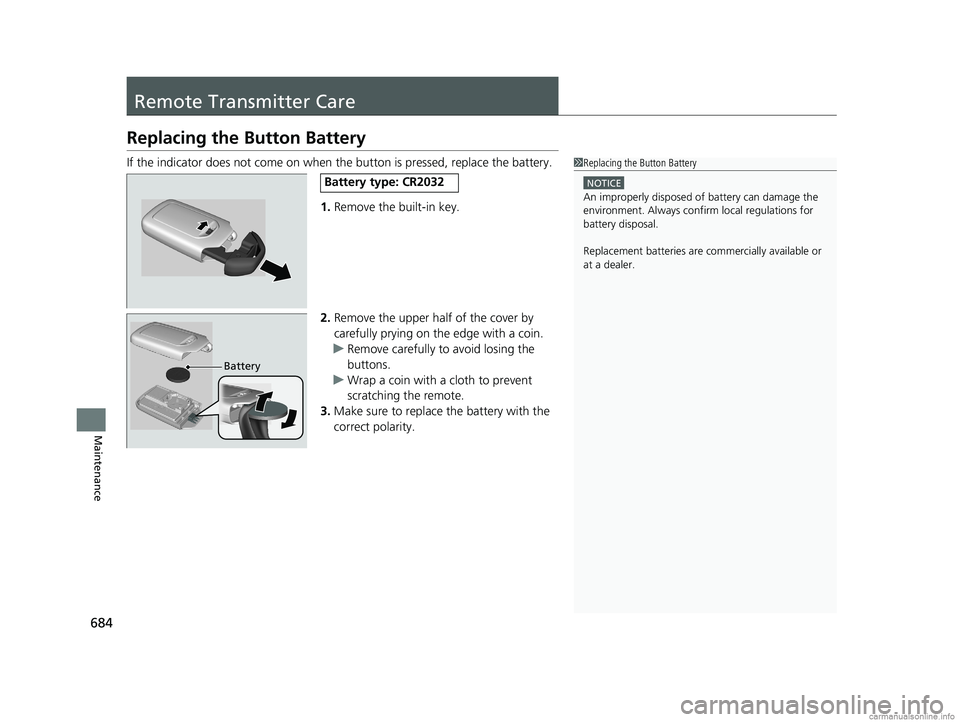
If the indicator does not come on when the button is pressed, replace the battery.
1. Remove the built-in key.
2. Remove the upper half of the cover by
carefully prying on the edge with a coin.
u Remove carefully to avoid losing the
buttons.
u Wrap a coin with a cloth to prevent
scratching the remote.
3. Make sure to replace the battery with the
correct polarity.1 Replacing the Button Battery
NOTICE
An improperly disposed of battery can damage the
environment. Always conf irm local regulations for
battery disposal.
Replacement batteries are commercially available or
at a dealer.
Battery type: CR2032
Battery
18 US ODYSSEY-31THR6010.book 684 ページ 2018年12月6日 木曜日 午後4時18分
Page 687 of 763
685Continued
Maintenance
Remote Control and Wireless Headphone Care*
Replacing the Battery
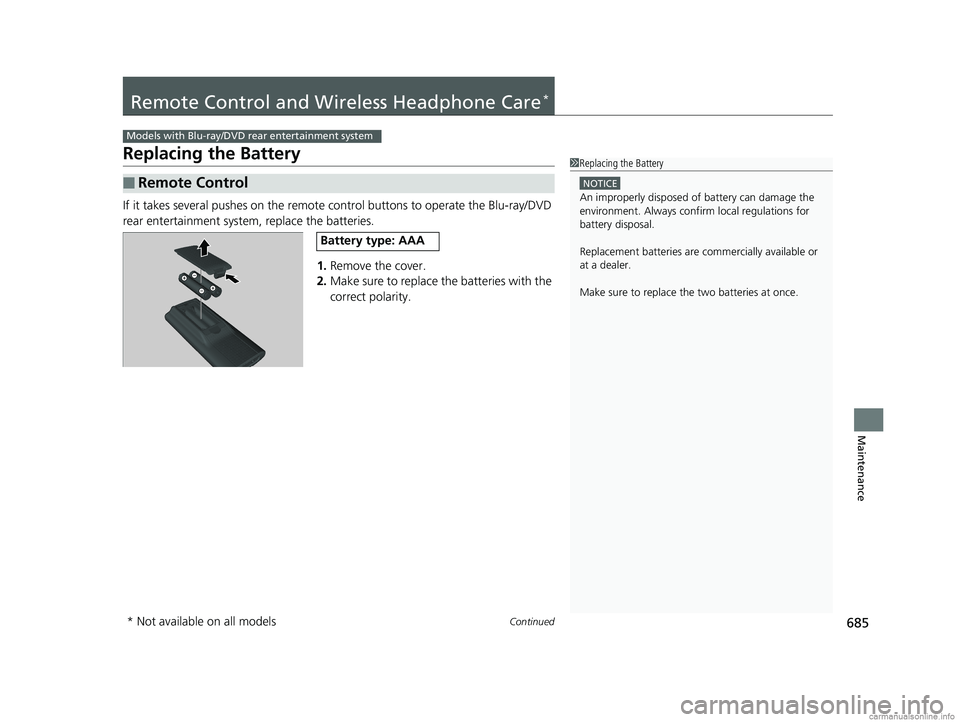
If it takes several pushes on the remote control buttons to operate the Blu-ray/DVD
rear entertainment system, replace the batteries.
1.Remove the cover.
2. Make sure to replace the batteries with the
correct polarity.
■Remote Control
Models with Blu-ray/DVD rear entertainment system
1Replacing the Battery
NOTICE
An improperly disposed of battery can damage the
environment. Always conf irm local regulations for
battery disposal.
Replacement batteries are commercially available or
at a dealer.
Make sure to replace the two batteries at once.
Battery type: AAA
* Not available on all models
18 US ODYSSEY-31THR6010.book 685 ページ 2018年12月6日 木曜日 午後4時18分
Page 711 of 763

709
uuEngine Does Not Start uIf the Remote Battery is Weak
Handling the Unexpected
If the Remote Battery is Weak
If the beeper sounds, the To Start, Hold Remote Near Start Button message
appears on the driver information interface, the ENGINE START/STOP button
flashes, and the engine won’t start. Start the engine as follows:
1.Touch the center of the ENGINE START/
STOP button with the H logo on the
remote while the ENGINE START/STOP
button is flashing. The buttons on the
remote should be facing you.
u The ENGINE START/STOP button
flashes for about 30 seconds.
2. Depress the brake pedal and press the
ENGINE START/STOP button within 10
seconds after the beeper sounds and the
ENGINE START/STOP button changes
from flashing to on.
u If you don’t depress the pedal, the mode
will change to ACCESSORY.
18 US ODYSSEY-31THR6010.book 709 ページ 2018年12月6日 木曜日 午後4時18分
Page 756 of 763
754
Index
H
Halogen Bulbs................................... 658, 661
Handling the Unexpected ........................ 697
HandsFreeLink® (HFL)....................... 470, 495
Automatic Import of Ce llular Phonebook and
Call History .................................... 484, 504
Automatic Transferring ............................ 503
Caller’s ID Information ............................. 482
Displaying Messages ................................ 514
Favorite Contacts ..................................... 505
HFL Buttons ..................................... 470, 495
HFL Menus ...................................... 472, 498
HFL Status Display............................ 471, 497
In Case of Emergency .............................. 518
Limitations fo r Manual Operation .... 471, 497
Making a Call .................................. 489, 507
Options During a Call ...................... 494, 510
Phone Setup .................................... 476, 500
Receiving a Call ............................... 493, 510
Receiving a Text Message ........................ 512
Ring Tone ........................................ 482, 503
Selecting a Phone .................................... 513
Speed Dial ............................................... 485
To Clear the System ................................. 483
To Set Up a Text Message Options ........... 511
Hazard Warning Button ............................... 4
HD Radio
TM................................................ 321
HDMITM Port .............................................. 399
Head Restraints ......................................... 212 Headlights
................................................. 189
Aiming .................................................... 658
Auto High-Beam ..................................... 194
Automatic Operation............................... 190
Dimming ......................................... 189, 193
Operating................................................ 189
Heated Steering Wheel ............................ 241
Heated Windshield Button ...................... 202
Heaters (Seat) ................................... 242, 243
HFL (HandsFreeLink ®)....................... 470, 495
High Beam Indicator .................................. 92
HomeLink ® Universal Transceiver ............ 467
Honda App License Agreement .............. 376
HondaLink ®............................................... 349
HondaVAC
TM............................................. 245
I
Identification Numbers Engine and Transmission ......................... 740
Vehicle Identification ............................... 740
Illumination Control Knob ....................................................... 200
Immobilizer System .................................. 179
Indicator.................................................... 93
Indicators .................................................... 84
Adaptive Cruise Control (ACC) (Amber)..... 98
Adaptive Cruise Control (ACC) (Green) .............................................. 98, 99 Anti-lock Brake System (ABS) .................... 90
Auto High-Beam ....................................... 90
Auto Idle Stop (Amber) ............................. 95
Auto Idle Stop (Green) .............................. 95
Automatic Brake Hold ............................... 86
Automatic Brake Hold System ................... 86
Blind spot information (BSI) ..................... 101
Charging System............................... 87, 716
Collision Mitigati
on Braking System
TM
(CMBSTM) ........................................ 99, 100
CRUISE CONTROL ............................. 95, 560
CRUISE MAIN.................................... 95, 559
Econ Mode ............................................... 94
Electric Power Steering (EPS)
System ............................................ 91, 720
Fog Light .................................................. 93
Gear Position ............................................ 87
Hazard Warning........................................ 92
High Beam ................................................ 92
Immobilizer System ................................... 93
Lane Keeping Assist System (LKAS) (Amber) .................................................. 96
Lane Keeping Assist System (LKAS) (Green) ................................................... 96
Lights On .................................................. 93
Low Fuel ................................................... 89
Low Oil Pressure Symbol ......................... 716
Low Tire Pressure/TPMS ............ 92, 594, 720
Maintenance Minder............................... 639
18 US ODYSSEY-31THR6010.book 754 ページ 2018年12月6日 木曜日 午後4時18分