2018 HONDA CLARITY PLUG IN HYBRID transmission
[x] Cancel search: transmissionPage 389 of 591
387 uu When Driving u Shifting
Driving
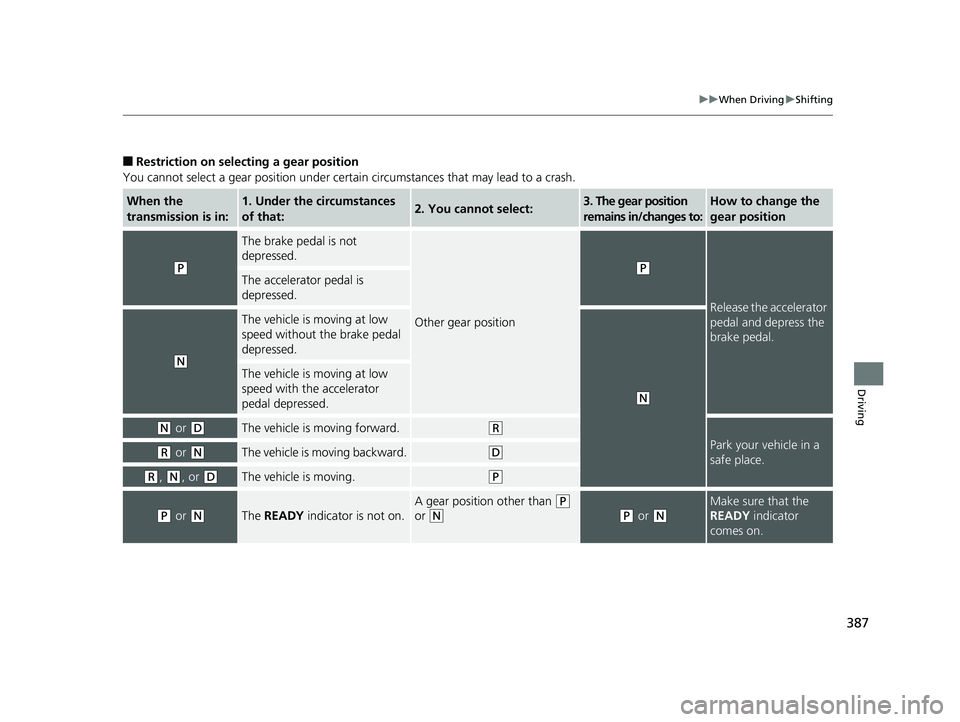
■ Restriction on select ing a gear position
You cannot select a gear position under certain circumstances that may lead to a crash.
When the
transmission is in: 1. Under the circumstances
of that: 2. You cannot select: 3. The gear position
remains in/changes to: How to change the
gear position
( P The brake pedal is not
depressed.
Other gear position ( P
Release the accelerator
pedal and depress the
brake pedal.The accelerator pedal is
depressed.
( N The vehicle is moving at low
speed without the brake pedal
depressed.
( NThe vehicle is moving at low
speed with the accelerator
pedal depressed.
( N
or ( D
The vehicle is moving forward. ( R
Park your vehicle in a
safe place.( R
or ( N
The vehicle is moving backward. ( D
( R
, ( N
, or ( D
The vehicle is moving. ( P
( P
or ( N
The READY indicator is not on. A gear position other than ( P
or ( N ( P
or ( N Make sure that the
READY indicator
comes on.18 CLARITY PHEV CSS-31TRW6000.book 387 ページ 2017年8月31日 木曜日 午後2時49分
Page 434 of 591
uu Braking u Brake System
432
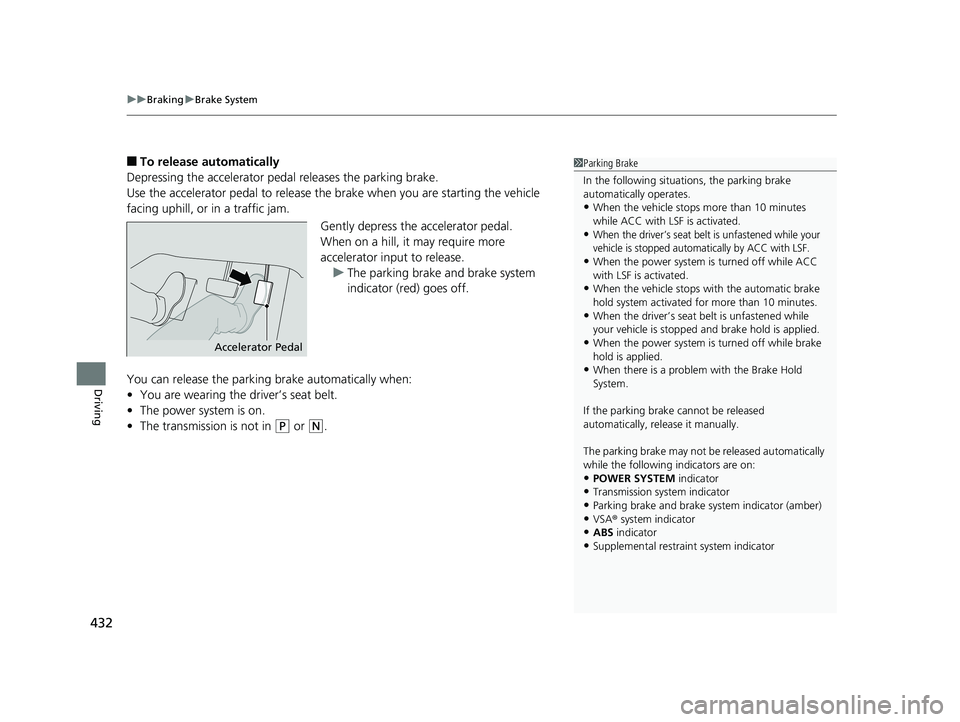
Driving ■ To release automatically
Depressing the accelerator pedal releases the parking brake.
Use the accelerator pedal to release th e brake when you are starting the vehicle
facing uphill, or in a traffic jam.
Gently depress the accelerator pedal.
When on a hill, it may require more
accelerator input to release.
u The parking brake and brake system
indicator (red) goes off.
You can release the parki ng brake automatically when:
• You are wearing the driver’s seat belt.
• The power system is on.
• The transmission is not in ( P
or ( N
. 1 Parking Brake
In the following situations, the parking brake
automatically operates.
• When the vehicle stops more than 10 minutes
while ACC with LSF is activated.
• When the driver’s seat belt is unfastened while your
vehicle is stopped automatically by ACC with LSF.
• When the power system is turned off while ACC
with LSF is activated.
• When the vehicle stops with the automatic brake
hold system activated for more than 10 minutes.
• When the driver’s seat belt is unfastened while
your vehicle is stopped and brake hold is applied.
• When the power system is turned off while brake
hold is applied.
• When there is a problem with the Brake Hold
System.
If the parking brake cannot be released
automatically, release it manually.
The parking brake may not be released automatically
while the following indicators are on:
• POWER SYSTEM indicator
• Transmission system indicator
• Parking brake and brake sy stem indicator (amber)
• VSA ® system indicator
• ABS indicator
• Supplemental restraint system indicatorAccelerator Pedal18 CLARITY PHEV CSS-31TRW6000.book 432 ページ 2017年8月31日 木曜日 午後2時49分
Page 437 of 591
Continued
435 uu Braking u Brake System
Driving
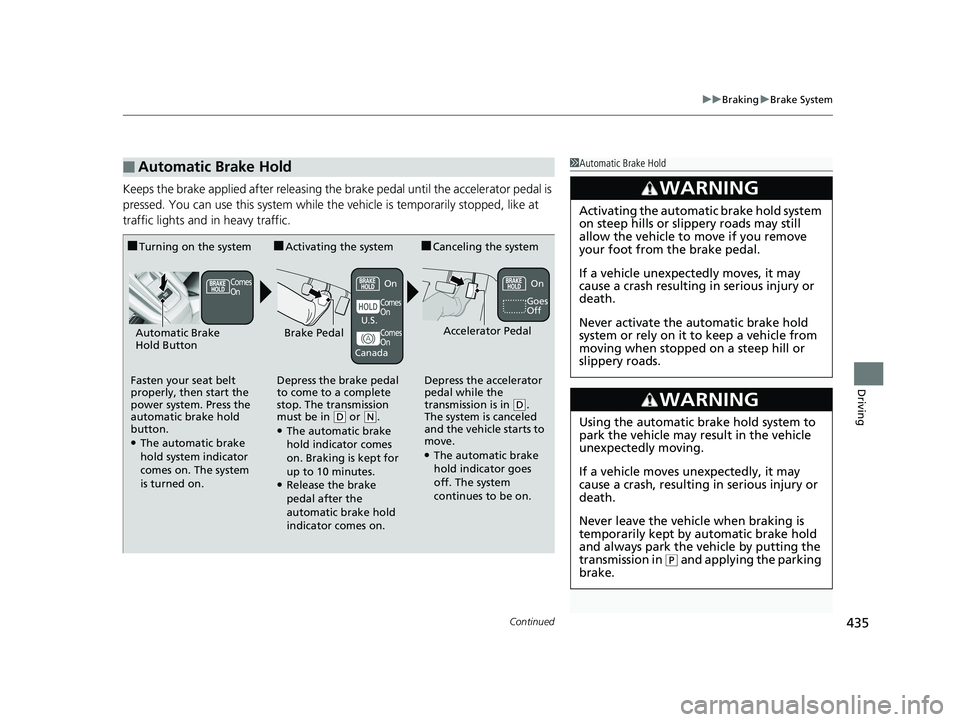
Keeps the brake applied after releasing the brake pedal until the accelerator pedal is
pressed. You can use this system while th e vehicle is temporarily stopped, like at
traffic lights and in heavy traffic.
■ Automatic Brake Hold 1 Automatic Brake Hold
3
WARNING Activating the automatic brake hold system
on steep hills or slippery roads may still
allow the vehicle to move if you remove
your foot from the brake pedal.
If a vehicle unexpectedly moves, it may
cause a crash resulting in serious injury or
death.
Never activate the automatic brake hold
system or rely on it to keep a vehicle from
moving when stopped on a steep hill or
slippery roads.
3
WARNING Using the automatic brake hold system to
park the vehicle may result in the vehicle
unexpectedly moving.
If a vehicle moves unexpectedly, it may
cause a crash, resulting in serious injury or
death.
Never leave the vehicl e when braking is
temporarily kept by automatic brake hold
and always park the vehicle by putting the
transmission in ( P
and applying the parking
brake.■ Turning on the system
Fasten your seat belt
properly, then start the
power system. Press the
automatic brake hold
button. ●
The automatic brake
hold system indicator
comes on. The system
is turned on. ■ Activating the system
Depress the brake pedal
to come to a complete
stop. The transmission
must be in ( D
or ( N
. ●
The automatic brake
hold indicator comes
on. Braking is kept for
up to 10 minutes. ●
Release the brake
pedal after the
automatic brake hold
indicator comes on. ■ Canceling the system
Depress the accelerator
pedal while the
transmission is in ( D
.
The system is canceled
and the vehicle starts to
move. ●
The automatic brake
hold indicator goes
off. The system
continues to be on. Accelerator Pedal
Brake PedalAutomatic Brake
Hold Button Goes
OffComes
On On On
Comes
On
Comes
OnU.S.
Canada18 CLARITY PHEV CSS-31TRW6000.book 435 ページ 2017年8月31日 木曜日 午後2時49分
Page 451 of 591
449Continued
Driving
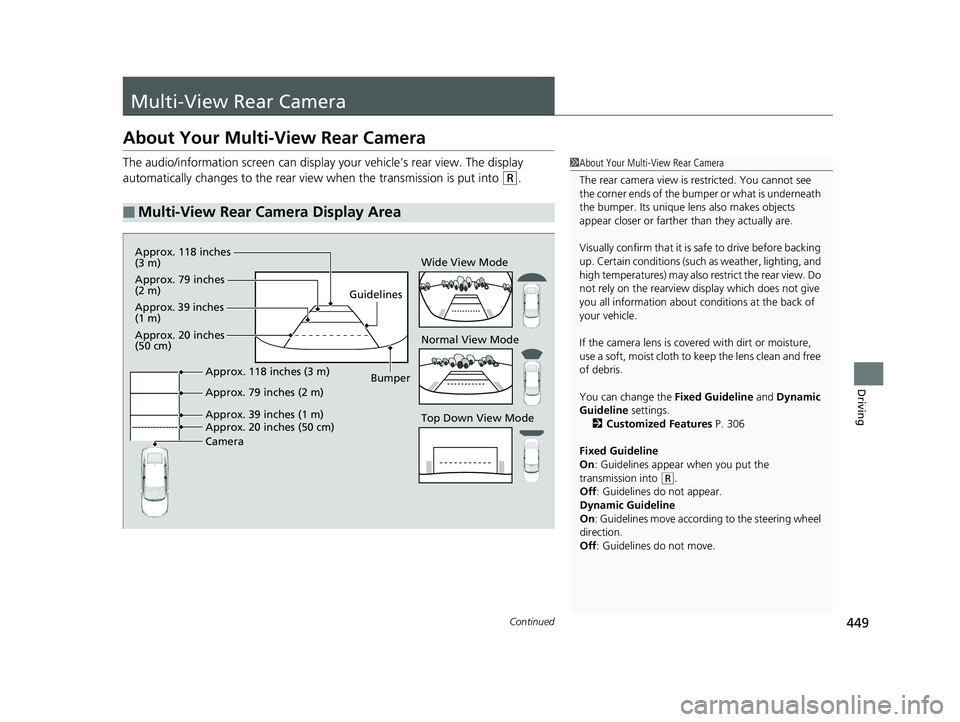
Multi-View Rear Camera About Your Multi-View Rear Camera The audio/information screen can display your vehicle’s rear view. The display
automatically changes to the rear view when the transmission is put into ( R
.
■ Multi-View Rear Camera Display Area 1 About Your Multi-View Rear Camera
The rear camera view is restricted. You cannot see
the corner ends of the bum per or what is underneath
the bumper. Its unique le ns also makes objects
appear closer or farther than they actually are.
Visually confirm that it is safe to drive before backing
up. Certain conditions (such as weather, lighting, and
high temperatures) may also re strict the rear view. Do
not rely on the rearview display which does not give
you all information about conditions at the back of
your vehicle.
If the camera lens is cove red with dirt or moisture,
use a soft, moist cloth to keep the lens clean and free
of debris.
You can change the Fixed Guideline and Dynamic
Guideline settings.
2 Customized Features P. 306
Fixed Guideline
On : Guidelines appear when you put the
transmission into ( R
.
Off : Guidelines do not appear.
Dynamic Guideline
On : Guidelines move according to the steering wheel
direction.
Off : Guidelines do not move.Top Down View ModeNormal View ModeWide View Mode
Guidelines
Bumper
CameraApprox. 20 inches (50 cm)Approx. 39 inches (1 m)Approx. 79 inches (2 m)Approx. 118 inches (3 m)Approx. 118 inches
(3 m)
Approx. 79 inches
(2 m)
Approx. 39 inches
(1 m)
Approx. 20 inches
(50 cm)18 CLARITY PHEV CSS-31TRW6000.book 449 ページ 2017年8月31日 木曜日 午後2時49分
Page 452 of 591
450 uu Multi-View Rear Camera u About Your Multi-View Rear Camera
Driving You can view three different camera mode s on the rearview display. Touch the
appropriate icon to switch the mode.
: Wide view mode
: Normal view mode
: Top down view mode
• If the last used viewing mo de was Wide or Normal view mode, the same mode is
selected the next time you put the transmission into ( R
.
• If Top down view mode was last used before you turned off the power system,
Wide View mode is selected next ti me you turn the power on and put the
transmission into ( R
.
• If Top down view mode was last used more than 10 second s after you change
from ( R
, Wide View mode is selected the ne xt time you put the transmission into
( R
.18 CLARITY PHEV CSS-31TRW6000.book 450 ページ 2017年8月31日 木曜日 午後2時49分
Page 454 of 591
452 uu Refueling u How to Refuel
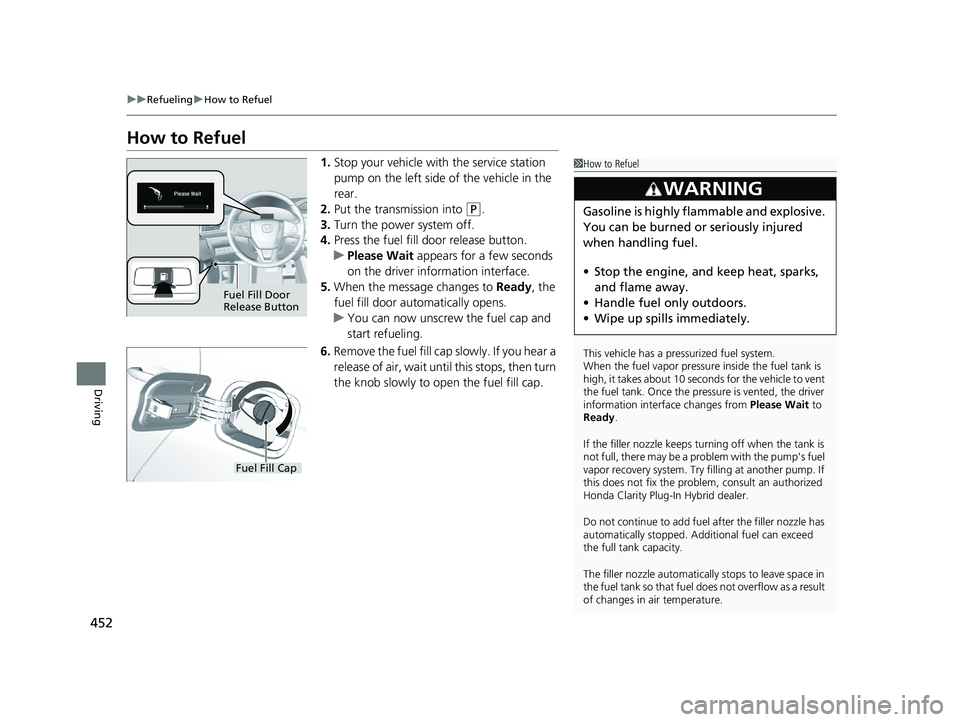
Driving How to Refuel 1. Stop your vehicle with the service station
pump on the left side of the vehicle in the
rear.
2. Put the transmission into ( P
.
3. Turn the power system off.
4. Press the fuel fill door release button.
u Please Wait appears for a few seconds
on the driver information interface.
5. When the message changes to Ready , the
fuel fill door automatically opens.
u You can now unscrew the fuel cap and
start refueling.
6. Remove the fuel fill cap slowly. If you hear a
release of air, wait unt il this stops, then turn
the knob slowly to open the fuel fill cap. 1 How to Refuel
This vehicle has a pressurized fuel system.
When the fuel vapor pressure inside the fuel tank is
high, it takes about 10 seconds for the vehicle to vent
the fuel tank. Once the pressure is vented, the driver
information interface changes from Please Wait to
Ready .
If the filler nozzle keeps tu rning off when the tank is
not full, there may be a problem with the pump's fuel
vapor recovery system. Try fi lling at another pump. If
this does not fix the problem, consult an authorized
Honda Clarity Plug-In Hybrid dealer.
Do not continue to add fuel after the filler nozzle has
automatically stopped. Addi tional fuel can exceed
the full tank capacity.
The filler nozzle automatically stops to leave space in
the fuel tank so that fuel does not overflow as a result
of changes in air temperature.3
WARNING Gasoline is highly flammable and explosive.
You can be burned or seriously injured
when handling fuel.
• Stop the engine, and keep heat, sparks,
and flame away.
• Handle fuel only outdoors.
• Wipe up spills immediately.Fuel Fill Door
Release Button
Fuel Fill Cap18 CLARITY PHEV CSS-31TRW6000.book 452 ページ 2017年8月31日 木曜日 午後2時49分
Page 458 of 591
uu Charging u Charge the High Voltage battery using a Level 1 or 2 charger
456
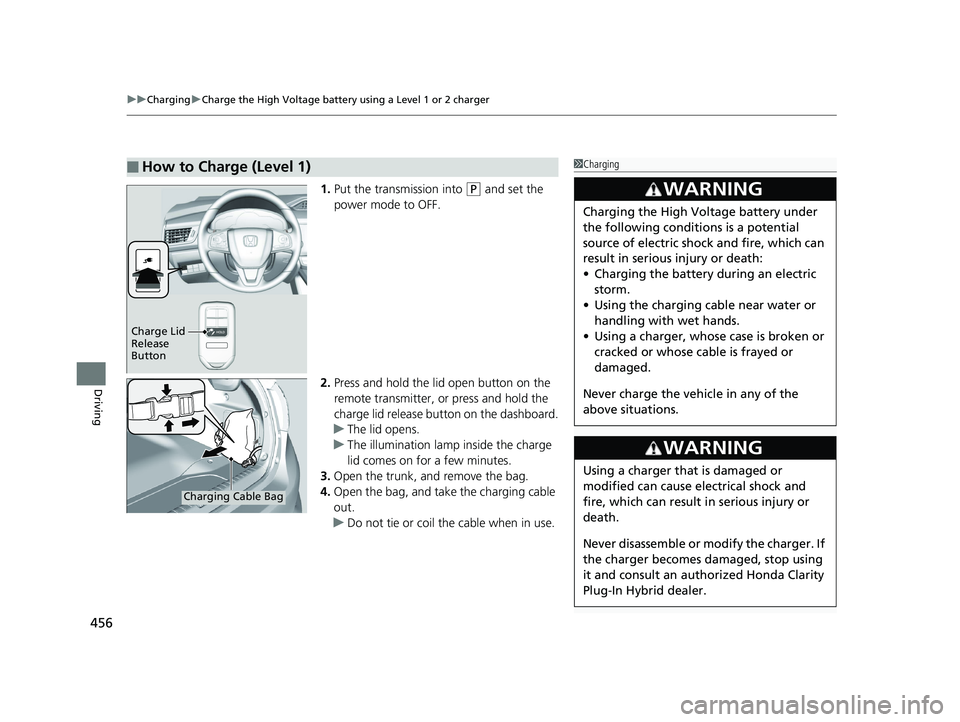
Driving 1. Put the transmission into ( P
and set the
power mode to OFF.
2. Press and hold the lid open button on the
remote transmitter, or press and hold the
charge lid release button on the dashboard.
u The lid opens.
u The illumination lamp inside the charge
lid comes on for a few minutes.
3. Open the trunk, and remove the bag.
4. Open the bag, and take the charging cable
out.
u Do not tie or coil the cable when in use.■ How to Charge (Level 1) 1 Charging
3
WARNING Charging the High Vo ltage battery under
the following conditions is a potential
source of electric shock and fire, which can
result in serious injury or death:
• Charging the battery during an electric
storm.
• Using the charging cable near water or
handling with wet hands.
• Using a charger, whose case is broken or
cracked or whose cable is frayed or
damaged.
Never charge the vehi cle in any of the
above situations.
3
WARNING Using a charger that is damaged or
modified can cause electrical shock and
fire, which can result in serious injury or
death.
Never disassemble or modify the charger. If
the charger becomes damaged, stop using
it and consult an authorized Honda Clarity
Plug-In Hybrid dealer.Charge Lid
Release
Button
Charging Cable Bag18 CLARITY PHEV CSS-31TRW6000.book 456 ページ 2017年8月31日 木曜日 午後2時49分
Page 461 of 591
Continued
459uu Charging u Charge the High Voltage battery using a Level 1 or 2 charger
Driving
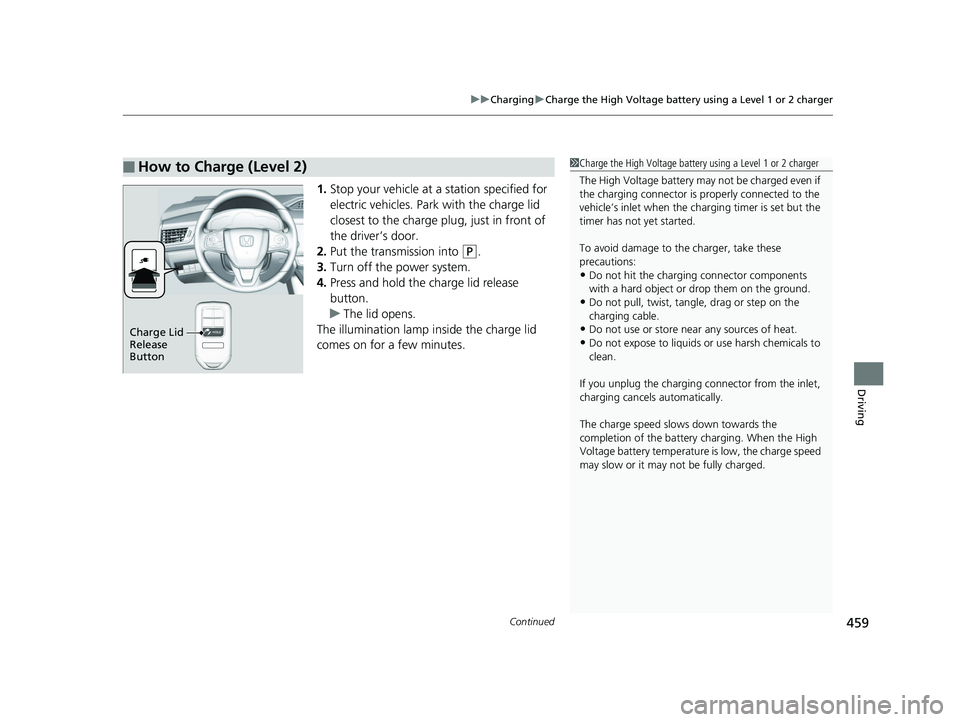
1. Stop your vehicle at a station specified for
electric vehicles. Park with the charge lid
closest to the charge plug, just in front of
the driver’s door.
2. Put the transmission into ( P
.
3. Turn off the power system.
4. Press and hold the charge lid release
button.
u The lid opens.
The illumination lamp inside the charge lid
comes on for a few minutes.■ How to Charge (Level 2) 1 Charge the High Voltage battery using a Level 1 or 2 charger
The High Voltage battery may not be charged even if
the charging connector is properly connected to the
vehicle’s inlet when the charging timer is set but the
timer has not yet started.
To avoid damage to th e charger, take these
precautions:
• Do not hit the charging connector components
with a hard object or drop them on the ground.
• Do not pull, twist, tangle, drag or step on the
charging cable.
• Do not use or store near any sources of heat.
• Do not expose to liquids or use harsh chemicals to
clean.
If you unplug the charging connector from the inlet,
charging cancels automatically.
The charge speed slows down towards the
completion of the battery charging. When the High
Voltage battery temperature is low, the charge speed
may slow or it may not be fully charged.Charge Lid
Release
Button18 CLARITY PHEV CSS-31TRW6000.book 459 ページ 2017年8月31日 木曜日 午後2時49分