Page 129 of 559
127
uuGauges and Driver Information Interface uDriver Information Interface
Continued
Instrument Panel
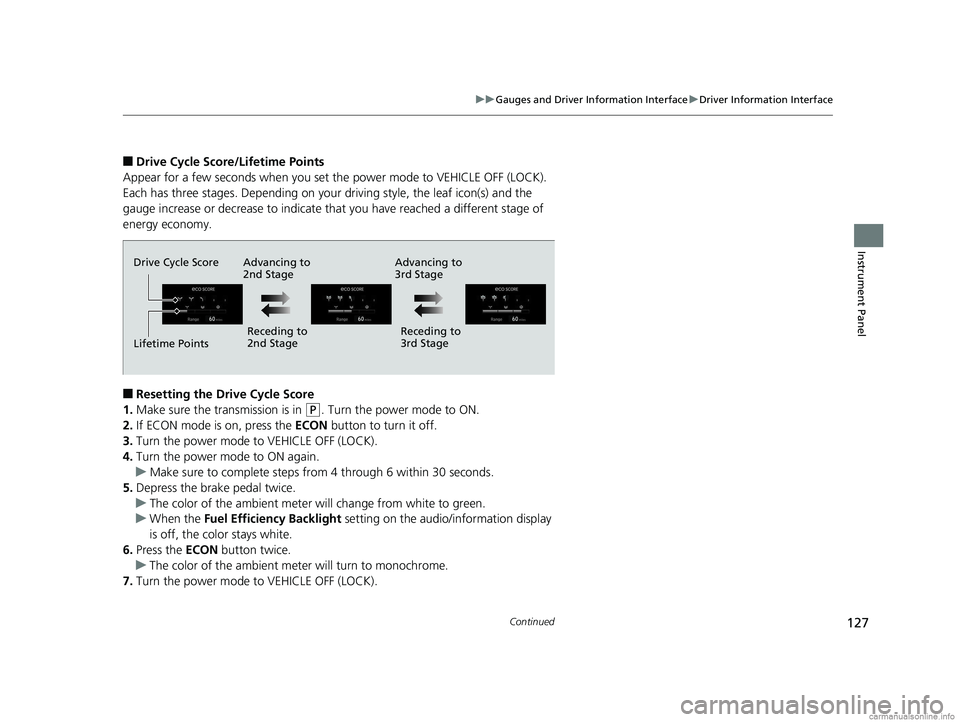
■Drive Cycle Score/Lifetime Points
Appear for a few seconds when you set the power mode to VEHICLE OFF (LOCK).
Each has three stages. Depending on your driving style, the leaf icon(s) and the
gauge increase or decrease to indicate that you have reached a different stage of
energy economy.
■Resetting the Drive Cycle Score
1. Make sure the transmission is in
(P. Turn the power mode to ON.
2. If ECON mode is on, press the ECON button to turn it off.
3. Turn the power mode to VEHICLE OFF (LOCK).
4. Turn the power mode to ON again.
u Make sure to complete steps fro m 4 through 6 within 30 seconds.
5. Depress the brake pedal twice.
u The color of the ambient meter wi ll change from white to green.
u When the Fuel Efficiency Backlight setting on the audio/information display
is off, the color stays white.
6. Press the ECON button twice.
u The color of the ambient mete r will turn to monochrome.
7. Turn the power mode to VEHICLE OFF (LOCK).
Drive Cycle Score
Lifetime Points Advancing to
2nd Stage
Receding to
2nd Stage Receding to
3rd Stage
Advancing to
3rd Stage
18 CLARITY ELECTRIC CSS-31TRV6100.book 127 ページ 2018年2月5日 月曜日 午後12時0分
Page 154 of 559
152
Controls
Operating the Switches Around the Steering Wheel
POWER Button
■Changing the Power Mode1POWER Button
POWER Button Operating Range
You can start the power system when the smart entry
remote is inside the vehicle.
The power system may also start if the smart entry
remote is close to the door or window, even if it is
outside the vehicle.
ON mode:
The POWER button is on (in red), if the power system
is on.
If the battery of the smar t entry remote is getting
low, the power system may not start when you press
the POWER button. If the power system does not
start, refer to the following link. 2 If the Smart Entry Remote Battery is Weak
P. 512
Do not leave the power mode in ACCESSORY or ON
when you get out.
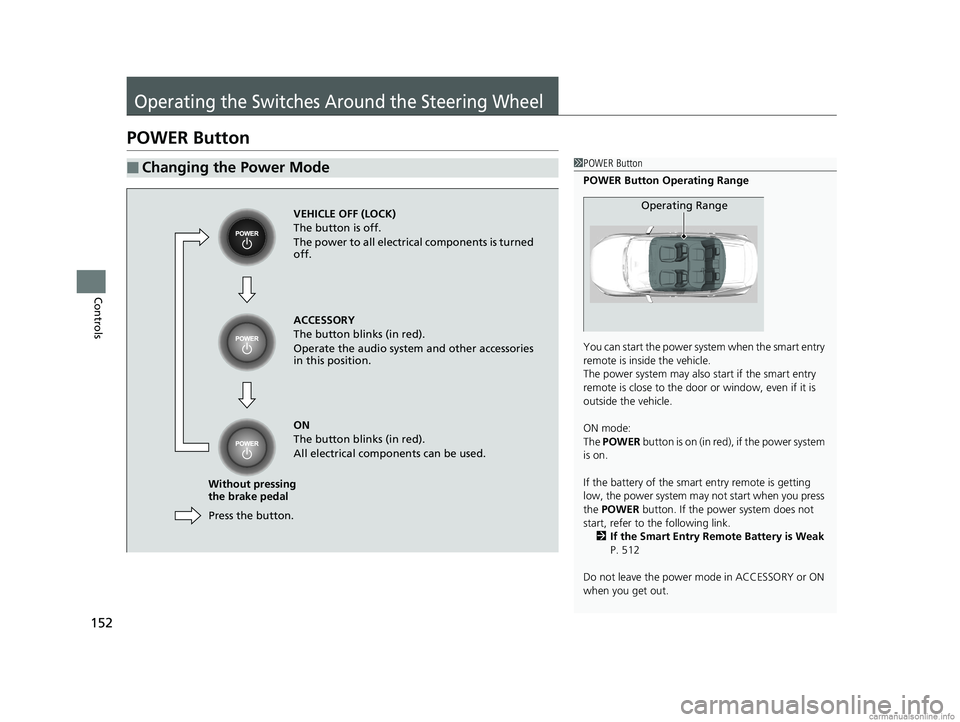
Operating RangeVEHICLE OFF (LOCK)
The button is off.
The power to all electrical components is turned
off.
Press the button.
Without pressing
the brake pedal ACCESSORY
The button blinks (in red).
Operate the audio system and other accessories
in this position.
ON
The button blinks (in red).
All electrical components can be used.
18 CLARITY ELECTRIC CSS-31TRV6100.book 152 ページ 2018年2月5日 月曜日 午後12時0分
Page 161 of 559
159
uuOperating the Switches Around the Steering Wheel uDaytime Running Lights
Controls
Daytime Running Lights
The daytime running lights come on when th e following conditions have been met:
• The power mode is in ON.
• The headlight switch is AUTO, or OFF .
• The parking brake is released.
The lights remain on even if you set the parking brake.
Setting the power mode to VEHICLE OFF (L OCK) will turn off the daytime running
lights.
The daytime running lights are off once the h eadlight switch is turned on, or when
the headlight switch is in AUTO and it is getting darker outside.
18 CLARITY ELECTRIC CSS-31TRV6100.book 159 ページ 2018年2月5日 月曜日 午後12時0分
Page 167 of 559
165
uuOperating the Switches Around the Steering Wheel uDriving Position Memory System
Controls
1. Set the power mode to ON. Adjust the
driver’s seat to the desired position.
2. Press the SET button.
u You will hear the beeper, and the
memory button indicator light will blink.
3. Press and hold memory button
(1 or (2
within five seconds of pressing the SET
button.
u Once the seat position has been
memorized, the indicator light on the
button you pressed stays on and you will
hear the double-beep.
1. Put the transmission into
(P.
2. Apply the parking brake.
3. Press a memory button (
(1 or (2).
u You will hear the beeper, and the
indicator light will blink.
The seat will automatically move to the
memorized position. When it has finished
moving, you will hear the beeper, and the
indicator light stays on.
■Storing a Position in Memory1 Storing a Position in Memory
After you press the SET button, the storing operation
will be canceled when:
•You do not press the memory button within five
seconds.
•You readjust the seat position before the double-
beep.
•You set the power mode to any position except
ON.
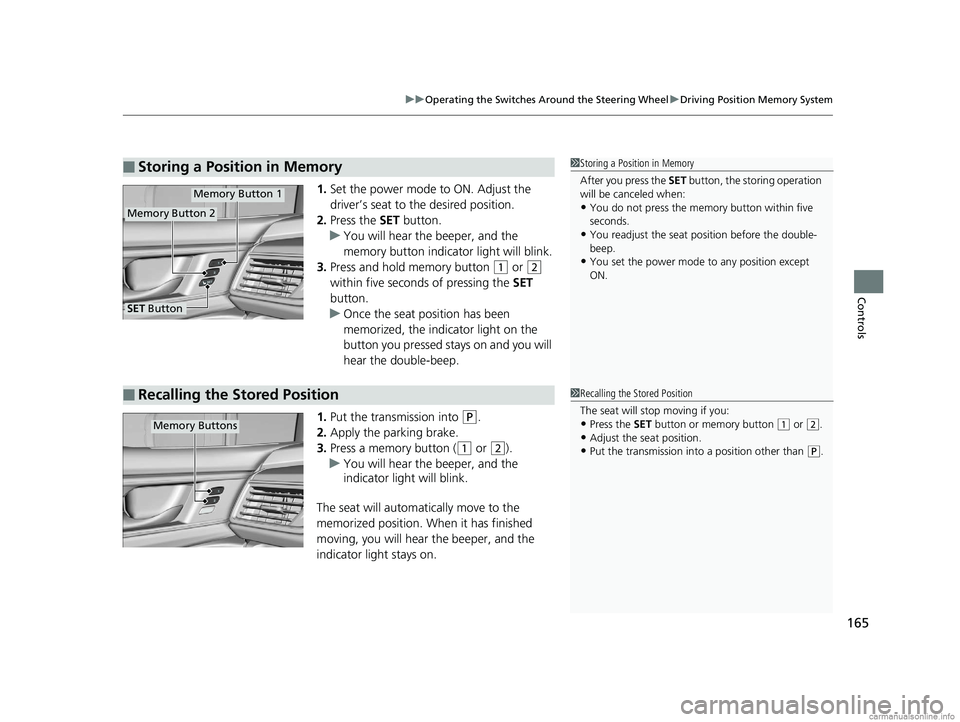
Memory Button 1
Memory Button 2
SET Button
■Recalling the Stored Position1 Recalling the Stored Position
The seat will st op moving if you:
•Press the SET button or memory button (1 or (2.
•Adjust the seat position.
•Put the transmission into a position other than (P.
Memory Buttons
18 CLARITY ELECTRIC CSS-31TRV6100.book 165 ページ 2018年2月5日 月曜日 午後12時0分
Page 176 of 559
174
uuAdjusting the Seats uRear Seats
Controls
Rear Seats
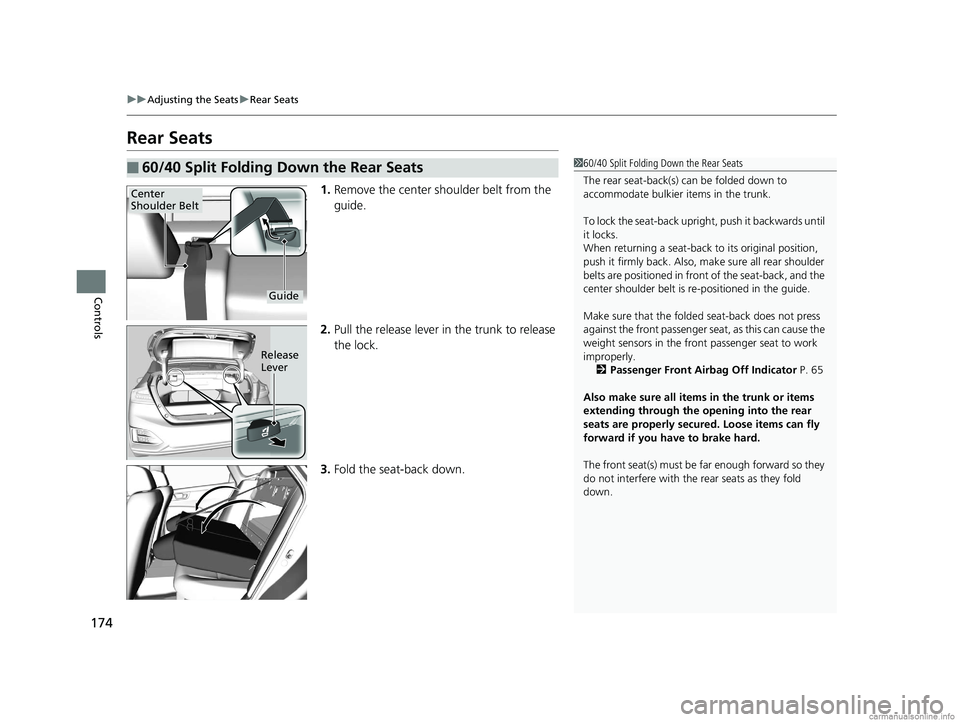
1. Remove the center shoulder belt from the
guide.
2. Pull the release lever in the trunk to release
the lock.
3. Fold the seat-back down.
■60/40 Split Folding Down the Rear Seats160/40 Split Folding Down the Rear Seats
The rear seat-back(s) can be folded down to
accommodate bulkier items in the trunk.
To lock the seat-back upri ght, push it backwards until
it locks.
When returning a seat-back to its original position,
push it firmly back. Also, m ake sure all rear shoulder
belts are positioned in front of the seat-back, and the
center shoulder belt is re -positioned in the guide.
Make sure that the folded seat-back does not press
against the front passenger se at, as this can cause the
weight sensors in the front passenger seat to work
improperly.
2 Passenger Front Airbag Off Indicator P. 65
Also make sure all items in the trunk or items
extending through the opening into the rear
seats are properly secured. Loose items can fly
forward if you have to brake hard.
The front seat(s) must be far enough forward so they
do not interfere with the rear seats as they fold
down.
Center
Shoulder Belt
Guide
Release
Lever
18 CLARITY ELECTRIC CSS-31TRV6100.book 174 ページ 2018年2月5日 月曜日 午後12時0分
Page 194 of 559
uuClimate Control System uUsing Automatic Climate Control
192
Controls
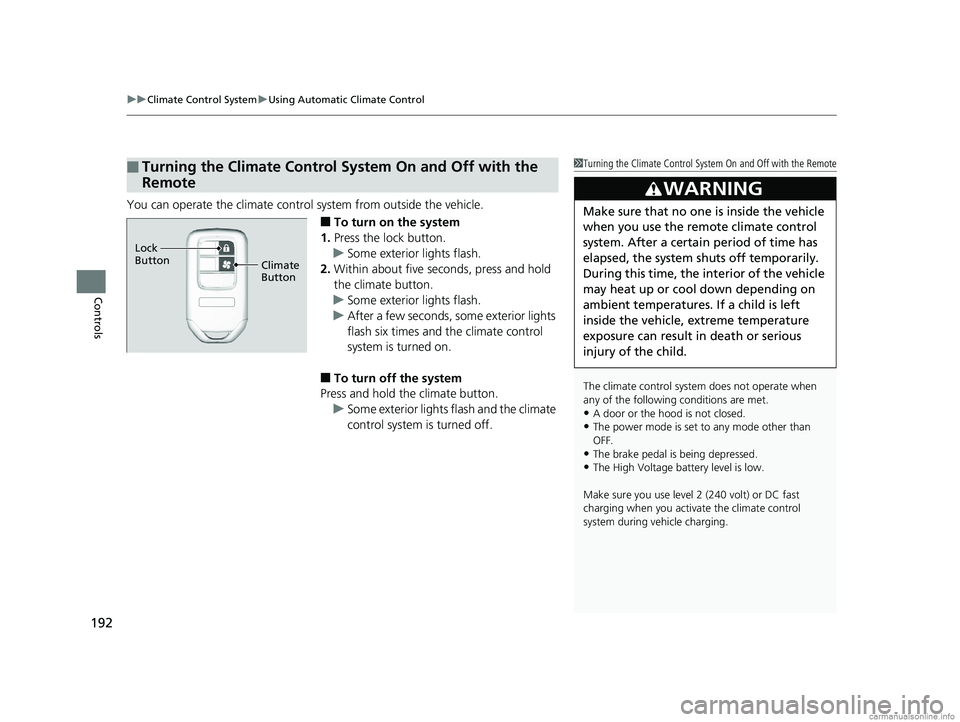
You can operate the climate contro l system from outside the vehicle.
■To turn on the system
1. Press the lock button.
u Some exterior lights flash.
2. Within about five seconds, press and hold
the climate button.
u Some exterior lights flash.
u After a few seconds, some exterior lights
flash six times and the climate control
system is turned on.
■To turn off the system
Press and hold the climate button.
u Some exterior lights flash and the climate
control system is turned off.
■Turning the Climate Control System On and Off with the
Remote1Turning the Climate Control System On and Off with the Remote
The climate control system does not operate when
any of the following conditions are met.
•A door or the hood is not closed.
•The power mode is set to any mode other than
OFF.
•The brake pedal is being depressed.
•The High Voltage battery level is low.
Make sure you use level 2 (240 volt) or DC fast
charging when you activate the climate control
system during vehicle charging.
3WARNING
Make sure that no one is inside the vehicle
when you use the remote climate control
system. After a certain period of time has
elapsed, the system sh uts off temporarily.
During this time, the in terior of the vehicle
may heat up or cool down depending on
ambient temperatures. If a child is left
inside the vehicle, extreme temperature
exposure can result in death or serious
injury of the child.
Climate
Button
Lock
Button
18 CLARITY ELECTRIC CSS-31TRV6100.book 192 ページ 2018年2月5日 月曜日 午後12時0分
Page 195 of 559
193
uuClimate Control System uUsing Automatic Climate Control
Controls
1Turning the Climate Control System On and Off with the Remote
The climate control system automatically turned off
when any of the following conditions are met.
•The system has been operated for more than 30
minutes.
•The High Voltage battery level becomes low.
•A door or the hood is opened.
•The power mode is set to any mode other than
OFF.
•The brake pedal is being depressed.
If the charging connector is unplugged, the High
Voltage battery is used to power the climate control
system.
18 CLARITY ELECTRIC CSS-31TRV6100.book 193 ページ 2018年2月5日 月曜日 午後12時0分
Page 361 of 559
359
Driving
This chapter discusses driving and charging.
Before Driving................................... 360
Towing a Trailer ................................ 365
When Driving Turning on the Power ...................... 366
Precautions While Driving................. 369
Transmission .................................... 370
Shifting ............................................ 371
ECON Mode .................................... 377
SPORT Mode.................................... 378
Deceleration Paddle Selector ............ 379
Acoustic Vehicle Al erting System ...... 382
Front Sensor Camera ....................... 383
Road Departure Mi tigation (RDM)
System ........................................ 385
Adaptive Cruise Control (ACC) with Low
Speed Follow (LSF) ......................... 389
Lane Keeping Assist System (LKAS)...... 404Vehicle Stability Assist ® (VSA ®), aka
Electronic Stability Control (ESC),
System ....................................... 411
Agile Handling Assist ....................... 413Tire Pressure Monitoring System (TPMS) .. 414Tire Pressure Monitoring System (TPMS) -
Required Federal Explanation ......... 416
LaneWatchTM....................................... 418Braking Brake System ................................... 420
Anti-lock Brake System (ABS) ........... 426 Brake Assist System ......................... 427
Collision Mitigation Braking System
TM
(CMBSTM) ....................................... 428
Parking Your Vehicle When Stopped ................................ 436
Multi-View Rear Camera .................. 438
Charging ............................................ 440
Before Charging .............................. 440
Charge the High Voltage battery using a
Level 1, 2 or SAE J1772 DC charger ...441
Control Box ..................................... 448
High Voltage Battery........................ 453
Using a Timer .................................. 454
Energy Economy ............................... 456
18 CLARITY ELECTRIC CSS-31TRV6100.book 359 ページ 2018年2月5日 月曜日 午後12時0分