2018 FORD EXPEDITION fuel
[x] Cancel search: fuelPage 195 of 571
•
Incorrect fuel for climatic conditions.
• Incorrect engine oil viscosity for
climactic conditions.
Note: Some vehicles have a lifetime fuel
filter that is integrated with the fuel tank.
Regular maintenance or replacement is not
needed.
Note: If these checks do not help you
correct the concern, have your vehicle
checked as soon as possible.
Noise Emissions Warranty,
Prohibited Tampering Acts and
Maintenance
On January 1, 1978, Federal regulation
became effective governing the noise
emission on trucks over 10,000 lb
(4,536 kg) Gross Vehicle Weight Rating
(GVWR). The preceding statements
concerning prohibited tampering acts and
maintenance, and the noise warranty
found in the Warranty Guide, are
applicable to complete chassis cabs over
10,000 lb (4,536 kg)
GVWR.
CATALYTIC CONVERTER WARNING:
Do not park, idle or
drive your vehicle on dry grass or other
dry ground cover. The emission system
heats up the engine compartment and
exhaust system, creating the risk of fire. WARNING:
The normal operating
temperature of the exhaust system is
very high. Never work around or attempt
to repair any part of the exhaust system
until it has cooled. Use special care when
working around the catalytic converter.
The catalytic converter heats up to a very
high temperature after only a short
period of engine operation and stays hot
after the engine is switched off. WARNING:
Exhaust leaks may
result in entry of harmful and potentially
lethal fumes into the passenger
compartment. If you smell exhaust
fumes inside your vehicle, have your
vehicle inspected immediately. Do not
drive if you smell exhaust fumes.
Your vehicle has various emission control
components and a catalytic converter that
enables it to comply with applicable
exhaust emission standards.
To make sure that the catalytic converter
and other emission control components
continue to work properly:
• Do not crank the engine for more than
10 seconds at a time.
• Do not run the engine with a spark plug
lead disconnected.
• Do not push-start or tow-start your
vehicle. Use booster cables. See Jump
Starting the Vehicle
(page 302).
• Use only the specified fuel listed.
• Do not switch the ignition off when your
vehicle is moving.
• Avoid running out of fuel.
• Have the items listed in scheduled
maintenance information performed
according to the specified schedule.
Note: Resulting component damage may
not be covered by the vehicle Warranty.
The scheduled maintenance items listed
in scheduled maintenance information are
essential to the life and performance of
your vehicle and to its emissions system.
If you use anything other than Ford,
Motorcraft or Ford-authorized parts for
maintenance replacements or for service
of components affecting emission control,
such non-Ford parts should be equivalent
to genuine Ford Motor Company parts in
performance and durability.
192
Expedition (TB8) Canada/United States of America, enUSA, Edition date: 201708, Third-Printing- Engine Emission Control
Page 196 of 571

Illumination of the service engine soon
indicator, charging system warning light or
the temperature warning light, fluid leaks,
strange odors, smoke or loss of engine
power could indicate that the emission
control system is not working properly.
An improperly operating or damaged
exhaust system may allow exhaust to
enter the vehicle. Have a damaged or
improperly operating exhaust system
inspected and repaired immediately.
Do not make any unauthorized changes to
your vehicle or engine. By law, vehicle
owners and anyone who manufactures,
repairs, services, sells, leases, trades
vehicles, or supervises a fleet of vehicles
are not permitted to intentionally remove
an emission control device or prevent it
from working. Information about your
vehicle
’s emission system is on the Vehicle
Emission Control Information Decal
located on or near the engine. This decal
also lists engine displacement.
Please consult your warranty information
for complete details.
On-Board Diagnostics (OBD-II)
Your vehicle has a computer known as the
on-board diagnostics system (OBD-II) that
monitors the engine ’s emission control
system. The system protects the
environment by making sure that your
vehicle continues to meet government
emission standards. The OBD-II system
also assists a service technician in properly
servicing your vehicle. When the service engine soon
indicator illuminates, the OBD-II
system has detected a
malfunction. Temporary malfunctions may
cause the service engine soon indicator to
illuminate. Examples are: 1. Your vehicle has run out of fuel
—the
engine may misfire or run poorly.
2. Poor fuel quality or water in the fuel —the engine may misfire or run
poorly.
3. The fuel fill inlet may not have closed properly. See Refueling (page 187).
4. Driving through deep water —the
electrical system may be wet.
You can correct these temporary
malfunctions by filling the fuel tank with
good quality fuel, properly closing the fuel
fill inlet or letting the electrical system dry
out. After three driving cycles without these
or any other temporary malfunctions
present, the service engine soon indicator
should stay off the next time you start the
engine. A driving cycle consists of a cold
engine startup followed by mixed city and
highway driving. No additional vehicle
service is required.
If the service engine soon indicator remains
on, have your vehicle serviced at the first
available opportunity. Although some
malfunctions detected by the OBD-II may
not have symptoms that are apparent,
continued driving with the service engine
soon indicator on can result in increased
emissions, lower fuel economy, reduced
engine and transmission smoothness and
lead to more costly repairs.
Readiness for Inspection and
Maintenance (I/M) Testing
Some state and provincial and local
governments may have
Inspection/Maintenance (I/M) programs
to inspect the emission control equipment
on your vehicle. Failure to pass this
inspection could prevent you from getting
a vehicle registration. If the service engine soon
indicator is on or the bulb does
not work, your vehicle may need
service. See On-Board Diagnostics.
193
Expedition (TB8) Canada/United States of America, enUSA, Edition date: 201708, Third-Printing- Engine Emission Control
Page 201 of 571
WARNING: When doing this
procedure, you need to take the
transmission out of park (P) which
means your vehicle can roll freely. To
avoid unwanted vehicle movement,
always fully apply the parking brake prior
to doing this procedure. Use wheels
chocks if appropriate.
1. Do not press the brake pedal. Press the
START/STOP
button.
2. Fully press down on the brake pedal. Keep the brakes applied through step
6.
3. Press the accelerator pedal to the floor
and hold through step 6.
4. Rotate transmission selector to Neutral
(N) and press the manual (M) button.
5. Press and release the push to start button, the transmission needs a
minimum of 2 seconds to exit park.
6. When neutral (N) is displayed, the brake and accelerator pedals can be
released.
To exit Stay in Neutral mode, select a
different gear.
A message appears in your information
display screen when your vehicle has
entered Stay in Neutral mode.
Drive (D)
Drive (D) is the normal driving position for
the best fuel economy. The overdrive
function allows automatic upshifts and
downshifts through gears one through ten.
Manual (M)
With the transmission selector in manual
(M), you can change gears up or down as
desired. By pushing the manual (M) button,
you have control of selecting the gear you
desire using the + and - buttons on the
transmission selector. Tow/Haul Mode WARNING:
Do not use tow/haul
when the road surface is slippery. Failure
to follow this instruction could result in
the loss of control of your vehicle. With Column Shifter
To activate tow haul for the
column shifter, press the button
on the gearshift lever to cycle through the
available drive modes until tow haul mode
is selected.
See Drive Control (page 261).
The tow haul indicator light illuminates in
the instrument cluster when the system is
active.
Without Column Shifter
To activate tow haul, press the drive
modes button or rotate the dial, to cycle
through the available drive modes until
tow haul is selected.
See Drive Control
(page 261). The tow haul indicator light
illuminates in the instrument cluster when
the system is active.
The tow/haul feature:
• Moves upshifts to higher engine speeds
to reduce the frequency of
transmission shifting.
• Provides engine braking in all forward
gears, which slows your vehicle and
assist you in controlling your vehicle
when descending a slope.
• Depending on driving conditions and
load conditions, may downshift the
transmission, slow your vehicle to help
control your vehicle speed when
descending a hill. The amount of
downshift braking provided varies
based upon the amount the brake
pedal is pressed.
The tow haul feature improves
transmission operation when towing a
trailer or a heavy load.
198
Expedition (TB8) Canada/United States of America, enUSA, Edition date: 201708, Third-Printing- TransmissionE246592
Page 206 of 571

Note:
The information display may show
messages during 4WD operation. See
Information Messages (page 123).
Your 4X4 control is located in one of the
following locations:
• On the instrument panel.
• On the
DRIVE MODE selection switch.
2H - 4X2
Delivers power to the rear wheels only. The
information display momentarily shows
2H when this mode is selected. This mode
is appropriate for normal on-road driving
on dry pavement and provides the best
fuel economy.
Note: 2H may turn on or off automatically
based on Drive Mode selection. See
Drive
Control (page 261).
4A - 4X4 AUTO
Provides electronic controlled four-wheel
drive with power delivered to the front and
rear wheels, as required, for increased
traction. When you select this mode, the
information display shows 4A. The system
continuously monitors road conditions,
driver input as well as other vehicle sensors
and optimizes the system's behavior based
on drive mode selection.
Note: On vehicles with a rotary drive mode
switch, 4A should remain on in Mud/Rut and
Sand but with aggressive tuning which
provides electronically locked four-wheel
drive power to front and rear wheels, the
same as traditional 4H.
Note: 4A may turn on or off automatically
based on Drive Mode selection. See
Drive
Control (page 261). 4H - 4X4 HIGH
Provides electronically locked four-wheel
drive power to front and rear wheels. When
you select this mode, the information
display shows 4H. This mode is not
recommended for use on dry pavement.
This mode is only intended for severe
winter or off-road conditions, such as deep
snow, ice or shallow sand.
Note:
4H may turn on or off automatically
based on Drive Mode selection. In
configurations with a rotary Drive Mode
switch, 4H functionality is within the
Mud/Ruts and Sand Drive Modes even when
the indicator lamp shows 4A. See
Drive
Control (page 261).
4L - 4X4 LOW
Provides electronically locked four-wheel
drive power to both the front and rear
wheels with additional gearing for
increased torque multiplication. Intended
only for off-road applications such as deep
sand, steep grades, or pulling heavy
objects. 4L - 4X4 low does not engage
when your vehicle is moving above
3 mph
(5 km/h); this is normal and should be no
reason for concern. Refer to Shifting to or
from 4L - 4X4 low for proper operation.
Note: 4L may turn off automatically based
on Drive Mode selection. See
Drive Control
(page 261).
Shifting Between 4WD System Modes
Note: Momentarily releasing the accelerator
pedal when a shift in progress message
displays improves engagement and
disengagement performance.
Note: Do not perform this operation if the
rear wheels are slipping.
Note: Some noise may be heard as the
system shifts or engages; this is normal.
203
Expedition (TB8) Canada/United States of America, enUSA, Edition date: 201708, Third-Printing- Four-Wheel Drive
(If Equipped)
Page 265 of 571
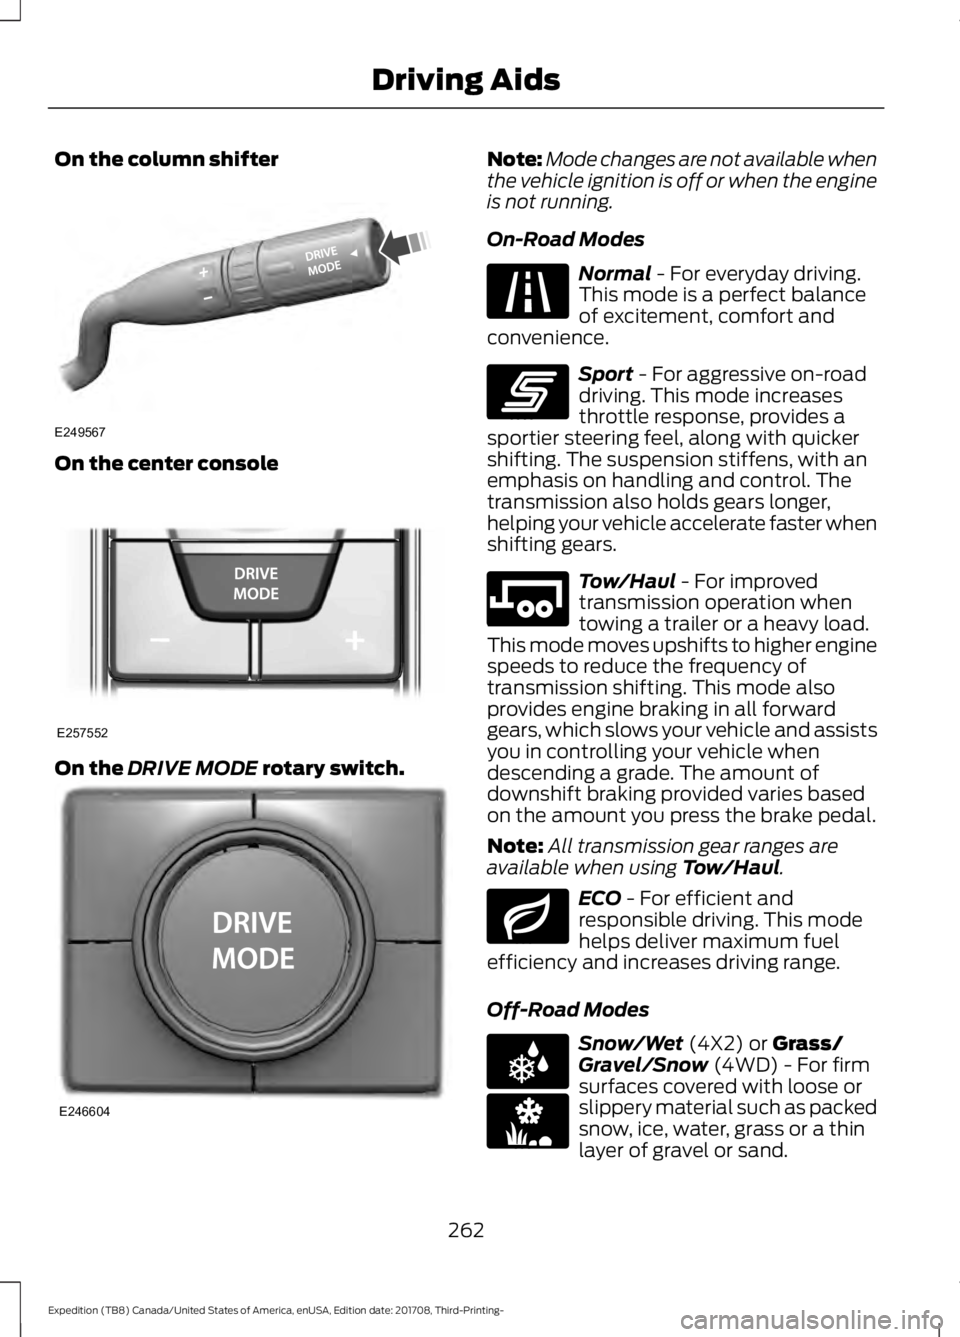
On the column shifter
On the center console
On the DRIVE MODE rotary switch. Note:
Mode changes are not available when
the vehicle ignition is off or when the engine
is not running.
On-Road Modes Normal
- For everyday driving.
This mode is a perfect balance
of excitement, comfort and
convenience. Sport
- For aggressive on-road
driving. This mode increases
throttle response, provides a
sportier steering feel, along with quicker
shifting. The suspension stiffens, with an
emphasis on handling and control. The
transmission also holds gears longer,
helping your vehicle accelerate faster when
shifting gears. Tow/Haul
- For improved
transmission operation when
towing a trailer or a heavy load.
This mode moves upshifts to higher engine
speeds to reduce the frequency of
transmission shifting. This mode also
provides engine braking in all forward
gears, which slows your vehicle and assists
you in controlling your vehicle when
descending a grade. The amount of
downshift braking provided varies based
on the amount you press the brake pedal.
Note: All transmission gear ranges are
available when using
Tow/Haul. ECO
- For efficient and
responsible driving. This mode
helps deliver maximum fuel
efficiency and increases driving range.
Off-Road Modes Snow/Wet
(4X2) or Grass/
Gravel/Snow (4WD) - For firm
surfaces covered with loose or
slippery material such as packed
snow, ice, water, grass or a thin
layer of gravel or sand.
262
Expedition (TB8) Canada/United States of America, enUSA, Edition date: 201708, Third-Printing- Driving AidsE249567 E257552 E246604 E225310 E246593 E246592 E246597 E225312 E246594
Page 270 of 571
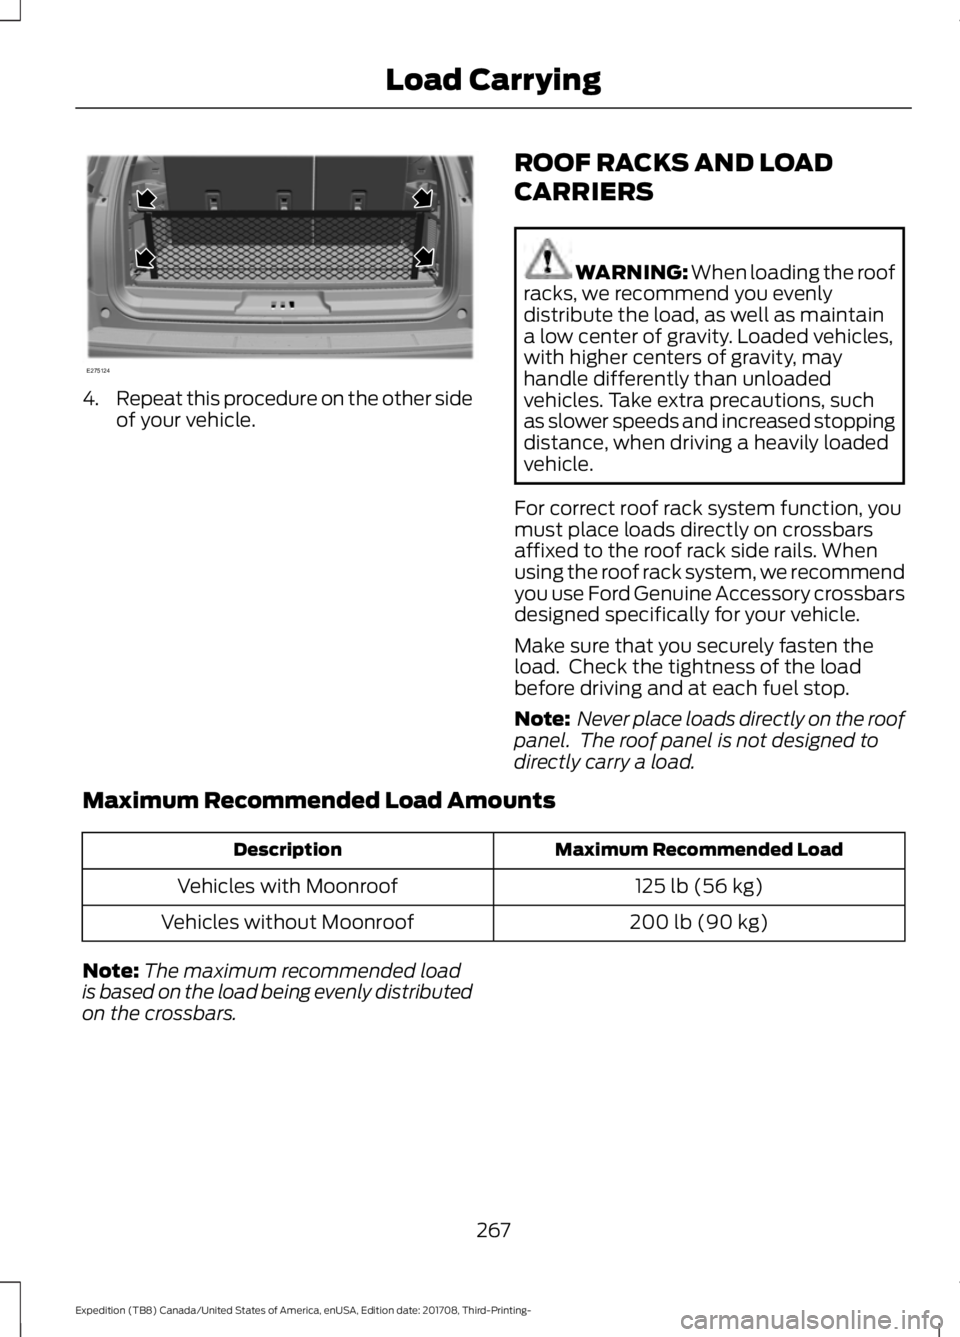
4.
Repeat this procedure on the other side
of your vehicle. ROOF RACKS AND LOAD
CARRIERS WARNING: When loading the roof
racks, we recommend you evenly
distribute the load, as well as maintain
a low center of gravity. Loaded vehicles,
with higher centers of gravity, may
handle differently than unloaded
vehicles. Take extra precautions, such
as slower speeds and increased stopping
distance, when driving a heavily loaded
vehicle.
For correct roof rack system function, you
must place loads directly on crossbars
affixed to the roof rack side rails. When
using the roof rack system, we recommend
you use Ford Genuine Accessory crossbars
designed specifically for your vehicle.
Make sure that you securely fasten the
load. Check the tightness of the load
before driving and at each fuel stop.
Note: Never place loads directly on the roof
panel. The roof panel is not designed to
directly carry a load.
Maximum Recommended Load Amounts Maximum Recommended Load
Description
125 lb (56 kg)
Vehicles with Moonroof
200 lb (90 kg)
Vehicles without Moonroof
Note: The maximum recommended load
is based on the load being evenly distributed
on the crossbars.
267
Expedition (TB8) Canada/United States of America, enUSA, Edition date: 201708, Third-Printing- Load CarryingE275124
Page 288 of 571
This feature applies your vehicle brakes at
individual wheels and, if necessary, reduces
engine power. If the trailer begins to sway,
the stability control light flashes and the
message TRAILER SWAY REDUCE
SPEED appears in the information display.
The first thing to do is slow your vehicle
down, then pull safely to the side of the
road and check for proper tongue load and
trailer load distribution. See Towing (page
274
).
RECOMMENDED TOWING
WEIGHTS
Note: Do not exceed the trailer
weight for your vehicle
configuration listed in the chart
below.
Note: Make sure to take into
consideration trailer frontal area.
Do not exceed 36.5 feet² (3.39
meters²) if your vehicle is equipped
with the standard towing package,
or 60 feet² (5.57 meters²) if your
vehicle is equipped with the
optional heavy duty package.
Note: Exceeding this limitation
may significantly reduce the
performance of your towing
vehicle. Selecting a trailer with a
low aerodynamic drag and rounded
front design helps optimize
performance and fuel economy.
Note: For high altitude operation,
reduce the gross combined weight
by 2% per
1,000 ft (300 m)
starting at the 1,000 ft (300 m)
elevation point. Note:
Certain states require
electric trailer brakes for trailers
over a specified weight. Be sure to
check state regulations for this
specified weight. The maximum
trailer weights listed may be limited
to this specified weight, as the
vehicle ’s electrical system may not
include the wiring connector
needed to activate electric trailer
brakes.
Your vehicle may tow a trailer
provided the maximum trailer
weight is less than or equal to the
maximum trailer weight listed for
your vehicle configuration on the
following chart.
To calculate the maximum loaded
trailer weight for your vehicle:
1. Start with the gross combined weight rating for your vehicle
model and axle ratio. See the
following chart.
2. Subtract all of the following
that apply to your vehicle:
•Vehicle curb weight.
• Hitch hardware weight, such
as a draw bar, ball, locks or
weight distributing.
• Driver weight.
• Passenger weight.
• Payload, cargo and luggage
weight.
• Aftermarket equipment
weight.
3. This equals the maximum
loaded trailer weight for this
combination.
285
Expedition (TB8) Canada/United States of America, enUSA, Edition date: 201708, Third-Printing- Towing
Page 296 of 571
Before Towing a Trailer
Practice turning, stopping and backing up
to get the feel of your vehicle-trailer
combination before starting on a trip.
When turning, make wider turns so the
trailer wheels clear curbs and other
obstacles.
When Towing a Trailer
•
Do not tow during the first 1,000 mi
(1,600 km).
• Do not make full-throttle starts.
• Check your hitch, electrical connections
and trailer wheel lug nuts thoroughly
after you have traveled 50 mi (80 km).
• When stopped in congested or heavy
traffic during hot weather, place the
transmission in park (P) to aid engine
and transmission cooling and to help
A/C performance.
• Turn off the speed control with heavy
loads or in hilly terrain. The speed
control may turn off automatically
when you are towing on long, steep
slopes.
• Shift to a lower gear when driving down
a long or steep hill. Do not apply the
brakes continuously, as they may
overheat and become less effective.
• If your transmission is equipped with a
Grade Assist or Tow/Haul feature, use
this feature when towing. This provides
engine braking and helps eliminate
excessive transmission shifting for
optimum fuel economy and
transmission cooling.
• If your vehicle is equipped with
AdvanceTrac with RSC, this system
may turn on during typical cornering
maneuvers with a heavily loaded trailer.
This is normal. Turning the corner at a
slower speed when towing may reduce
this tendency. •
If you are towing a trailer frequently in
hot weather, hilly conditions, at the
gross combined weight rating (or any
combination of these factors), consider
refilling your rear axle with synthetic
gear lubricant if the axle is not already
filled with it. See
Capacities and
Specifications (page 380).
• Allow more distance for stopping with
a trailer attached. Anticipate stops and
brake gradually.
• Avoid parking on a slope. However, if
you must park on a slope:
1. Turn the steering wheel to point your vehicle tires away from traffic flow.
2. Set your vehicle parking brake.
3. Place the transmission in park (P).
4. Place wheel chocks in front and back of the trailer wheels. Chocks are not
included with your vehicle.
Your vehicle may be equipped with a
temporary or conventional spare tire. A
temporary spare tire is different in size,
tread-type, or is from a different
manufacturer than the road tires on your
vehicle. Consult information on the tire
label or Safety Compliance label for
limitations when using these tires.
Launching or Retrieving a Boat or
Personal Watercraft (PWC)
Note: Disconnect the wiring to the trailer
before backing the trailer into the water.
Note: Reconnect the wiring to the trailer
after removing the trailer from the water.
When backing down a ramp during boat
launching or retrieval:
• Do not allow the static water level to
rise above the bottom edge of the rear
bumper.
• Do not allow waves to break higher
than
6 in (15 cm) above the bottom
edge of the rear bumper.
293
Expedition (TB8) Canada/United States of America, enUSA, Edition date: 201708, Third-Printing- Towing