2018 FORD EXPEDITION ECU
[x] Cancel search: ECUPage 28 of 571

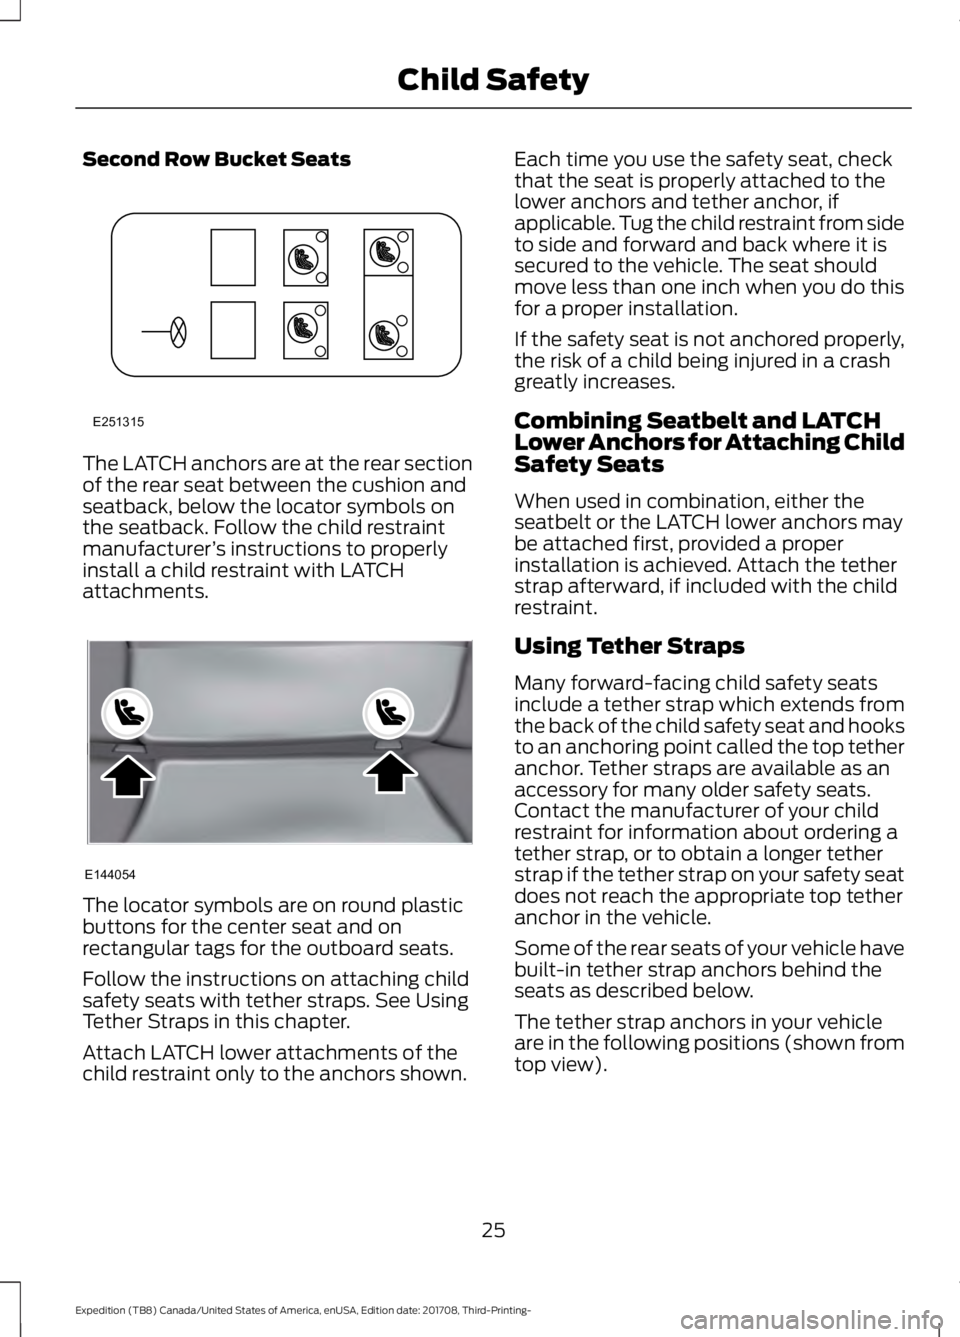
Second Row Bucket Seats
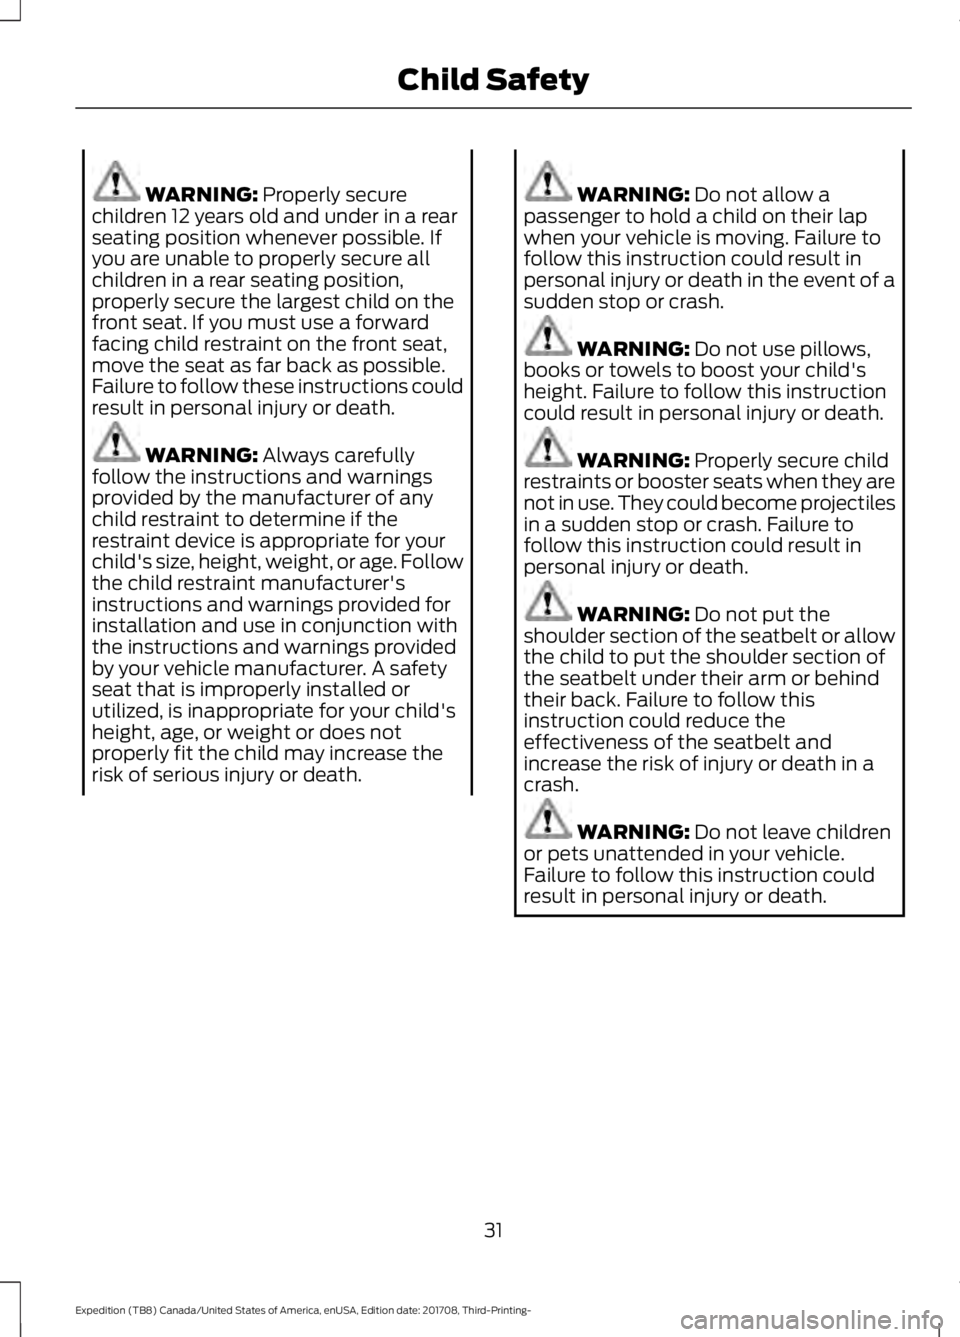
The LATCH anchors are at the rear section
of the rear seat between the cushion and
seatback, below the locator symbols on
the seatback. Follow the child restraint
manufacturer
’s instructions to properly
install a child restraint with LATCH
attachments. The locator symbols are on round plastic
buttons for the center seat and on
rectangular tags for the outboard seats.
Follow the instructions on attaching child
safety seats with tether straps. See Using
Tether Straps in this chapter.
Attach LATCH lower attachments of the
child restraint only to the anchors shown. Each time you use the safety seat, check
that the seat is properly attached to the
lower anchors and tether anchor, if
applicable. Tug the child restraint from side
to side and forward and back where it is
secured to the vehicle. The seat should
move less than one inch when you do this
for a proper installation.
If the safety seat is not anchored properly,
the risk of a child being injured in a crash
greatly increases.
Combining Seatbelt and LATCH
Lower Anchors for Attaching Child
Safety Seats
When used in combination, either the
seatbelt or the LATCH lower anchors may
be attached first, provided a proper
installation is achieved. Attach the tether
strap afterward, if included with the child
restraint.
Using Tether Straps
Many forward-facing child safety seats
include a tether strap which extends from
the back of the child safety seat and hooks
to an anchoring point called the top tether
anchor. Tether straps are available as an
accessory for many older safety seats.
Contact the manufacturer of your child
restraint for information about ordering a
tether strap, or to obtain a longer tether
strap if the tether strap on your safety seat
does not reach the appropriate top tether
anchor in the vehicle.
Some of the rear seats of your vehicle have
built-in tether strap anchors behind the
seats as described below.
The tether strap anchors in your vehicle
are in the following positions (shown from
top view).
25
Expedition (TB8) Canada/United States of America, enUSA, Edition date: 201708, Third-Printing- Child SafetyE251315 E144054
Page 34 of 571

WARNING: Properly secure
children 12 years old and under in a rear
seating position whenever possible. If
you are unable to properly secure all
children in a rear seating position,
properly secure the largest child on the
front seat. If you must use a forward
facing child restraint on the front seat,
move the seat as far back as possible.
Failure to follow these instructions could
result in personal injury or death. WARNING:
Always carefully
follow the instructions and warnings
provided by the manufacturer of any
child restraint to determine if the
restraint device is appropriate for your
child's size, height, weight, or age. Follow
the child restraint manufacturer's
instructions and warnings provided for
installation and use in conjunction with
the instructions and warnings provided
by your vehicle manufacturer. A safety
seat that is improperly installed or
utilized, is inappropriate for your child's
height, age, or weight or does not
properly fit the child may increase the
risk of serious injury or death. WARNING:
Do not allow a
passenger to hold a child on their lap
when your vehicle is moving. Failure to
follow this instruction could result in
personal injury or death in the event of a
sudden stop or crash. WARNING:
Do not use pillows,
books or towels to boost your child's
height. Failure to follow this instruction
could result in personal injury or death. WARNING:
Properly secure child
restraints or booster seats when they are
not in use. They could become projectiles
in a sudden stop or crash. Failure to
follow this instruction could result in
personal injury or death. WARNING:
Do not put the
shoulder section of the seatbelt or allow
the child to put the shoulder section of
the seatbelt under their arm or behind
their back. Failure to follow this
instruction could reduce the
effectiveness of the seatbelt and
increase the risk of injury or death in a
crash. WARNING:
Do not leave children
or pets unattended in your vehicle.
Failure to follow this instruction could
result in personal injury or death.
31
Expedition (TB8) Canada/United States of America, enUSA, Edition date: 201708, Third-Printing- Child Safety
Page 38 of 571

•
Crash sensors and monitoring system
with readiness indicator.
The seatbelt pretensioners and rear
inflatable seatbelts are designed to
activate in frontal, near-frontal and side
crashes, and in rollovers. The seatbelt
pretensioners at the front seating positions
are designed to tighten the seatbelts firmly
against the occupant’ s body when
activated. This helps increase the
effectiveness of the seatbelts. In frontal
crashes, the seatbelt pretensioners can be
activated alone or, if the crash is of
sufficient severity, together with the front
airbags.
FASTENING THE SEATBELTS
Standard belts shown, inflatable belts
similar
The front outboard and rear safety
restraints in the vehicle are combination
lap and shoulder belts. 1. Insert the seatbelt tongue into the
proper buckle (the buckle closest to
the direction the tongue is coming
from) until you hear a snap and feel it
latch. Make sure you securely fasten
the tongue in the buckle. 2. To unfasten, press the release button
and remove the tongue from the
buckle.
35
Expedition (TB8) Canada/United States of America, enUSA, Edition date: 201708, Third-Printing- SeatbeltsE67017 E142587 E142588
Page 57 of 571

Press the button to release the key blade.
Press and hold the button to fold the key
blade back in when not in use.
Note:
Your vehicle keys came with a
security label that provides important key
cut information. Keep the label in a safe
place for future reference.
Intelligent Access Key (If Equipped)
Note: You may not be able to shift out of
park (P) unless the intelligent access key is
inside your vehicle. The intelligent access keys operate the
power locks and the remote start system.
The key must be in your vehicle to use the
push button start.
Removable Key Blade
The intelligent access key also contains a
removable key blade that you can use to
unlock your vehicle.
54
Expedition (TB8) Canada/United States of America, enUSA, Edition date: 201708, Third-Printing- Keys and Remote ControlsE191532 E151795 E253517
Page 58 of 571

Push the release button and pull the key
blade out.
Note:
Your vehicle keys came with a
security label that provides important key
cut information. Keep the label in a safe
place for future reference.
Using the Key Blade
The key cylinder is under the driver side
door handle. To access the cylinder: 1. Pull the handle and hold it.
2. While holding the handle outward,
identify the cylinder and insert the key
blade into the slot.
3. Actuate the cylinder to unlock or lock the door.
Replacing the Battery
Note: Refer to local regulations when
disposing of transmitter batteries.
Note: Do not wipe off any grease on the
battery terminals or on the back surface of
the circuit board.
Note: Replacing the battery does not erase
the programmed key from your vehicle. The
transmitter should operate normally.
A message appears in the information
display when the remote control battery
is low. See Information Messages (page
123).
Integrated Keyhead Transmitter
The remote control uses one coin-type
three-volt lithium battery CR2032 or
equivalent.
55
Expedition (TB8) Canada/United States of America, enUSA, Edition date: 201708, Third-Printing- Keys and Remote ControlsE254065 E151795 E251885
Page 71 of 571

Autounlock
Autounlock unlocks all the doors when:
•
The ignition is on, all the doors are
closed, and your vehicle has been
moving at a speed greater than 12 mph
(20 km/h).
• Your vehicle comes to a stop and you
switch the ignition off, or to the
accessory position.
• You open the driver door within 10
minutes of switching the ignition off or
to accessory.
Note: The doors do not autounlock if you
electronically lock your vehicle after you
switch the ignition off and before you open
the driver door.
Enabling or Disabling Autounlock
You can enable or disable the autounlock
feature in the information display or an
authorized dealer can do it for you. See
General Information
(page 111).
Illuminated Entry
(If Equipped)
The interior lamps and some exterior
lamps illuminate when you unlock the
doors with the remote control.
The lamps turn off if:
• The ignition is on.
• You press the remote control lock
button.
• 25 seconds have elapsed.
The lamps do not turn off if:
• You turn them on with the lamp
control.
• Any door is open.
Illuminated Exit
The interior lamps and some exterior
lamps illuminate when all doors are closed
and you switch the ignition off. The lamps turn off if all the doors remain
closed and:
•
25 seconds have elapsed.
• You press the push button ignition
switch.
Battery Saver
If you leave the courtesy lamps, interior
lamps or headlamps on, the battery saver
shuts them off 10 minutes after you switch
the ignition off.
Battery Saver for Intelligent Access
Keys
If you leave the ignition switched on, it
shuts off when it detects a certain amount
of battery drain, or after 45 minutes.
KEYLESS ENTRY
SECURICODE™ KEYLESS ENTRY
KEYPAD
The keypad is near the driver window. It
illuminates when touched.
Note: If you enter your entry code too fast
on the keypad, the unlock function may not
work. Enter your entry code again more
slowly.
68
Expedition (TB8) Canada/United States of America, enUSA, Edition date: 201708, Third-Printing- Doors and Locks
Page 72 of 571

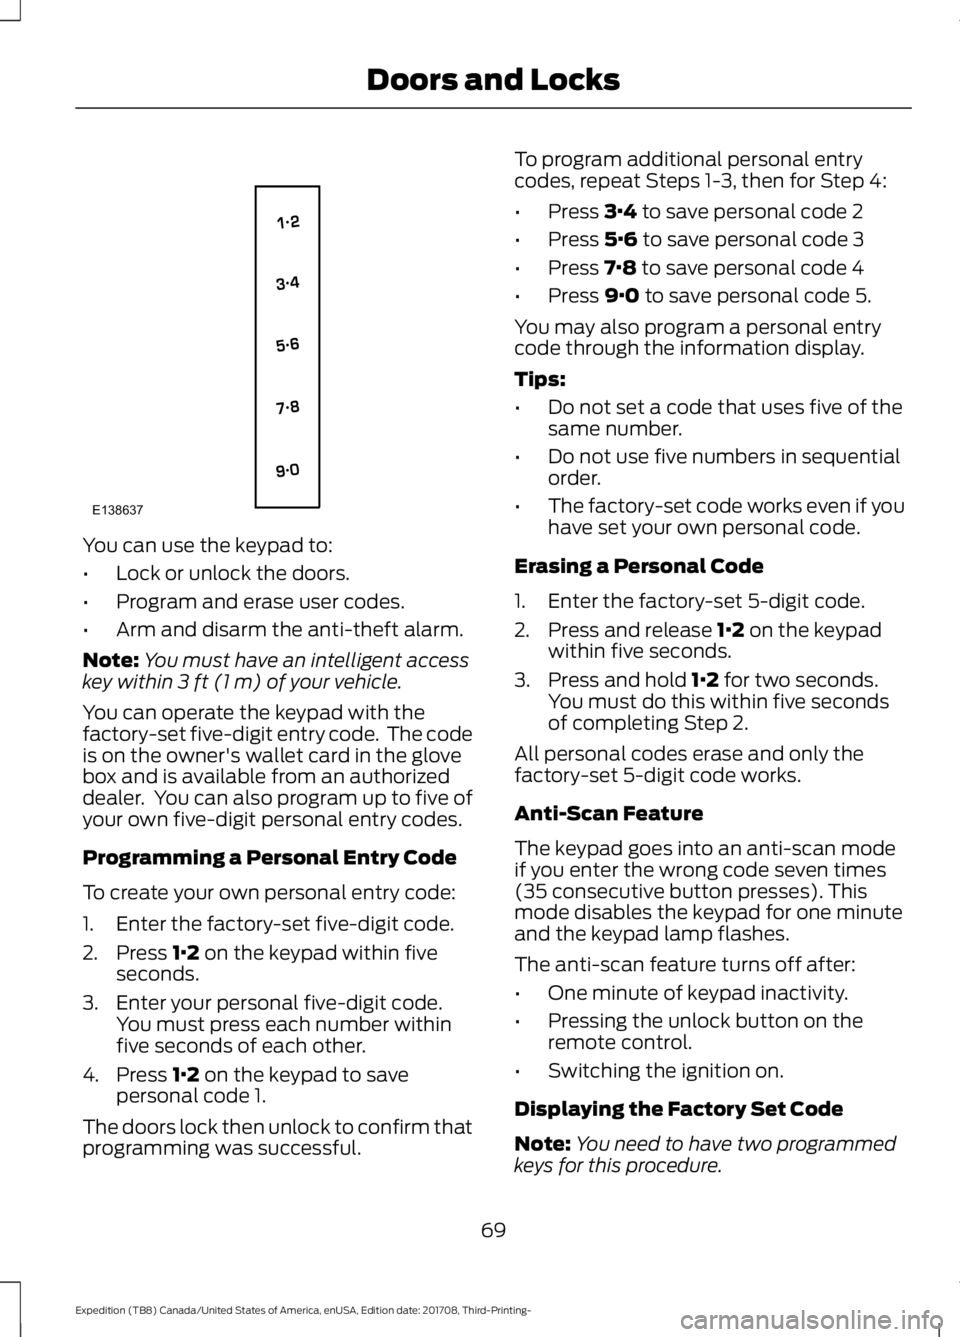
You can use the keypad to:
•
Lock or unlock the doors.
• Program and erase user codes.
• Arm and disarm the anti-theft alarm.
Note: You must have an intelligent access
key within 3 ft (1 m) of your vehicle.
You can operate the keypad with the
factory-set five-digit entry code. The code
is on the owner's wallet card in the glove
box and is available from an authorized
dealer. You can also program up to five of
your own five-digit personal entry codes.
Programming a Personal Entry Code
To create your own personal entry code:
1. Enter the factory-set five-digit code.
2. Press
1·2 on the keypad within five
seconds.
3. Enter your personal five-digit code. You must press each number within
five seconds of each other.
4. Press
1·2 on the keypad to save
personal code 1.
The doors lock then unlock to confirm that
programming was successful. To program additional personal entry
codes, repeat Steps 1-3, then for Step 4:
•
Press
3·4 to save personal code 2
• Press
5·6 to save personal code 3
• Press
7·8 to save personal code 4
• Press
9·0 to save personal code 5.
You may also program a personal entry
code through the information display.
Tips:
• Do not set a code that uses five of the
same number.
• Do not use five numbers in sequential
order.
• The factory-set code works even if you
have set your own personal code.
Erasing a Personal Code
1. Enter the factory-set 5-digit code.
2. Press and release
1·2 on the keypad
within five seconds.
3. Press and hold
1·2 for two seconds.
You must do this within five seconds
of completing Step 2.
All personal codes erase and only the
factory-set 5-digit code works.
Anti-Scan Feature
The keypad goes into an anti-scan mode
if you enter the wrong code seven times
(35 consecutive button presses). This
mode disables the keypad for one minute
and the keypad lamp flashes.
The anti-scan feature turns off after:
• One minute of keypad inactivity.
• Pressing the unlock button on the
remote control.
• Switching the ignition on.
Displaying the Factory Set Code
Note: You need to have two programmed
keys for this procedure.
69
Expedition (TB8) Canada/United States of America, enUSA, Edition date: 201708, Third-Printing- Doors and LocksE138637
Page 80 of 571

PASSIVE ANTI-THEFT
SYSTEM
Note:
The system is not compatible with
non-Ford aftermarket remote start systems.
Use of these systems may result in vehicle
starting problems and a loss of security
protection.
Note: Metallic objects, electronic devices
or a second coded key on the same key
chain may cause vehicle starting problems
if they are too close to the key when starting
the engine. Prevent these objects from
touching the coded key while starting the
engine. Switch the ignition off, move all
objects on the key chain away from the
coded key and restart the engine if a
problem occurs.
Note: Do not leave a duplicate coded key
in the vehicle. Always take your keys and
lock all doors when leaving the vehicle.
SecuriLock ™
The system is an engine immobilization
system. The intended design is to help
prevent the engine from starting unless a
coded key programmed to your vehicle is
used. Using the wrong key may prevent
the engine from starting. A message may
appear in the information display.
If you are unable to start the engine with a
correctly coded key, a malfunction has
happened and a message may appear in
the information display.
Automatic Arming
The vehicle arms immediately after you
switch the ignition off.
Automatic Disarming
If you switch the ignition on with a coded
key you disarm the vehicle. If you unlock
the doors with the touch handle you disarm
the alarm. Replacement Keys
Note:
Your vehicle comes equipped with
two intelligent access keys.
The intelligent access key functions as a
programmed key that operates the driver
door lock and activates the intelligent
access with push button start system, as
well as a remote control.
If your programmed transmitters are lost
or stolen and you do not have an extra
coded key, you will need to have your
vehicle towed to an authorized dealer. You
need to erase the key codes from your
vehicle and program new coded keys.
Store an extra programmed key away from
the vehicle in a safe place to help prevent
any inconveniences. See your authorized
dealer to purchase additional spare or
replacement keys.
Programming a Spare Integrated
Keyhead Transmitter
Note: You can program a maximum of
eight coded keys to your vehicle. All eight
can be integrated keyhead transmitters.
You can program your own integrated
keyhead transmitter or standard
SecuriLock coded keys to your vehicle.
This procedure programs both the engine
immobilizer keycode and the remote entry
portion of the remote control to your
vehicle
Only use integrated keyhead transmitters
or standard SecuriLock keys.
You must have two previously
programmed coded keys and the new
unprogrammed key readily accessible. See
your authorized dealer to have the spare
key programmed if two previously
programmed coded keys are not available.
Read and understand the entire procedure
before you begin.
77
Expedition (TB8) Canada/United States of America, enUSA, Edition date: 201708, Third-Printing- Security