2018 FORD EXPEDITION fuel type
[x] Cancel search: fuel typePage 107 of 571
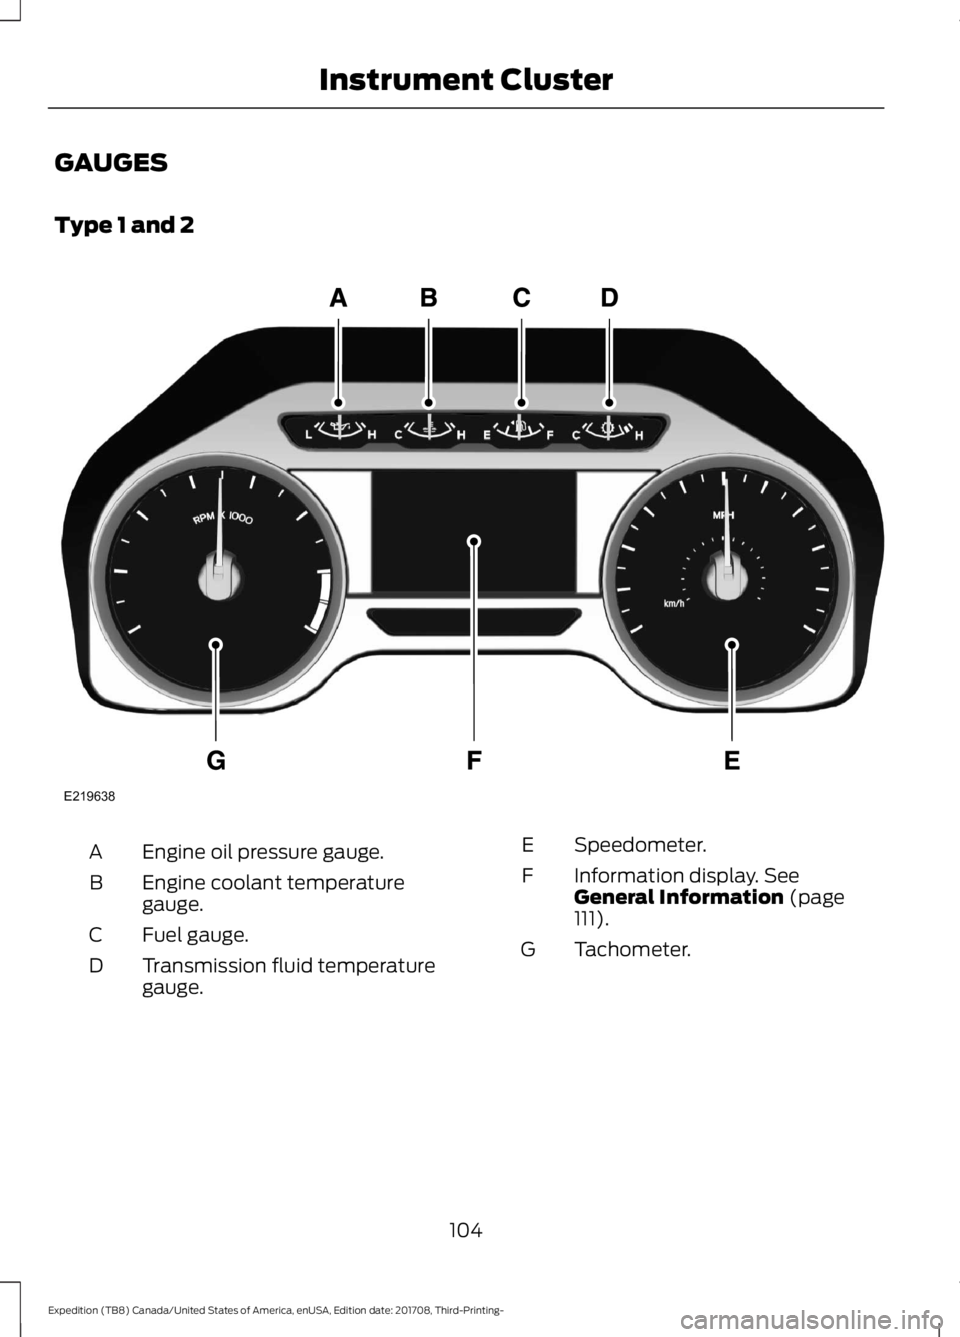
GAUGES
Type 1 and 2
Engine oil pressure gauge.
A
Engine coolant temperature
gauge.
B
Fuel gauge.
C
Transmission fluid temperature
gauge.
D Speedometer.
E
Information display. See
General Information (page
111).
F
Tachometer.
G
104
Expedition (TB8) Canada/United States of America, enUSA, Edition date: 201708, Third-Printing- Instrument ClusterE219638
Page 108 of 571
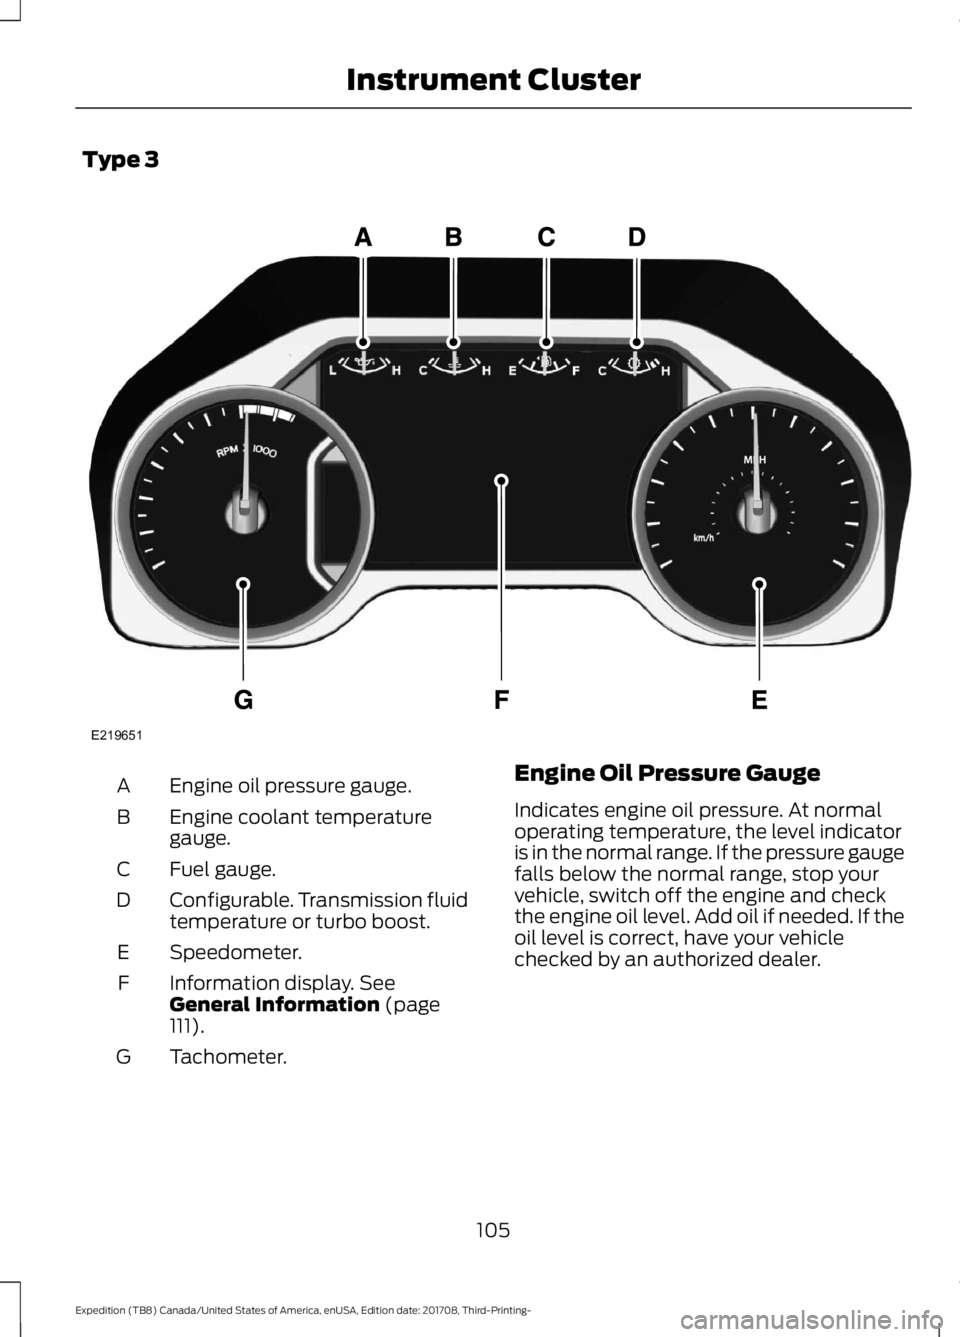
Type 3
Engine oil pressure gauge.
A
Engine coolant temperature
gauge.
B
Fuel gauge.
C
Configurable. Transmission fluid
temperature or turbo boost.
D
Speedometer.
E
Information display. See
General Information (page
111).
F
Tachometer.
G Engine Oil Pressure Gauge
Indicates engine oil pressure. At normal
operating temperature, the level indicator
is in the normal range. If the pressure gauge
falls below the normal range, stop your
vehicle, switch off the engine and check
the engine oil level. Add oil if needed. If the
oil level is correct, have your vehicle
checked by an authorized dealer.
105
Expedition (TB8) Canada/United States of America, enUSA, Edition date: 201708, Third-Printing- Instrument ClusterE219651
Page 114 of 571
GENERAL INFORMATION
WARNING: Driving while
distracted can result in loss of vehicle
control, crash and injury. We strongly
recommend that you use extreme
caution when using any device that may
take your focus off the road. Your
primary responsibility is the safe
operation of your vehicle. We
recommend against the use of any
hand-held device while driving and
encourage the use of voice-operated
systems when possible. Make sure you
are aware of all applicable local laws
that may affect the use of electronic
devices while driving.
Various systems on your vehicle can be
controlled using the information display
controls on the steering wheel.
Corresponding information is displayed in
the information display.
Note: Some options may appear slightly
different or not at all if the items are
optional. Note:
Trailer options are not available if
your vehicle speed is greater than
3 mph
(5 km/h).
Note: Some MyKey menu options only
appear if MyKey is enabled and at least one
MyKey is programmed. This icon gives you the ability to
switch a feature on or off. A
check in the box indicates the
feature is on, and unchecked indicates the
feature is off.
Information Display Controls
(Type 1 and 2)
• Press the up and down arrow buttons
to scroll through and highlight the
options within a menu.
• Press the right arrow button to enter a
sub-menu.
• Press the left arrow button to exit a
menu.
• Press the
OK button to choose and
confirm a setting or messages.
Type 1 Main Menu
Trip 1
Trip 2
Fuel Economy Driver Assist Settings
111
Expedition (TB8) Canada/United States of America, enUSA, Edition date: 201708, Third-Printing- Information DisplaysE204495
Page 117 of 571
Settings
Do Not Disturb
AdvanceTrac
Max Speed
Speed Minder
Vol. Limiter Enter the submenu and select your
setting
Clear MyKeys
Enter the submenu and select your
setting
Units
Display Setup
Temperature
Tire Pressure
Language
Type 2 Main Menu
Display Mode Trip/FuelTowing
Off Road Settings Display Mode
Distance to Empty
Tire Pressure
Digital Speedometer
114
Expedition (TB8) Canada/United States of America, enUSA, Edition date: 201708, Third-Printing- Information Displays
Page 121 of 571
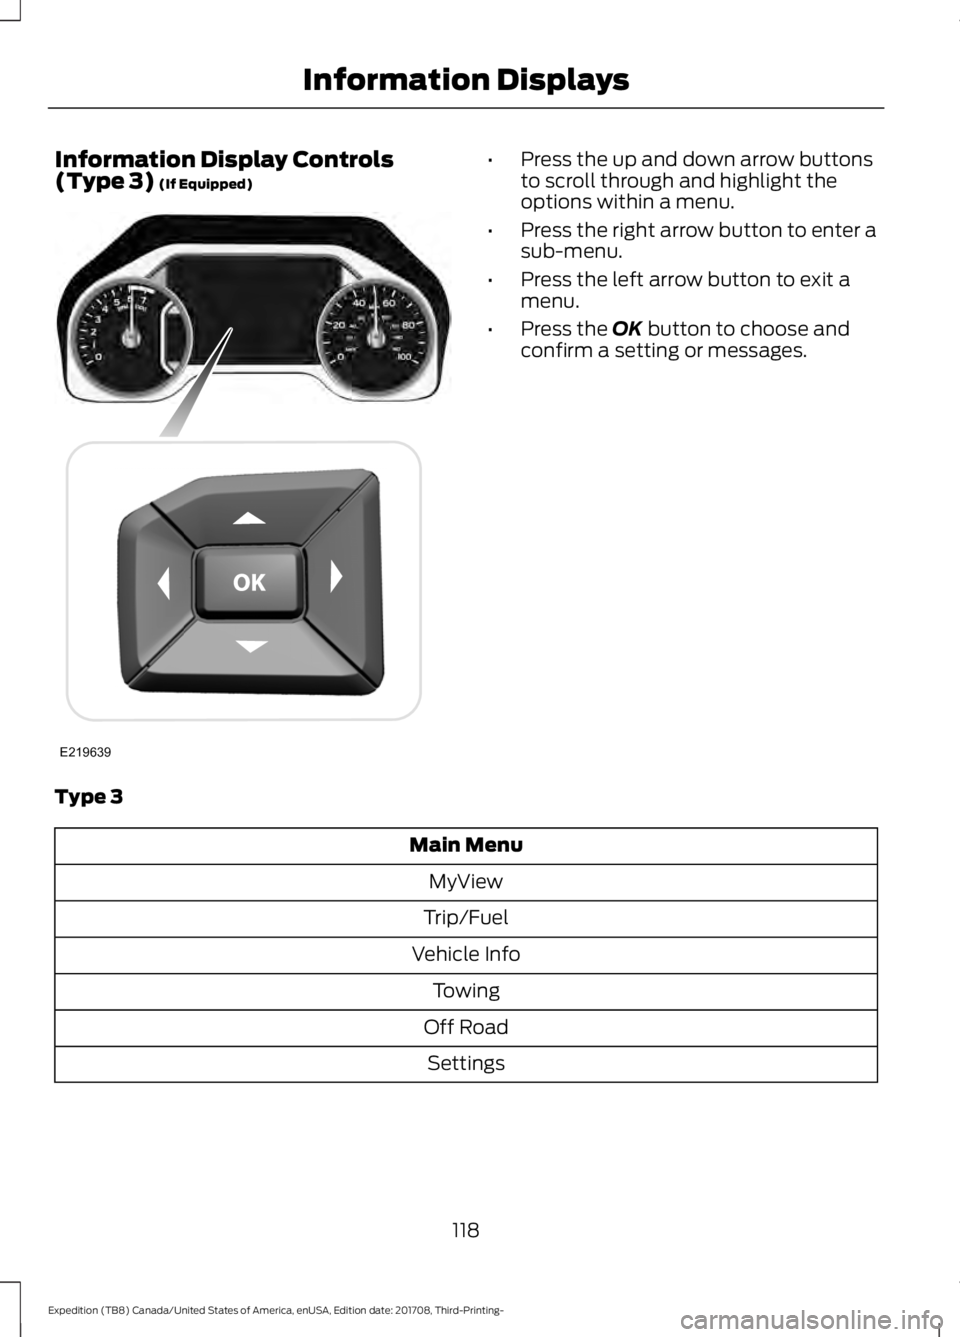
Information Display Controls
(Type 3) (If Equipped) •
Press the up and down arrow buttons
to scroll through and highlight the
options within a menu.
• Press the right arrow button to enter a
sub-menu.
• Press the left arrow button to exit a
menu.
• Press the
OK button to choose and
confirm a setting or messages.
Type 3 Main Menu
MyView
Trip/Fuel
Vehicle Info Towing
Off Road Settings
118
Expedition (TB8) Canada/United States of America, enUSA, Edition date: 201708, Third-Printing- Information DisplaysE219639
Page 184 of 571

AUTO-START-STOP
The system helps reduce fuel consumption
by automatically stopping and restarting
the engine when your vehicle has stopped.
The engine restarts automatically when
you release the brake pedal.
In some situations, your vehicle may restart
automatically, for example:
•
To maintain interior comfort.
• To recharge the battery.
Note: Power assist steering turns off when
the engine is off.
Note: If your vehicle is flex fuel capable,
Auto-Start-Stop will be inhibited for a short
time after a refuel event while the system
is verifying the fuel type being used. WARNING: Always fully apply the
parking brake. Make sure you shift into
park (P) for vehicles with an automatic
transmission. Switch the ignition off and
remove the key whenever you leave your
vehicle. WARNING:
Before opening the
hood or performing any maintenance,
fully apply the parking brake, shift into
park (P) or neutral (N) and switch the
ignition off. WARNING:
Always switch the
ignition off before leaving the vehicle. If
the ignition is switched on an automatic
restart may occur at any time. WARNING:
The system may
require the engine to automatically
restart when the auto-start-stop
indicator illuminates green or flashes
amber. Failure to follow this instruction
could result in personal injury. The Auto-Start-Stop system status is
available at a glance within the information
display. See Information Displays (page
111
).
Enabling Auto-Start-Stop
The system automatically enables every
time you start your vehicle if:
• You do not press the Auto-Start-Stop
button (not illuminated).
• Your vehicle exceeds an initial speed
of
3 mph (5 km/h) after you have
initially started your vehicle.
• You have stopped your vehicle.
• Your foot is on the brake pedal.
• The driver door is closed.
• There is adequate brake vacuum.
• The interior compartment has cooled
or warmed to an acceptable level.
• The front windshield defroster is off.
• You have not turned the steering wheel
rapidly or you do not have it at a sharp
angle.
• The vehicle is not on a steep road
grade.
• The battery is within optimal operating
conditions (battery state of charge and
temperature in range).
• The engine coolant is at operating
temperature.
• Elevation is below about
11,000 ft
(3,350 m).
• Ambient temperature is moderate.
• The trailer is not connected.
• If you select Normal, Eco, Snow/Wet
or Grass/Gravel/Snow modes.
• You are not in 4H or 4L.
• You have not selected Manual shift
mode.
181
Expedition (TB8) Canada/United States of America, enUSA, Edition date: 201708, Third-Printing- Unique Driving Characteristics
Page 193 of 571
Filling the Fuel Tank
For consistent results when refueling:
•
Turn the ignition off before fueling; an
inaccurate reading results if the engine
is left running.
• Use the same fill rate
(low-medium-high) each time the tank
is filled.
• Allow no more than one automatic
shut-off when refueling.
Results are most accurate when the filling
method is consistent.
Calculating Fuel Economy
Your vehicle calculates fuel economy
figures through the trip computer average
fuel function. See Information Displays
(page 111).
The first
1,000 mi (1,500 km) of driving is
the break-in period of the engine. A more
accurate measurement is obtained after
2,000 mi (3,000 km)
.
1. Completely fill the fuel tank and record
the initial odometer reading.
See
Refueling (page 187).
2. Each time you fill the fuel tank, record the amount of fuel added.
3. After at least three fill ups, fill the fuel tank and record the current odometer
reading.
4. Subtract your initial odometer reading from the current odometer reading.
To calculate L/100 km (liters per 100
kilometers) fuel consumption, multiply the
liters used by 100, then divide by kilometers
traveled. To calculate MPG (miles per
gallon) fuel consumption, divide miles
traveled by gallons used. Keep a record for at least one month and
record the type of driving, for example city
or highway. This provides an accurate
estimate of your vehicle
’s fuel economy
under current driving conditions. Keeping
records during summer and winter shows
how temperature impacts fuel economy.
Conditions
• Heavily loading your vehicle reduces
fuel economy.
• Carrying unnecessary weight in your
vehicle may reduce fuel economy.
• Avoid adding accessories that increase
aerodynamic drag to your vehicle such
as bug deflectors, car top carriers and
ski or bike racks.
• Using fuel blended with alcohol may
lower fuel economy.
• Fuel economy may decrease with lower
temperatures.
• Fuel economy may decrease when
driving short distances.
• You will get better fuel economy when
driving on flat terrain than when driving
on hilly terrain.
190
Expedition (TB8) Canada/United States of America, enUSA, Edition date: 201708, Third-Printing- Fuel and Refueling
Page 296 of 571
Before Towing a Trailer
Practice turning, stopping and backing up
to get the feel of your vehicle-trailer
combination before starting on a trip.
When turning, make wider turns so the
trailer wheels clear curbs and other
obstacles.
When Towing a Trailer
•
Do not tow during the first 1,000 mi
(1,600 km).
• Do not make full-throttle starts.
• Check your hitch, electrical connections
and trailer wheel lug nuts thoroughly
after you have traveled 50 mi (80 km).
• When stopped in congested or heavy
traffic during hot weather, place the
transmission in park (P) to aid engine
and transmission cooling and to help
A/C performance.
• Turn off the speed control with heavy
loads or in hilly terrain. The speed
control may turn off automatically
when you are towing on long, steep
slopes.
• Shift to a lower gear when driving down
a long or steep hill. Do not apply the
brakes continuously, as they may
overheat and become less effective.
• If your transmission is equipped with a
Grade Assist or Tow/Haul feature, use
this feature when towing. This provides
engine braking and helps eliminate
excessive transmission shifting for
optimum fuel economy and
transmission cooling.
• If your vehicle is equipped with
AdvanceTrac with RSC, this system
may turn on during typical cornering
maneuvers with a heavily loaded trailer.
This is normal. Turning the corner at a
slower speed when towing may reduce
this tendency. •
If you are towing a trailer frequently in
hot weather, hilly conditions, at the
gross combined weight rating (or any
combination of these factors), consider
refilling your rear axle with synthetic
gear lubricant if the axle is not already
filled with it. See
Capacities and
Specifications (page 380).
• Allow more distance for stopping with
a trailer attached. Anticipate stops and
brake gradually.
• Avoid parking on a slope. However, if
you must park on a slope:
1. Turn the steering wheel to point your vehicle tires away from traffic flow.
2. Set your vehicle parking brake.
3. Place the transmission in park (P).
4. Place wheel chocks in front and back of the trailer wheels. Chocks are not
included with your vehicle.
Your vehicle may be equipped with a
temporary or conventional spare tire. A
temporary spare tire is different in size,
tread-type, or is from a different
manufacturer than the road tires on your
vehicle. Consult information on the tire
label or Safety Compliance label for
limitations when using these tires.
Launching or Retrieving a Boat or
Personal Watercraft (PWC)
Note: Disconnect the wiring to the trailer
before backing the trailer into the water.
Note: Reconnect the wiring to the trailer
after removing the trailer from the water.
When backing down a ramp during boat
launching or retrieval:
• Do not allow the static water level to
rise above the bottom edge of the rear
bumper.
• Do not allow waves to break higher
than
6 in (15 cm) above the bottom
edge of the rear bumper.
293
Expedition (TB8) Canada/United States of America, enUSA, Edition date: 201708, Third-Printing- Towing