2018 DODGE CHARGER child restraint
[x] Cancel search: child restraintPage 211 of 553
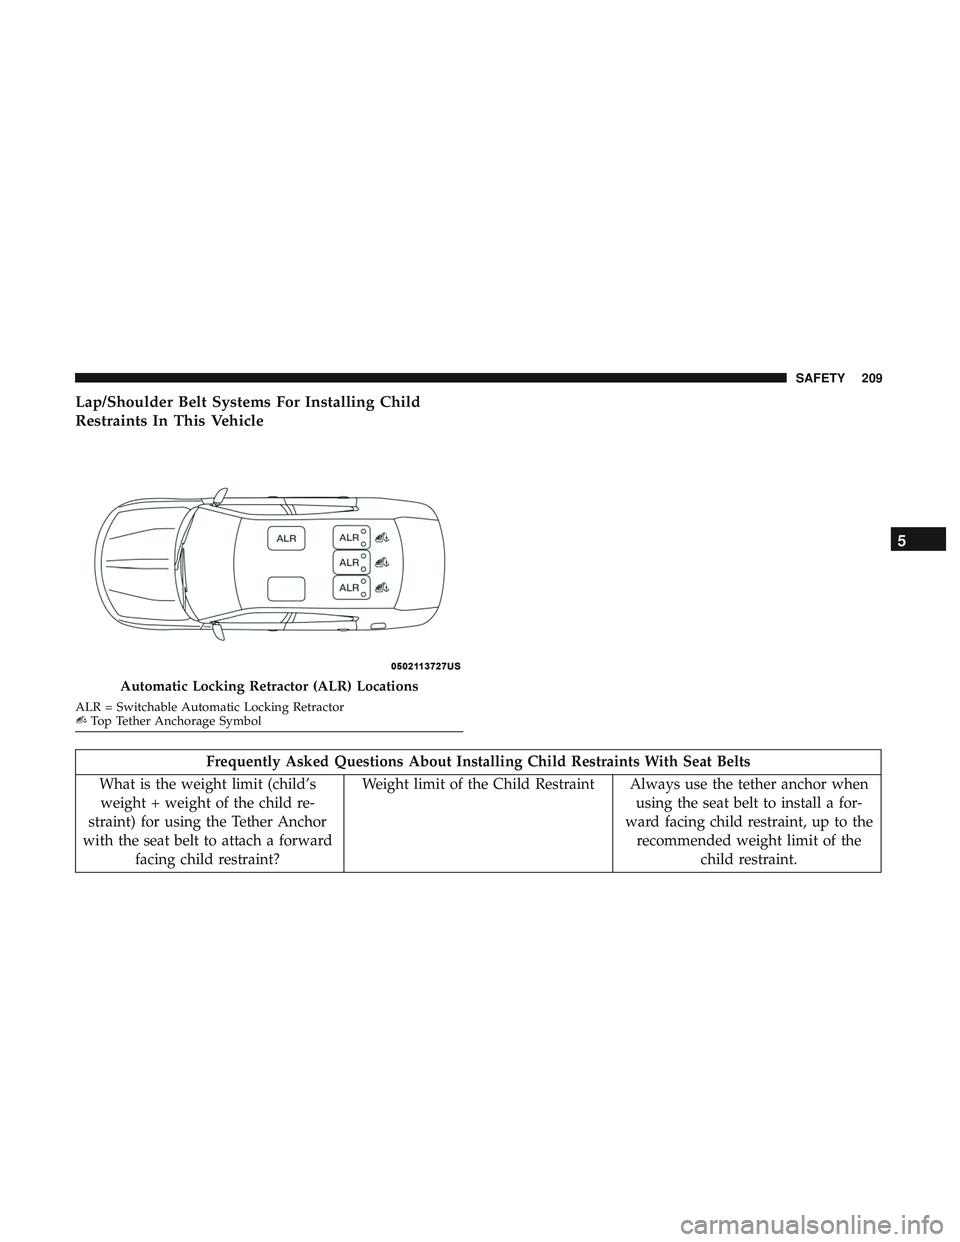
Lap/Shoulder Belt Systems For Installing Child
Restraints In This Vehicle
Frequently Asked Questions About Installing Child Restraints With Seat Belts
What is the weight limit (child’s weight + weight of the child re-
straint) for using the Tether Anchor
with the seat belt to attach a forward facing child restraint? Weight limit of the Child Restraint Always use the tether anchor when
using the seat belt to install a for-
ward facing child restraint, up to the recommended weight limit of the child restraint.
Automatic Locking Retractor (ALR) Locations
ALR = Switchable Automatic Locking RetractorTop Tether Anchorage Symbol
5
SAFETY 209
Page 212 of 553
Frequently Asked Questions About Installing Child Restraints With Seat Belts
Can the rear-facing child restraint
touch the back of the front passenger seat? Yes Contact between the front passenger
seat and the child restraint is al-
lowed, if the child restraint manufac- turer also allows contact.
Can the head restraints be removed? YesCenter Only may be removed.
Can the buckle stalk be twisted to
tighten the seat belt against the belt path of the child restraint? No
Do not twist the buckle stalk in a
seating position with an ALR retrac- tor.
Installing A Child Restraint With A Switchable
Automatic Locking Retractor (ALR):
Child restraint systems are designed to be secured in
vehicle seats by lap belts or the lap belt portion of a
lap/shoulder belt.
WARNING!
•Improper installation or failure to properly secure a
child restraint can lead to failure of the restraint. The
child could be badly injured or killed.
• Follow the child restraint manufacturer ’s directions
exactly when installing an infant or child restraint. 1. Place the child seat in the center of the seating position.
For some second row seats, you may need to recline the
seat and/or raise the head restraint to get a better fit. If
the rear seat can be moved forward and rearward in the
vehicle, you may wish to move it to its rear-most
position to make room for the child seat. You may also
move the front seat forward to allow more room for the
child seat.
2. Pull enough of the seat belt webbing from the retractor to pass it through the belt path of the child restraint. Do
not twist the belt webbing in the belt path.
3. Slide the latch plate into the buckle until you hear a “click.”
210 SAFETY
Page 213 of 553
4. Pull on the webbing to make the lap portion tightagainst the child seat.
5. To lock the seat belt, pull down on the shoulder part of the belt until you have pulled all the seat belt webbing
out of the retractor. Then, allow the webbing to retract
back into the retractor. As the webbing retracts, you will
hear a clicking sound. This means the seat belt is now in
the Automatic Locking mode.
6. Try to pull the webbing out of the retractor. If it is locked, you should not be able to pull out any webbing.
If the retractor is not locked, repeat step 5.
7. Finally, pull up on any excess webbing to tighten the lap portion around the child restraint while you push the
child restraint rearward and downward into the vehicle
seat. 8. If the child restraint has a top tether strap and the
seating position has a top tether anchorage, connect the
tether strap to the anchorage and tighten the tether
strap. See the section “Installing Child Restraints Using
the Top Tether Anchorage” for directions to attach a
tether anchor.
9. Test that the child restraint is installed tightly by pulling back and forth on the child seat at the belt path. It
should not move more than 1 inch (25.4 mm) in any
direction.
Any seat belt system will loosen with time, so check the
belt occasionally, and pull it tight if necessary.
Installing Child Restraints Using The Top Tether
Anchorage:
WARNING!
Do not attach a tether strap for a rear-facing car seat to
any location in front of the car seat, including the seat
frame or a tether anchorage. Only attach the tether
strap of a rear-facing car seat to the tether anchorage
that is approved for that seating position, located
behind the top of the vehicle seat. See the section
(Continued)
5
SAFETY 211
Page 214 of 553
WARNING!(Continued)
“Lower Anchors and Tethers for CHildren (LATCH)
Restraint System” for the location of approved tether
anchorages in your vehicle.
1. Look behind the seating position where you plan to
install the child restraint to find the tether anchorage.
You may need to move the seat forward to provide
better access to the tether anchorage. If there is no top
tether anchorage for that seating position, move the
child restraint to another position in the vehicle if one is
available.
2. Rotate or lift the cover to access the anchor directly behind the seat where you are placing the child re-
straint.
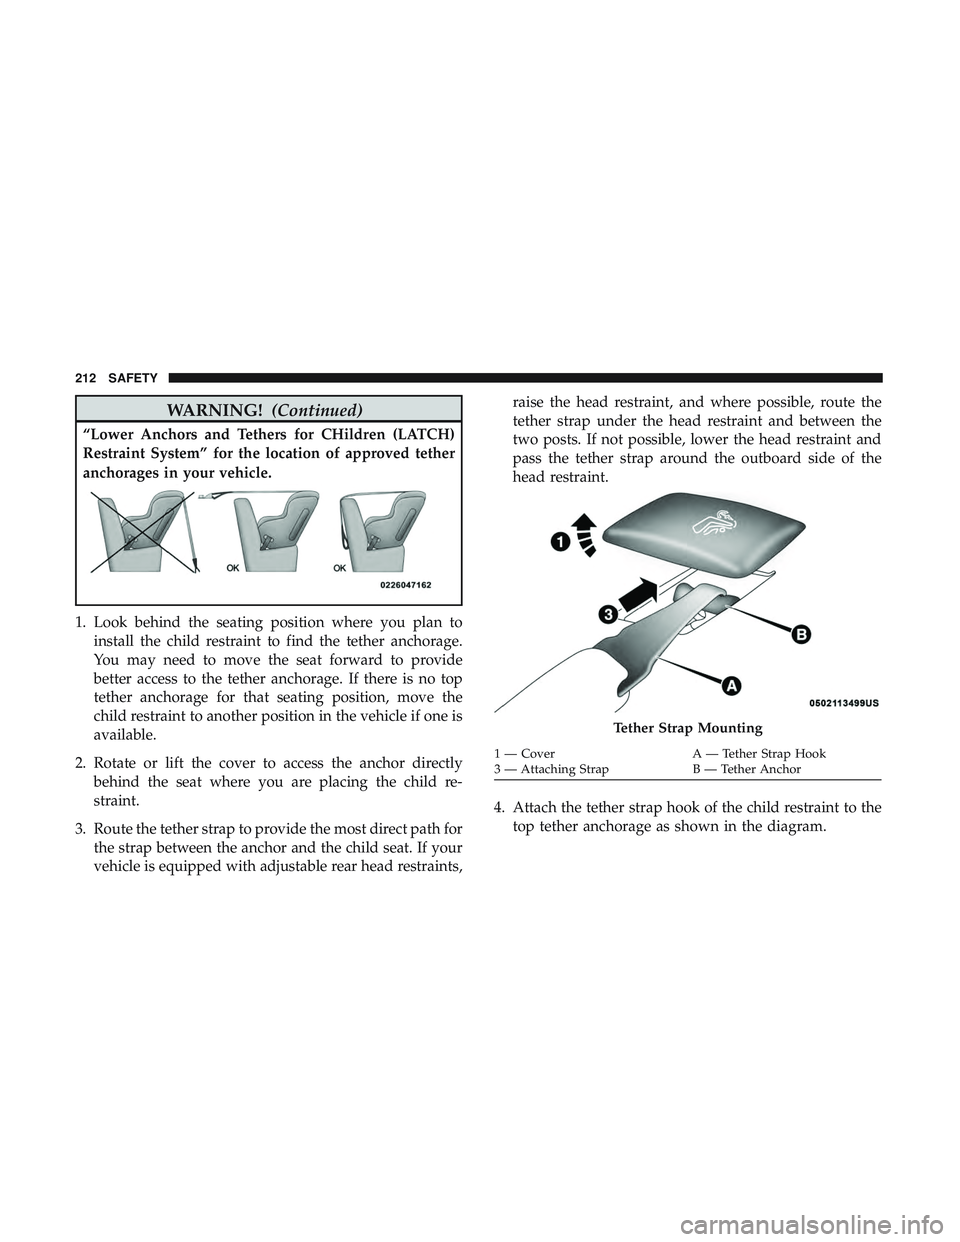
3. Route the tether strap to provide the most direct path for the strap between the anchor and the child seat. If your
vehicle is equipped with adjustable rear head restraints, raise the head restraint, and where possible, route the
tether strap under the head restraint and between the
two posts. If not possible, lower the head restraint and
pass the tether strap around the outboard side of the
head restraint.
4. Attach the tether strap hook of the child restraint to the top tether anchorage as shown in the diagram.
Tether Strap Mounting
1 — Cover A — Tether Strap Hook
3 — Attaching Strap B — Tether Anchor
212 SAFETY
Page 215 of 553
5. Remove slack in the tether strap according to the childrestraint manufacturer ’s instructions.
WARNING!
•An incorrectly anchored tether strap could lead to
increased head motion and possible injury to the
child. Use only the anchorage position directly be-
hind the child seat to secure a child restraint top
tether strap.
• If your vehicle is equipped with a split rear seat,
make sure the tether strap does not slip into the
opening between the seatbacks as you remove slack
in the strap.
Center Tether Attachment
1. Lower the adjustable center head restraint to the full
down position.
2. Route the tether strap over the seatback and head restraint. 3. Attach the tether strap hook of the child restraint to the
center tether anchorage located in the panel between the
rear seatback and the rear window.
4. Remove slack in the tether strap according to the child restraint manufacturer ’s instructions.
Transporting Pets
Air Bags deploying in the front seat could harm your pet.
An unrestrained pet will be thrown about and possibly
injured, or injure a passenger during panic braking or in a
collision.
Pets should be restrained in the rear seat in pet harnesses or
pet carriers that are secured by seat belts.
SAFETY TIPS
Transporting Passengers
NEVER TRANSPORT PASSENGERS IN THE CARGO
AREA.
5
SAFETY 213
Page 538 of 553
Bulb Replacement..........................307
Bulbs, Light .......................... .217, 307
Camera, Rear ............................ .279
Capacities, Fluid .......................... .431
Caps, Filler Oil (Engine) ..................... .362, 369, 370
Radiator (Coolant Pressure) .................383
Carbon Monoxide Warning ................214, 428
Cargo Vehicle Loading ..........................283
Cargo Area Cover ..........................101
Cargo Compartment ........................101
Car Washes ...............................414
Cellular Phone ............................506
Certification Label ..........................284
Chains, Tire ............................. .410
Changing A Flat Tire ........................388
Chart, Tire Sizing .......................... .391
Check Engine Light (Malfunction Indicator Light). . . .143
Checking Your Vehicle For Safety ...............213
Checks, Safety ............................ .213
Child Restraint ............................197
Child Restraints Booster Seats ............................201 Child Seat Installation
.....................210
How To Stow An unused ALR Seat Belt ........207
Infant And Child Restraints .................200
Lower Anchors And Tethers For Children .......203
Older Children And Child Restraints ...........200
Seating Positions ........................ .202
Child Safety Locks ..........................41
Clean Air Gasoline ........................ .425
Cleaning Wheels ............................... .409
Climate Control ............................76
Automatic ............................76, 82
Manual ................................76
Coin Holder ............................. .109
Cold W
eather Operation ..................... .225
Compact Disc (CD) Maintenance ................526
Compact Spare Tire ........................ .407
Console Floor .................................109
Contract, Service .......................... .530
Cooling Pressure Cap (Radiator Cap) ............383
Cooling System ............................380
Adding Coolant (Antifreeze) .................382
Coolant Level ........................381, 384
Cooling Capacity ........................ .431
536 INDEX
Page 544 of 553

Service............................... .307
Traction Control ........................ .152
Turn Signals ....................65, 69, 141, 217
Vanity Mirror ............................64
Warning Instrument Cluster Descriptions . . . .134, 141
Loading Vehicle ........................283, 285
Capacities ............................. .285
Tires................................. .395
Load Shed Battery Saver On ...................129
Load Shed Electrical Load Reduction .............129
Load Shed Intelligent Battery Sensor .............129
Locks Automatic Door ..........................41
Auto Unlock .............................41
Child Protection ..........................41
Power Door .............................36
Low Tire Pressure System .....................166
Lubrication, Body ..........................375
Lug Nuts ............................... .422
Maintenance Free Battery .....................366
Maintenance Schedule .............353, 354, 357, 359
Malfunction Indicator Light (Check Engine) . . . .135, 143
Manual, Service ............................532
Media Hub ...............................505 Memory Feature (Memory Seats)
..............43, 47
Memory Seat ............................43, 47
Memory Seats And Radio ...................43, 47
Methanol ............................... .426
Mirrors ..................................60
Electric Powered ..........................62
Electric Remote ...........................62
Heated .................................63
Outside ................................62
Rearview ........................ .60, 61, 301
Vanity .................................64
Modifications/Alterations, Vehicle ................5
Monitor, Tire Pressure System ..................166
Mopar Parts ............................. .531
MP3 Control ............................. .505
Multi-Function Control Lever ...................65
New V
ehicle Break-In Period ..................226
Occupant Restraints ........................ .172
Octane Rating, Gasoline (Fuel) ..............424, 432
Oil Change Indicator ........................124
Reset .................................124
Oil, Engine ............................368, 432
Capacity ...............................431
542 INDEX
Page 546 of 553
Recline.................................46
Power Steering Fluid ........................432
Pregnant Women And Seat Belts ................181
Preparation For Jacking ..................... .325
Pretensioners Seat Belts ............................. .181
Radial Ply Tires ............................401
Radiator Cap (Coolant Pressure Cap) .............383
Radio Frequency General Information ................25, 31, 33, 41
Radio Operation .......................... .506
Rain Sensitive Wiper System ...................74
Rear Axle (Differential) ..................... .388
Rear Camera ............................. .279
Rear Cross Path ............................161
Rear ParkSense System ..................... .267
Rear Seats, Folding ..........................53
Rear Wheel Drive Towing ............................... .349
Recreational Towing ........................ .295
Reformulated Gasoline .......................425
Refrigerant ...............................372
Release, Hood ..............................97
Reminder, Lights On .........................68 Reminder, Seat Belt
........................ .174
Remote Keyless Entry Arm The Alarm ..........................33
Panic Alarm .............................20
Programming Additional Key Fobs ..........24, 32
Unlatch The Trunk ........................20
Remote Starting Exit Remote Start Mode .....................30
Uconnect Customer Programmable Features ......31
Uconnect Settings .........................31
Remote Trunk Release ........................98
Replacement Bulbs ........................ .307
Replacement Keys ........................24, 32
Replacement Tires ..........................404
Reporting Safety Defects .....................531
Restraints, Child .......................... .197
Restraints, Head .......................54, 55, 56
Rocking Vehicle When Stuck ...................345
Rotation, T
ires.............................411
RWD Towing ............................... .349
Safety Checks Inside Vehicle ...................215
Safety Checks Outside Vehicle .................217
Safety Defects, Reporting .....................531
544 INDEX