2018 DODGE CHARGER belt
[x] Cancel search: beltPage 45 of 553
SEATS
Seats are a part of the Occupant Restraint System of the
vehicle.
WARNING!
•It is dangerous to ride in a cargo area, inside or
outside of a vehicle. In a collision, people riding in
these areas are more likely to be seriously injured or
killed.
• Do not allow people to ride in any area of your
vehicle that is not equipped with seats and seat belts.
In a collision, people riding in these areas are more
likely to be seriously injured or killed.
• Be sure everyone in your vehicle is in a seat and
using a seat belt properly.
Manual Adjustment (Front Seats) — If Equipped
WARNING!
•Adjusting a seat while the vehicle is moving is
dangerous. The sudden movement of the seat could
cause you to lose control. The seat belt might not be
adjusted properly and you could be injured. Adjust
the seat only while the vehicle is parked.
• Do not ride with the seatback reclined so that the
shoulder belt is no longer resting against your chest.
In a collision you could slide under the seat belt and
be seriously or even fatally injured. Use the recliner
only when the vehicle is parked.
Manual Front Seats Forward/Rearward Adjustment
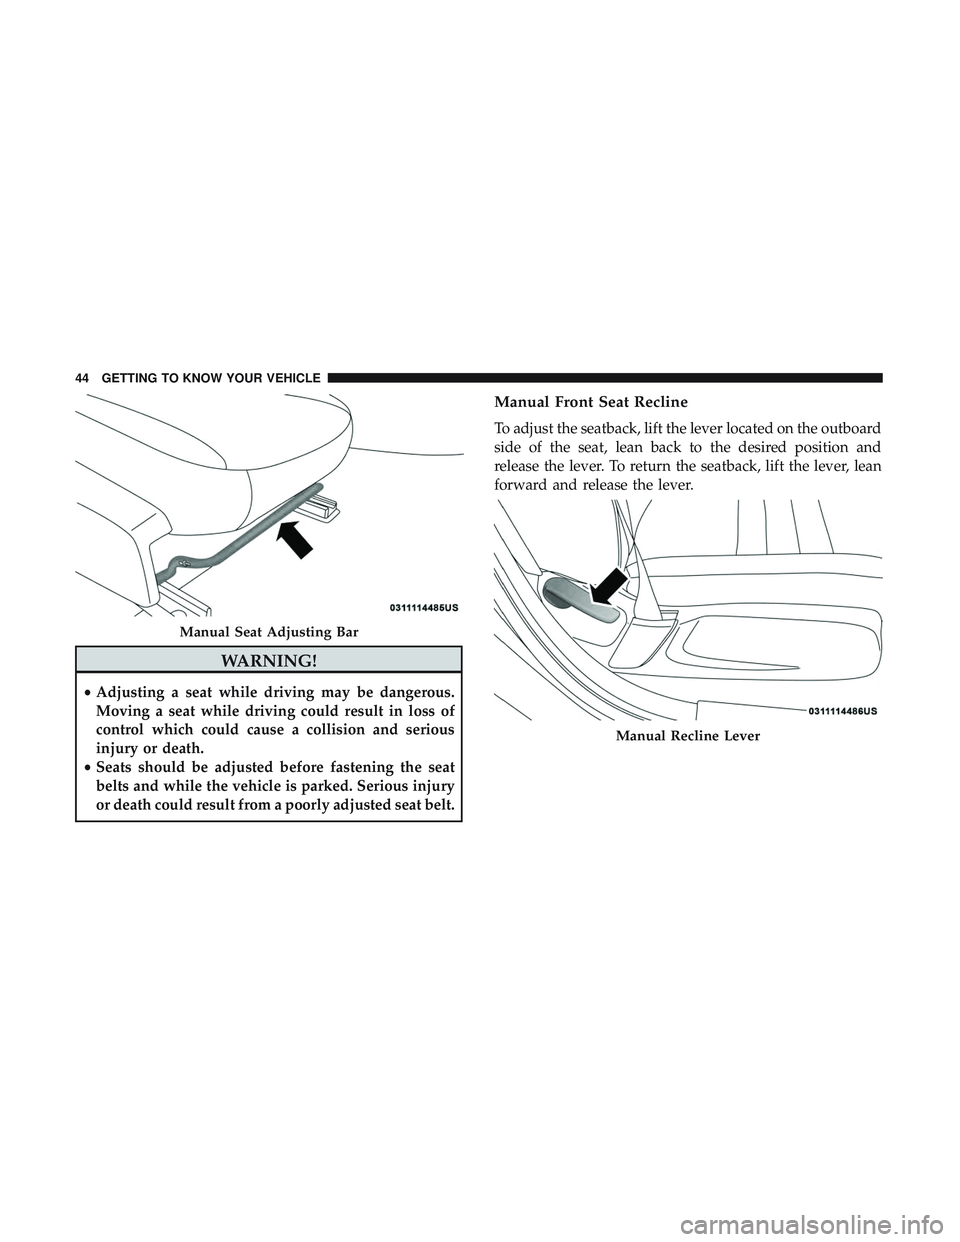
The adjusting bar is at the front of the seat, near the floor.
Pull the bar upward to move the seat forward or rearward.
Release the bar once the seat is in the position desired.
Using body pressure, move forward and rearward on the
seat to be sure that the seat adjusters have latched.
3
GETTING TO KNOW YOUR VEHICLE 43
Page 46 of 553
WARNING!
•Adjusting a seat while driving may be dangerous.
Moving a seat while driving could result in loss of
control which could cause a collision and serious
injury or death.
• Seats should be adjusted before fastening the seat
belts and while the vehicle is parked. Serious injury
or death could result from a poorly adjusted seat belt.
Manual Front Seat Recline
To adjust the seatback, lift the lever located on the outboard
side of the seat, lean back to the desired position and
release the lever. To return the seatback, lift the lever, lean
forward and release the lever.
Manual Seat Adjusting Bar
Manual Recline Lever
44 GETTING TO KNOW YOUR VEHICLE
Page 47 of 553
WARNING!
Do not ride with the seatback reclined so that the
shoulder belt is no longer resting against your chest. In
a collision you could slide under the seat belt, which
could result in serious injury or death.
Power Seats — If Equipped
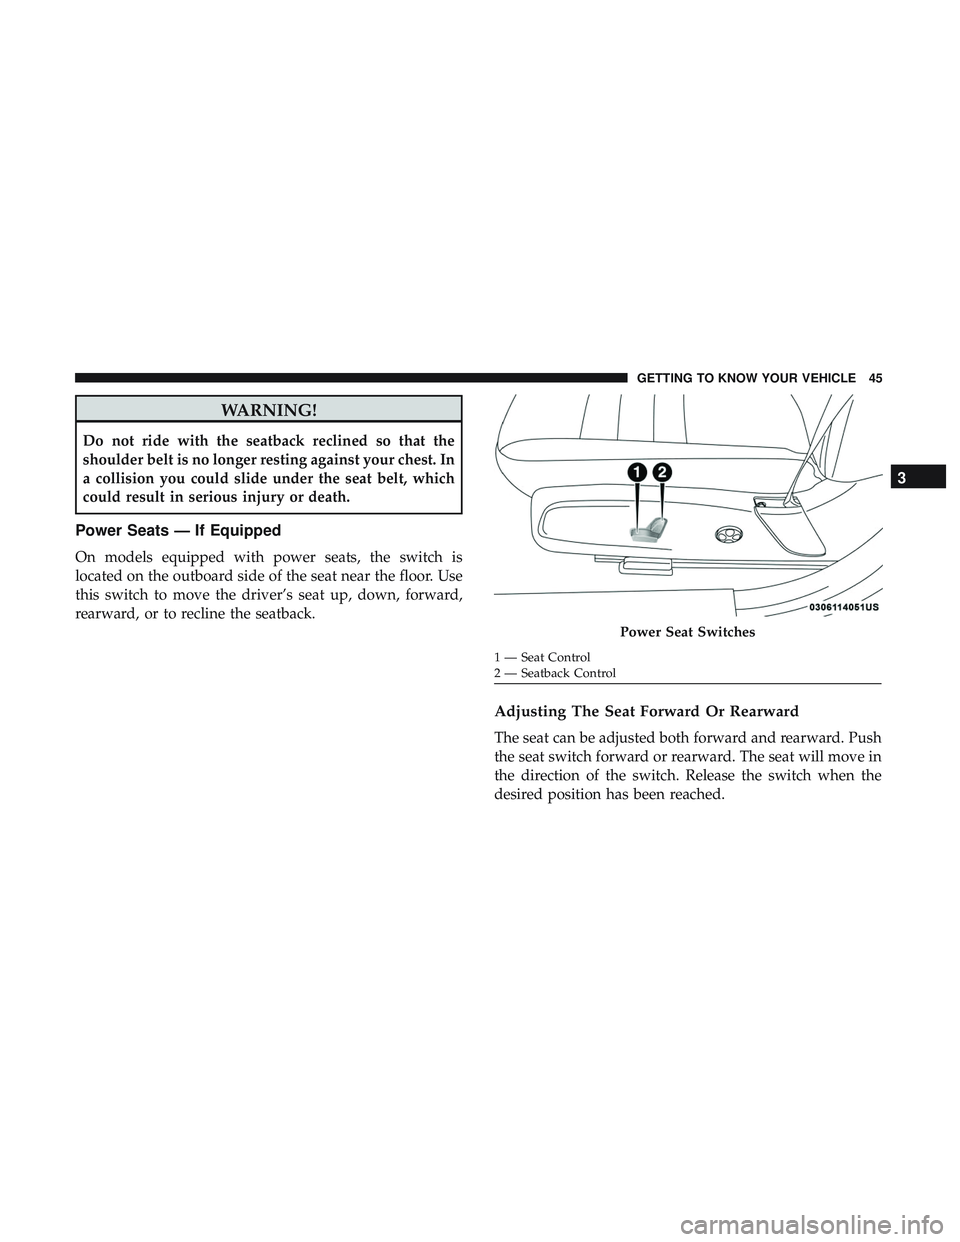
On models equipped with power seats, the switch is
located on the outboard side of the seat near the floor. Use
this switch to move the driver’s seat up, down, forward,
rearward, or to recline the seatback.
Adjusting The Seat Forward Or Rearward
The seat can be adjusted both forward and rearward. Push
the seat switch forward or rearward. The seat will move in
the direction of the switch. Release the switch when the
desired position has been reached.
Power Seat Switches
1 — Seat Control
2 — Seatback Control
3
GETTING TO KNOW YOUR VEHICLE 45
Page 48 of 553
Adjusting The Seat Up Or Down
The height of the seats can be adjusted up or down. Pull
upward or push downward on the seat switch; the seat will
move in the direction of the switch. Release the switch
when the desired position has been reached.
Reclining The Seatback
The angle of the seatback can be adjusted forward or
rearward. Push the seatback switch forward or rearward,
the seat will move in the direction of the switch. Release the
switch when the desired position is reached.
WARNING!
•Adjusting a seat while driving may be dangerous.
Moving a seat while driving could result in loss of
control which could cause a collision and serious
injury or death.
• Seats should be adjusted before fastening the seat
belts and while the vehicle is parked. Serious injury
or death could result from a poorly adjusted seat belt.
• Do not ride with the seatback reclined so that the
shoulder belt is no longer resting against your chest.
In a collision you could slide under the seat belt,
which could result in serious injury or death.
CAUTION!
Do not place any article under a power seat or impede
its ability to move as it may cause damage to the seat
controls. Seat travel may become limited if movement
is stopped by an obstruction in the seat’s path.
Tilting The Seat Up Or Down
The angle of the seat cushion can be adjusted up or down.
Pull upward or push downward on the front of the seat
switch. The front of the seat cushion will move in the
direction of the switch. Release the switch when the
desired position has been reached.
Power Lumbar — If Equipped
Vehicles equipped with power driver or passenger seats
may also be equipped with power lumbar. The power
lumbar switch is located on the outboard side of the power
seat. Push the switch forward or rearward to increase or
decrease the lumbar support. Push the switch upward or
downward to raise or lower the lumbar support.
46 GETTING TO KNOW YOUR VEHICLE
Page 56 of 553
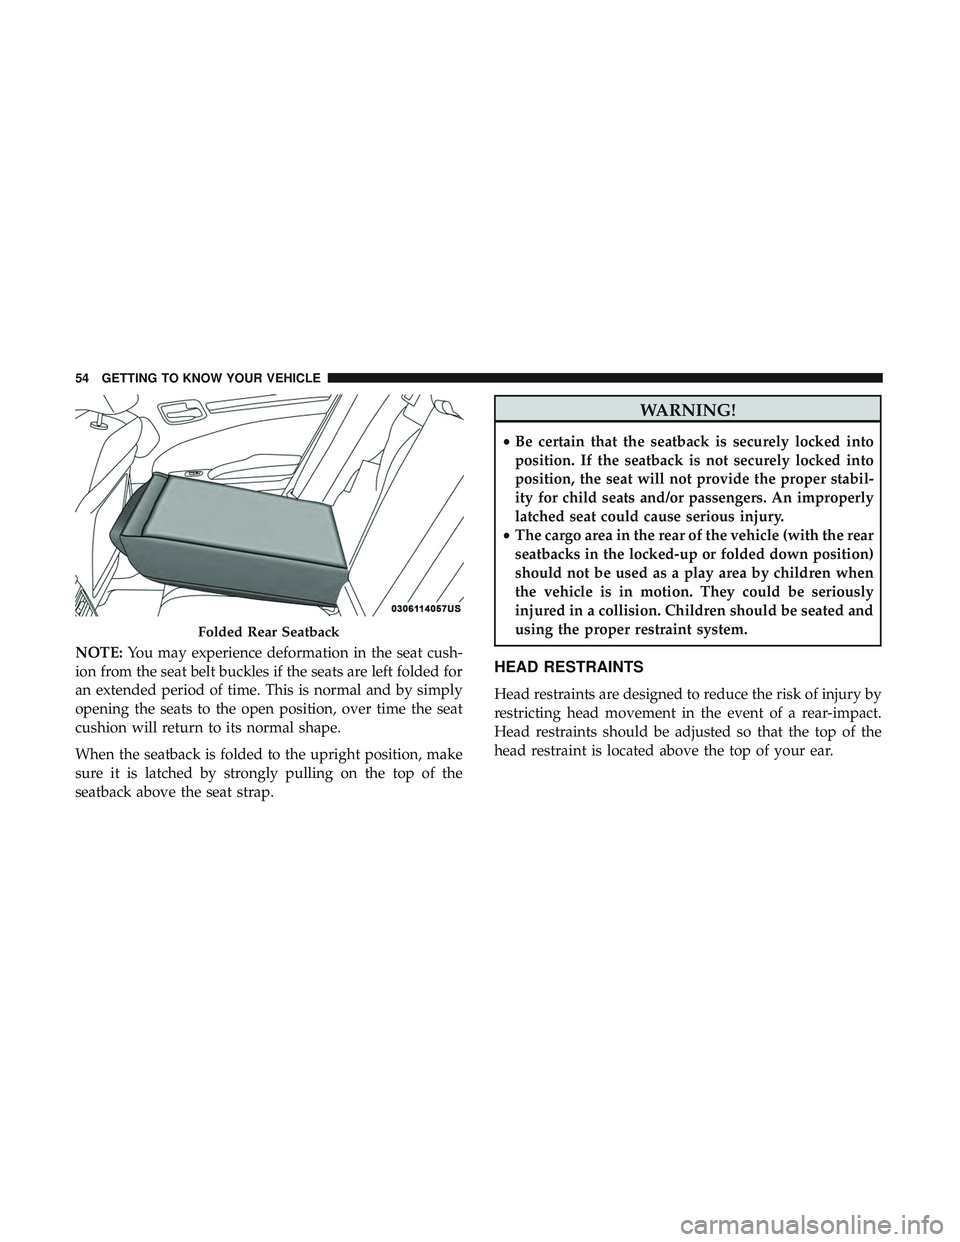
NOTE:You may experience deformation in the seat cush-
ion from the seat belt buckles if the seats are left folded for
an extended period of time. This is normal and by simply
opening the seats to the open position, over time the seat
cushion will return to its normal shape.
When the seatback is folded to the upright position, make
sure it is latched by strongly pulling on the top of the
seatback above the seat strap.
WARNING!
• Be certain that the seatback is securely locked into
position. If the seatback is not securely locked into
position, the seat will not provide the proper stabil-
ity for child seats and/or passengers. An improperly
latched seat could cause serious injury.
• The cargo area in the rear of the vehicle (with the rear
seatbacks in the locked-up or folded down position)
should not be used as a play area by children when
the vehicle is in motion. They could be seriously
injured in a collision. Children should be seated and
using the proper restraint system.
HEAD RESTRAINTS
Head restraints are designed to reduce the risk of injury by
restricting head movement in the event of a rear-impact.
Head restraints should be adjusted so that the top of the
head restraint is located above the top of your ear.
Folded Rear Seatback
54 GETTING TO KNOW YOUR VEHICLE
Page 97 of 553
WARNING!(Continued)
equipped with Keyless Enter-N-Go in the ACC or
ON/RUN mode. Occupants, particularly unattended
children, can become entrapped by the power sun-
roof while operating the power sunroof switch. Such
entrapment may result in serious injury or death.
• In a collision, there is a greater risk of being thrown
from a vehicle with an open sunroof. You could also
be seriously injured or killed. Always fasten your
seat belt properly and make sure all passengers are
also properly secured.
• Do not allow small children to operate the sunroof.
Never allow your fingers, other body parts, or any
object, to project through the sunroof opening. In-
jury may result.
Opening Sunroof
Express
Push the switch rearward and release it within one-half
second. The sunroof and sunshade will open automatically
and stop when the full open position is reached. This is
called “Express Open.” During Express Open operation,
any other actuation of the sunroof switch will stop the
sunroof. Manual Mode
To open the sunroof, push and hold the switch rearward.
The sunroof will move rearward and automatically stop at
full open position. Any release of the switch will stop the
movement. The sunroof and sunshade will remain in a
partially opened condition until the sunroof switch is
pushed again.
Closing Sunroof
Express
Push the switch forward and release it within one-half
second and the sunroof will close automatically from any
position. The sunroof will close fully and stop automati-
cally. This is called “Express Close.” During Express Close
operation, any other actuation of the switch will stop the
sunroof.
Manual Mode
To close the sunroof, push and hold the switch forward.
The sunroof will move forward and automatically stop at
full closed position. Any release of the switch will stop the
movement and the sunroof will remain in a partially closed
condition until the sunroof switch is pushed again.
3
GETTING TO KNOW YOUR VEHICLE 95
Page 103 of 553
Cargo Area Features
Cargo Area — Vehicles Equipped With 60/40
Split-Folding Rear Seat
The 60/40 split-folding rear seat provides cargo-carrying
versatility. The seatbacks fold down easily by pulling nylon
tabs between the seatbacks and the bolsters. When the seats
are folded down, they provide a continuous, nearly-flat
extension of the load floor.
When the seatback is folded to the upright position, make
sure it is latched by strongly pulling on the top of the
seatback above the seat strap.
WARNING!
•Be certain that the seatback is securely locked into
position. If the seatback is not securely locked into
position, the seat will not provide the proper stabil-
ity for child seats and/or passengers. An improperly
latched seat could cause serious injury.
• The cargo area in the rear of the vehicle (with the rear
seatbacks in the locked-up or folded down position)
should not be used as a play area by children when
the vehicle is in motion. They could be seriously
(Continued)
WARNING! (Continued)
injured in a collision. Children should be seated and
using the proper restraint system.
• To help protect against personal injury, passengers
should not be seated in the rear cargo area. The rear
cargo space is intended for load carrying purposes
only, not for passengers, who should sit in seats and
use seat belts.
The weight and position of cargo and passengers can
change the vehicle center of gravity and vehicle han-
dling. To avoid loss of control resulting in personal
injury, follow these guidelines for loading your ve-
hicle:
• Always place cargo evenly on the cargo floor. Put
heavier objects as low and as far forward as possible.
• Place as much cargo as possible in front of the rear
axle. Too much weight or improperly placed weight
over or behind the rear axle can cause the rear of the
vehicle to sway.
• Do not pile luggage or cargo higher than the top of
the seatback. This could impair visibility or become
a dangerous projectile in a sudden stop or collision.
3
GETTING TO KNOW YOUR VEHICLE 101
Page 136 of 553
come on when the ignition is placed in the ON/RUN or
ACC/ON/RUN position and remain on briefly as a bulb
check. If the light does not come on during starting, have
the system checked by an authorized dealer.
— Engine Coolant Temperature Warning Light
This warning light warns of an overheated engine condi-
tion. If the engine coolant temperature is too high, this
indicator will illuminate and a single chime will sound. If
the temperature reaches the upper limit, a continuous
chime will sound for four minutes or until the engine is
able to cool: whichever comes first.
If the light turns on while driving, safely pull over and stop
the vehicle. If the A/C system is on, turn it off. Also, shift
the transmission into NEUTRAL and idle the vehicle. If the
temperature reading does not return to normal, turn the
engine off immediately and call for service.
Refer to “If Your Engine Overheats” in “In Case Of
Emergency” for further information.
— Oil Pressure Warning Light
This warning light will illuminate to indicate low engine
oil pressure. If the light turns on while driving, stop thevehicle, shut off the engine as soon as possible, and contact
an authorized dealer. A chime will sound when this light
turns on.
Do not operate the vehicle until the cause is corrected. This
light does not indicate how much oil is in the engine. The
engine oil level must be checked under the hood.
— Oil Temperature Warning Light
This warning light will illuminate to indicate the engine oil
temperature is high. If the light turns on while driving,
stop the vehicle and shut off the engine as soon as possible.
Wait for oil temperature to return to normal levels.
— Seat Belt Reminder Warning Light
This warning light indicates when the driver or passenger
seat belt is unbuckled. When the ignition is first placed in
the ON/RUN or ACC/ON/RUN position and if the
driver ’s seat belt is unbuckled, a chime will sound and the
light will turn on. When driving, if the driver or front
passenger seat belt remains unbuckled, the Seat Belt Re-
minder Light will flash or remain on continuously and a
chime will sound.
Refer to “Occupant Restraint Systems” in “Safety” for
further information.
134 GETTING TO KNOW YOUR INSTRUMENT PANEL