Page 434 of 696
LampsBulb Number
Dedicated Daytime Running Lamp (If Equipped) LED (Serviced at Authorized Dealer)
Front Turn Signal Lamp PWY24WNA (If Halogen Headlamp Equipped)
PWY24WSV (If HID Headlamp Equipped)
Side Marker Lamp W3W
Front Park Lamp PWY24WNA (If Bulb Equipped)
LED (Serviced At Authorized Dealer)
Front Fog Lamp H11LL
LED Front Fog Lamp LED (Serviced At Authorized Dealer)
Center High Mounted Stop (CHMSL) Lamp LED (Serviced At Authorized Dealer)
Stop/Turn Signal Lamp W21/5WLL
Rear Tail/Side Marker Lamp Rear Tail - Body Side - W21/5WLL (If Bulb Equipped);
LED (Serviced at Authorized Dealer)
Rear Tail - Liftgate - W5WLL (If Bulb Equipped); LED (Serviced at Authorized Dealer)Rear Side Marker: W3W
Backup Lamp W21W
License Lamp LED (Serviced At Authorized Dealer)
432 IN CASE OF EMERGENCY
Page 435 of 696

Replacing Exterior Bulbs
High Intensity Discharge (HID) Headlamps — If
Equipped
The headlamps contain a type of high voltage discharge
light source. High voltage can remain in the circuit even
with the headlamp switch off. Because of this, you should
not attempt to service a HID headlamp light source your-
self. If an HID headlamp light source fails, take your
vehicle to an authorized dealer for service.
NOTE:On vehicles equipped with HID headlamps, when
the headlamps are turned on, there is a blue hue to the
lights. This diminishes and becomes more white after
approximately 10 seconds, as the system charges.
WARNING!
A transient high voltage occurs at the bulb sockets of
HID headlamps when the headlamp switch is turned
ON. It may cause serious electrical shock or electrocu-
tion if not serviced properly. See your authorized
dealer for service.
Halogen Headlamps
1. Reach behind the headlamp housing to access the headlamp bulb cap.
2. Firmly grasp the headlamp bulb cap and rotate it counterclockwise to unlock it.
3. Firmly grasp the headlamp bulb socket assembly and rotate counterclockwise to remove from the housing.
Headlamp Bulb Cap
7
IN CASE OF EMERGENCY 433
Page 436 of 696
4. Disconnect the bulb from the electrical connector andthen connect the replacement bulb.CAUTION!
Do not touch the new bulb with your fingers. Oil
contamination will severely shorten bulb life. If the
bulb comes in contact with any oily surface, clean the
bulb with rubbing alcohol.
5. Install the bulb and connector assembly into the head- lamp housing and rotate clockwise to lock it in place.
6. Install the headlamp bulb cap in the headlamp housing and rotate clockwise to lock it in place.
Headlamp Bulb SocketHeadlamp Bulb
434 IN CASE OF EMERGENCY
Page 439 of 696

CAUTION!
Do not touch the new bulb with your fingers. Oil
contamination will severely shorten bulb life. If the
bulb comes in contact with any oily surface, clean the
bulb with rubbing alcohol.
5. Install the front fog lamp bulb into the front fog lamp housing, and rotate the bulb clockwise to lock it in place.
6. Position the inner wheel liner in place and install fasteners.
Rear Liftgate Mounted Back-Up Lamps And Tail
Lamps (If Bulb Equipped)
1. Raise the liftgate.
2. Use a fiber stick or flat blade screw driver to pry off thebulb access cover on the lower liftgate trim.
3. Back-up lamps/tail lamp (if bulb equipped) are now visible. Rotate socket(s) counter clockwise.
4. Remove/replace bulb(s).
5. Reinstall the socket(s)
6. Reverse process to reinstall the liftgate trim.
Rear Bodyside Mounted Taillamps
1. Raise the liftgate.
2. Remove two torx head screws on bodyside lamp using a T30 screwdriver.
3. Remove lamp from vehicle body and locate bulb socket on rear of lamp. Rotate socket counter-clockwise.
4. Remove/replace bulb(s).
5. Reinstall the socket(s)
6. Reverse process to reinstall the lamp onto vehicle.
Center High-Mounted Stop Lamp (CHMSL)
The center high-mounted stop lamp is an LED assembly.
See your authorized dealer for replacement.
Rear License Lamp
The rear license lamps are LED. See your authorized dealer
for replacement.
7
IN CASE OF EMERGENCY 437
Page 445 of 696
Cavity Cartridge FuseBlade FuseDescription
F62 – – Not Used
F63 –20 Amp Yellow Trailer Tow Left Stop/Turn — If Equipped
F64 –15 Amp Blue RT HID Headlamp
F65 – – Not Used
F66 –15 Amp Blue Instrument Panel Cluster (IPC)
F67 –10 Amp Red Haptic Lane Feedback Module (HALF) / Parktron-
ics System (PTS)/Drivers Assist System Module(DASM)
F68 – – Not Used
F69 – – Not Used
F70 – – Not Used
F71 –20 Amp Yellow Horn
F72 –10 Amp Red Heated Mirrors – If Equipped
F73 30 Amp Pink –Rear Defroster (EBL)
F74 20 Amp Blue –Trailer Tow Backup
F75 – 5 Amp Tan Overhead Console / RR ISC
F76 –20 Amp Yellow Uconnect/DCSD/Telematics
7
IN CASE OF EMERGENCY 443
Page 446 of 696
Cavity Cartridge FuseBlade FuseDescription
F77A –10 Amp Red RR Entertainment Screen 1 & 2/Media HUB 1 &
2/3rd Row USB Charge Only/2nd Row USB
Charge Only/Vaccum Cleaner SW/3rd Row Re- cline ST SW/LT & RT Stow N Go SW/LT & RT Sliding Door SW Backlight
F77B –10 Amp Red Rain Sensor/Sunroof /CRVMM
F78A –15 Amp Blue Transmission Control Module (TCM)/ E-Shifter
F78B –15 Amp Blue Instrument Cluster
F79 –10 Amp Red ICS/Front And Rear HVAC/ SCCM/ EPB
F80 – – Not Used
F81 – – Not Used
F82 – – Not Used
F83 20 Amp Blue –TT Park Lights — If Equipped
30 Amp Pink –Headlamp Washer Pump — If Equipped
F84 – – Not Used
F85 –20 Amp Yellow Cigar Lighter
F86 – – Not Used
F87 – – Not Used
F88 –20 Amp Yellow Front Heated Seats
F89 –20 Amp Yellow Rear Heated Seats
444 IN CASE OF EMERGENCY
Page 447 of 696
Cavity Cartridge FuseBlade FuseDescription
F90 – – Not Used
F91 –15 Amp Blue Front Ventilated Seats/Heated Steering Wheel
F92 – 5 Amp Tan Security Gateway
F93 – – Not Used
F94 40 Amp Green –ESC Motor Pump
F95A –10 Amp Red USB Charge Port — ACC RUN
F95B –10 Amp Red Selectable Fuse Location
F96 –10 Amp Red Occupant Restraint Controller (ORC) (Airbag)
F97 –10 Amp Red Occupant Restraint Controller (ORC) (Airbag)
F98 –15 Amp Blue Left HID Headlamp
F99 30 Amp Pink –Trailer Tow Module - If Equipped
F100A –10 Amp Red AHLM
F100B –10 Amp Red Rear Camera/LBSS/RBSS/CVPM/Humidity
Sensor/In Vehicle Temperature Sensor
Circuit Breakers
CB1 25 Amp Power Seats (Driver)
CB2 25 Amp * Power Seats (Pass)
CB3 25 Amp FRT PWR Window W/O Door Nodes + RR PWR
Window Lockout
* 30A mini fuse is substituted for 25A Circuit Breaker.
7
IN CASE OF EMERGENCY 445
Page 454 of 696

CAUTION!
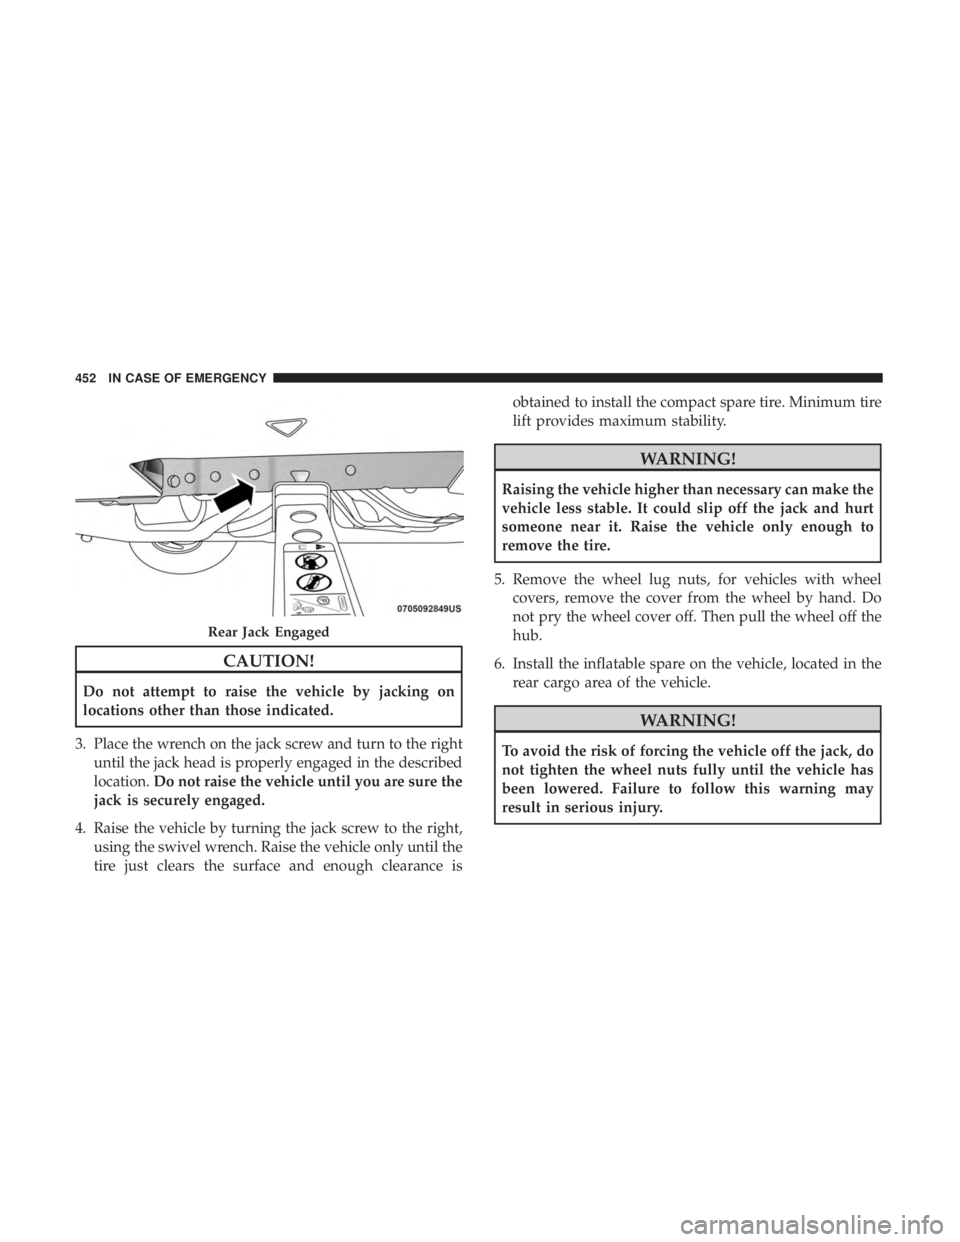
Do not attempt to raise the vehicle by jacking on
locations other than those indicated.
3. Place the wrench on the jack screw and turn to the right until the jack head is properly engaged in the described
location. Do not raise the vehicle until you are sure the
jack is securely engaged.
4. Raise the vehicle by turning the jack screw to the right, using the swivel wrench. Raise the vehicle only until the
tire just clears the surface and enough clearance is obtained to install the compact spare tire. Minimum tire
lift provides maximum stability.
WARNING!
Raising the vehicle higher than necessary can make the
vehicle less stable. It could slip off the jack and hurt
someone near it. Raise the vehicle only enough to
remove the tire.
5. Remove the wheel lug nuts, for vehicles with wheel covers, remove the cover from the wheel by hand. Do
not pry the wheel cover off. Then pull the wheel off the
hub.
6. Install the inflatable spare on the vehicle, located in the rear cargo area of the vehicle.
WARNING!
To avoid the risk of forcing the vehicle off the jack, do
not tighten the wheel nuts fully until the vehicle has
been lowered. Failure to follow this warning may
result in serious injury.
Rear Jack Engaged
452 IN CASE OF EMERGENCY