2018 CHRYSLER PACIFICA oil change
[x] Cancel search: oil changePage 189 of 696

Driver Assist — If Equipped
•ACC/LaneSense
Fuel Economy
• Average Fuel Economy Value (Hold Ok To Reset)
• Range
• Current Fuel Economy Gauge
Trip (Trip A/Trip B)
• Distance
• Average MPG
• Elapsed Time
• (Hold OK to Reset All)
Audio
• Current Media Source
• Song title
• Artist (If Available)
• Phone Call Status
Messages
Screen Setup
Stop/Start — If EquippedOil Life Reset
• Your vehicle is equipped with an engine oil change
indicator system. The “Oil Change Required” message
will display for approximately five seconds after a single
chime has sounded, to indicate the next scheduled oil
change interval. The engine oil change indicator system
is duty cycle based, which means the engine oil change
interval may fluctuate, dependent upon your personal
driving style.
• Unless reset, this message will continue to display each
time the ignition is cycled to the ON/RUN position.
• To reset the oil change indicator after performing the
scheduled maintenance, refer to the following proce-
dure.
Oil Life Reset
Without pressing the brake pedal, push the ENGINE
START/STOP button and place the ignition in the ON/
RUN position (do not start the vehicle.)
1. Push the OKbutton to enter the instrument cluster
display menu screen.
2. Push and release the downarrow button to access the
”Oil Life” menu screen.
4
GETTING TO KNOW YOUR INSTRUMENT PANEL 187
Page 190 of 696
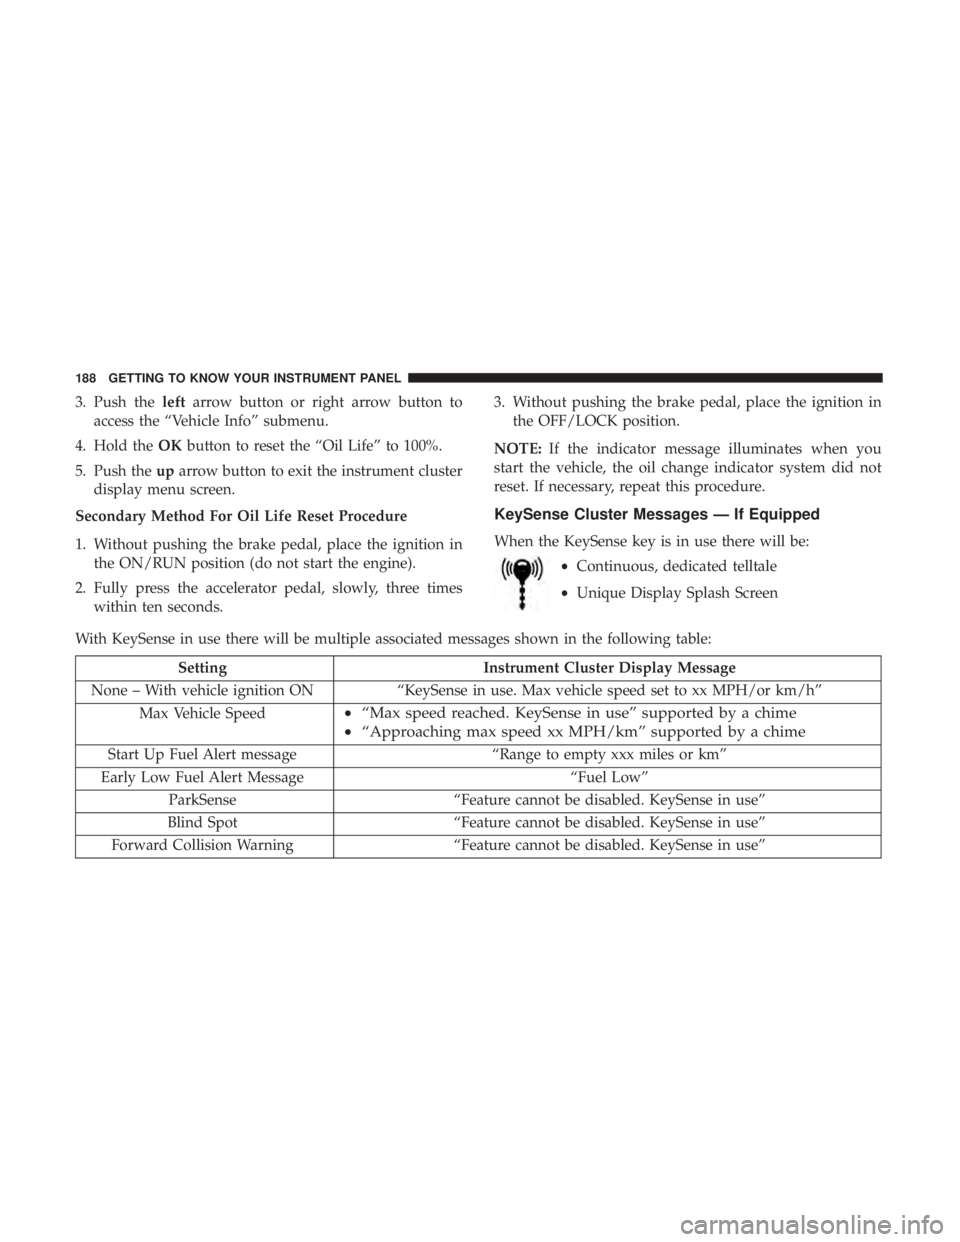
3. Push theleftarrow button or right arrow button to
access the “Vehicle Info” submenu.
4. Hold the OKbutton to reset the “Oil Life” to 100%.
5. Push the uparrow button to exit the instrument cluster
display menu screen.
Secondary Method For Oil Life Reset Procedure
1. Without pushing the brake pedal, place the ignition in the ON/RUN position (do not start the engine).
2. Fully press the accelerator pedal, slowly, three times within ten seconds. 3. Without pushing the brake pedal, place the ignition in
the OFF/LOCK position.
NOTE: If the indicator message illuminates when you
start the vehicle, the oil change indicator system did not
reset. If necessary, repeat this procedure.
KeySense Cluster Messages — If Equipped
When the KeySense key is in use there will be:
•Continuous, dedicated telltale
• Unique Display Splash Screen
With KeySense in use there will be multiple associated messages shown in the following table:
Setting Instrument Cluster Display Message
None – With vehicle ignition ON “KeySense in use. Max vehicle speed set to xx MPH/or km/h”
Max Vehicle Speed
• “Max speed reached. KeySense in use” supported by a chime
• “Approaching max speed xx MPH/km” supported by a chime
Start Up Fuel Alert message “Range to empty xxx miles or km”
Early Low Fuel Alert Message “Fuel Low”
ParkSense “Feature cannot be disabled. KeySense in use”
Blind Spot “Feature cannot be disabled. KeySense in use”
Forward Collision Warning “Feature cannot be disabled. KeySense in use”
188 GETTING TO KNOW YOUR INSTRUMENT PANEL
Page 303 of 696
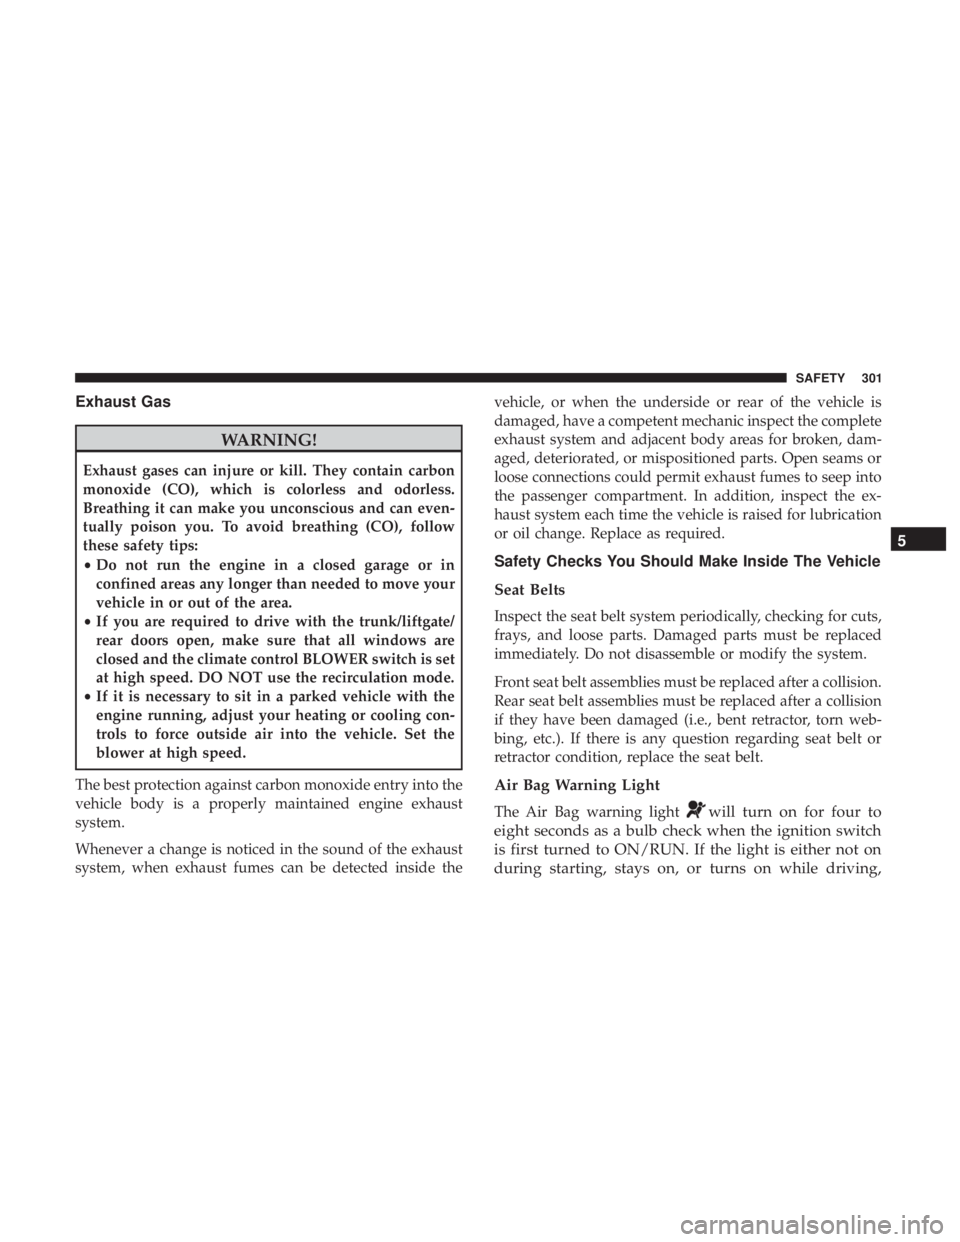
Exhaust Gas
WARNING!
Exhaust gases can injure or kill. They contain carbon
monoxide (CO), which is colorless and odorless.
Breathing it can make you unconscious and can even-
tually poison you. To avoid breathing (CO), follow
these safety tips:
•Do not run the engine in a closed garage or in
confined areas any longer than needed to move your
vehicle in or out of the area.
• If you are required to drive with the trunk/liftgate/
rear doors open, make sure that all windows are
closed and the climate control BLOWER switch is set
at high speed. DO NOT use the recirculation mode.
• If it is necessary to sit in a parked vehicle with the
engine running, adjust your heating or cooling con-
trols to force outside air into the vehicle. Set the
blower at high speed.
The best protection against carbon monoxide entry into the
vehicle body is a properly maintained engine exhaust
system.
Whenever a change is noticed in the sound of the exhaust
system, when exhaust fumes can be detected inside the vehicle, or when the underside or rear of the vehicle is
damaged, have a competent mechanic inspect the complete
exhaust system and adjacent body areas for broken, dam-
aged, deteriorated, or mispositioned parts. Open seams or
loose connections could permit exhaust fumes to seep into
the passenger compartment. In addition, inspect the ex-
haust system each time the vehicle is raised for lubrication
or oil change. Replace as required.
Safety Checks You Should Make Inside The Vehicle
Seat Belts
Inspect the seat belt system periodically, checking for cuts,
frays, and loose parts. Damaged parts must be replaced
immediately. Do not disassemble or modify the system.
Front seat belt assemblies must be replaced after a collision.
Rear seat belt assemblies must be replaced after a collision
if they have been damaged (i.e., bent retractor, torn web-
bing, etc.). If there is any question regarding seat belt or
retractor condition, replace the seat belt.
Air Bag Warning Light
The Air Bag warning lightwill turn on for four to
eight seconds as a bulb check when the ignition switch
is first turned to ON/RUN. If the light is either not on
during starting, stays on, or turns on while driving, 5
SAFETY 301
Page 314 of 696
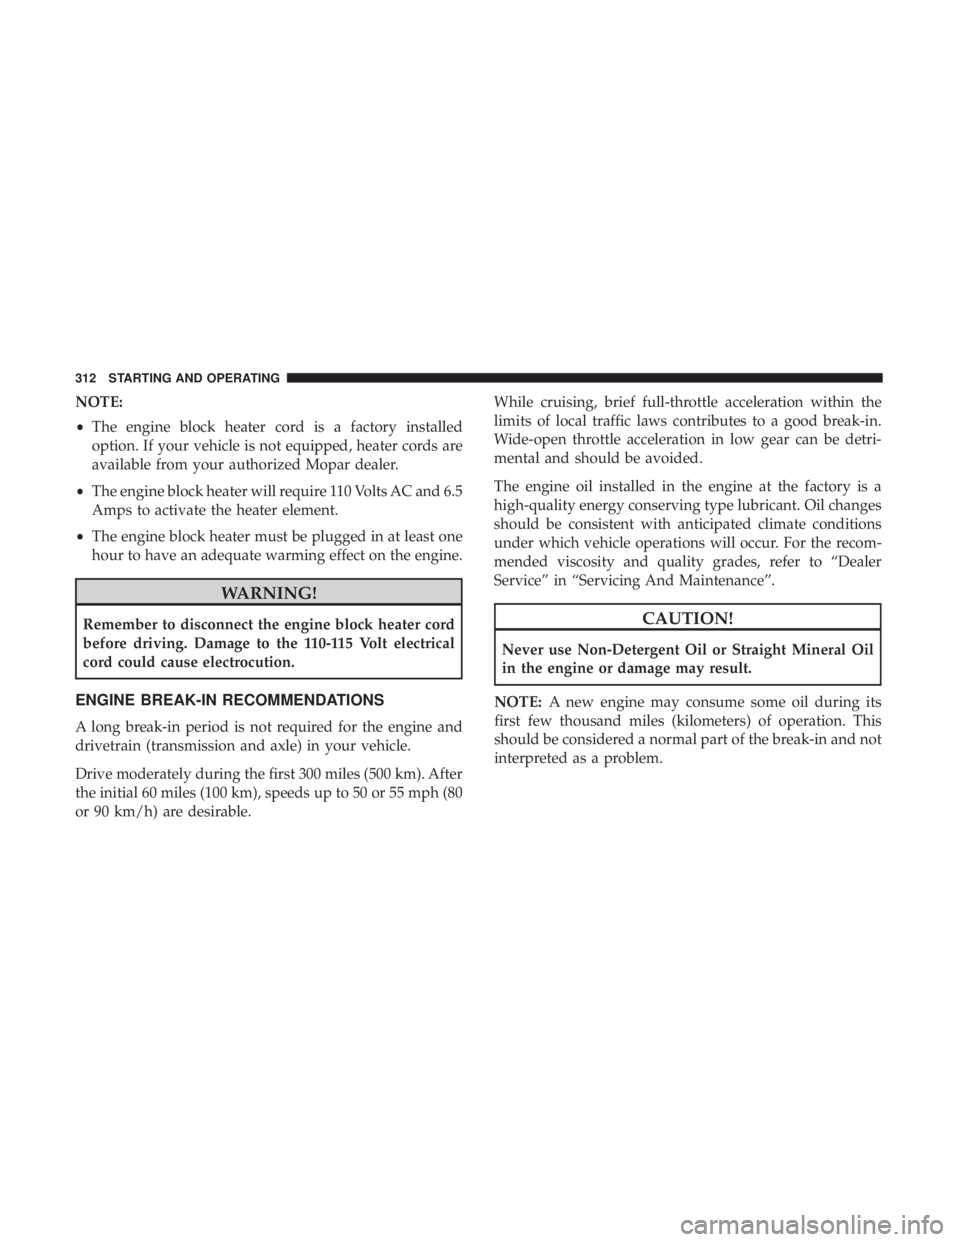
NOTE:
•The engine block heater cord is a factory installed
option. If your vehicle is not equipped, heater cords are
available from your authorized Mopar dealer.
• The engine block heater will require 110 Volts AC and 6.5
Amps to activate the heater element.
• The engine block heater must be plugged in at least one
hour to have an adequate warming effect on the engine.
WARNING!
Remember to disconnect the engine block heater cord
before driving. Damage to the 110-115 Volt electrical
cord could cause electrocution.
ENGINE BREAK-IN RECOMMENDATIONS
A long break-in period is not required for the engine and
drivetrain (transmission and axle) in your vehicle.
Drive moderately during the first 300 miles (500 km). After
the initial 60 miles (100 km), speeds up to 50 or 55 mph (80
or 90 km/h) are desirable. While cruising, brief full-throttle acceleration within the
limits of local traffic laws contributes to a good break-in.
Wide-open throttle acceleration in low gear can be detri-
mental and should be avoided.
The engine oil installed in the engine at the factory is a
high-quality energy conserving type lubricant. Oil changes
should be consistent with anticipated climate conditions
under which vehicle operations will occur. For the recom-
mended viscosity and quality grades, refer to “Dealer
Service” in “Servicing And Maintenance”.
CAUTION!
Never use Non-Detergent Oil or Straight Mineral Oil
in the engine or damage may result.
NOTE: A new engine may consume some oil during its
first few thousand miles (kilometers) of operation. This
should be considered a normal part of the break-in and not
interpreted as a problem.
312 STARTING AND OPERATING
Page 463 of 696

WARNING!(Continued)
provided. Failure to follow these warnings can result
in injuries that are serious or fatal to you, your
passengers, and others around you.
• Take care not to allow the contents of Tire Service Kit
to come in contact with hair, eyes, or clothing. Tire
Service Kit sealant is harmful if inhaled, swallowed,
or absorbed through the skin. It causes skin, eye, and
respiratory irritation. Flush immediately with plenty
of water if there is any contact with eyes or skin.
Change clothing as soon as possible, if there is any
contact with clothing.
• Tire Service Kit Sealant solution contains latex. In
case of an allergic reaction or rash, consult a physi-
cian immediately. Keep Tire Service Kit out of reach
of children. If swallowed, rinse mouth immediately
with plenty of water and drink plenty of water. Do
not induce vomiting! Consult a physician immedi-
ately.
Whenever You Stop To Use Tire Service Kit:
1. Pull over to a safe location and turn on the vehicle’s Hazard Warning flashers. 2. Verify that the valve stem (on the wheel with the
deflated tire) is in a position that is near to the ground.
This will allow the Tire Service Kit Hose to reach the
valve stem and keep the Tire Service Kit flat on the
ground. This will provide the best positioning of the kit
when running the air pump. Move the vehicle as
necessary to place the valve stem in this position before
proceeding.
3. Place the transmission in PARK and cycle the ignition in the OFF position.
4. Ensure the park brake is engaged.
Setting Up To Use Tire Service Kit:
1. Remove the Tire Service Kit from the storage location.
2. Uncoil the Sealant/Air Hose. Remove the cap from the valve stem and then screw the fitting
in at the end of the Sealant/Air Hose
clockwise onto the valve stem.
7
IN CASE OF EMERGENCY 461
Page 491 of 696

SCHEDULED SERVICING
Your vehicle is equipped with an automatic oil change
indicator system. The oil change indicator system will
remind you that it is time to take your vehicle in for
scheduled maintenance.
Based on engine operation conditions, the oil change
indicator message will illuminate. This means that service
is required for your vehicle. Operating conditions such as
frequent short-trips, trailer tow, extremely hot or cold
ambient temperatures will influence when the “Oil Change
Required” message is displayed. Severe Operating Condi-
tions can cause the change oil message to illuminate as
early as 3,500 miles (5,600 km) since last reset. Have your
vehicle serviced as soon as possible, within the next 500
miles (805 km).
Your authorized dealer will reset the oil change indicator
message after completing the scheduled oil change. If a
scheduled oil change is performed by someone other than
your authorized dealer, the message can be reset by
referring to “Instrument Cluster Display” in “Getting To
Know Your Instrument Panel”.NOTE:
Under no circumstances should oil change inter-
vals exceed 10,000 miles (16,000 km), twelve months or 350
hours of engine run time, whichever comes first. The 350
hours of engine run or idle time is generally only a concern
for fleet customers.
Severe Duty All Models
Change Engine Oil at 4,000 miles (6,500 km) or 350 hours of
engine run time if the vehicle is operated in a dusty and off
road environment or is operated predominately at idle or
only very low engine RPM’s. This type of vehicle use is
considered Severe Duty.
Once A Month Or Before A Long Trip:
• Check engine oil level.
• Check windshield washer fluid level.
• Check tire pressure and look for unusual wear or
damage. Rotate tires at the first sign of irregular wear,
even if it occurs before the oil indicator system turns on.
• Check the fluid levels of the coolant reservoir and brake
master cylinder, fill as needed.
• Check function of all interior and exterior lights.
8
SERVICING AND MAINTENANCE 489
Page 492 of 696
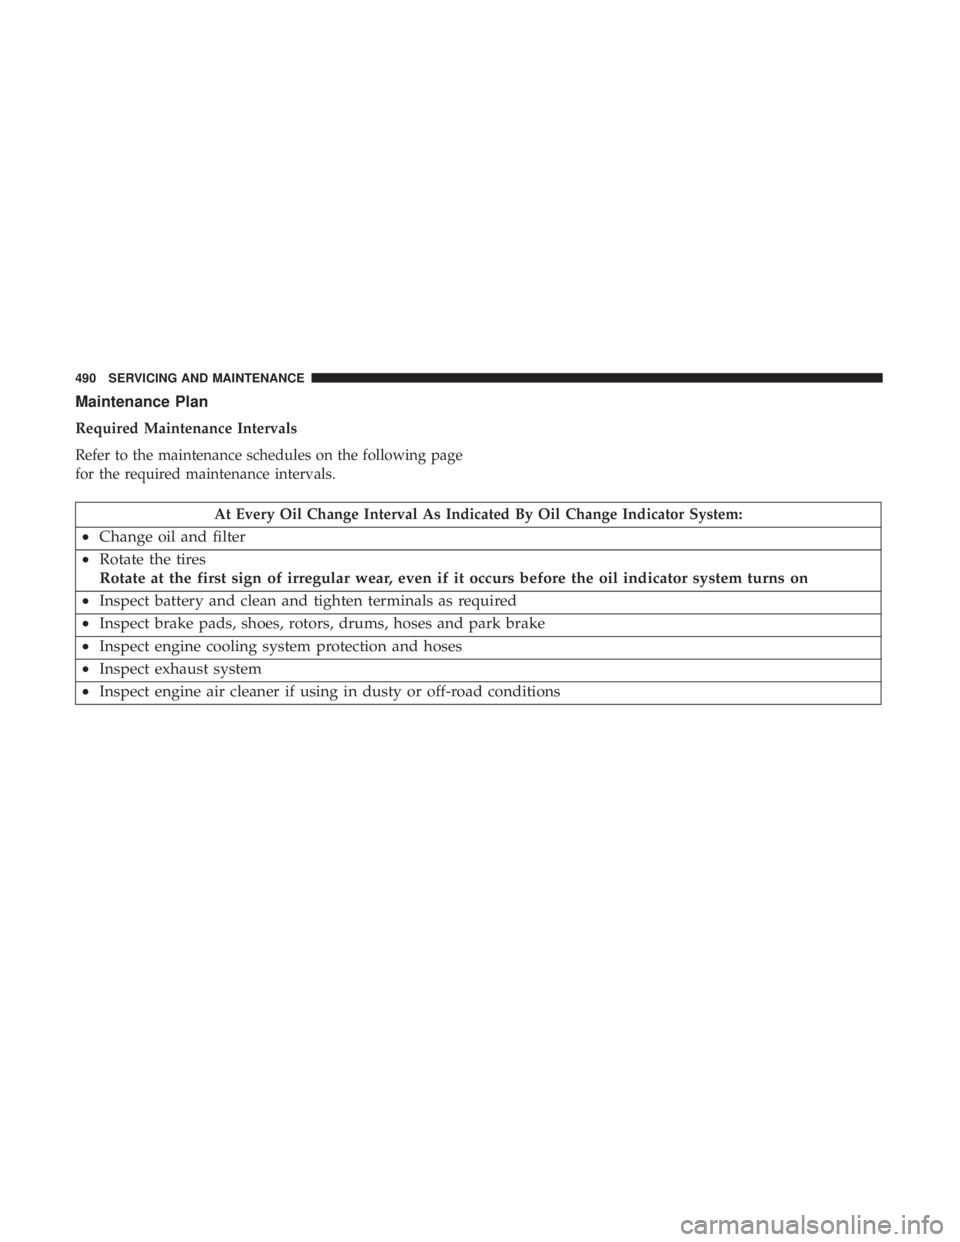
Maintenance Plan
Required Maintenance Intervals
Refer to the maintenance schedules on the following page
for the required maintenance intervals.
At Every Oil Change Interval As Indicated By Oil Change Indicator System:
•Change oil and filter
• Rotate the tires
Rotate at the first sign of irregular wear, even if it occurs before the oil indicator system turns on
• Inspect battery and clean and tighten terminals as required
• Inspect brake pads, shoes, rotors, drums, hoses and park brake
• Inspect engine cooling system protection and hoses
• Inspect exhaust system
• Inspect engine air cleaner if using in dusty or off-road conditions
490 SERVICING AND MAINTENANCE
Page 494 of 696
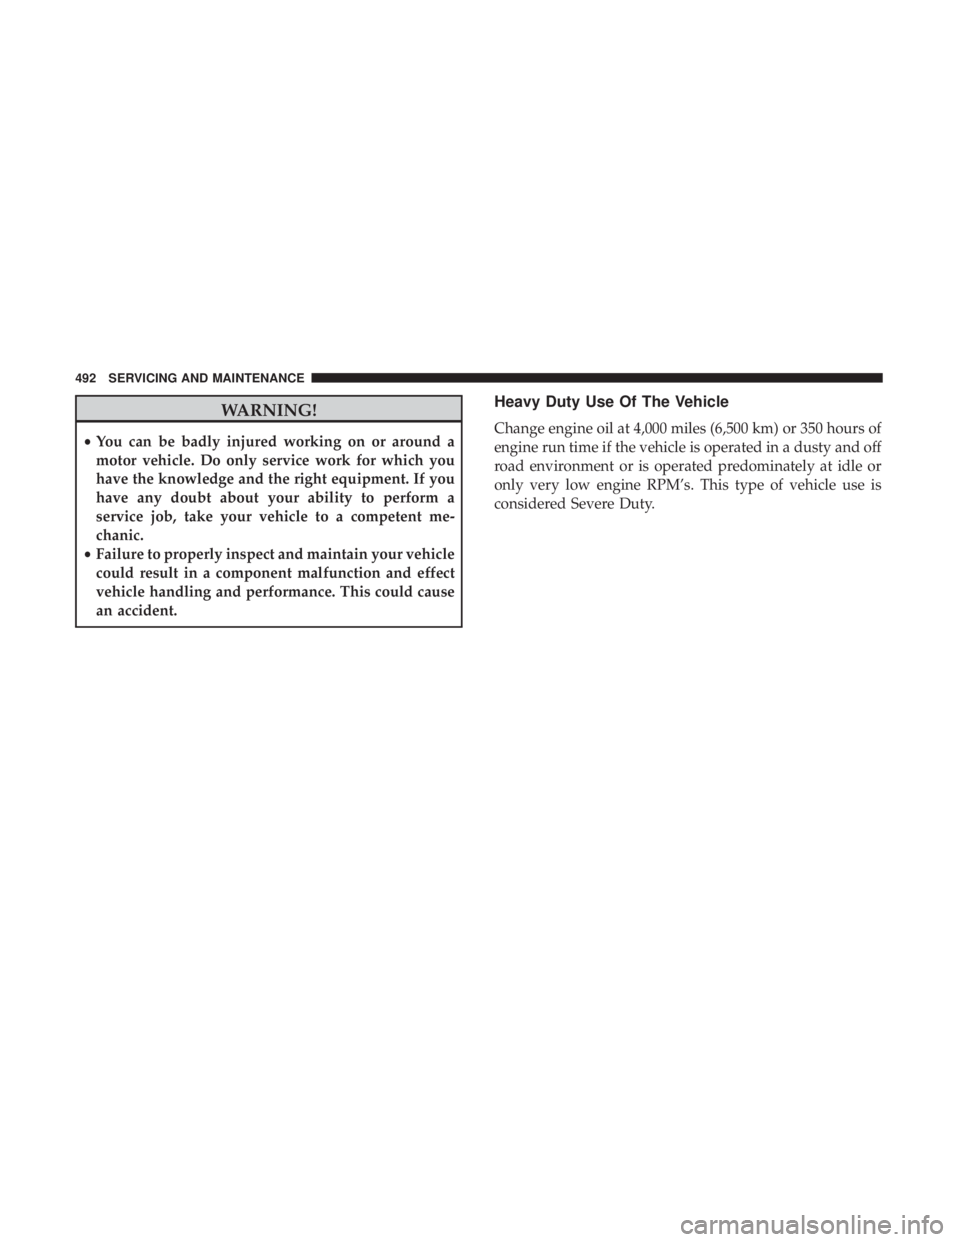
WARNING!
•You can be badly injured working on or around a
motor vehicle. Do only service work for which you
have the knowledge and the right equipment. If you
have any doubt about your ability to perform a
service job, take your vehicle to a competent me-
chanic.
• Failure to properly inspect and maintain your vehicle
could result in a component malfunction and effect
vehicle handling and performance. This could cause
an accident.
Heavy Duty Use Of The Vehicle
Change engine oil at 4,000 miles (6,500 km) or 350 hours of
engine run time if the vehicle is operated in a dusty and off
road environment or is operated predominately at idle or
only very low engine RPM’s. This type of vehicle use is
considered Severe Duty.
492 SERVICING AND MAINTENANCE