Page 129 of 614
The hood release lever (to open the primary latch) and
safety latch (to open the secondary latch) must be released
to open the hood.
1. Pull the hood release lever located under the driver ’sside of the instrument panel.
2. Move to the outside of the front of the vehicle.
3. Push the safety latch release lever toward the passenger side of the vehicle. The safety latch is located behind the
center front edge of the hood. 4. Remove the support rod from the locking tab and insert
it into the seat located on the underside of the hood.
NOTE:
• Before lifting the hood, check that the wiper arms are not
in motion and not in the lifted position.
• While lifting the hood, use both hands.
• Vehicle must be at a stop and the automatic transmission
must be in park.
Hood Release Lever
Safety Latch Location
3
GETTING TO KNOW YOUR VEHICLE 127
Page 130 of 614

•If the vehicle was actively charging the HV battery when
the hood was opened, the vehicle will stop charging
until the hood is closed.
Closing
1. Hold up the hood with one hand and with the other hand remove the support rod from its seat and reinsert
it into the locking tab.
2. Lower the hood to approximately 12 inches (30 cm) from the engine compartment and drop it. Make sure that the
hood is completely closed.
NOTE: If the vehicle stopped charging the HV battery
when the hood was opened, the vehicle will resume
charging when the hood closes.
WARNING!
Be sure the hood is fully latched before driving your
vehicle. If the hood is not fully latched, it could open
when the vehicle is in motion and block your vision.
Failure to follow this warning could result in serious
injury or death.
CAUTION!
To prevent possible damage, do not slam the hood to
close it. Lower hood to approximately 12 inches (30 cm)
and drop the hood to close. Make sure hood is fully
closed for both latches. Never drive vehicle unless
hood is fully closed, with both latches engaged.
LIFTGATE
Opening
To Unlock/Enter The Liftgate
The liftgate may be released in several ways:
• Overhead console liftgate button
• Key fob
• Outside handle
Push the liftgate button on the key fob twice within five
seconds to release the liftgate.
128 GETTING TO KNOW YOUR VEHICLE
Page 131 of 614
The key fob and the overhead console button will release
the liftgate when the liftgate is locked. The outside handle
requires the liftgate to be unlocked. If the vehicle is
equipped with Passive Entry, pulling the outside handle
will unlock and release the liftgate, with a valid Passive
Entry key fob within 5 ft (1.5 m) of the liftgate.NOTE:
If 1st Press of key fob Unlocks “All Doors” is
programmed in Uconnect Settings, all doors will unlock
with a Passive Entry handle activation. If 1st Press of key
fob Unlocks “Driver Door” is programmed in Uconnect
Settings, the liftgate will only unlock with handle activa-
tion. Refer to “Uconnect Settings” in “Multimedia” for
further information.
Unlock Liftgate Using An Key FobUnlock Liftgate Using Passive Entry
3
GETTING TO KNOW YOUR VEHICLE 129
Page 132 of 614

Closing
To Close The Liftgate
Grasp the liftgate closing handle and initiate lowering the
liftgate. Release the handle when the liftgate takes over the
closing effort.
To Lock The Vehicle
With a valid Passive Entry key fob within 5 ft (1.5 m) of the
liftgate, pushing the passive entry lock button located to
the right of the outside handle will lock the vehicle.
WARNING!
•Driving with the liftgate open can allow poisonous
exhaust gases into your vehicle. You and your pas-
sengers could be injured by these fumes. Keep the
liftgate closed when you are operating the vehicle.
• If you are required to drive with the liftgate open,
make sure that all windows are closed, and the
climate control blower switch is set at high speed. Do
not use the recirculation mode.
Power Liftgate — If Equipped
The power liftgate may be opened or closed in several
ways:
• Overhead console liftgate button
• Key fob
• Outside handle (opens liftgate only)
• Button just inside the liftgate on the upper left trim
(when liftgate is open)
• Hands-Free Liftgate (opens liftgate only) — If Equipped
Using the above ways:
• When the liftgate is fully closed, the liftgate will open
• When the liftgate is fully open, the liftgate will close
• When the liftgate is moving, the liftgate will reverse
Push the Power Liftgate button on the Overhead Console
to open or close the liftgate.
Push the liftgate button on the key fob twice within five
seconds to open or close the liftgate.
130 GETTING TO KNOW YOUR VEHICLE
Page 133 of 614

The key fob and the overhead console button will operate
the liftgate when the liftgate is locked. The outside handle
requires the liftgate to be unlocked. If the vehicle is
equipped with Passive Entry, depressing the touch pad on
the outside handle or Hands-Free Liftgate foot activation(if equipped) will unlock and open the liftgate, with a valid
Passive Entry key fob within 5 ft (1.5 m) of the liftgate
handle.
NOTE:
•
To open the liftgate, the Hands-Free Liftgate foot activa-
tion (if equipped) requires a valid Passive Entry key fob
within 5 ft (1.5 m) of the door handle.
• If 1st Press of key fob Unlocks “All Doors” is pro-
grammed in Uconnect Settings, all doors will unlock
with a Passive Entry hands-free activation. If 1st Press of
key fob Unlocks “Driver Door” is programmed in
Uconnect Settings, the liftgate will only unlock with
hands-free activation.
• Tones are sounded and the turn signals are flashed with
liftgate movements. These alerts can be turned on or off
in Uconnect Settings.
• Refer to “Uconnect Settings” in “Multimedia” for fur-
ther information.
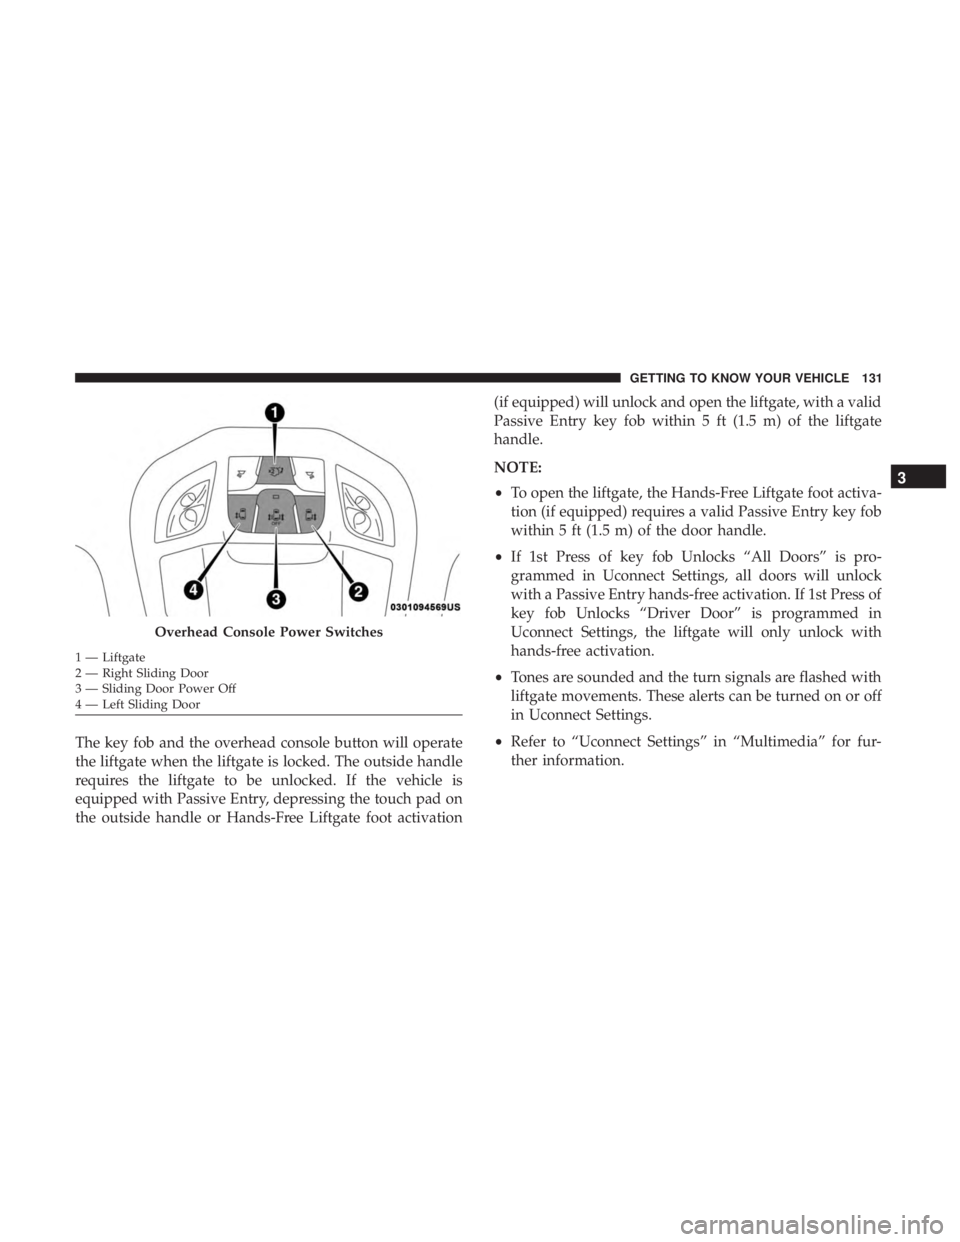
Overhead Console Power Switches
1 — Liftgate
2 — Right Sliding Door
3 — Sliding Door Power Off
4 — Left Sliding Door
3
GETTING TO KNOW YOUR VEHICLE 131
Page 134 of 614
To Close The Liftgate
The liftgate can also be closed using the Rear Interior
Power Liftgate button (if equipped), located in the upper
left trim in the liftgate opening.
Lock The Vehicle
With a valid Passive Entry key fob within 5 ft (1.5 m) of the
liftgate, pushing the passive entry lock button located to
the right of the outside handle will lock the vehicle.Hands-Free Liftgate — If Equipped
To open the liftgate using hands-free activation, use a
straight in and out kicking motion under the vehicle
activation zone in the general location below the liftgate
door handle. Do not move your foot sideways or in a
sweeping motion or the sensors may not detect the motion.
When a valid kicking motion is completed, the liftgate will
chime, the hazard lights will flash and the liftgate will open
after approximately one second. This assumes all options
are enabled in the radio.
Rear Interior Power Liftgate Switch
Hands-Free Liftgate Activation Zone
132 GETTING TO KNOW YOUR VEHICLE
Page 141 of 614

If you unplugged the garage door opener/device for
programming, plug it back in at this time.
Reprogramming A Single HomeLink Button (Canadian/
Gate Operator)
To reprogram a channel that has been previously trained,
follow these steps:
1. Cycle the ignition to the ON/RUN position.
2. Press and hold the desired HomeLink button until theindicator light begins to flash after 20 seconds. Do not
release the button.
3. Without releasing the button, proceed with “Canadian/ Gate Operator Programming” step 2 and follow all
remaining steps.
Using HomeLink
To operate, push and release the programmed HomeLink
button. Activation will now occur for the programmed
device (i.e. garage door opener, gate operator, security
system, entry door lock, home/office lighting, etc.). The
hand-held transmitter of the device may also be used at
any time.
Security
It is advised to erase all channels before you sell or turn in
your vehicle.
To do this, push and hold the two outside buttons for
20 seconds until the orange indicator flashes. Note that all
channels will be erased. Individual channels cannot be
erased.
The HomeLink Universal Transceiver is disabled when the
Vehicle Security Alarm is active.
Troubleshooting Tips
If you are having trouble programming HomeLink, here
are some of the most common solutions:
•Replace the battery in the Garage Door Opener hand-
held transmitter.
• Push the LEARN button on the Garage Door Opener to
complete the training for a Rolling Code.
• Did you unplug the device for programming and re-
member to plug it back in?
If you have any problems, or require assistance, please call
toll-free 1-800-355-3515 or, on the Internet at HomeLink.com
for information or assistance.
3
GETTING TO KNOW YOUR VEHICLE 139
Page 175 of 614

Red Warning Lights
— Air Bag Warning Light
This light indicates a fault with the air bag, and will turn on
for four to eight seconds as a bulb check when the ignition
is placed in the ON/RUN or ACC/ON/RUN position.
This light will illuminate with a single chime when a fault
with the air bag has been detected, it will stay on until the
fault is cleared. If the light is either not on during startup,
stays on, or turns on while driving, have the system
inspected at an authorized dealer as soon as possible.
— Seat Belt Reminder Warning Light
This light indicates when the driver or passenger seat belt
is unbuckled. When the ignition is first placed in the
ON/RUN or ACC/ON/RUN position and if the driver ’s
seat belt is unbuckled, a chime will sound and the light will
turn on. When driving, if the driver or front passenger seat
belt remains unbuckled, the Seat Belt Reminder Light will
flash or remain on continuously and a chime will sound.
Refer to “Occupant Restraint Systems” in “Safety” for
further information.
— Brake Warning Light
This light monitors various brake functions, including
brake fluid level and parking brake application. If thebrake light turns on it may indicate that the parking brake
is applied, that the brake fluid level is low, or that there is
a problem with the anti-lock brake system reservoir.
If the light remains on when the parking brake has been
disengaged, and the fluid level is at the full mark on the
master cylinder reservoir, it indicates a possible brake
hydraulic system malfunction or that a problem with the
Brake Booster has been detected by the Anti-Lock Brake
System (ABS) / Electronic Stability Control (ESC) system.
In this case, the light will remain on until the condition has
been corrected. If the problem is related to the brake
booster, the ABS pump will run when applying the brake,
and a brake pedal pulsation may be felt during each stop.
The dual brake system provides a reserve braking capacity
in the event of a failure to a portion of the hydraulic
system. A leak in either half of the dual brake system is
indicated by the Brake Warning Light, which will turn on
when the brake fluid level in the master cylinder has
dropped below a specified level.
The light will remain on until the cause is corrected.
NOTE:
The light may flash momentarily during sharp
cornering maneuvers, which change fluid level conditions.
4
GETTING TO KNOW YOUR INSTRUMENT PANEL 173