Page 511 of 614

Customer Programmable Features — Uconnect
4C/4C NAV Settings
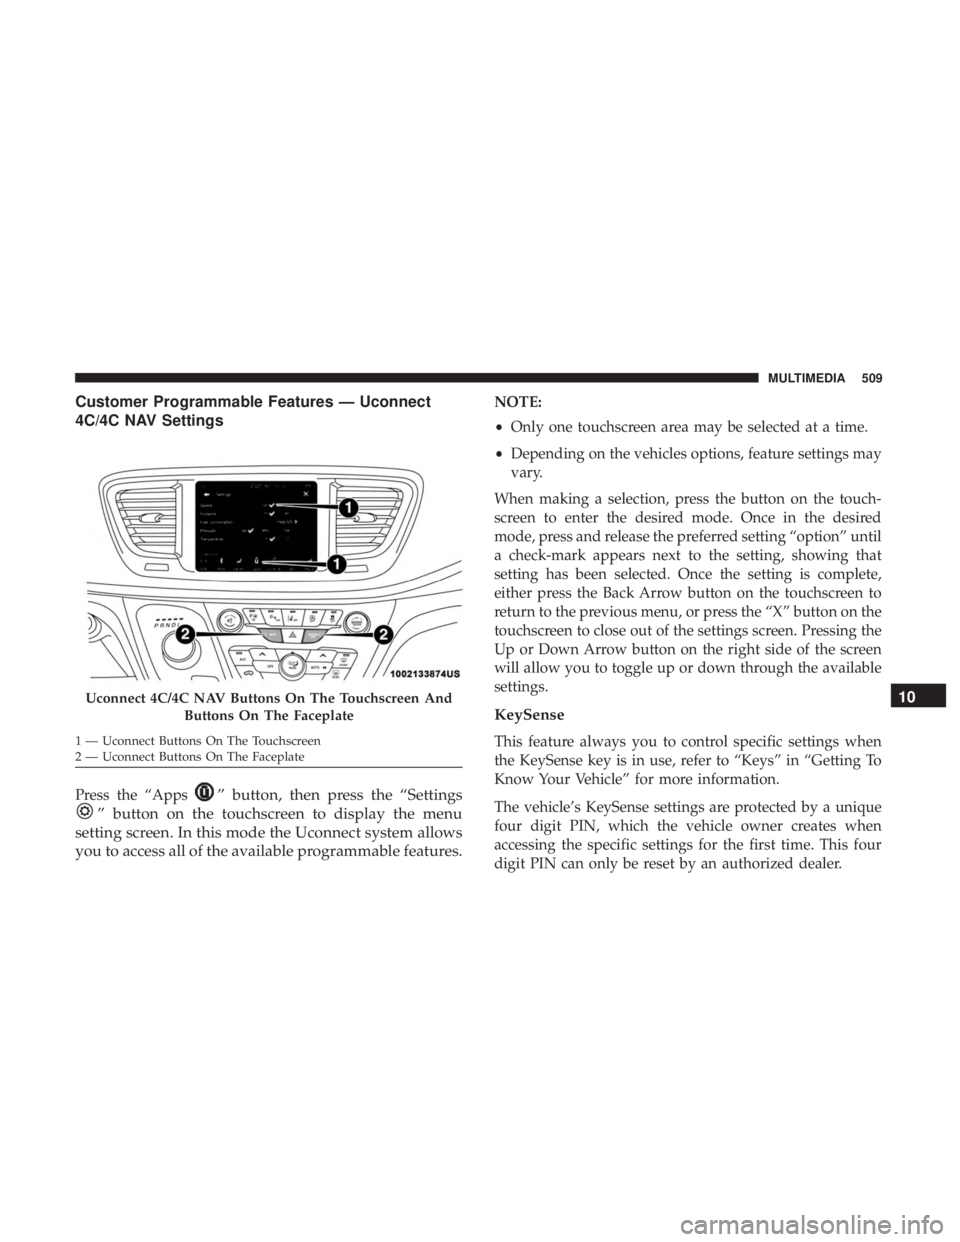
Press the “Apps” button, then press the “Settings
” button on the touchscreen to display the menu
setting screen. In this mode the Uconnect system allows
you to access all of the available programmable features.
NOTE:
• Only one touchscreen area may be selected at a time.
• Depending on the vehicles options, feature settings may
vary.
When making a selection, press the button on the touch-
screen to enter the desired mode. Once in the desired
mode, press and release the preferred setting “option” until
a check-mark appears next to the setting, showing that
setting has been selected. Once the setting is complete,
either press the Back Arrow button on the touchscreen to
return to the previous menu, or press the “X” button on the
touchscreen to close out of the settings screen. Pressing the
Up or Down Arrow button on the right side of the screen
will allow you to toggle up or down through the available
settings.
KeySense
This feature always you to control specific settings when
the KeySense key is in use, refer to “Keys” in “Getting To
Know Your Vehicle” for more information.
The vehicle’s KeySense settings are protected by a unique
four digit PIN, which the vehicle owner creates when
accessing the specific settings for the first time. This four
digit PIN can only be reset by an authorized dealer.
Uconnect 4C/4C NAV Buttons On The Touchscreen And Buttons On The Faceplate
1 — Uconnect Buttons On The Touchscreen
2 — Uconnect Buttons On The Faceplate
10
MULTIMEDIA 509
Page 534 of 614
Reset
After pressing the “Reset” button on the touchscreen, the
following settings will be available:
Setting NameSelectable Options
Restore App Drawer to Default Order OK
Cancel
Restore Settings OKCancel
NOTE:
When the “Restore Settings” feature is selected it will reset all settings to their default settings. Clear Personal Data OKCancel
NOTE:
When the “Clear Personal Data” feature is selected it will remove all personal data including Bluetooth devices and
presets.
532 MULTIMEDIA
Page 536 of 614
STEERING WHEEL AUDIO CONTROLS
The remote sound system controls are located on the rear
surface of the steering wheel at the three and nine o’clock
positions. Both controls are rocker-type switches with a
push-button in the center.
Left Switch
•Pushing the top of the switch will �Seek�up for the next
listenable station and pushing the bottom of the switch
will �Seek� down for the next listenable station. Pushing
the center button will make the radio switch to the next
preset station. The function of the left-hand control is
different depending on which mode the radio is in.
Right Switch
• Pushing the top of the switch will increase volume and
pushing the bottom of the switch will decrease volume.
Pushing the center button will make the radio switch
between the various modes available (AM/FM/SXM/
AUX, etc.).
Steering Wheel Audio Controls
(Back View Of Steering Wheel)
534 MULTIMEDIA
Page 543 of 614

3. Press the “Remote” button towards the bottom of theUconnect Theater touchscreen, within the settings
menu.
4. Press the “Pair Remote” option. Press the “OK” button. A touchscreen notification will appear indicating that
your remote has been paired successfully or unsuccess-
fully.
5. Test to make sure the remote is successfully paired by dragging your finger across the gesture pad. If you do
not see the on screen arrow, try using the “Screen”
button on the remote to switch between rear screen one
and rear screen two to make sure the remote is control-
ling the intended screen. It may take several seconds for
the remote to react when initially paired.
NOTE:
• If pairing fails try resetting the remote by, pressing and
holding the Play/Pause, Down arrow, and the Screen
button simultaneously for about five seconds until the
back light flashes.
• If remote is ever non-operational, try re-pairing remote.
• The system can accommodate up to ten paired remote
controls.Unpairing The Remote
In events such as updating the Uconnect Theater software,
or taking a remote to another vehicle, the remote will need
to be unpaired from your Uconnect Theater system. To
unpair the remote:
1. Press the Settings icon found in the lower right portion of the Uconnect Theater touchscreen.
2. Press the “Remote” button towards the bottom of the Uconnect Theater touchscreen, within the settings
menu.
3. Select “Manage Remote Controls” from the Remote section of �Settings” and follow the on screen instruc-
tions to complete the unpairing process.
4. Once complete, the remote will be ready to pair again.
NOTE: There will be a touchscreen notification message
when unpairing is successful. Repeat the above steps to
unpair a second remote.
10
MULTIMEDIA 541
Page 558 of 614

Delphi Automotive reserves the right to replace any dis-
continued Product with a comparable model. THIS WAR-
RANTY IS THE SOLE WARRANTY FOR THIS PRODUCT,
SETS FORTH YOUR EXCLUSIVE REMEDY REGARDING
DEFECTIVE PRODUCTS, AND IS IN LIEU OF ALL
OTHER WARRANTIES (EXPRESS OR IMPLIED), IN-
CLUDING ANY WARRANTY FOR MERCHANTABILITY
OR FITNESS FOR A PARTICULAR PURPOSE.
If you have any questions or comments regarding your
Delphi Automotive wireless headphones, or to register
your wireless headphones, please phone:
1-888-293-3332
Display Settings
When watching a video source, pushing “Settings”icon
on the touchscreen activates the Settings menu. These
settings control the appearance of the video on the
screen. The factory default settings are already set for
optimum viewing, so there is no need to change these
settings under normal circumstances.
To change the settings, use one of the touchscreens or
remote. To reset all values back to the original settings,
select the “Reset to Defaults” then select “YES.”
Listening To Audio With The Screen Closed
To listen to only audio portion of the channel with the
screen closed:
• Set the audio to the desired source and channel.
• Close the video screen.
• When the screen is reopened, the video screen will
automatically turn back on and show the appropriate
display menu or media.
If the screen is closed and there is no audio heard, verify
that the headphones are turned on (the ON indicator is
illuminated) and the headphone selector switch is on the
desired channel. If the headphones are turned on, push the
remote control’s power button to turn audio on. If audio is
still not heard, check that fully charged batteries are
installed in the headphones.
556 MULTIMEDIA