2018 CHRYSLER PACIFICA HYBRID reset
[x] Cancel search: resetPage 248 of 614

NOTE:
•Air bag covers may not be obvious in the interior trim,
but they will open during air bag deployment.
• After any collision, the vehicle should be taken to an
authorized dealer immediately.
Enhanced Accident Response System
In the event of an impact, if the communication network
remains intact, and the power remains intact, depending
on the nature of the event, the ORC will determine whether
to have the Enhanced Accident Response System perform
the following functions:
• Cut off fuel to the engine (If Equipped)
• Cut off battery power to the electric motor (If Equipped)
• Flash hazard lights as long as the battery has power
•
Turn on the interior lights, which remain on as long as the
battery has power or for 15 minutes from the intervention
of the Enhanced Accident Response System.
• Unlock the power door locks.
Your vehicle may also be designed to perform any of these
other functions in response to the Enhanced Accident
Response System: •
Turn off the Fuel Filter Heater, Turn off the HVAC
Blower Motor, Close the HVAC Circulation Door
• Cut off battery power to the:
• Engine
• Electric Motor (if equipped)
• Electric power steering
• Brake booster
• Electric park brake
• Automatic transmission gear selector
• Horn
• Front wiper
• Headlamp washer pump
NOTE: After an accident, remember to cycle the ignition to
the STOP (OFF/LOCK) position and remove the key from
the ignition switch to avoid draining the battery. Carefully
check the vehicle for fuel leaks in the engine compartment
and on the ground near the engine compartment and fuel
tank before resetting the system and starting the engine. If
there are no fuel leaks or damage to the vehicle electrical
devices (e.g. headlights) after an accident, reset the system
by following the procedure described below.
246 SAFETY
Page 249 of 614

Enhanced Accident Response System Reset
Procedure
After an event occurs requiring activation of the Enhanced
Accident Response System, when the system is active, a “
Service Hybrid Electric Vehicle System” message will be
displayed on the instrument cluster. The vehicle is not
drivable in this state.
In order to reset the High Voltage Battery and Engine, the
vehicle must be towed to an authorized dealer immedi-
ately to be inspected and have the Enhanced Accident
Response System reset.
In order to immediately reset the Hazard Flashers, Interior
Lights, Power Door Locks, HVAC Blower Motor, the igni-
tion switch must be changed from START or ON/RUN to
ignition OFF.
Maintaining Your Air Bag System
WARNING!
•Modifications to any part of the air bag system could
cause it to fail when you need it. You could be
injured if the air bag system is not there to protect
(Continued)
WARNING! (Continued)
you. Do not modify the components or wiring, in-
cluding adding any kind of badges or stickers to the
steering wheel hub trim cover or the upper right side
of the instrument panel. Do not modify the front
bumper, vehicle body structure, or add aftermarket
side steps or running boards.
• It is dangerous to try to repair any part of the air bag
system yourself. Be sure to tell anyone who works on
your vehicle that it has an air bag system.
• Do not attempt to modify any part of your air bag
system. The air bag may inflate accidentally or may
not function properly if modifications are made.
Take your vehicle to an authorized dealer for any air
bag system service. If your seat, including your trim
cover and cushion, needs to be serviced in any way
(including removal or loosening/tightening of seat
attachment bolts), take the vehicle to your authorized
dealer. Only manufacturer approved seat accessories
may be used. If it is necessary to modify the air bag
system for persons with disabilities, contact your
authorized dealer.
5
SAFETY 247
Page 287 of 614

open, the vehicle is at a standstill, and there is no attempt
to depress the brake pedal or accelerator pedal, the park
brake will automatically engage to prevent the vehicle
from rolling.
SafeHold can be temporarily bypassed by pushing the
Electric Park Brake Switch while the driver door is open
and brake pedal is pressed. Once manually bypassed,
SafeHold will be enabled again once the vehicle reaches
12 mph (20 km/h) or the ignition is cycled to the OFF
position and back to ON again.
Brake Service Mode
We recommend having your brakes serviced by your
authorized dealer. You should only make repairs for which
you have the knowledge and the right equipment. You
should only enter Brake Service Mode during brake ser-
vice.
When servicing your rear brakes, it may be necessary for
you or your technician to push the rear piston into the rear
caliper bore. With the Electric Park Brake system, this can
only be done after retracting the Electric Park Brakeactuator. Fortunately, actuator retraction can be done easily
by entering the “Brake Service” through the “Uconnect
Settings” in your vehicle. This menu based system will
guide you through the steps necessary to retract the EPB
actuator in order to perform rear brake service.
Brake Service Mode has requirements that must be met in
order to be activated:
•
The vehicle must be at a standstill.
• The park brake must be unapplied.
• The transmission must be in PARK or NEUTRAL.
While in service mode, the Electric Park Brake fault lamp
will flash continuously while the ignition switch is ON.
When brake service work is complete, the following steps
must be followed to reset the parking brake system to
normal operation:
• Ensure the vehicle is at a standstill.
• Press the brake pedal with moderate force.
• Apply the Electric Park Brake Switch.
6
STARTING AND OPERATING 285
Page 294 of 614

LOW (L)
This range should be used when descending very steep
grades. The vehicle transmission can be operated continu-
ously in LOW without damaging the vehicle or causing
issues. Using the LOW position will increase the rate of
deceleration when the accelerator pedal is released in
comparison to the DRIVE position. To access the LOW
position, push down on the gear selector and rotate it fully
clockwise. Shifting between DRIVE and LOW can be done
at any speed.
Transmission Limp Home Mode
Transmission function is monitored electronically for ab-
normal conditions. If a condition is detected that could
result in transmission damage, Transmission Limp Home
Mode is activated. In this mode, vehicle speed is limited to
about 45 mph (72 km/h). In addition to the Malfunction
Indicator Light (MIL), the Service Hybrid System Telltale,
the Red Turtle indication, and a popup message indicating
that vehicle speed may be limited may all be illuminated.
Limp Home Mode allows the vehicle to be driven to an
authorized dealer for service without damaging the trans-
mission.In the event of a momentary problem, the transmission can
be reset to regain functionality by performing the following
steps:
1. Stop the vehicle.
2. Shift the transmission into PARK, if possible. If not, shift
the transmission to NEUTRAL.
3. Push and hold the ignition switch until the vehicle turns OFF.
4. Wait approximately 30 seconds.
5. Restart the vehicle.
6. Shift into the desired gear range. If the problem is no longer detected, the transmission will return to normal
operation.
NOTE: Even if the transmission can be reset, we recom-
mend that you visit an authorized dealer at your earliest
possible convenience. An authorized dealer has diagnostic
equipment to assess the condition of your transmission. If
the transmission cannot be reset, authorized dealer service
is required.
292 STARTING AND OPERATING
Page 296 of 614

NOTE:
•
Even if the power steering assistance is no longer opera-
tional, it is still possible to steer the vehicle. Under these
conditions there will be a substantial increase in steering
effort, especially at low speeds and during parking ma-
neuvers.
• The power steering system is fully electric; it requires no
power steering fluid.
• If the condition persists, see your authorized dealer for
service.
SPEED CONTROL — IF EQUIPPED
When engaged, the Speed Control takes over accelerator
operations at speeds greater than 25 mph (40 km/h).
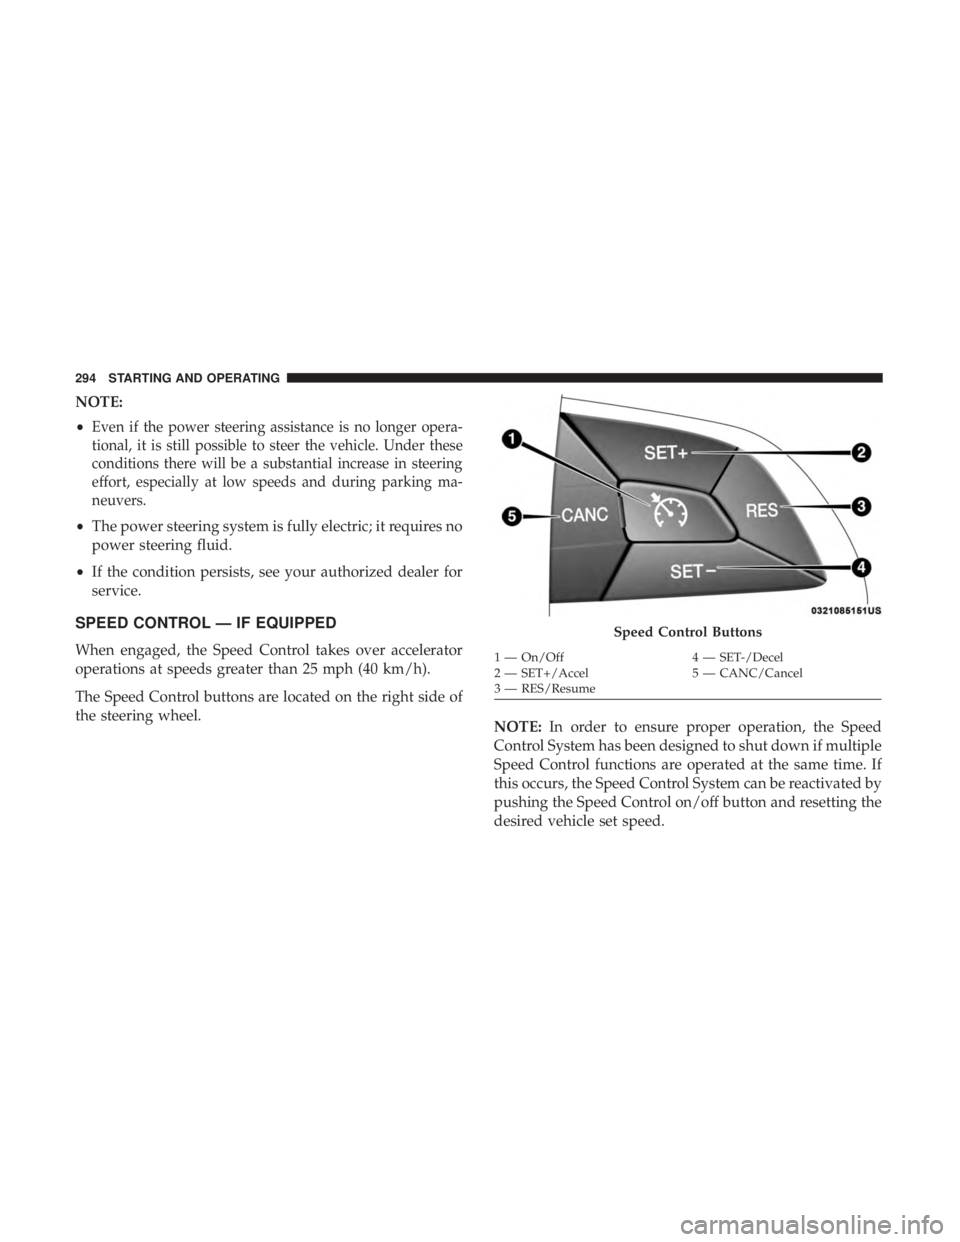
The Speed Control buttons are located on the right side of
the steering wheel. NOTE:In order to ensure proper operation, the Speed
Control System has been designed to shut down if multiple
Speed Control functions are operated at the same time. If
this occurs, the Speed Control System can be reactivated by
pushing the Speed Control on/off button and resetting the
desired vehicle set speed.
Speed Control Buttons
1 — On/Off 4 — SET-/Decel
2 — SET+/Accel 5 — CANC/Cancel
3 — RES/Resume
294 STARTING AND OPERATING
Page 299 of 614

To Deactivate
A soft tap on the brake pedal, pushing the CANC (cancel)
button, or normal brake pressure while slowing the vehicle
will deactivate the speed control without erasing the set
speed from memory.
Pushing the on/off button or cycling the ignition to OFF,
erases the set speed from memory.
ADAPTIVE CRUISE CONTROL (ACC) —
IF EQUIPPED
Adaptive Cruise Control (ACC) increases the driving con-
venience provided by cruise control while traveling on
highways and major roadways. However, it is not a safety
system and not designed to prevent collisions.Speed
Control function performs differently. Please refer to the
proper section within this chapter.
ACC will allow you to keep cruise control engaged in light
to moderate traffic conditions without the constant need to
reset your cruise control. ACC utilizes a radar sensor and a
forward facing camera designed to detect a vehicle directly
ahead of you. NOTE:
•
If the sensor does not detect a vehicle ahead of you, ACC
will maintain a fixed set speed.
• If the ACC sensor detects a vehicle ahead, ACC will
apply limited braking or accelerate (not to exceed the
original set speed) automatically to maintain a preset
following distance, while matching the speed of the
vehicle ahead.
The Cruise Control system has two control modes:
• Adaptive Cruise Control mode for maintaining an ap-
propriate distance between vehicles.
• Normal (Fixed Speed) Cruise Control mode for cruising
at a constant preset speed. For additional information,
refer to “Normal (Fixed Speed) Cruise Control Mode” in
this section.
NOTE: Normal (Fixed Speed) Cruise Control will not react
to preceding vehicles. Always be aware of the mode
selected.
You can change the mode by using the Cruise Control
buttons. The two control modes function differently. Al-
ways confirm which mode is selected.
6
STARTING AND OPERATING 297
Page 433 of 614

SCHEDULED SERVICING
Your vehicle is equipped with an automatic oil change
indicator system. The oil change indicator system will
remind you that it is time to take your vehicle in for
scheduled maintenance.
Based on engine operation conditions, the oil change
indicator message will illuminate. This means that service
is required for your vehicle. Operating conditions such as
frequent short-trips, or extremely hot or cold ambient
temperatures will influence when the “Oil Change Re-
quired” message is displayed. Severe Operating Condi-
tions can cause the change oil message to illuminate as
early as 3,500 miles (5,600 km) since last reset. Have your
vehicle serviced as soon as possible, within the next 500
miles (805 km).
NOTE:Even though the vehicle may not have been driven,
both the fuel in the tank and oil in the engine will still
degrade over time. Additionally, there will be a notification
to the driver if the engine is being run to maintain the oil
and fuel systems. Your authorized dealer will reset the oil change indicator
message after completing the scheduled oil change. If a
scheduled oil change is performed by someone other than
your authorized dealer, the message can be reset by
referring to “Vehicle Info” in “Instrument Cluster Display”
in “Getting To Know Your Instrument Panel”.
NOTE:
Under no circumstances should oil change inter-
vals exceed 10,000 miles (16,000 km), twelve months or
350 hours of engine run time, whichever comes first. The
350 hours of engine run or idle time is generally only a
concern for fleet customers.
Severe Duty All Models
Change Engine Oil at 4,000 miles (6,500 km) or 350 hours of
engine run time if the vehicle is operated in a dusty and off
road environment or is operated predominately at idle or
only very low engine RPM’s. This type of vehicle use is
considered Severe Duty.
8
SERVICING AND MAINTENANCE 431
Page 463 of 614

Fluid Level Check
The fluid level is preset at the factory and does not require
adjustment under normal operating conditions. Routine
fluid level checks are not required; therefore the transmis-
sion has no dipstick. An authorized dealer can check your
transmission fluid level using special service tools. If you
notice fluid leakage or transmission malfunction, visit an
authorized dealer immediately to have the transmission
fluid level checked. Operating the vehicle with an im-
proper fluid level can cause severe transmission damage.
CAUTION!
If a transmission fluid leak occurs, visit an authorized
dealer immediately. Severe transmission damage may
occur. An authorized dealer has the proper tools to
adjust the fluid level accurately.
Fluid Changes
Under normal operating conditions, the fluid installed at
the factory will provide satisfactory lubrication for the life
of the vehicle.
Routine fluid changes are not required. However, change
the fluid if it becomes contaminated (with water, etc.), or if
the transmission is disassembled for any reason.
RAISING THE VEHICLE
In the case where it is necessary to raise the vehicle, go to
an authorized dealer or service station.
TIRES
Tire Safety Information
Tire safety information will cover aspects of the following
information: Tire Markings, Tire Identification Numbers,
Tire Terminology and Definitions, Tire Pressures, and Tire
Loading.
8
SERVICING AND MAINTENANCE 461