Page 52 of 614

Remote Start Cancel Message — If Equipped
The following messages will display in the instrument
cluster if the vehicle fails to remote start or exits remote
start prematurely:
•Remote Start Cancelled — Door Open
(Prior to remote start attempt)
• Remote Start Cancelled — Hood Open
• Remote Start Cancelled — Fuel Low
• Remote Start Cancelled — Liftgate Open
• Remote Start Cancelled — Time Expired
• Remote Start Disabled — Start Vehicle To Reset
The message will stay active until the ignition is placed in
the ON/RUN position.
How To Use Remote Start
All of the following conditions must be met before the
vehicle will remote start:
• Gear Selector in PARK
• Doors closed
• Hood closed
• Liftgate closed •
Hazard switch off
• Brake switch inactive (brake pedal not pushed)
• 12 volt battery at an acceptable charge level
• Key fob PANIC button not pushed
• System not disabled from previous remote start event
• Vehicle alarm system indicator flashing
• Ignition in STOP/OFF position
• Fuel level meets minimum requirement
• MIL lamp is OFF, Vehicle is in propulsion system active
WARNING!
•Do not start or run an engine in a closed garage or
confined area. Exhaust gas contains Carbon Monox-
ide (CO) which is odorless and colorless. Carbon
Monoxide is poisonous and can cause serious injury
or death when inhaled.
• Keep key fobs away from children. Operation of the
Remote Start System, windows, door locks or other
controls could cause serious injury or death.
50 GETTING TO KNOW YOUR VEHICLE
Page 53 of 614

To Enter Remote Start Mode
Push and release the Remote Start button on the key fob
twice within five seconds. The vehicle doors will lock, the
turn signals will flash twice, and the horn will chirp twice.
Then the vehicle will start, and the vehicle will remain in
the Remote Start mode for a 15-minute cycle.
NOTE:
•The vehicle can be started two consecutive times (two
15-minute cycles) from the key fob. However, the igni-
tion must be placed in the ON/RUN position before any
additional remote start requests can be received.
• The park lamps will turn on and remain on during
Remote Start mode.
• For security, power window operation is disabled when
the vehicle is in the Remote Start mode.
To Exit Remote Start Mode Without Driving The
Vehicle
Push and release the Remote Start button one time or allow
the remote start cycle to complete the entire 15-minute
cycle.
In addition, the ignition can be cycled to the Run Propul-
sion System Available position by pressing the ignition switch with the key fob in the vehicle, and then pressing
the ignition switch one more time to cycle the ignition
mode to
�OFF�.
NOTE: To avoid unintentional shutdowns, the system will
disable the one time push of the Remote Start button for
two seconds after receiving a valid Remote Start request.
To Exit Remote Start Mode And Drive The Vehicle
Before the end of 15-minute cycle, push and release the
unlock button on the key fob to unlock the doors, or unlock
the vehicle using Keyless Enter-N-Go — Passive Entry via
the door handles, and disarm the vehicle security alarm (if
equipped). Then, prior to the end of the 15-minute cycle,
push and release the START/STOP button.
NOTE: For vehicles equipped with the Keyless Enter-
N-Go — Passive Entry feature, the message “Remote Start
Active — Push Start Button” will display in the instrument
cluster display until you push the ignition START button.
Remote Start Comfort Systems — If Equipped
When Remote Start is activated, the Climate Control,
vented seats (if equipped) are also activated in tempera-
tures above 80° F (26.7° C), and the optional heated seats,
and optional heated steering wheel in temperatures below
3
GETTING TO KNOW YOUR VEHICLE 51
Page 56 of 614

lamps and/or turn signals will flash, and the vehicle
security light in the instrument cluster will flash.
Rearming Of The System
If something triggers the alarm, and no action is taken to
disarm it, the vehicle security alarm will turn the horn off
after 29 seconds, 5 seconds between cycles, up to 8 cycles if
the trigger remains active and then the vehicle security
alarm will rearm itself.
To Arm The System
Follow these steps to arm the vehicle security alarm:
1. Make sure the vehicles ignition is cycled to the “OFF”position (refer to �Starting The Vehicle� in�Starting And
Operating� for further information).
• For vehicles equipped with Keyless Enter-N-Go —
Passive Entry, make sure the vehicle ignition system is
OFF.
2. Perform one of the following methods to lock the vehicle:
• Push lock on the interior power door lock switch with
the driver and/or passenger door open.
• Push the lock button on the exterior Passive Entry
Door Handle with a valid key fob available in the same exterior zone (refer to
�Keyless Enter-N-Go — Passive
Entry� in�Getting To Know Your Vehicle� for further
information).
• Push the lock button on the key fob.
3. If any doors are open, close them.
To Disarm The System
The vehicle security alarm can be disarmed using any of
the following methods:
• Push the unlock button on the key fob.
• Grasp the Passive Entry Unlock Door Handle (if
equipped, refer to �Keyless Enter-N-Go — Passive En-
try� in�Doors� under�Getting To Know Your Vehicle� for
further information).
•
Hands Free Liftgate passive entry activation (if equipped
with Hands Free Liftgate passive entry).
• Cycle the vehicle ignition system out of the OFF posi-
tion.
• For vehicles equipped with Keyless Enter-N-Go —
Passive Entry, push the keyless ignition START/STOP
button (requires at least one valid key fob in the
vehicle).
54 GETTING TO KNOW YOUR VEHICLE
Page 67 of 614
WARNING!
Personal injury or cargo damage may occur if caught in
the path of the sliding door. Make sure the door path is
clear before closing the door.
WARNING!
Before driving off, check the instrument cluster for a
sliding door or door open message or warning indica-
tor. Failure to do this could result in unintentionally
leaving the sliding door open while driving.
Hands-Free Sliding Doors — If Equipped
To open the Hands-Free Sliding Doors, use a straight in
and out kicking motion under the vehicle in the general
Passenger Side Power Sliding Side Door Switch
Hands-Free Sliding Doors
3
GETTING TO KNOW YOUR VEHICLE 65
Page 99 of 614

Front Fog Lights — If Equipped
To activate the front fog lights, turn on the parking lights or
the low beam headlights and push in the headlight switch
control knob. Pushing the headlight switch control knob in
a second time will turn the front fog lights off.
Turn Signals
Move the multifunction lever up or down and the arrows
on each side of the instrument cluster flash to show proper
operation of the front and rear turn signal lights.NOTE:
If either light remains on and does not flash, or
there is a very fast flash rate, check for a defective outside
light bulb. If an indicator fails to light when the lever is
moved, it would suggest that the indicator bulb is defec-
tive.
Turn Signal Warning
If the vehicle electronics sense that the vehicle has traveled
for about 1 mile (1.6 km) with the turn signals on, a chime
will sound and a message will display in the cluster to alert
the driver.
Lane Change Assist — If Equipped
Tap the multifunction lever up or down once, without
moving beyond the detent, and the turn signal (right or
left) will flash three times then automatically turn off.
Battery Protection
This feature provides battery protection to avoid wearing
down the battery if the headlights or parking lights are left
on for extended periods of time when the ignition switch is
in the LOCK position. After eight minutes of the ignition
switch being in the LOCK position and the headlight
switch in any position other than OFF or AUTO, the lights
will turn off automatically until the next cycle of the
ignition switch or headlight switch.Fog Light Switch
3
GETTING TO KNOW YOUR VEHICLE 97
Page 102 of 614

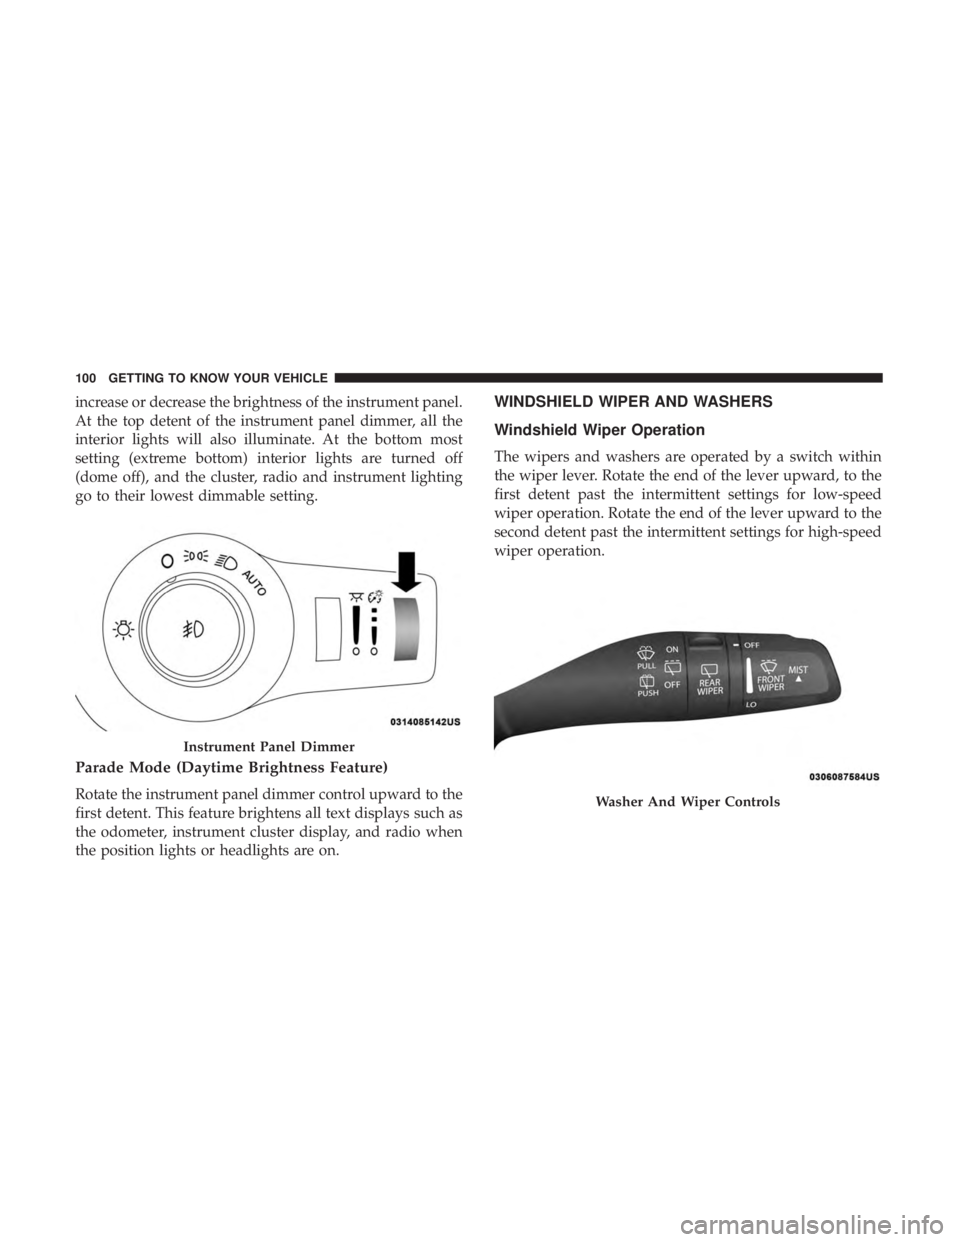
increase or decrease the brightness of the instrument panel.
At the top detent of the instrument panel dimmer, all the
interior lights will also illuminate. At the bottom most
setting (extreme bottom) interior lights are turned off
(dome off), and the cluster, radio and instrument lighting
go to their lowest dimmable setting.
Parade Mode (Daytime Brightness Feature)
Rotate the instrument panel dimmer control upward to the
first detent. This feature brightens all text displays such as
the odometer, instrument cluster display, and radio when
the position lights or headlights are on.
WINDSHIELD WIPER AND WASHERS
Windshield Wiper Operation
The wipers and washers are operated by a switch within
the wiper lever. Rotate the end of the lever upward, to the
first detent past the intermittent settings for low-speed
wiper operation. Rotate the end of the lever upward to the
second detent past the intermittent settings for high-speed
wiper operation.
Instrument Panel Dimmer
Washer And Wiper Controls
100 GETTING TO KNOW YOUR VEHICLE
Page 159 of 614

GETTING TO KNOW YOUR INSTRUMENT PANEL
CONTENTS
�INSTRUMENT CLUSTER ..................158
▫ Instrument Cluster Descriptions ............159
� INSTRUMENT CLUSTER DISPLAY ...........160
▫ Instrument Cluster Display Location
And Controls ......................... .160
▫ Oil Life Reset ........................ .161
▫ Fuel And Oil Refresh Mode ................162
▫ KeySense Cluster Messages — If Equipped .....163
▫ Instrument Cluster Display Menu Items .......164
▫ Battery Saver On/Battery Saver Mode Message —
Electrical Load Reduction Actions —
If Equipped ......................... .170�
WARNING LIGHTS AND MESSAGES .........172
▫ Red Warning Lights .....................173
▫ Yellow Warning Lights ...................177
▫ Yellow Indicator Lights ...................182
▫ Green Indicator Lights ...................182
▫ White Indicator Lights ...................183
▫ Blue Indicator Lights ....................184
� ONBOARD DIAGNOSTIC SYSTEM — OBD II . . .184
▫ Onboard Diagnostic System (OBD II)
Cybersecurity ........................ .184
� EMISSIONS INSPECTION AND MAINTENANCE
PROGRAMS .......................... .1854
Page 160 of 614
INSTRUMENT CLUSTER
Instrument Cluster
158 GETTING TO KNOW YOUR INSTRUMENT PANEL