2018 CHEVROLET MALIBU reset
[x] Cancel search: resetPage 20 of 413
Chevrolet Malibu Owner Manual (GMNA-Localizing-U.S./Canada/Mexico-
11348460) - 2018 - crc - 5/3/17
In Brief 19
Hybrid Low Mode
When descending steep grades or
in stop-and-go traffic, L (Low)
provides the ability to slow the
vehicle with regenerative braking
when lifting off the accelerator
pedal. L2 provides moderate
braking and L1 provides maximum
braking below 80 km/h (50 mph).
When the battery reaches full
charge the engine may run to
maintain braking.
To use this feature:1. Move the shift lever to L (Low). The transmission will enter L2.
2. Press + (Plus) or −(Minus) on
the shift lever to shift between
L2 and L1.
See Manual Mode 0225.
Vehicle Features
Infotainment System
Base radio information is included in
this manual. See the infotainment
manual for information on other
available infotainment systems.
Read the following pages to
become familiar with the features.
{Warning
Taking your eyes off the road for
too long or too often while using
any infotainment feature can
cause a crash. You or others
could be injured or killed. Do not
give extended attention to
infotainment tasks while driving.
Limit your glances at the vehicle
displays and focus your attention
on driving. Use voice commands
whenever possible.
The infotainment system has built-in
features intended to help avoid
distraction by disabling some
functions when driving. These functions may gray out when they
are unavailable. Many infotainment
features are also available through
the instrument cluster and steering
wheel controls.
Before driving:
.
Become familiar with the
operation, center stack controls,
and infotainment display
controls.
. Set up the audio by presetting
favorite stations, setting the
tone, and adjusting the
speakers.
. Set up phone numbers in
advance so they can be called
easily by pressing a single
control or by using a single voice
command if equipped with
Bluetooth phone capability.
See Defensive Driving 0207.
To play the infotainment system with
the ignition off, see Retained
Accessory Power (RAP) 0221.
Page 23 of 413
Chevrolet Malibu Owner Manual (GMNA-Localizing-U.S./Canada/Mexico-
11348460) - 2018 - crc - 5/3/17
22 In Brief
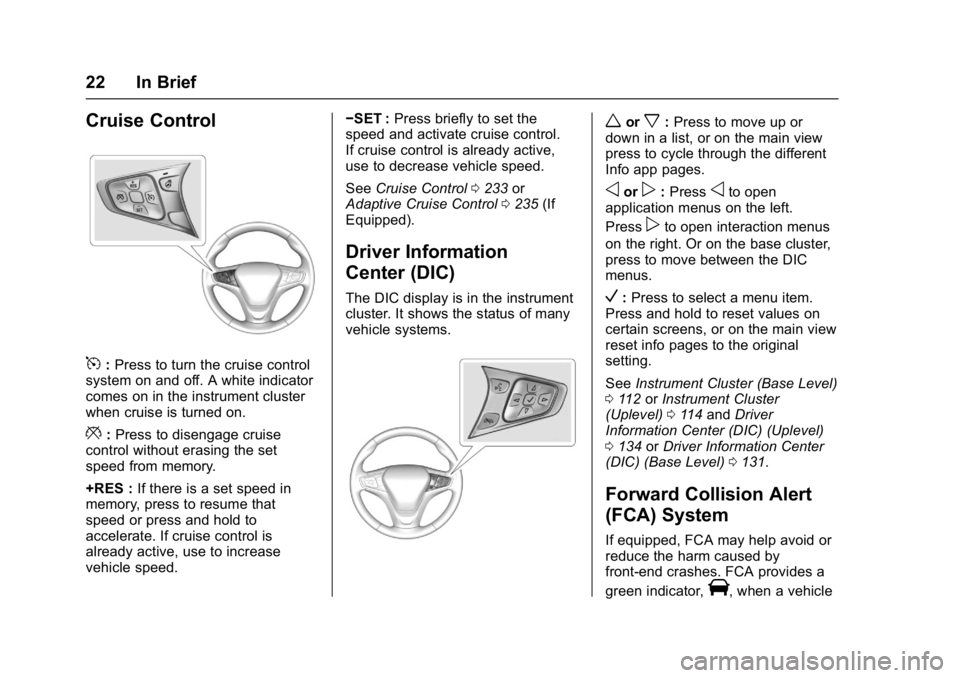
Cruise Control
5:Press to turn the cruise control
system on and off. A white indicator
comes on in the instrument cluster
when cruise is turned on.
*: Press to disengage cruise
control without erasing the set
speed from memory.
+RES : If there is a set speed in
memory, press to resume that
speed or press and hold to
accelerate. If cruise control is
already active, use to increase
vehicle speed. −SET :
Press briefly to set the
speed and activate cruise control.
If cruise control is already active,
use to decrease vehicle speed.
See Cruise Control 0233 or
Adaptive Cruise Control 0235 (If
Equipped).
Driver Information
Center (DIC)
The DIC display is in the instrument
cluster. It shows the status of many
vehicle systems.
worx: Press to move up or
down in a list, or on the main view
press to cycle through the different
Info app pages.
oorp: Pressoto open
application menus on the left.
Press
pto open interaction menus
on the right. Or on the base cluster,
press to move between the DIC
menus.
V: Press to select a menu item.
Press and hold to reset values on
certain screens, or on the main view
reset info pages to the original
setting.
See Instrument Cluster (Base Level)
0 112 orInstrument Cluster
(Uplevel) 0114 and Driver
Information Center (DIC) (Uplevel)
0 134 orDriver Information Center
(DIC) (Base Level) 0131.
Forward Collision Alert
(FCA) System
If equipped, FCA may help avoid or
reduce the harm caused by
front-end crashes. FCA provides a
green indicator,
V, when a vehicle
Page 30 of 413
Chevrolet Malibu Owner Manual (GMNA-Localizing-U.S./Canada/Mexico-
11348460) - 2018 - crc - 5/3/17
In Brief 29
E85 or FlexFuel
No E85 or FlexFuel
Gasoline-ethanol fuel blends greater
than E15 (15% ethanol by volume),
such as E85, cannot be used in this
vehicle.
Engine Oil Life System
The engine oil life system calculates
engine oil life based on vehicle use
and displays the CHANGE ENGINE
OIL SOON message when it is time
to change the engine oil and filter.
The oil life system should be reset
to 100% only following an oil
change.
Resetting the Oil Life System1. Using the DIC controls on the right side of the steering wheel,
display REMAINING OIL LIFE
on the DIC. See
Driver Information Center
(DIC) (Uplevel) 0134 orDriver
Information Center (DIC) (Base
Level) 0131. When remaining
oil life is low, the CHANGE
ENGINE OIL SOON message
will appear on the display.
2. Press
Von the DIC controls
and hold down for a few
seconds to clear the CHANGE
ENGINE OIL SOON message
and reset the oil life at 100%.
Be careful not to reset the oil
life display accidentally at any
time other than after the oil is
changed. It cannot be reset
accurately until the next oil
change.
The system is reset when the
CHANGE ENGINE OIL SOON
message is off and the REMAINING
OIL LIFE 100% message is
displayed.
See Engine Oil Life System 0281.
Driving for Better Fuel
Economy
Driving habits can affect fuel
mileage. Here are some driving tips
to get the best fuel economy
possible.
.
Avoid fast starts and accelerate
smoothly.
. Brake gradually and avoid
abrupt stops.
. Avoid idling the engine for long
periods of time.
. When road and weather
conditions are appropriate, use
cruise control.
. Always follow posted speed
limits or drive more slowly when
conditions require.
. Keep vehicle tires properly
inflated.
. Combine several trips into a
single trip.
. Replace the vehicle's tires with
the same TPC Spec number
molded into the tire's sidewall
near the size.
Page 43 of 413
Chevrolet Malibu Owner Manual (GMNA-Localizing-U.S./Canada/Mexico-
11348460) - 2018 - crc - 5/3/17
42 Keys, Doors, and Windows
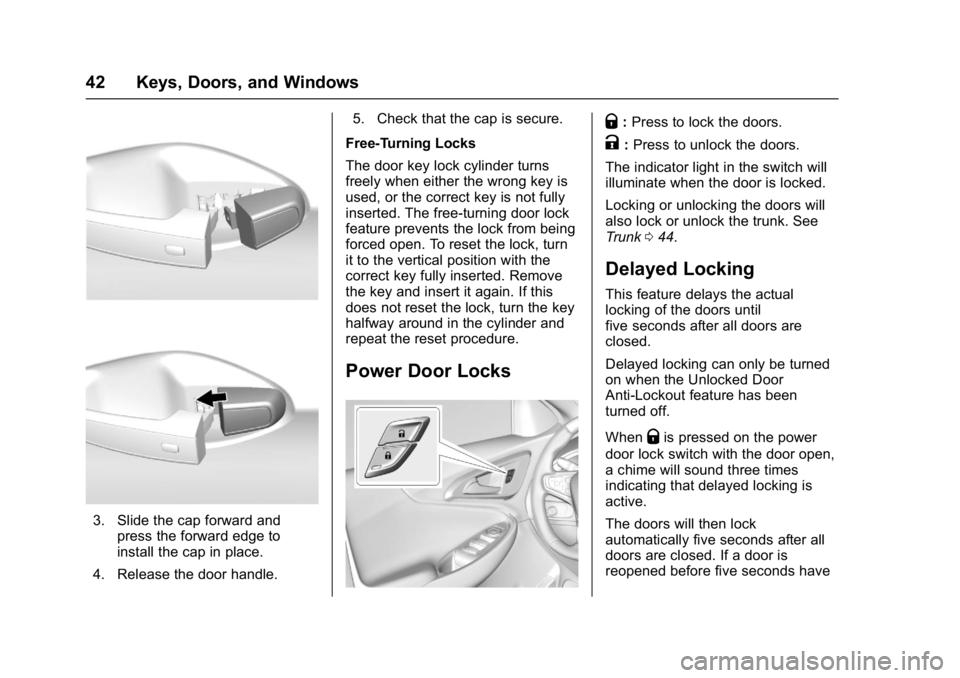
3. Slide the cap forward andpress the forward edge to
install the cap in place.
4. Release the door handle. 5. Check that the cap is secure.
Free-Turning Locks
The door key lock cylinder turns
freely when either the wrong key is
used, or the correct key is not fully
inserted. The free-turning door lock
feature prevents the lock from being
forced open. To reset the lock, turn
it to the vertical position with the
correct key fully inserted. Remove
the key and insert it again. If this
does not reset the lock, turn the key
halfway around in the cylinder and
repeat the reset procedure.
Power Door Locks
Q: Press to lock the doors.
K:Press to unlock the doors.
The indicator light in the switch will
illuminate when the door is locked.
Locking or unlocking the doors will
also lock or unlock the trunk. See
Trunk 044.
Delayed Locking
This feature delays the actual
locking of the doors until
five seconds after all doors are
closed.
Delayed locking can only be turned
on when the Unlocked Door
Anti-Lockout feature has been
turned off.
When
Qis pressed on the power
door lock switch with the door open,
a chime will sound three times
indicating that delayed locking is
active.
The doors will then lock
automatically five seconds after all
doors are closed. If a door is
reopened before five seconds have
Page 44 of 413
Chevrolet Malibu Owner Manual (GMNA-Localizing-U.S./Canada/Mexico-
11348460) - 2018 - crc - 5/3/17
Keys, Doors, and Windows 43
elapsed, the five-second timer will
reset once all the doors are closed
again.
Press
Qon the door lock switch
again, or press
Qon the RKE
transmitter, to override this feature
and lock the doors immediately.
Delayed locking can be
programmed. See Vehicle
Personalization 0138.
Automatic Door Locks
The doors will lock automatically
when all doors are closed, the
ignition is on, and the vehicle is
shifted out of P (Park).
If a vehicle door is unlocked, and
then opened and closed, the doors
will lock either when your foot is
removed from the brake or the
vehicle speed becomes faster than
13 km/h (8 mph).
To unlock the doors:
.
Press
Kon the power door lock
switch. .
Shift the transmission into
P (Park).
Automatic door locking cannot be
disabled. Automatic door unlocking
can be programmed. See Vehicle
Personalization 0138.
Lockout Protection
If the ignition is on or in ACC/
ACCESSORY and the power door
lock switch is pressed with the
driver door open, all the doors will
lock and only the driver door will
unlock.
If the vehicle is off and locking is
requested while a door is open,
when all doors are closed the
vehicle will check for RKE
transmitters inside. If an RKE
transmitter is detected and the
number of RKE transmitters inside
has not reduced, the driver door will
unlock and the horn will chirp three
times. Lockout Protection can be manually
overridden with the driver door open
by pressing and holding
Qon the
power door lock switch.
Unlocked Door Anti-Lockout
If Unlocked Door Anti-Lockout has
been turned on and the vehicle is
off, the driver door is open, and
locking is requested, all the doors
will lock and the driver door will
remain unlocked. Push the lock
button on the door or the RKE
transmitter a second time to lock the
driver door. The Unlocked Door
Anti-Lockout feature can be turned
on or off. See Vehicle
Personalization 0138.
Page 109 of 413
Chevrolet Malibu Owner Manual (GMNA-Localizing-U.S./Canada/Mexico-
11348460) - 2018 - crc - 5/3/17
108 Instruments and Controls
Auto Set
When Auto Set is enabled, the time
cannot be manually set.
From the Set Time or Set
Date menu:1. Press the preset button under Auto Set.
2. Turn MENU to select Off (Manual) or On-Cell Network,
then press MENU to select it
and return to the Time and
Date menu.
3. To exit without saving, press BACK at any time.
Setting the 12/24 Hour Format
From the Set Time menu:
1. Press the preset button under 12-24 HR to change between
12 hour and 24 hour modes.
2. To return to the Time and Date menu, press BACK at any time.
Radio with Touchscreen
The infotainment system controls
are used to access the time and
date settings through the menu
system. See Operation0167 on
how to use the menu system.
Setting the Time and Date
When Auto Set is enabled the time
cannot be manually set.
1. Press
{, then touch Settings.
2. Touch Time and Date, then Set Time or Set Date.
3. Touch + or −to adjust the
value.
4. Touch
RorQto adjust AM or
PM for 12 hour format.
5. Touch
0to return to the
Time and Date menu.
Auto Set
1. Press{, then touch Settings.
2. Touch Time and Date, then Auto Set.
3. Select from the available selections. 4. Touch
0to return to the
Time and Date menu.
Setting the 12/24 Hour Format
1. Press{, then touch Settings.
2. Touch Time and Date, then select 12h or 24h format.
3. Touch
0to return to the
Time and Date menu.
Setting the Month and Day
Format
1. Press{, then touch Settings.
2. Touch Time and Date, then Set Date Format.
3. Select DD/MM/YYYY (day/ month/year), MM/DD/YYYY
(month/day/year), or YYYY/
MM/DD (year/month/day)
format.
4. Touch
0to return to the
Time and Date menu.
Page 111 of 413
Chevrolet Malibu Owner Manual (GMNA-Localizing-U.S./Canada/Mexico-
11348460) - 2018 - crc - 5/3/17
110 Instruments and Controls
operate briefly then turn off.
A protection circuit shuts off the
power supply and the indicator light
turns off. To reset the circuit, unplug
the item and plug it back in or turn
the Retained Accessory Power
(RAP) off and then back on. See
Retained Accessory Power (RAP)
0221. The power restarts when
equipment using 150 watts or less is
plugged into the outlet and a system
fault is not detected.
The power outlet is not designed for
the following, and may not work
properly if they are plugged in:
. Equipment with high initial peak
wattage, such as
compressor-driven refrigerators
and electric power tools
. Other equipment requiring an
extremely stable power supply,
such as
microcomputer-controlled
electric blankets and touch
sensor lamps
. Medical equipment
See High Voltage Devices and
Wiring 0300.Wireless Charging
The vehicle may have a wireless
charging pocket outside the armrest
of the center console. The system
operates at 145 kHz and wirelessly
charges one PMA or Qi compatible
mobile device. The power output of
the system is capable of charging at
a rate up to 1 amp (5W), as
requested by the compatible mobile
device. See Radio Frequency
Statement 0385.
To check for phone or other device
compatibility:
. In the U.S., see
my.chevrolet.com/learn.
. In Canada, see
gmtotalconnect.ca.
. Or, see your dealer for details.
{Warning
Wireless charging can affect the
operation of an implanted
pacemaker or other medical
devices. If you have one, it is
(Continued)
Warning (Continued)
recommended to consult with
your doctor before using the
wireless charging system.
The vehicle must be on, in ACC/
ACCESSORY, or Retained
Accessory Power (RAP) must be
active. The wireless charging
feature may not correctly indicate
charging when the vehicle is in RAP.
See Retained Accessory Power
(RAP) 0221.
The operating temperature is −20 °C
(−4 °F) to 60 °C (140 °F) for the
charging system and 0 °C (32 °F) to
35 °C (95 °F) for the mobile device.
{Warning
Remove all objects from the
charging pocket before charging
your mobile phone. Objects, such
as coins, keys, rings, paper clips,
or cards, between the mobile
phone and the charger will
(Continued)
Page 118 of 413
Chevrolet Malibu Owner Manual (GMNA-Localizing-U.S./Canada/Mexico-
11348460) - 2018 - crc - 5/3/17
Instruments and Controls 117
Info Pages :Presspwhile Info
Pages is displayed to enter the Info
Pages menu and select the items to
be displayed in the Info app.
See Driver Information Center (DIC)
(Uplevel) 0134 orDriver Information
Center (DIC) (Base Level) 0131.
Speed Warning : The Speed
Warning display allows the driver to
set a speed that they do not want to
exceed. To set the Speed Warning,
press
pwhen Speed Warning is
displayed. Press
worxto adjust
the value. Press
Vto set the speed.
Once the speed is set, this feature
can be turned off by pressing
V
while viewing this page. If the
selected speed limit is exceeded, a
pop-up warning is displayed with a
chime.
Speedometer
The speedometer shows the
vehicle's speed in either kilometers
per hour (km/h) or miles per
hour (mph).
Odometer
The odometer shows how far the
vehicle has been driven, in either
kilometers or miles.
Trip Odometer
The trip odometer shows how far
the vehicle has been driven since
the trip odometer was last reset.
The trip odometer is accessed and
reset through the Driver Information
Center (DIC).
See Driver Information Center (DIC)
(Uplevel) 0134 orDriver Information
Center (DIC) (Base Level) 0131.
Tachometer (Non-Hybrid)
The tachometer displays the engine
speed in revolutions per
minute (rpm).
For vehicles with the stop/start
system, when the ignition is on, the
tachometer indicates the vehicle
status. When pointing to AUTO
STOP, the engine is off but the
vehicle is on and can move. The engine could auto start at any time.
When the indicator points to OFF,
the vehicle is off.
When the engine is on, the
tachometer will indicate the engine’s
revolutions per minute (rpm). The
tachometer may vary by several
hundred rpm’s, during Auto Stop
mode, when the engine is shutting
off and restarting.
A slight bump may be felt when the
transmission is determining the
most fuel efficient operating range.
Caution
If the engine is operated with the
rpm’s in the warning area at the
high end of the tachometer, the
vehicle could be damaged, and
the damage would not be covered
by the vehicle warranty. Do not
operate the engine with the rpm’s
in the warning area.