2018 CHEVROLET MALIBU reset
[x] Cancel search: resetPage 166 of 413
Chevrolet Malibu Owner Manual (GMNA-Localizing-U.S./Canada/Mexico-
11348460) - 2018 - crc - 5/3/17
Infotainment System 165
.Turn to highlight menu
items or to set values while
in a menu.
. Turn to manually select
radio stations.
9. Preset Buttons 1−4 .Press and hold to store a
station.
. Press to go to a preset
favorite station.
10. FAV .Press to go to a
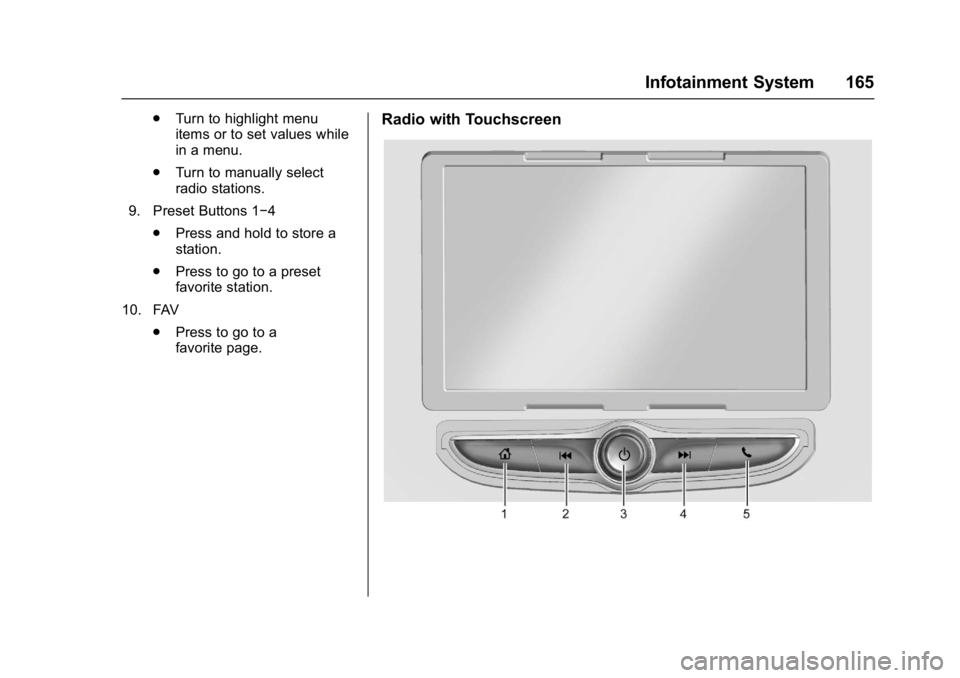
favorite page.Radio with Touchscreen
Page 170 of 413
Chevrolet Malibu Owner Manual (GMNA-Localizing-U.S./Canada/Mexico-
11348460) - 2018 - crc - 5/3/17
Infotainment System 169
Automatic Switch-Off
If the infotainment system has been
turned on after the ignition is turned
off, the system will turn off
automatically after 10 minutes.
Volume Control
O:Turn to increase or decrease.
O:Press when the system is on to
mute and unmute the system.
System Settings
Auto Volume
This feature automatically adjusts
the radio volume to compensate for
road and wind noise.
The level of volume compensation
can be selected, or the feature can
be turned off.
1. Touch MENU from a source screen.
2. Select Auto Volume.
3. Select the desired setting.
4. Touch
3to go back to the
source screen. Tone Settings
The tone settings can be set for
each radio band and each audio
player source.
Preset Tone Settings
1. Touch MENU.
2. Touch Tone Settings.
3. Select a preset tone setting.
Custom Tone Settings 1. Touch MENU.
2. Touch Tone Settings.
3. Touch Custom. .Bass, Midrange, or Treble:
Touch −or +.
. Fader or Balance: Adjust
the front/rear or left/right
speakers by dragging the
dot in the vehicle image on
the screen.
4. Touch
3to go back to the
source screen.
Software Updates
Over-the-Air Software Updates
If equipped, the infotainment system
can download and install select
software updates over a wireless
connection. The system will prompt
for certain updates to be
downloaded and installed. There is
also an option to check for updates
manually.
To manually check for updates,
touch SETTINGS on the Home
Page, followed by Software
Information, and then System
Update. Follow the on-screen
prompts. Steps for downloading and
installing updates may vary by
vehicle.
Downloading Over-the-Air vehicle
software updates requires Internet
connectivity, which can be accessed
through the vehicle’ s built-in OnStar
4G LTE connection, if equipped and
active. If required, data plans are
provided by a third party. Optionally,
a secure Wi-Fi hotspot such as a
compatible mobile device hotspot,
Page 171 of 413
Chevrolet Malibu Owner Manual (GMNA-Localizing-U.S./Canada/Mexico-
11348460) - 2018 - crc - 5/3/17
170 Infotainment System
home hotspot or public hotspot can
be used. Applicable data rates may
apply.
To connect the infotainment system
to a secured mobile device hotspot,
home hotspot, or a public hotspot,
touch SETTINGS on the Home
Page, followed by Wi-Fi, and then
Manage Wi-Fi Networks. Select the
appropriate Wi-Fi network, and
follow the on-screen prompts.
Download speeds may vary.
On most compatible mobile devices,
activation of the Wi-Fi hotspot is in
the Settings menu under Mobile
Network Sharing, Personal Hotspot,
Mobile Hotspot or similar.
Availability of Over-the-Air vehicle
software updates varies by vehicle
and country. For more information
on this feature, see
my.chevrolet.com/learn.Radio
AM-FM Radio
Playing the Radio without
Touchscreen
Audio Source Menu
O:Press and hold to turn the
system on and off. Turn to increase
or decrease the volume or to cancel
mute when the audio system is
muted.
MENU : Turn to change the radio
station.
RADIO : Press to select AM
and FM.
7or6: Press to seek the
previous or next station.
Press and hold to quick seek a
station.
FAV : Press to open the favorites
list and select a favorite page or
view the radio station and current
song playing information.
Preset Buttons 1–4 : Press to
select preset stations.
Radio Data System (RDS)
RDS is a service by FM stations
that makes it easier to find radio
stations with fault-free reception.
RDS stations are indicated by the
program service name with
broadcasting frequency.
Selecting a Band
Press RADIO to choose AM or FM.
The last station that was playing
starts playing again.
Selecting an Auxiliary Device
Press MEDIA to select a connected
auxiliary device.
Selecting a Station
Seek Tuning
If the radio station is not known:
Press
7or6to automatically
search for available radio stations.
Press and hold
7or6to change
the radio stations as desired, then
release to stop at the next available
station.
Page 172 of 413
Chevrolet Malibu Owner Manual (GMNA-Localizing-U.S./Canada/Mexico-
11348460) - 2018 - crc - 5/3/17
Infotainment System 171
Favorites List
There are two ways to select a
station from the Favorites List:
.Press FAV repeatedly, until the
desired FAV page is displayed,
then press the preset button of
the desired FAV station.
. Press FAV, turn MENU until the
desired FAV station is
highlighted, then press MENU to
select the desired FAV station.
Stations List 1. From AM or FM, turn MENU to select Stations List, then press
to select.
2. Turn MENU to move to the desired station from the
Stations List, then press to
receive the station.
Category List
Most stations that broadcast an
RDS program type code specify the
type of programming transmitted.
Some stations change the program
type code depending on the content. The system stores the RDS
stations sorted by program type in
the FM category list.
To search for a programming type
determined by station:
1. From the FM menu, turn MENU to select FM Category List,
then press MENU.
2. Turn MENU to move to the desired station, then press
MENU to receive the selected
broadcasting channel.
Update Stations List
From AM or FM, press MENU, turn
MENU to Update Stations List, then
press MENU.
During the AM or FM broadcasting
list update, press the preset button
under Cancel or BACK to stop the
updates.
Storing a Station as a Favorite
Stations from all bands can be
stored in any order in the favorite
pages.
Up to four stations can be stored in
each favorite page. Storing Stations
Press FAV to select the desired
page of saved favorites.
To store the station to a position in
the list, press and hold the
corresponding preset button 1−4
until a beep is heard.
Playing the Radio with
Touchscreen
Audio Source Menu
{:
Press to go to the Home Page.
O:Press to turn on, mute,
or unmute the system. Press and
hold to turn off the system.
Selecting a Band
1. Press{.
2. Touch AUDIO.
3. Touch Source.
4. Select AM, FM, or SXM, if equipped.
The last station that was playing
starts playing again.
Page 173 of 413
Chevrolet Malibu Owner Manual (GMNA-Localizing-U.S./Canada/Mexico-
11348460) - 2018 - crc - 5/3/17
172 Infotainment System
Selecting an Auxiliary Device
Connect the auxiliary device to the
AUX input terminal. Play will begin
when the system has finished
reading the information on the
device.
If the auxiliary device is already
connected:1. Press
{.
2. Touch AUDIO.
3. Touch Source.
4. Select the device.
Selecting a Station
Seek Tuning
If the radio station is not known:
Press
gordto automatically
search for available radio stations.
Direct Tune
From the AM or FM menu:
1. Touch Tune.
2. Enter the station number.
3. Touch Go. Favorite
1. Touch
SorTto scroll through
the favorite pages.
2. Touch the station to select it.
Station List 1. From the AM or FM menu, touch Menu.
2. Select Station List.
3. Touch
QorRto scroll through
the list. Touch the station to
select it.
Update Station List
. From the AM or FM menu, touch
Menu, then touch Update Station
List. The broadcasting list
updating will begin.
. During the AM or FM
broadcasting list update, touch
Cancel to stop the updates.
Menu
Touch to choose between available
menus for the current source.
Storing a Station as a Favorite
Stations from all bands can be
stored in any order in the favorite
pages.
Up to 25 stations can be stored.
Storing Stations
To store the station to a position in
the list, touch the corresponding
button 1−5 until a beep is heard.
1. Select the desired station.
2. Touch
SorTto select the
desired page of saved
favorites.
3. Touch and hold any of the preset buttons to save the
current radio station to that
button of the selected
favorites page.
To change a preset button, tune to
the new desired radio station and
touch and hold the preset button.
Page 174 of 413
Chevrolet Malibu Owner Manual (GMNA-Localizing-U.S./Canada/Mexico-
11348460) - 2018 - crc - 5/3/17
Infotainment System 173
Satellite Radio
If equipped, vehicles with a
SiriusXM Satellite Radio tuner and a
valid SiriusXM Satellite Radio
subscription can receive SiriusXM
programming.
SiriusXM Satellite Radio
Service
SiriusXM is a satellite radio service
based in the 48 contiguous United
States and 10 Canadian provinces.
SiriusXM Satellite Radio has a wide
variety of programming and
commercial-free music, coast to
coast, and in digital-quality sound.
During your trial or when you
subscribe, you will get unlimited
access to SiriusXM Radio Online for
when you are not in the vehicle.
A service fee is required to receive
the SiriusXM service. If SiriusXM
service needs to be reactivated, the
radio will display "No Subscription
Please Renew" on channel SXM1.
For more information, contact
SiriusXM at www.siriusxm.com or
1-888-601-6296 (U.S.), and
www.siriusxm.ca or 1-877-438-9677
(Canada).
Listening to SiriusXM Radio
1. Press{.
2. Touch AUDIO.
3. Touch Source.
4. Touch SXM and the most recent listened to SiriusXM
channel will display.
Selecting a Category
From Menu, touch Categories, then
touch the desired category or from
Categories, touch
QorRto find the
desired channel. Touch the channel
to select it.
Selecting a Channel
Pressgordto seek the previous
or next channel.
Using the Presets
Up to five favorites pages can be
saved, and each page can store up
to five channels.
To change a preset, tune to the new
desired channel then touch and hold
the preset. Listening to Preset Channels
1. Touch
SorTrepeatedly to
select the desired
favorites page.
2. Touch the preset to listen to the channel.
Using the SiriusXM Menu
Operation
1. Touch MENU on the SXM radio screen.
2. Touch the menu to select the desired item or to display the
detail menu item.
3. Touch Back on the infotainment display to return to the
previous menu.
Channel List 1. Touch Channel List from the SXM menu. The channel list is
displayed.
2. Touch
QorRto find the
desired channel. Touch the
channel to select it.
Page 223 of 413

Chevrolet Malibu Owner Manual (GMNA-Localizing-U.S./Canada/Mexico-
11348460) - 2018 - crc - 5/3/17
222 Driving and Operating
If you are towing a trailer and
parking on a hill, seeDriving
Characteristics and Towing Tips
0 262.
Shifting out of Park
This vehicle is equipped with an
electronic shift lock release system.
The shift lock release is designed to
prevent movement of the shift lever
out of P (Park), unless the ignition is
on and the brake pedal is applied.
The shift lock release is always
functional except in the case of an
uncharged or low voltage (less than
9-volt) battery.
If the vehicle has an uncharged
battery or a battery with low voltage,
try charging or jump starting the
battery. See Jump Starting - North
America 0343.
To shift out of P (Park): 1. Apply the brake pedal.
2. Turn the ignition on.
3. Press the shift lever button.
4. Move the shift lever to the desired position. If still unable to shift out of P (Park):
1. Fully release the shift lever button.
2. Hold the brake pedal down and press the shift lever button
again.
3. Move the shift lever to the desired position.
If you are still having a problem
shifting, see your dealer.
Parking over Things
That Burn
{Warning
Things that can burn could touch
hot exhaust parts under the
vehicle and ignite. Do not park
over papers, leaves, dry grass,
or other things that can burn.
Extended Parking
It is better not to park with the
vehicle running. If the vehicle is left
while running, follow the proper
steps to be sure the vehicle will not move and there is adequate
ventilation.
See
Shifting Into Park 0221 and
Engine Exhaust 0223.
If the vehicle is left parked while
running and the Remote Keyless
Entry (RKE) transmitter is outside
the vehicle, the vehicle will turn off
after one hour. If the vehicle is left
parked while running and the RKE
transmitter is inside, the vehicle will
turn off after two hours.
The timer will reset if the vehicle is
taken out of P (Park) while it is
running.
Page 282 of 413
Chevrolet Malibu Owner Manual (GMNA-Localizing-U.S./Canada/Mexico-
11348460) - 2018 - crc - 5/3/17
Vehicle Care 281
Used oil can be a threat to the
environment. If you change your
own oil, be sure to drain all the oil
from the filter before disposal. Never
dispose of oil by putting it in the
trash or pouring it on the ground,
into sewers, or into streams or
bodies of water. Recycle it by taking
it to a place that collects used oil.
Engine Oil Life System
When to Change Engine Oil
This vehicle has a computer system
that indicates when to change the
engine oil and filter. This is based
on a combination of factors which
include engine revolutions, engine
temperature, and miles driven.
Based on driving conditions, the
mileage at which an oil change is
indicated can vary considerably. For
the oil life system to work properly,
the system must be reset every time
the oil is changed.
When the system has calculated
that oil life has been diminished, it
indicates that an oil change is
necessary. A CHANGE ENGINE
OIL SOON message displays.Change the oil as soon as possible
within the next 1 000 km (600 mi).
It is possible that, if driving under
the best conditions, the oil life
system may indicate that an oil
change is not necessary for up to a
year. The engine oil and filter must
be changed at least once a year
and, at this time, the system must
be reset. Your dealer has trained
service people who will perform this
work and reset the system. It is also
important to check the oil regularly
over the course of an oil drain
interval and keep it at the proper
level.
If the system is ever reset
accidentally, the oil must be
changed at 5 000 km (3,000 mi)
since the last oil change.
Remember to reset the oil life
system whenever the oil is changed.
How to Reset the Engine Oil
Life System
1. Using the DIC controls on the
right side of the steering wheel,
display REMAINING OIL LIFE
on the DIC. See
Driver Information Center
(DIC) (Uplevel) 0134 orDriver
Information Center (DIC) (Base
Level) 0131. When remaining
oil life is low, the CHANGE
ENGINE OIL SOON message
will appear on the display.
2. Press
Von the DIC controls
and hold down for a few
seconds to clear the CHANGE
ENGINE OIL SOON message
and reset the oil life at 100%.
Be careful not to reset the oil
life display accidentally at any
time other than after the oil is
changed. It cannot be reset
accurately until the next oil
change.
The system is reset when the
CHANGE ENGINE OIL SOON
message is off and the REMAINING
OIL LIFE message is displayed.
If the CHANGE ENGINE OIL SOON
message comes back on when the
vehicle is started, the engine oil life
system has not been reset. Repeat
the procedure.