2018 CHEVROLET MALIBU reset infotainment system
[x] Cancel search: reset infotainment systemPage 20 of 413
Chevrolet Malibu Owner Manual (GMNA-Localizing-U.S./Canada/Mexico-
11348460) - 2018 - crc - 5/3/17
In Brief 19
Hybrid Low Mode
When descending steep grades or
in stop-and-go traffic, L (Low)
provides the ability to slow the
vehicle with regenerative braking
when lifting off the accelerator
pedal. L2 provides moderate
braking and L1 provides maximum
braking below 80 km/h (50 mph).
When the battery reaches full
charge the engine may run to
maintain braking.
To use this feature:1. Move the shift lever to L (Low). The transmission will enter L2.
2. Press + (Plus) or −(Minus) on
the shift lever to shift between
L2 and L1.
See Manual Mode 0225.
Vehicle Features
Infotainment System
Base radio information is included in
this manual. See the infotainment
manual for information on other
available infotainment systems.
Read the following pages to
become familiar with the features.
{Warning
Taking your eyes off the road for
too long or too often while using
any infotainment feature can
cause a crash. You or others
could be injured or killed. Do not
give extended attention to
infotainment tasks while driving.
Limit your glances at the vehicle
displays and focus your attention
on driving. Use voice commands
whenever possible.
The infotainment system has built-in
features intended to help avoid
distraction by disabling some
functions when driving. These functions may gray out when they
are unavailable. Many infotainment
features are also available through
the instrument cluster and steering
wheel controls.
Before driving:
.
Become familiar with the
operation, center stack controls,
and infotainment display
controls.
. Set up the audio by presetting
favorite stations, setting the
tone, and adjusting the
speakers.
. Set up phone numbers in
advance so they can be called
easily by pressing a single
control or by using a single voice
command if equipped with
Bluetooth phone capability.
See Defensive Driving 0207.
To play the infotainment system with
the ignition off, see Retained
Accessory Power (RAP) 0221.
Page 109 of 413
Chevrolet Malibu Owner Manual (GMNA-Localizing-U.S./Canada/Mexico-
11348460) - 2018 - crc - 5/3/17
108 Instruments and Controls
Auto Set
When Auto Set is enabled, the time
cannot be manually set.
From the Set Time or Set
Date menu:1. Press the preset button under Auto Set.
2. Turn MENU to select Off (Manual) or On-Cell Network,
then press MENU to select it
and return to the Time and
Date menu.
3. To exit without saving, press BACK at any time.
Setting the 12/24 Hour Format
From the Set Time menu:
1. Press the preset button under 12-24 HR to change between
12 hour and 24 hour modes.
2. To return to the Time and Date menu, press BACK at any time.
Radio with Touchscreen
The infotainment system controls
are used to access the time and
date settings through the menu
system. See Operation0167 on
how to use the menu system.
Setting the Time and Date
When Auto Set is enabled the time
cannot be manually set.
1. Press
{, then touch Settings.
2. Touch Time and Date, then Set Time or Set Date.
3. Touch + or −to adjust the
value.
4. Touch
RorQto adjust AM or
PM for 12 hour format.
5. Touch
0to return to the
Time and Date menu.
Auto Set
1. Press{, then touch Settings.
2. Touch Time and Date, then Auto Set.
3. Select from the available selections. 4. Touch
0to return to the
Time and Date menu.
Setting the 12/24 Hour Format
1. Press{, then touch Settings.
2. Touch Time and Date, then select 12h or 24h format.
3. Touch
0to return to the
Time and Date menu.
Setting the Month and Day
Format
1. Press{, then touch Settings.
2. Touch Time and Date, then Set Date Format.
3. Select DD/MM/YYYY (day/ month/year), MM/DD/YYYY
(month/day/year), or YYYY/
MM/DD (year/month/day)
format.
4. Touch
0to return to the
Time and Date menu.
Page 132 of 413
Chevrolet Malibu Owner Manual (GMNA-Localizing-U.S./Canada/Mexico-
11348460) - 2018 - crc - 5/3/17
Instruments and Controls 131
Energy Information
(Hybrid)
To view the Consumption History
screen on the infotainment display,
touch
[on the Home Page or on
the Application Tray on the top of
the infotainment display. Then touch
INFO at the bottom of the display.
Consumption History
The consumption history graph
shows the average fuel economy
over the last 50 km or 50 mi. The
Present bar provides the average
fuel economy for the present 5 km
or 5 mi.
Touch Reset to clear the
history data.
Driver Information Center
(DIC) (Base Level)
The DIC displays are shown in the
center of the instrument cluster.
See Instrument Cluster (Base Level)
0 112 orInstrument Cluster
(Uplevel) 0114. The displays show
the status of many vehicle systems.
worx: Press to move up or
down in a list.
oorp: Press to move between
the DIC menus.
V: Press to open a menu or select
a menu item. Press and hold to
reset values on certain screens.
Trip/Fuel Menu (TRIP) Items
Useworxto scroll through the
menu items. Not all items are
available on every vehicle. The
following is a list of all possible
menu items:
Digital Speed : Displays how fast
the vehicle is moving in either
kilometers per hour (km/h) or miles
per hour (mph). The speedometer
cannot be reset.
Trip 1 or Trip 2, Average Fuel
Economy : Displays the current
distance traveled, in either
kilometers (km) or miles (mi), from
the last reset for the trip odometer.
The trip odometer can be reset to
zero by pressing and holding
V
while the trip odometer display is
showing.
Also displays the approximate
average liters per 100 kilometers
(L/100 km) or miles per gallon
(mpg). This number is based on the
Page 164 of 413
Chevrolet Malibu Owner Manual (GMNA-Localizing-U.S./Canada/Mexico-
11348460) - 2018 - crc - 5/3/17
Infotainment System 163
functions may gray out when they
are unavailable. Many infotainment
features are also available through
the instrument cluster and steering
wheel controls.
Before driving:
.Become familiar with the
operation, center stack controls,
and infotainment display
controls.
. Set up the audio by presetting
favorite stations, setting the
tone, and adjusting the
speakers.
. Set up phone numbers in
advance so they can be called
easily by pressing a single
control or by using a single voice
command if equipped with
Bluetooth phone capability.
See Defensive Driving 0207.
To play the infotainment system with
the ignition off, see Retained
Accessory Power (RAP) 0221.Theft-Deterrent Feature
The infotainment system has an
electronic security system installed
to prevent theft.
The infotainment system only works
in the vehicle in which it was first
installed, and cannot be used in
another vehicle.
Page 166 of 413
Chevrolet Malibu Owner Manual (GMNA-Localizing-U.S./Canada/Mexico-
11348460) - 2018 - crc - 5/3/17
Infotainment System 165
.Turn to highlight menu
items or to set values while
in a menu.
. Turn to manually select
radio stations.
9. Preset Buttons 1−4 .Press and hold to store a
station.
. Press to go to a preset
favorite station.
10. FAV .Press to go to a
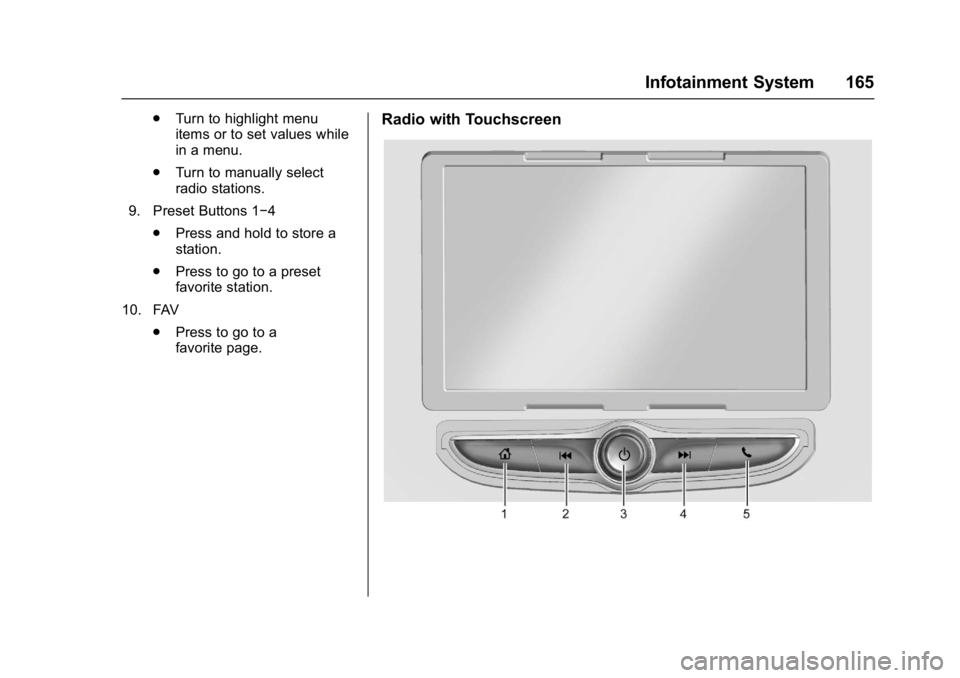
favorite page.Radio with Touchscreen
Page 170 of 413
Chevrolet Malibu Owner Manual (GMNA-Localizing-U.S./Canada/Mexico-
11348460) - 2018 - crc - 5/3/17
Infotainment System 169
Automatic Switch-Off
If the infotainment system has been
turned on after the ignition is turned
off, the system will turn off
automatically after 10 minutes.
Volume Control
O:Turn to increase or decrease.
O:Press when the system is on to
mute and unmute the system.
System Settings
Auto Volume
This feature automatically adjusts
the radio volume to compensate for
road and wind noise.
The level of volume compensation
can be selected, or the feature can
be turned off.
1. Touch MENU from a source screen.
2. Select Auto Volume.
3. Select the desired setting.
4. Touch
3to go back to the
source screen. Tone Settings
The tone settings can be set for
each radio band and each audio
player source.
Preset Tone Settings
1. Touch MENU.
2. Touch Tone Settings.
3. Select a preset tone setting.
Custom Tone Settings 1. Touch MENU.
2. Touch Tone Settings.
3. Touch Custom. .Bass, Midrange, or Treble:
Touch −or +.
. Fader or Balance: Adjust
the front/rear or left/right
speakers by dragging the
dot in the vehicle image on
the screen.
4. Touch
3to go back to the
source screen.
Software Updates
Over-the-Air Software Updates
If equipped, the infotainment system
can download and install select
software updates over a wireless
connection. The system will prompt
for certain updates to be
downloaded and installed. There is
also an option to check for updates
manually.
To manually check for updates,
touch SETTINGS on the Home
Page, followed by Software
Information, and then System
Update. Follow the on-screen
prompts. Steps for downloading and
installing updates may vary by
vehicle.
Downloading Over-the-Air vehicle
software updates requires Internet
connectivity, which can be accessed
through the vehicle’ s built-in OnStar
4G LTE connection, if equipped and
active. If required, data plans are
provided by a third party. Optionally,
a secure Wi-Fi hotspot such as a
compatible mobile device hotspot,
Page 171 of 413
Chevrolet Malibu Owner Manual (GMNA-Localizing-U.S./Canada/Mexico-
11348460) - 2018 - crc - 5/3/17
170 Infotainment System
home hotspot or public hotspot can
be used. Applicable data rates may
apply.
To connect the infotainment system
to a secured mobile device hotspot,
home hotspot, or a public hotspot,
touch SETTINGS on the Home
Page, followed by Wi-Fi, and then
Manage Wi-Fi Networks. Select the
appropriate Wi-Fi network, and
follow the on-screen prompts.
Download speeds may vary.
On most compatible mobile devices,
activation of the Wi-Fi hotspot is in
the Settings menu under Mobile
Network Sharing, Personal Hotspot,
Mobile Hotspot or similar.
Availability of Over-the-Air vehicle
software updates varies by vehicle
and country. For more information
on this feature, see
my.chevrolet.com/learn.Radio
AM-FM Radio
Playing the Radio without
Touchscreen
Audio Source Menu
O:Press and hold to turn the
system on and off. Turn to increase
or decrease the volume or to cancel
mute when the audio system is
muted.
MENU : Turn to change the radio
station.
RADIO : Press to select AM
and FM.
7or6: Press to seek the
previous or next station.
Press and hold to quick seek a
station.
FAV : Press to open the favorites
list and select a favorite page or
view the radio station and current
song playing information.
Preset Buttons 1–4 : Press to
select preset stations.
Radio Data System (RDS)
RDS is a service by FM stations
that makes it easier to find radio
stations with fault-free reception.
RDS stations are indicated by the
program service name with
broadcasting frequency.
Selecting a Band
Press RADIO to choose AM or FM.
The last station that was playing
starts playing again.
Selecting an Auxiliary Device
Press MEDIA to select a connected
auxiliary device.
Selecting a Station
Seek Tuning
If the radio station is not known:
Press
7or6to automatically
search for available radio stations.
Press and hold
7or6to change
the radio stations as desired, then
release to stop at the next available
station.
Page 172 of 413
Chevrolet Malibu Owner Manual (GMNA-Localizing-U.S./Canada/Mexico-
11348460) - 2018 - crc - 5/3/17
Infotainment System 171
Favorites List
There are two ways to select a
station from the Favorites List:
.Press FAV repeatedly, until the
desired FAV page is displayed,
then press the preset button of
the desired FAV station.
. Press FAV, turn MENU until the
desired FAV station is
highlighted, then press MENU to
select the desired FAV station.
Stations List 1. From AM or FM, turn MENU to select Stations List, then press
to select.
2. Turn MENU to move to the desired station from the
Stations List, then press to
receive the station.
Category List
Most stations that broadcast an
RDS program type code specify the
type of programming transmitted.
Some stations change the program
type code depending on the content. The system stores the RDS
stations sorted by program type in
the FM category list.
To search for a programming type
determined by station:
1. From the FM menu, turn MENU to select FM Category List,
then press MENU.
2. Turn MENU to move to the desired station, then press
MENU to receive the selected
broadcasting channel.
Update Stations List
From AM or FM, press MENU, turn
MENU to Update Stations List, then
press MENU.
During the AM or FM broadcasting
list update, press the preset button
under Cancel or BACK to stop the
updates.
Storing a Station as a Favorite
Stations from all bands can be
stored in any order in the favorite
pages.
Up to four stations can be stored in
each favorite page. Storing Stations
Press FAV to select the desired
page of saved favorites.
To store the station to a position in
the list, press and hold the
corresponding preset button 1−4
until a beep is heard.
Playing the Radio with
Touchscreen
Audio Source Menu
{:
Press to go to the Home Page.
O:Press to turn on, mute,
or unmute the system. Press and
hold to turn off the system.
Selecting a Band
1. Press{.
2. Touch AUDIO.
3. Touch Source.
4. Select AM, FM, or SXM, if equipped.
The last station that was playing
starts playing again.