2018 Alfa Romeo Stelvio warning
[x] Cancel search: warningPage 57 of 276

Power Window System Initialization
If power supply is interrupted, the
electric window automatic operation
must be re-initialized.
To perform the initialization procedure,
which must be done on each door with the
doors closed, manually fully close the
window to be initialized.
Warning!
Never leave children unattended in a vehicle,
and do not let children play with power
windows. Do not leave the key fob in or near
the vehicle, or in a location accessible to
children. Occupants, particularly unattended
children, can become entrapped by the
windows while operating the power window
switches. Such entrapment may result in
serious injury or death.
POWER SUNROOF — IF
EQUIPPED
Power Sunroof
The power sunroof consists of a single
glass panel and is fitted with a power
sunshade the full length of the panel.
Operation of the sunroof is only possible
with the ignition in ON mode. Refer to
“Ignition System” in this chapter for
further information.
The sunroof has three preset positions:
Fully closed.
Comfort (intermediate opening).
Fully open.
Note: You cannot have the sunshade
closed when the sunroof is open.
Warning!
Never leave children unattended in a
vehicle, or with access to an unlocked
vehicle. Never leave the key fob in or near
the vehicle, or in a location accessible to
children. Do not leave the ignition of a
vehicle equipped with keyless ignition in the
ON mode. Occupants, particularly
unattended children, can become entrapped
by the power sunroof while operating the
power sunroof switch. Such entrapment
may result in serious injury or death.
In a collision, there is a greater risk of
being thrown from a vehicle with an open
sunroof. You could also be seriously injured or killed. Always fasten your seat belt
properly and make sure all passengers are
also properly secured.
Do not allow small children to operate the
sunroof. Never allow your fingers, other
body parts, or any object, to project through
the sunroof opening. Injury may result.
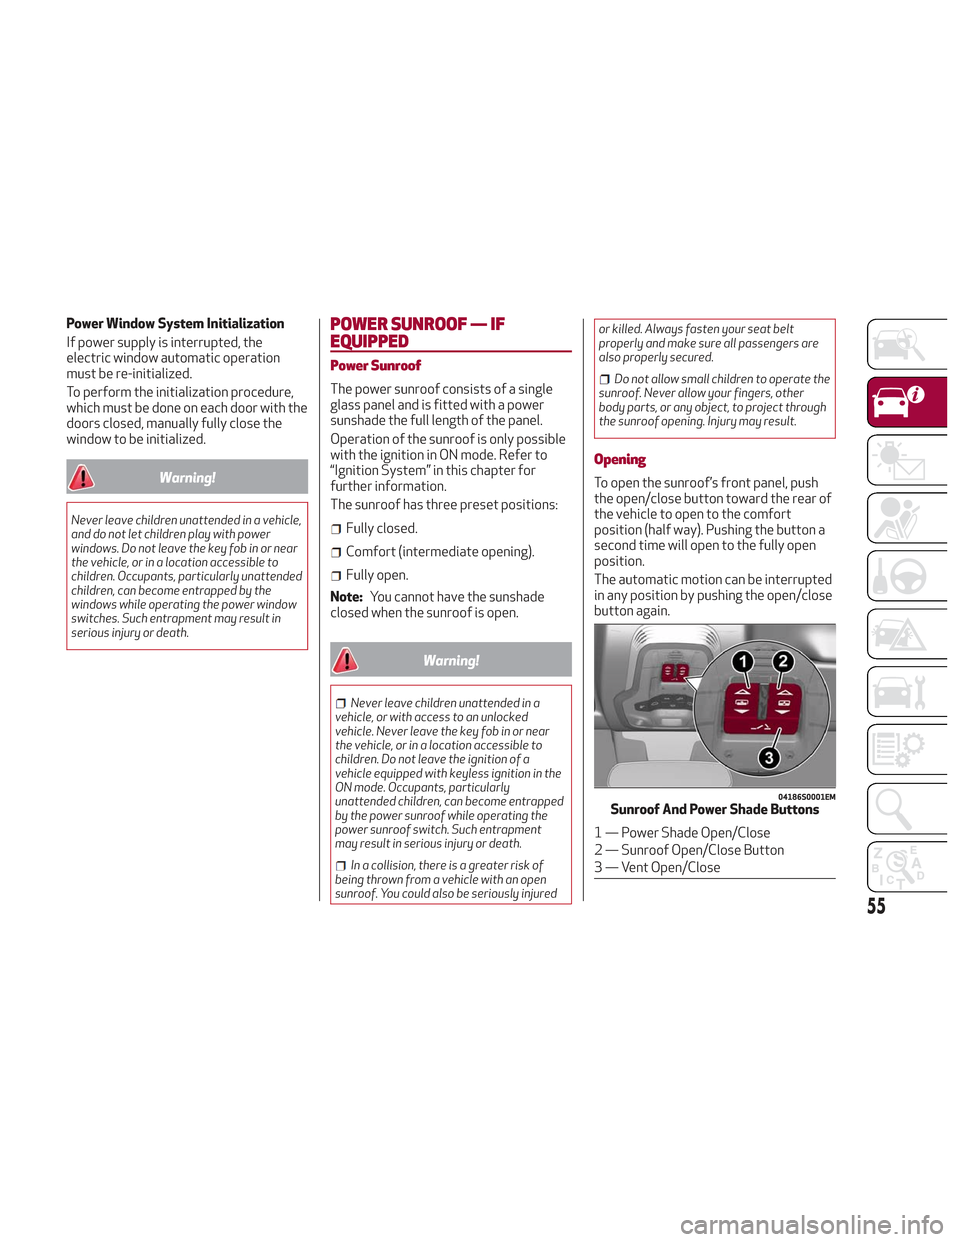
Opening
To open the sunroof’s front panel, push
the open/close button toward the rear of
the vehicle to open to the comfort
position (half way). Pushing the button a
second time will open to the fully open
position.
The automatic motion can be interrupted
in any position by pushing the open/close
button again.
04186S0001EMSunroof And Power Shade Buttons
1 — Power Shade Open/Close
2 — Sunroof Open/Close Button
3 — Vent Open/Close
55
Page 59 of 276

HOOD
Opening The Hood
To open the hood, proceed as follows:
1. Pull the release lever located on the
driver’s side kick panel.
2. Move to the outside of the vehicle and
position yourself in front of the grille.
3. Lift the hood slightly.
4. Move the under-hood latch from right
to left to release the hood.5. Raise the hood completely. The
operation is assisted by the addition of
two gas props which hold it in the open
position.
Note:
Use both hands to lift the hood.
Before lifting, check that the windshield
wiper arms are not raised from the
windshield or in operation. Also, ensure
that the vehicle is stationary and that
the electric park brake is engaged.
Do not tamper with the props.
Assist the hood while lifting it.
Closing The Hood
To close, lower the hood to
approximately 16 inches (40 cm) from
the engine compartment then let it drop.
Make sure that the hood is completely
closed and fully latched. Do this by trying
to open it. If it is not perfectly closed, do
not try to push the hood lid down, but
open it and repeat the procedure.
Note: Always check that the hood is
closed correctly to prevent it from
opening while the vehicle is travelling.
Since the hood is equipped with a double
locking system, one for each side, you
must check that it is closed on each side.
Warning!
Be sure the hood is fully latched before
driving your vehicle. If the hood is not fully
latched, it could open when the vehicle is in
motion and block your vision. Failure to
follow this warning could result in serious
injury or death.
0403132207USHood Release Lever
0403132304USHood Latch Location
57
Page 62 of 276

Hands Free Liftgate — If Equipped
To operate the Hands Free Liftgate
System:
1. If the doors are locked, the system
must detect the electronic key near the
liftgate.
2. If the doors are unlocked, the system
does not have to detect the electronic
key near the liftgate.
3. Go to the rear of the vehicle, in the
center and about 3 feet (1 m) from the
liftgate.
4. Move your foot under the bumper,
simulating a kick. When you have
completed this movement, withdraw your
leg. To activate the liftgate, both sensors
must detect your leg.If it is closed, the Hands Free Liftgate
unlocks and opens completely, and with
another movement of the foot, it stops. A
further movement of the foot reverses
the direction and closes the liftgate
completely, if you do not stop it again.
If it is open, with a movement of the foot,
the Hands Free Liftgate closes
completely, and with another movement
of the foot, it stops. If the liftgate is
stopped, another movement of the foot
will reverse the direction and open it
completely.
Note:
To conserve the battery charge,
avoid performing this operation
repeatedly with the engine off.
You can activate/deactivate the Hands
Free Liftgate on the Information and
Entertainment System by pushing the
MENU button to select the Main menu,
and selecting the following items:
1. Settings
2. Doors And Locks
3. Automatic Liftgate Opening Select
them by turning the Rotary Pad and
pushing it.Warning!
Driving with the liftgate open can allow
poisonous exhaust gases into your vehicle.
You and your passengers could be injured by
these fumes. Keep the liftgate closed when
you are operating the vehicle.
If you are required to drive with the
liftgate open, make sure that all windows
are closed, and the climate control blower
switch is set at high speed. Do not use the
recirculation mode.
Warning!
During power operation, personal injury or
cargo damage may occur. Ensure the
liftgate travel path is clear. Make sure the
liftgate is closed and latched before driving
away.
Liftgate Initialization
Note: Automatic operation of the
liftgate must be initialized again in case
of faulty liftgate operation. Proceed as
follows:
1. Close all the doors and the liftgate.
2. Push the lock button on the key fob.
3. Push the unlock button on the key fob.
0101132146USHands Free Liftgate Activation Zone
60
GETTING TO KNOW YOUR VEHICLE
Page 63 of 276

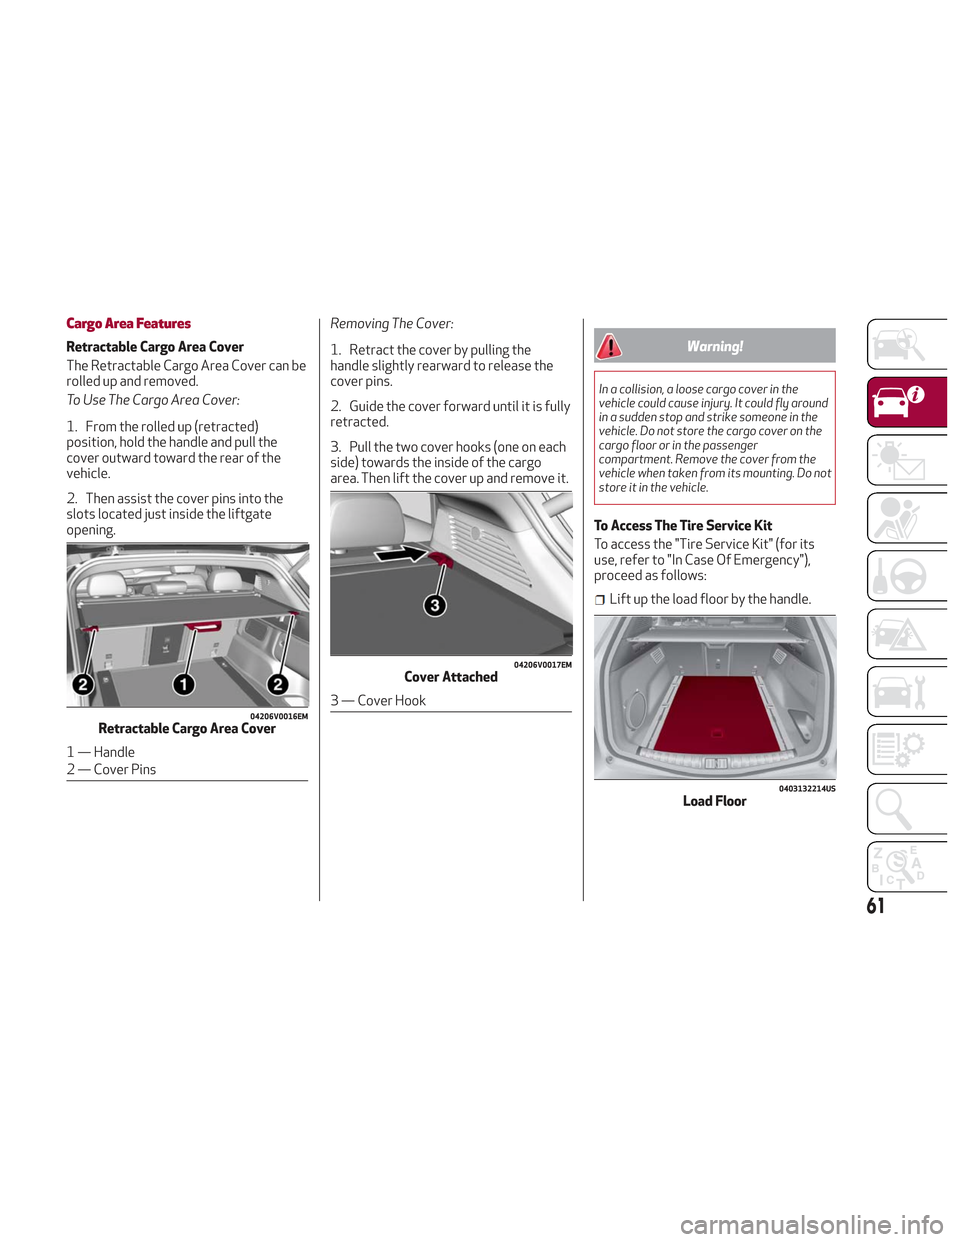
Cargo Area Features
Retractable Cargo Area Cover
The Retractable Cargo Area Cover can be
rolled up and removed.
To Use The Cargo Area Cover:
1. From the rolled up (retracted)
position, hold the handle and pull the
cover outward toward the rear of the
vehicle.
2. Then assist the cover pins into the
slots located just inside the liftgate
opening.Removing The Cover:
1. Retract the cover by pulling the
handle slightly rearward to release the
cover pins.
2. Guide the cover forward until it is fully
retracted.
3. Pull the two cover hooks (one on each
side) towards the inside of the cargo
area. Then lift the cover up and remove it.Warning!
In a collision, a loose cargo cover in the
vehicle could cause injury. It could fly around
in a sudden stop and strike someone in the
vehicle. Do not store the cargo cover on the
cargo floor or in the passenger
compartment. Remove the cover from the
vehicle when taken from its mounting. Do not
store it in the vehicle.
To Access The Tire Service Kit
To access the "Tire Service Kit" (for its
use, refer to "In Case Of Emergency"),
proceed as follows:
Lift up the load floor by the handle.
04206V0016EMRetractable Cargo Area Cover
1 — Handle
2 — Cover Pins
04206V0017EMCover Attached
3 — Cover Hook
0403132214USLoad Floor
61
Page 65 of 276

INTERNAL EQUIPMENT
Glove Compartment
To open the glove compartment proceed
as follows:
1. If equipped with a lock, unlock the
glove compartment by placing the
emergency key into the lock on the
handle.
2. Pull the handle to open the glove
compartment.
When the glove compartment is opened,
a light turns on to illuminate the inside of
the compartment.
Note:Do not insert large objects that
prevent the glove compartment from
closing completely. Always make sure
that the glove compartment is
completely closed when driving.
Sun Visors
The sun visors are located at the sides of
the interior rear view mirror. They can be
adjusted forward and sideways.
To direct the visor toward the passenger
side window, detach the visor from the
interior rear view mirror side hook and
turn it towards the side window.
From this position, the sun visor can also
be extended toward the rear of the
vehicle for additional blockage of
sunlight.
Courtesy mirrors with lights are fitted on
the back of the sun visors and can be
used even in poor light conditions.
Note: A rear facing child restraint
system should never be fitted in the front
passenger seat. Always comply with the
instructions on the sun visor. Refer to
"Child Restraints" in "Safety" for more
information.
Homelink
Description
Homelink is a fixed system installed on
the vehicle. It can sync up to three
different devices that activate garage
doors, gates, lighting systems, and home
or office alarm systems.
Programming
Warning!
Vehicle exhaust contains carbon
monoxide, a dangerous gas. Do not run your
vehicle in the garage while programming the
transceiver. Exhaust gas can cause serious
injury or death.
Your motorized door or gate will open and
close while you are programming the
universal transceiver. Do not program the
transceiver if people, pets or other objects
are in the path of the door or gate. Only use
this transceiver with a garage door opener
that has a “stop and reverse” feature as
required by Federal safety standards. This
includes most garage door opener models
manufactured after 1982. Do not use a
garage door opener without these safety
features. Call toll-free 1-800-355-3515 or,
on the Internet at HomeLink.com for safety
information or assistance.
Note: Without starting the engine,
activate the electric park brake and place
the ignition in the ON position.
0403132212USOpening The Glove Compartment
0403132210USRotate Sun Visor Toward Passenger Window
63
Page 67 of 276

Warning!
Vehicle exhaust contains carbon
monoxide, a dangerous gas. Do not run your
vehicle in the garage while programming the
transceiver. Exhaust gas can cause serious
injury or death.
Your motorized door or gate will open and
close while you are programming the
universal transceiver. Do not program the
transceiver if people, pets or other objects
are in the path of the door or gate. Only use
this transceiver with a garage door opener
that has a “stop and reverse” feature as
required by Federal safety standards. This
includes most garage door opener models
manufactured after 1982. Do not use a
garage door opener without these safety
features. Call toll-free 1-800-355-3515 or,
on the Internet at HomeLink.com for safety
information or assistance.
Note: To program Homelink using an
Alternative Code, the vehicle must be
within range of the garage door. Activate
the electric park brake and turn the
ignition to ON, without starting the
engine.
Proceed as follows: 1. Locate the “Learn” or “Train” button on
the garage door or gate motor. The color
and position may vary depending on the
manufacturer (consult the garage door or
gate manual). Push the “Learn” or “Train”
button (this normally activates the
setting warning light).
2. Push the desired HomeLink button (1,
2 or 3). When the HomeLink indicator
begins to flash slowly, move the portable
remote control one to three inches from
the HomeLink system (keeping the
programmable button pushed down).
3. Within 30 seconds, push the
programmed key (1, 2 or 3) and release it.
Push the programmed button a second
time and release it to conclude the
operation. For some motors, the
operation will probably have to be
repeated a third time to end the setting.
The motor should now be capable of
recognizing the signal transmitted by
HomeLink and then open/close the door
or gate.
Programming A Single Key
It is possible to program another original
remote control on an already
programmed HomeLink key by canceling
the previously stored frequency.
Warning!
Vehicle exhaust contains carbon
monoxide, a dangerous gas. Do not run your
vehicle in the garage while programming the
transceiver. Exhaust gas can cause serious
injury or death.
Your motorized door or gate will open and
close while you are programming the
universal transceiver. Do not program the
transceiver if people, pets or other objects
are in the path of the door or gate. Only use
this transceiver with a garage door opener
that has a “stop and reverse” feature as
required by Federal safety standards. This
includes most garage door opener models
manufactured after 1982. Do not use a
garage door opener without these safety
features. Call toll-free 1-800-355-3515 or,
on the Internet at HomeLink.com for safety
information or assistance.
Note: Activate the electric park brake
and place the ignition to ON without
starting the engine.
Proceed as follows:
1. Push the desired HomeLink button
and keep it pushed (1, 2 or 3). Do not
release the button until the last
operation has been performed.
65
Page 69 of 276

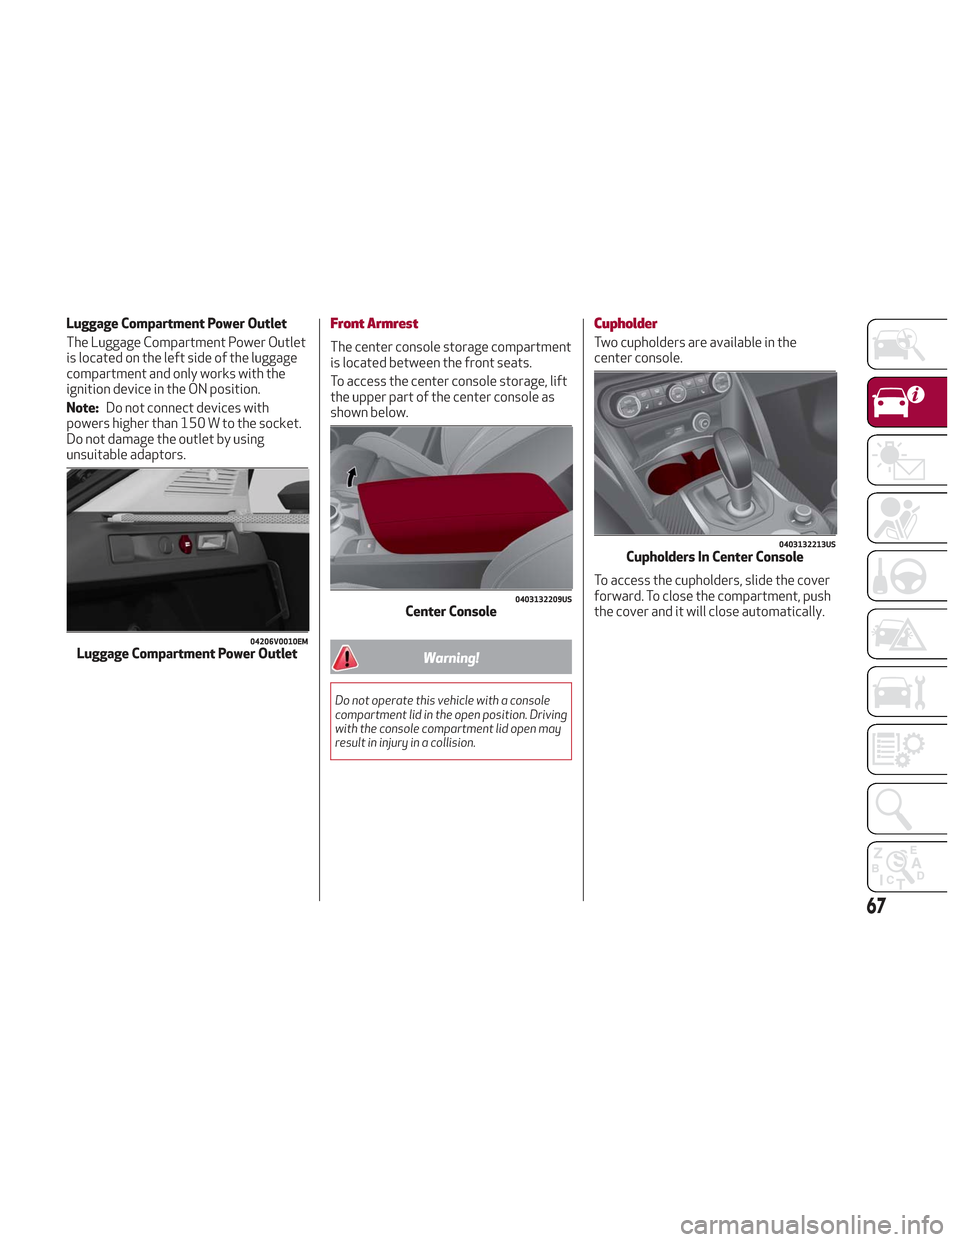
Luggage Compartment Power Outlet
The Luggage Compartment Power Outlet
is located on the left side of the luggage
compartment and only works with the
ignition device in the ON position.
Note:Do not connect devices with
powers higher than 150 W to the socket.
Do not damage the outlet by using
unsuitable adaptors.Front Armrest
The center console storage compartment
is located between the front seats.
To access the center console storage, lift
the upper part of the center console as
shown below.
Warning!
Do not operate this vehicle with a console
compartment lid in the open position. Driving
with the console compartment lid open may
result in injury in a collision.
Cupholder
Two cupholders are available in the
center console.
To access the cupholders, slide the cover
forward. To close the compartment, push
the cover and it will close automatically.
04206V0010EMLuggage Compartment Power Outlet
0403132209USCenter Console
0403132213USCupholders In Center Console
67
Page 71 of 276

GETTING TO KNOW YOUR INSTRUMENT PANEL
This section gives you all the information
you need to understand and use
the instrument panel correctly.INSTRUMENT PANEL FEATURES . . .70
INSTRUMENT CLUSTER DISPLAY . .71
WARNING LIGHTS AND MESSAGES ON
THE INSTRUMENT PANEL........77
ONBOARD DIAGNOSTIC SYSTEM . .101
EMISSIONS INSPECTION AND
MAINTENANCE PROGRAMS .....101
69