2018 Alfa Romeo Stelvio warning
[x] Cancel search: warningPage 37 of 276

The height of the outboard head
restraints can be adjusted. The head
restraint of the center seat, if equipped,
cannot be adjusted, only removed.
For upward adjustment, pull upward on
the head restraint until it clicks into
place.
For downward adjustment, push in the
adjustment button and lower the head
restraint at the same time to the desired
height.
Note:To allow for maximum visibility for
the driver, if a seat is not occupied by a
passenger, the head restraint should be
lowered to the fully lowered position.Head Restraints (Removal)
To remove the head restraints, proceed
as follows:
1. Recline the seat back to allow
clearance of the head restraint from the
vehicle’s roof.
2. Raise the head restraints to their
maximum height.
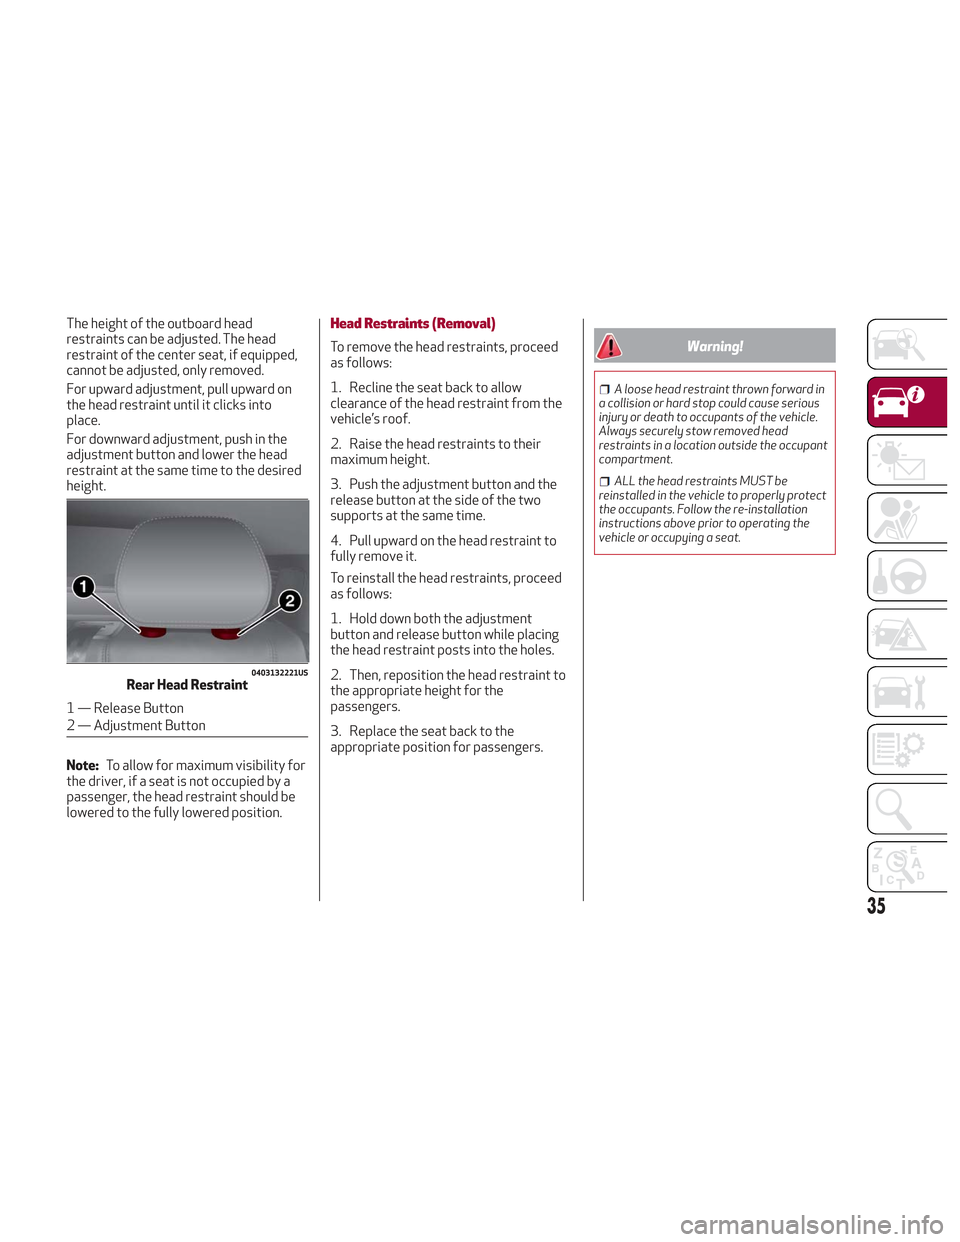
3. Push the adjustment button and the
release button at the side of the two
supports at the same time.
4. Pull upward on the head restraint to
fully remove it.
To reinstall the head restraints, proceed
as follows:
1. Hold down both the adjustment
button and release button while placing
the head restraint posts into the holes.
2. Then, reposition the head restraint to
the appropriate height for the
passengers.
3. Replace the seat back to the
appropriate position for passengers.Warning!
A loose head restraint thrown forward in
a collision or hard stop could cause serious
injury or death to occupants of the vehicle.
Always securely stow removed head
restraints in a location outside the occupant
compartment.
ALL the head restraints MUST be
reinstalled in the vehicle to properly protect
the occupants. Follow the re-installation
instructions above prior to operating the
vehicle or occupying a seat.
0403132221USRear Head Restraint
1 — Release Button
2 — Adjustment Button
35
Page 38 of 276

STEERING WHEEL
Steering Wheel Adjustments
The steering column is able to be tilted
upward or downward. It also allows you
to lengthen or shorten the steering
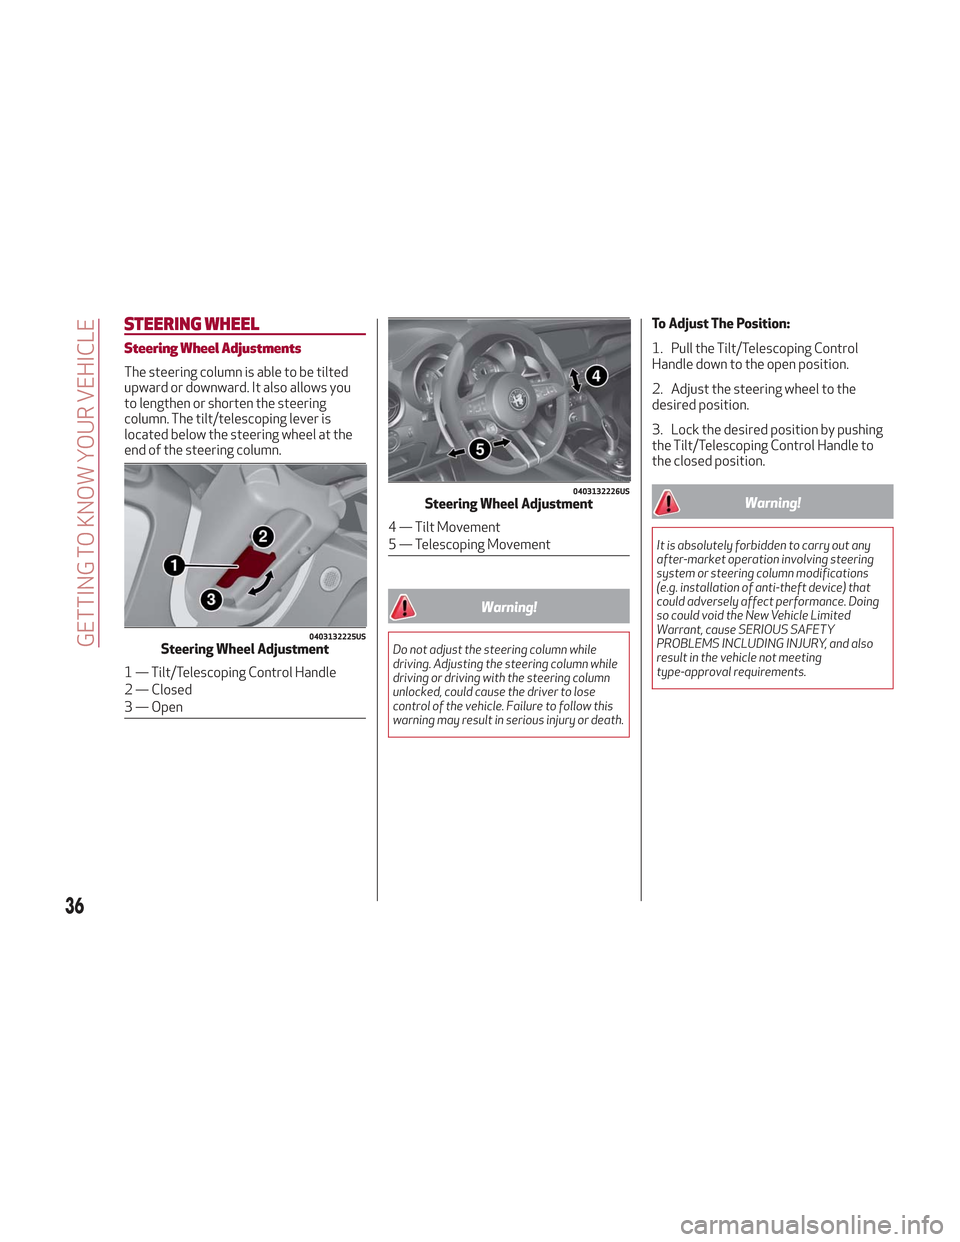
column. The tilt/telescoping lever is
located below the steering wheel at the
end of the steering column.
Warning!
Do not adjust the steering column while
driving. Adjusting the steering column while
driving or driving with the steering column
unlocked, could cause the driver to lose
control of the vehicle. Failure to follow this
warning may result in serious injury or death.
To Adjust The Position:
1. Pull the Tilt/Telescoping Control
Handle down to the open position.
2. Adjust the steering wheel to the
desired position.
3. Lock the desired position by pushing
the Tilt/Telescoping Control Handle to
the closed position.
Warning!
It is absolutely forbidden to carry out any
after-market operation involving steering
system or steering column modifications
(e.g. installation of anti-theft device) that
could adversely affect performance. Doing
so could void the New Vehicle Limited
Warrant, cause SERIOUS SAFETY
PROBLEMS INCLUDING INJURY, and also
result in the vehicle not meeting
type-approval requirements.
0403132225USSteering Wheel Adjustment
1 — Tilt/Telescoping Control Handle
2 — Closed
3 — Open
0403132226USSteering Wheel Adjustment
4 — Tilt Movement
5 — Telescoping Movement
36
GETTING TO KNOW YOUR VEHICLE
Page 39 of 276

Heated Steering Wheel
With the ignition in the ON position, push
the heated steering wheelbutton on
the instrument panel.
The indicator on the button will illuminate
when this feature is enabled.
Warning!
Persons who are unable to feel pain to the
skin because of advanced age, chronic
illness, diabetes, spinal cord injury,
medication, alcohol use, exhaustion, or other
physical conditions must exercise care when
using the steering wheel heater. It may
cause burns even at low temperatures,
especially if used for long periods.
Do not place anything on the steering
wheel that insulates against heat, such as a
blanket or steering wheel covers of any type
and material. This may cause the steering
wheel heater to overheat.
MIRRORS
Electrochromic Mirror
This mirror automatically adjusts for
headlight glare from vehicles behind you.
The electrochromic mirror has a power
button to activate/deactivate the
automatic dimming/anti-glare function.
When the vehicle is in REVERSE, the
automatic dimming feature is
deactivated.
Outside Power Mirrors
Power Adjustment
The power mirrors can only be adjusted
with the ignition ON.
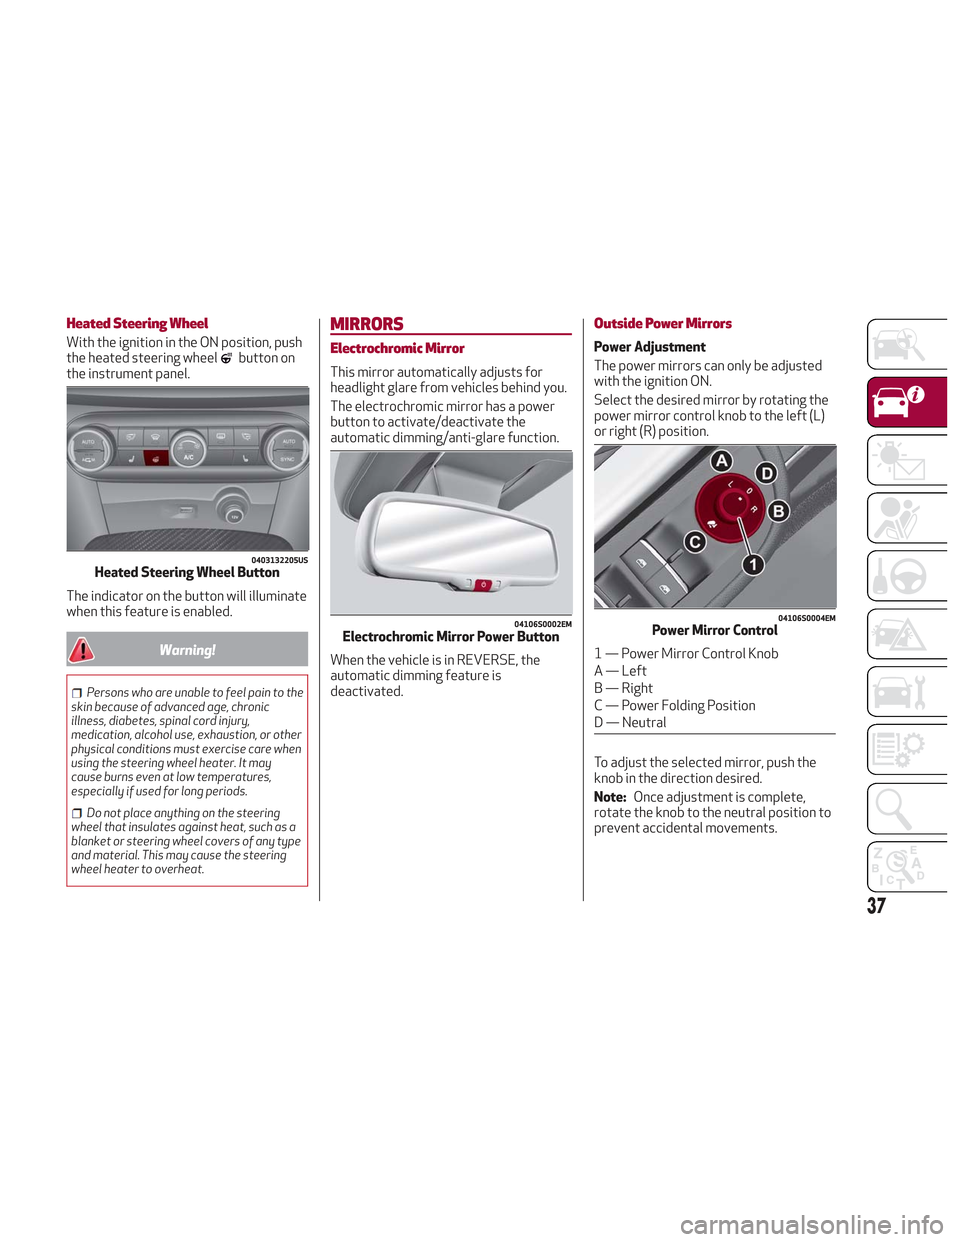
Select the desired mirror by rotating the
power mirror control knob to the left (L)
or right (R) position.
To adjust the selected mirror, push the
knob in the direction desired.
Note: Once adjustment is complete,
rotate the knob to the neutral position to
prevent accidental movements.
0403132205USHeated Steering Wheel Button
04106S0002EMElectrochromic Mirror Power Button
04106S0004EMPower Mirror Control
1 — Power Mirror Control Knob
A — Left
B — Right
C — Power Folding Position
D — Neutral
37
Page 40 of 276

Power Folding
With the power mirror control knob in the
neutral position, rotate it to the power
folding position. Rotate the knob back to
the neutral position to return the mirrors
to the driving position.
If the power mirror control knob is moved
again during door mirror folding (from
closed to open position and vice versa),
the movement direction is reversed.
Automatic Activation
Activating the central door locking
system from outside the vehicle
automatically folds the mirrors. The
mirrors return to the driving position
when the vehicle is then unlocked.
If the door mirrors were folded using the
power mirror control knob, they can only
be returned to the driving position by
rotating the knob again.Note:
The power folding operation can
be enabled only when the vehicle speed is
lower than 31 mph (50 km/h).
Automatic Dimming Mirrors — If
Equipped
Like the electrochromic mirror, an
automatic dimming feature is also
available on the outside rear view mirrors
to prevent glare. The automatic dimming
button for these mirrors is the same as
the electrochromic mirror.
Warning!
Vehicles and other objects seen in an outside
convex mirror will look smaller and farther
away than they really are. Relying too much
on side convex mirrors could cause you to
collide with another vehicle or other object.
Use your inside mirror when judging the size
or distance of a vehicle seen in a side convex
mirror.
Heated Mirrors
Push the rear defrostbutton, located
within the climate controls, to activate
the heated mirrors.
EXTERIOR LIGHTS
Headlight Switch
The headlight switch is located to the left
of the steering wheel on the instrument
panel. This switch controls the operation
of the headlights, parking lights,
instrument panel lights, instrument panel
light dimming, interior lights and rear fog
lights.
In addition, there are buttons for parking
sensors deactivation and stop/start.
Refer to “Starting And Operating” for
further information.
04106S0005EMFolding Mirror
04126V0001NAHeadlight Switch
1 — Parking Sensors Deactivation But-
ton
2 — Parking Light, Daylight Running
Lights, Headlight Switch
3 — Instrument Panel Dimmer
4 — Rear Fog Light Button
5 — Stop/Start Button
38
GETTING TO KNOW YOUR VEHICLE
Page 41 of 276

The exterior lights can be activated only
when the ignition is in the ON mode,
except for the parking lights. Refer to
"Parking Lights" in this section for more
information.
The instrument panel and the various
controls on the dashboard will be
illuminated when the exterior lights are
turned on.
Automatic Headlights
This system automatically turns the
headlights on or off according to ambient
light levels.
Function Activation
From the O (off) position, rotate the light
switch to the
(auto) position.
Note: The function can only operate with
the ignition position cycled to ON.
Function Deactivation
To deactivate the function, rotate the
light switch to a position other than the
(auto) position.
Daytime Running Lights (DRL)
With the ignition cycled to ON, and the
light switch turned to theposition, if
the dusk sensor detects sufficient
external light, the Daytime Running
Lights will turn on automatically while the
other lights remain off.
If the turn signals are operated, the
brightness of the corresponding Daytime
Running Lights will be decreased for as
long as the turn signals are on.
If equipped, the DRL can be
activated/deactivated from the
Information and Entertainment System,
by selecting the following functions in
sequence on the main MENU:
1. “Settings.”
2. “Lights.”
3. “Daytime Lights.”
Note: The Daytime Running Lights
cannot be deactivated in Canadian
markets.
Rear Fog Lights
The rear fog light switch is located within
the headlight switch.
Push the
button, located in the center
of the headlight switch, to turn the rear
fog lights on/off. The rear fog lights turn on only when the
headlights or parking lights are also
turned on. The lights can be turned off by
pushing the
button again or by turning
the headlight switch to the O (off)
position.
When the engine is stopped with the rear
fog lights on, they will be off the next
time the engine is started.
Parking Lights
With the ignition in STOP mode, rotate
the headlight switch to theposition to
turn the parking lights on. All of the
parking lights will turn on for eight
minutes, and opening the door activates
an audible warning.
To leave only the lights on one side
(right/left) illuminated, you must move
the multifunction lever (located on the
left side of the steering wheel) to the side
that you want to remain on. With the
parking lights on, the
warning light on
the instrument panel will illuminate.
Note: Cycling the ignition to ON mode
turns off the parking lights, which were
only illuminated on one side.
39
Page 42 of 276

Headlight Off Delay
The “Headlight Off Delay” function delays
the turning off of the headlights after the
vehicle’s engine has been stopped.
The function can be activated from the
Information and Entertainment System
by selecting the following functions in
sequence on the main menu:
1. “Settings.”
2. “Lights.”
3. “Headlight Off Delay.”
The side lights and the headlights stay on
for a time that can be set between 30,
60, and 90 seconds.
Function Activation
With the headlights on, cycle the ignition
to STOP mode and the timer will start.
Note:To activate this function, the
headlights must be deactivated within
two minutes after the ignition has been
cycled to the STOP mode.
Function Deactivation
This function is deactivated by turning on
the headlights, the side lights, or by
cycling the ignition to ON mode.
Adaptive Headlight System (AFS)
This is a system combined with Xenon
headlights (Bi-Xenon 35 W headlamp if
equipped) which directs the headlights
horizontally, and continuously and
automatically adapts them to the driving
conditions around bends or when
cornering.
The system directs the headlights to light
up the road in the best way, taking into
account the speed of the vehicle and the
bend or corner angle, as well as the speed
of steering.
The adaptive lights are automatically
activated when the vehicle is started.
High Beam Headlights
To activate the fixed high beam
headlights, push the multifunction lever,
located on the left side of the steering
wheel, towards the instrument panel. The
headlight switch must first be turned to
the
(auto) or(on) position.
With high beam headlights on, the
High Beam Indicator on the
instrument panel will illuminate. The high beam headlights are turned off
by pulling the multifunction lever
rearward to its original position. The
warning light/icon
will turn off in the
instrument panel when the high beams
are turned off.
Flashing The Headlights
Pulling the multifunction lever toward the
steering wheel will activate the high
beam headlights manually. The lights will
remain on as long as the lever is held.
Once the lever is released, the lights will
resume the previous setting.
04126S0020EMMultifunction Lever
40
GETTING TO KNOW YOUR VEHICLE
Page 43 of 276

Automatic High Beam Headlights — If
Equipped
The Automatic High Beam Headlights
system provides increased forward
lighting at night by automating high beam
control through the use of a digital
camera mounted on the windshield. This
camera detects vehicle specific light and
automatically turns from high beams to
low beams until the approaching vehicle
is out of view.
This function is enabled with the
Information and Entertainment System,
and can only be activated with the light
switch turned to the
(auto) position.
If the high beam headlights are on, the
blue icon/warning light
will illuminate
in the instrument panel.
When the speed is higher than 37 mph
(60 km/h) and the function is active, the
lights will turn off if the multifunction
lever is pushed again.
When the speed is lower than 15 mph
(25 km/h) and the function is active, the
function turns the high beam headlights
off.
If the high beam headlights are operated
again (pushing the multifunction lever
towards the instrument panel), the
warning light/icon
will illuminate in the
instrument panel, and the main beam
headlights only will be on until the speed
exceeds 37 mph (60 km/h).
When the speed of 37 mph (60 km/h) is
exceeded again, the automatic
functioning is reactivated. If the multifunction lever is pushed again
with the Automatic High Beam
Headlights activated, the function
deactivates.
This feature can also be deactivated by
rotating the headlight switch to the
position.
Note: If the system recognizes heavy
traffic areas, the automatic functions
remain disabled independently of the
vehicle’s speed.
Turn Signals
To activate the turn signals, move the
multifunction lever, located on the left
side of the steering wheel, up or down
until it reaches the detent. Moving the
lever upward flashes the right turn signal
and moving the lever downward will flash
the left turn signal.
The
orturn signal will blink on the
instrument panel.
The turn signals turn off automatically
when the vehicle is brought back onto a
straight course.
“Lane Change” Function
Tap the lever up or down once, without
moving beyond the detent, and the turn
signal (right or left) will flash five times.
Then, the turn signal (right or left) will
automatically turn off.
To turn off the flashing before the end of
the cycle, move the lever in the opposite
direction until the first click (about half
way).
INTERIOR LIGHTS
Front Map Reading Lights
The front map/reading and overhead
lights are mounted in the overhead
console. Each light can be turned on by
pushing the corresponding switch on the
console. These switches are backlit for
night time visibility. To turn the lights off,
push the switch a second time.
04136S0001EMOverhead Console
1 — Driver’s Reading/Map Light Switch
2 — Rear Overhead Lights Switch
3 — Overhead Lights Switch
4 — Overhead Lights On/Off When
Doors Open
5 — Passenger’s Reading/Map Light
Switch
6 — Passenger’s Reading/Map Light
7 — Center Reading/Map Light
8 — Driver’s Reading/Map Light
41
Page 47 of 276

Windshield Wiper/Washers
Operation: The switch on the wiper
stalk can be set to the following
positions:
Windshield Wiper Off.
Low Sensitivity Rain Sensing.
High Sensitivity Rain Sensing.
Low Continuous Wiper Speed.
High Continuous Wiper Speed.
Windshield Wiper Operation
Rotating the switch to the
position
activates the first (low) level continuous
speed of the windshield wipers in manual
mode.
Rotating the switch to the
position
activates the second (high) level
continuous speed of the windshield
wipers in manual mode. Rain Sensors
Rotating the switch to the
position,
activates the first, less sensitive level of
the Rain Sensing function.
Rotating the switch to the
position,
activates the second, more sensitive
level of the Rain Sensing function. Refer
to “Rain Sensor” in this section for more
information on how this system
functions.
Windshield Washer Operation
Pull the stalk toward the steering wheel
to operate the windshield washer.
Keep the stalk pulled to activate both the
windshield washer jet and the windshield
wiper with a single movement. The wipers
and washers will continue to operate until
stalk is released.
The windshield wiper stops working three
strokes after the stalk is released,
followed by a final stroke six seconds
later to complete the cycle.
Mist
Use this feature when weather
conditions make occasional usage of the
wipers necessary. Push the stalk upward
to the MIST position and release for a
single wiping cycle. This function is useful
to remove small deposits of dust from
the windshield or morning dew.
Note: This function does not activate the
windshield washer. To spray windshield
washer fluid onto the windshield, the
washing function must be used.
Warning!
Sudden loss of visibility through the
windshield could lead to a collision. You
might not see other vehicles or other
obstacles. To avoid sudden icing of the
windshield during freezing weather, warm
the windshield with the defroster before and
during windshield washer use.
Rain Sensor
The Rain Sensor is located behind the
interior rear view mirror. This feature
senses moisture on the windshield and
automatically activates the wipers for
the driver.
The feature is especially useful for road
splash or over spray from the windshield
washers of the vehicle ahead.
05036V0002EMWindshield Wiper Switch
04146V0002EMRain Sensor
45