Page 142 of 276

8. If the child restraint has a top tether
strap and the seating position has a top
tether anchorage, connect the tether
strap to the anchorage and tighten the
tether strap. See the section “Installing
Child Restraints Using the Top Tether
Anchorage” for directions to attach a
tether anchor.
9. Test that the child restraint is
installed tightly by pulling back and forth
on the child seat at the belt path. It should
not move more than 1 inch (25.4 mm) in
any direction.
Any seat belt system will loosen with
time, so check the belt occasionally, and
pull it tight if necessary.Installing Child Restraints Using
The Top Tether Anchorage:
Warning!
Do not attach a tether strap for a
rear-facing car seat to any location in front
of the car seat, including the seat frame or a
tether anchorage. Only attach the tether
strap of a rear-facing car seat to the tether
anchorage that is approved for that seating
position, located behind the top of the
vehicle seat. See the section “Lower Anchors
and Tethers for CHildren (LATCH) Restraint
System” for the location of approved tether
anchorages in your vehicle.
1. Look behind the seating position
where you plan to install the child
restraint to find the tether anchorage.
You may need to move the seat forward
to provide better access to the tether
anchorage. If there is no top tether
anchorage for that seating position,
move the child restraint to another
position in the vehicle if one is available.2. Route the tether strap to provide the
most direct path for the strap between
the anchor and the child seat. If your
vehicle is equipped with adjustable rear
head restraints, raise the head restraint,
and where possible, route the tether
strap under the head restraint and
between the two posts. If not possible,
lower the head restraint and pass the
tether strap around the outboard side of
the head restraint.
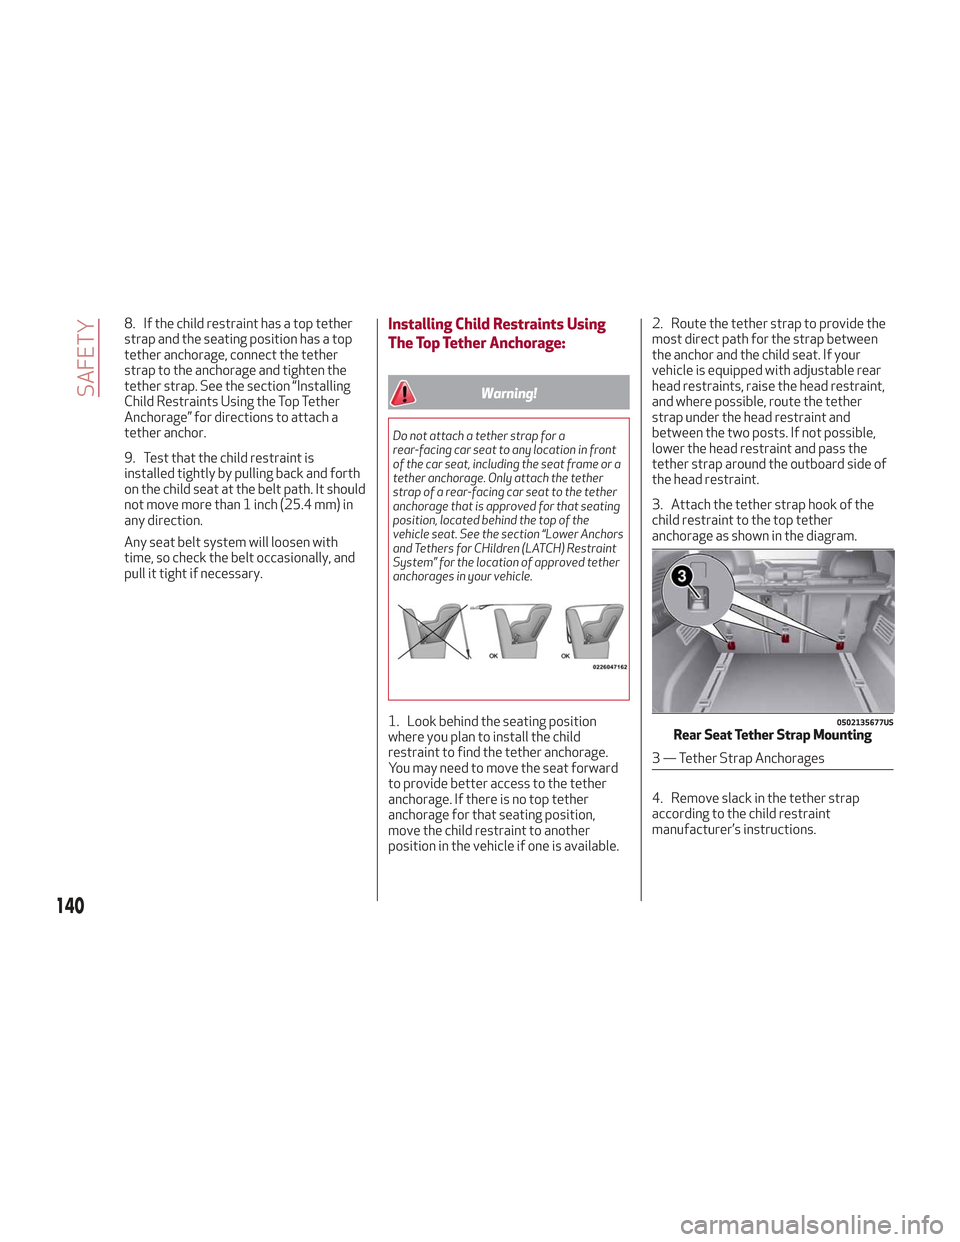
3. Attach the tether strap hook of the
child restraint to the top tether
anchorage as shown in the diagram.
4. Remove slack in the tether strap
according to the child restraint
manufacturer’s instructions.0502135677USRear Seat Tether Strap Mounting
3 — Tether Strap Anchorages
140
SAFETY
Page 155 of 276

In Manual Drive Mode (Sequential):
the mode (M), the current gear and the
double or single gear shift request, both
up and down (single or double arrow).
Gear Selector
The gear functioning is controlled by the
gear selector, which can assume the
following positions:
P = PARK
R = REVERSE
N = NEUTRAL
D= DRIVE (automatic forward speed)
AutoStick: + manually shift to higher
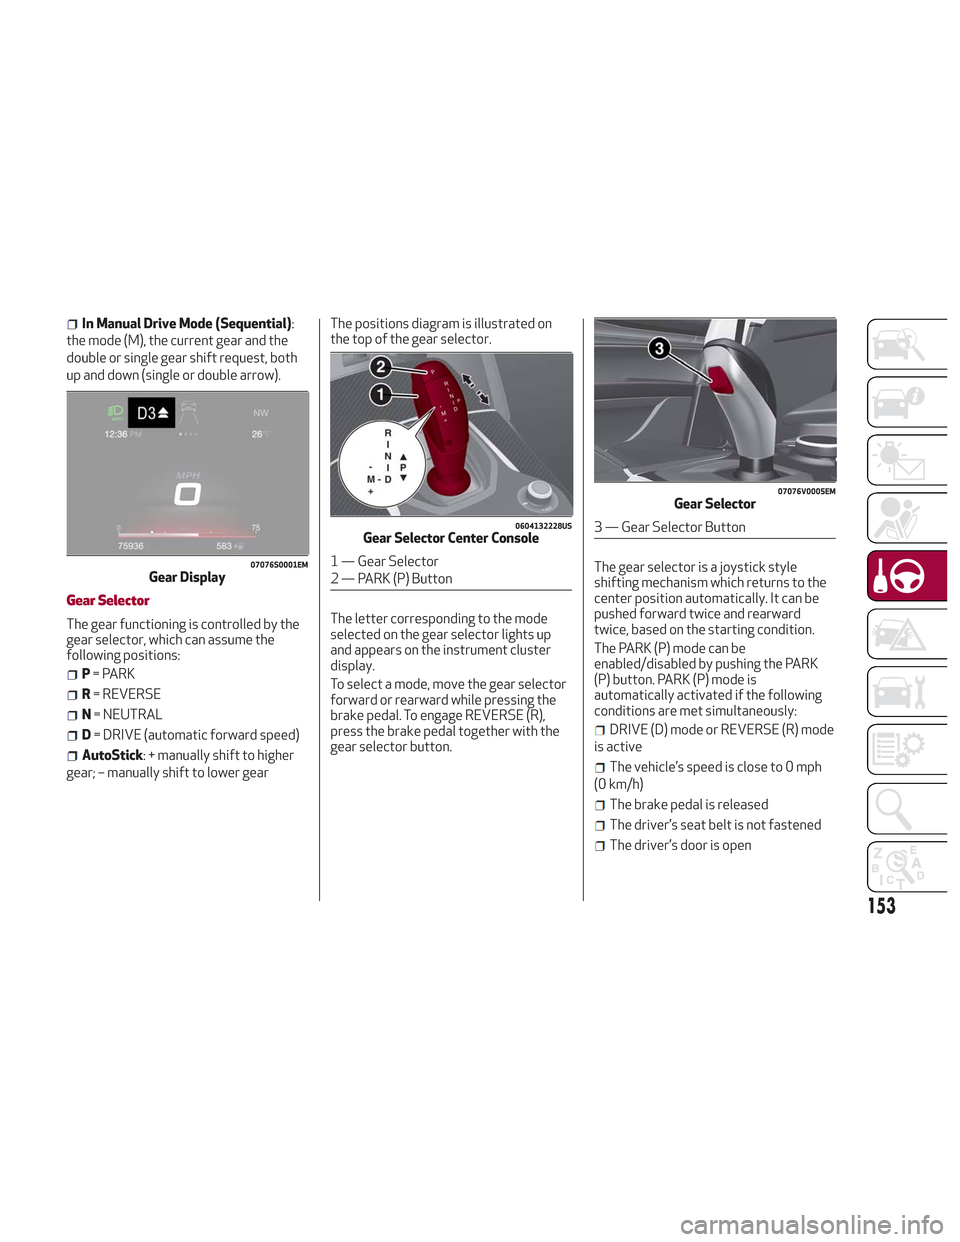
gear; – manually shift to lower gear The positions diagram is illustrated on
the top of the gear selector.
The letter corresponding to the mode
selected on the gear selector lights up
and appears on the instrument cluster
display.
To select a mode, move the gear selector
forward or rearward while pressing the
brake pedal. To engage REVERSE (R),
press the brake pedal together with the
gear selector button.
The gear selector is a joystick style
shifting mechanism which returns to the
center position automatically. It can be
pushed forward twice and rearward
twice, based on the starting condition.
The PARK (P) mode can be
enabled/disabled by pushing the PARK
(P) button. PARK (P) mode is
automatically activated if the following
conditions are met simultaneously:
DRIVE (D) mode or REVERSE (R) mode
is active
The vehicle’s speed is close to 0 mph
(0 km/h)
The brake pedal is released
The driver’s seat belt is not fastened
The driver’s door is open
07076S0001EMGear Display
0604132228USGear Selector Center Console
1 — Gear Selector
2 — PARK (P) Button
07076V0005EMGear Selector
3 — Gear Selector Button
153
Page 267 of 276

PUBLICATION ORDER FORMS
To order the following manuals, you may
use either the website or the phone
numbers listed below. Visa, Mastercard,
American Express, and Discover orders
are accepted.
Service Manuals
These comprehensive Service Manuals
provide the information that students
and professional technicians need in
diagnosing/troubleshooting, problem
solving, maintaining, servicing, and
repairing FCA US LLC vehicles. A
complete working knowledge of the
vehicle, system, and/or components is
written in straightforward language with
illustrations, diagrams, and charts.Diagnostic Procedure Manuals
Diagnostic Procedure Manuals are filled
with diagrams, charts and detailed
illustrations. These practical manuals
make it easy for students and technicians
to find and fix problems on
computer-controlled vehicle systems and
features. They show exactly how to find
and correct problems the first time, using
step-by-step troubleshooting and
drivability procedures, proven diagnostic
tests and a complete list of all tools and
equipment.
Owner's Manuals
These Owner's Manuals have been
prepared with the assistance of service
and engineering specialists to acquaint
you with specific FCA US LLC vehicles.
Included are starting, operating,
emergency and maintenance procedures
as well as specifications, capabilities and
safety tips.Call toll free at:1-800-890-4038 (U.S.)
1-800-387-1143 (Canada)
Or
Visit us on the Worldwide Web at:
www.techauthority.com
265