2018 Alfa Romeo Stelvio warning
[x] Cancel search: warningPage 21 of 276

IGNITIONSYSTEM
Operation
To activate the keyless ignition, the key
fob must be inside the vehicle.
The keyless ignition has the following
modes:
STOP: engine off, steering locked.
Some electrical devices (e.g. central door
locking system, alarm, etc.) are still
available.
ON: all electrical devices are available.
This state can be entered by pushing the
ignition button once, without pressing the
brake pedal.
AVV: engine starting. This state can be
entered by pushing the ignition button
once while pressing the brake pedal. Note:
With the keyless ignition in the ON
position: if 30 minutes pass with the
gear selector in P (Park) and the engine
stopped, the keyless ignition will
automatically reset to the STOP
position.
With the engine started, it is possible
to remove the key fob from the vehicle.
The engine will remain running and the
instrument cluster will indicate the
absence of the key fob when the door is
closed.
For more information on engine start-up,
refer to "Starting The Engine" in "Starting
And Operating."
Warning!
Never use the PARK position as a
substitute for the parking brake. Always
apply the parking brake fully when parked
to guard against vehicle movement and
possible injury or damage.
When exiting the vehicle, always make
sure the ignition is in the OFF mode, remove
the key fob from the vehicle, and lock your
vehicle.
Never leave children alone in a vehicle, or
with access to an unlocked vehicle. Allowing
children to be in a vehicle unattended is
dangerous for a number of reasons. A child
or others could be seriously or fatally
injured. Children should be warned not to touch the parking brake, brake pedal or the
transmission gear selector.
Do not leave the key fob in or near the
vehicle, (or in a location accessible to
children), and do not leave the ignition in the
AVV or ON/RUN mode. A child could operate
power windows, other controls, or move the
vehicle.
Be sure the parking brake is fully
disengaged before driving; failure to do so
can lead to brake failure and a collision.
Always fully apply the parking brake when
leaving your vehicle, or it may roll and cause
damage or injury. Also be certain to leave
the transmission in PARK. Failure to do so
may allow the vehicle to roll and cause
damage or injury.
Driving the vehicle with the parking brake
engaged, or repeated use of the parking
brake to slow the vehicle may cause serious
damage to the brake system.
Caution!
If the Brake System Warning Light remains
on with the parking brake released, a brake
system malfunction is indicated. Have the
brake system serviced by an authorized
dealer immediately.
0101132119USKeyless Ignition START/STOP Button
19
Page 23 of 276

Irregular Operation
If the key code is not recognized during
starting, the Engine Immobilizer
Failure/Break-in Attempt
icon is
displayed on the instrument panel (refer
to "Warning Lights And Messages" in
"Getting To Know Your Instrument
Panel"). This condition leads to the engine
turning off after two seconds. In this
case, switch the ignition to STOP and
then to ON; if it is still blocked, try with
the other keys provided. If it is still not
possible to start the engine, contact an
authorized dealer.
If the Engine Immobilizer Failure/
Break-in Attempt
icon is displayed
while driving, this means that the system
is running a self-diagnosis (e.g. due to a
voltage drop). If the display persists,
contact an authorized dealer. Note:
Do not tamper with the Engine
Immobilizer system. Any modifications
or alterations could cause the protection
function to be deactivated.
The Engine Immobilizer system is not
compatible with certain aftermarket
remote starting systems. The use of
these devices could cause problems
when starting, as well as the
deactivation of the protection function.
All keys provided with the vehicle
have been programmed in accordance
with the electronics on the vehicle itself.
Each key has its own code which must
be stored by the system's control unit.
Contact an authorized dealer to have
new keys (up to eight) stored with a
code.
SECURITY ALARM SYSTEM —
IF EQUIPPED
Alarm Activation
The vehicle security alarm monitors the
vehicle doors and ignition for
unauthorized operation. When the vehicle
security alarm is activated, interior
switches for door locks are disabled. The
system provides both audible and visible
signals.
While armed, the alarm will sound in the
following scenarios:
Opening of doors/hood/liftgate
(perimeter protection)
Operation of ignition with a key which
is not validated
Cutting of the battery cables
Movement inside the passenger
compartment (volumetric protection — if
equipped)
Unexpected lifting/tilting of the
vehicle (anti-lift protection — if
equipped)
Activation of the alarm triggers the
acoustic warning and the turn signals.
Note: The alarm system is activated by
the Engine Immobilizer system, which is
automatically activated when you get out
of the vehicle with the key fob and lock
the doors.
21
Page 24 of 276

To Arm The Alarm
With the doors, hood, and liftgate closed
and the keyless ignition system placed in
the STOP position, push and release the
lock button on the key fob. The alarm can
also be armed by pushing the Passive
Entry door handle button, located on the
exterior door handle. Refer to "Doors" in
"Getting To Know Your Vehicle” for
further information.
When the alarm is armed, the warning
lights on the door handle trim remain on.
The activation of the alarm is preceded
by a self-diagnosis stage: if a fault is
detected, the system emits a further
acoustic signal.If a second acoustic signal is emitted
after the alarm is already armed, wait
about four seconds and disarm the alarm
by pushing the unlock switch. Verify that
the doors, hood, and liftgate are closed
correctly. Then, reactivate the system by
pushing the lock switch.
If the alarm emits an acoustic signal even
when the doors, hood, and liftgate are
correctly closed, a fault has occurred in
system operation. In this case, contact an
authorized dealer.
To Disarm The Alarm
Push the unlock button on the key fob to
disarm the alarm. While disarming, the
following operations are performed:
Two brief flashes of the turn signals (if
programmed).
Two brief acoustic signals (if
programmed).
Doors are unlocked.
The alarm can also be disarmed using the
Passive Entry System, by grasping one of
the Passive Entry front door handles with
a valid key fob in hand to unlock. For
further information refer to "Passive
Entry" in "Doors."
Note: The alarm does not disarm when
the doors are unlocked by inserting the
blade of the emergency key into the door
handle lock cylinder.
Anti-Lift Protection — If Equipped
The vehicle security alarm system
monitors the doors and liftgate for
unauthorized entry and the ignition
switch for unauthorized operation.
To ensure the correct operation of the
protection, completely close the side
windows. If a perimeter violation triggers
the security system, the alarm will sound
and the exterior lights will flash.
To ensure the correct operation of the
Volumetric/Anti-Lift Protection system,
completely close the side windows.
To disable the function, push the
Volumetric/Anti-Lift Protection button
before activating the alarm.
0101132129USLock/Unlock Switches
22
GETTING TO KNOW YOUR VEHICLE
Page 25 of 276

When the function is disabled, this is
indicated by the light on the
Volumetric/Anti-Lift Protection button
flashing for several seconds.
Any disabling of the Volumetric/Anti-Lift
Protection must be repeated each time
the ignition is cycled off.
To Disarm The Alarm Using Passive
Entry
To completely deactivate the alarm (e.g.
during a long period of vehicle inactivity),
insert the blade of the emergency key,
found inside the key fob, into the door
handle lock cylinder and turn the
emergency key to the right (clockwise) to
lock the door(s).
DOORS
Locking And Unlocking Doors From The
Inside
If all doors are closed properly, they will
automatically lock once the vehicle has
exceeded approximately 12 MPH
(20 km/h) (“Auto Relock” function active).
Push the interior lock button on the driver
or passenger side door panel trim to lock
the doors.
Push the interior lock button on the rear
door panel trim to lock the rear doors
only.
With doors locked, push the unlock
button on the interior trim panel to
unlock the doors.
Warning!
Do not leave children or animals inside
parked vehicles in hot weather. Interior heat
build-up may cause serious injury or death.
For personal security and safety in the
event of a collision, lock the vehicle doors as
you drive as well as when you park and leave
the vehicle.
Before exiting a vehicle, always shift the
automatic transmission into PARK, apply
the parking brake, turn the engine OFF,
remove the key fob from the vehicle and
lock your vehicle.
Never leave children alone in a vehicle, or
with access to an unlocked vehicle.
Allowing children to be in a vehicle
unattended is dangerous for a number of
reasons. A child or others could be seriously
or fatally injured. Children should be warned
not to touch the parking brake, brake pedal
or the gear selector.
Do not leave the key fob in or near the
vehicle, or in a location accessible to
children. A child could operate power
windows, other controls, or move the
vehicle.
04046S0002EMVolumetric/Anti-Lift Protection Button
0101132136USDoor Lock And Unlock Switch Panel
23
Page 30 of 276

Unlocking The Doors With A Discharged
Battery
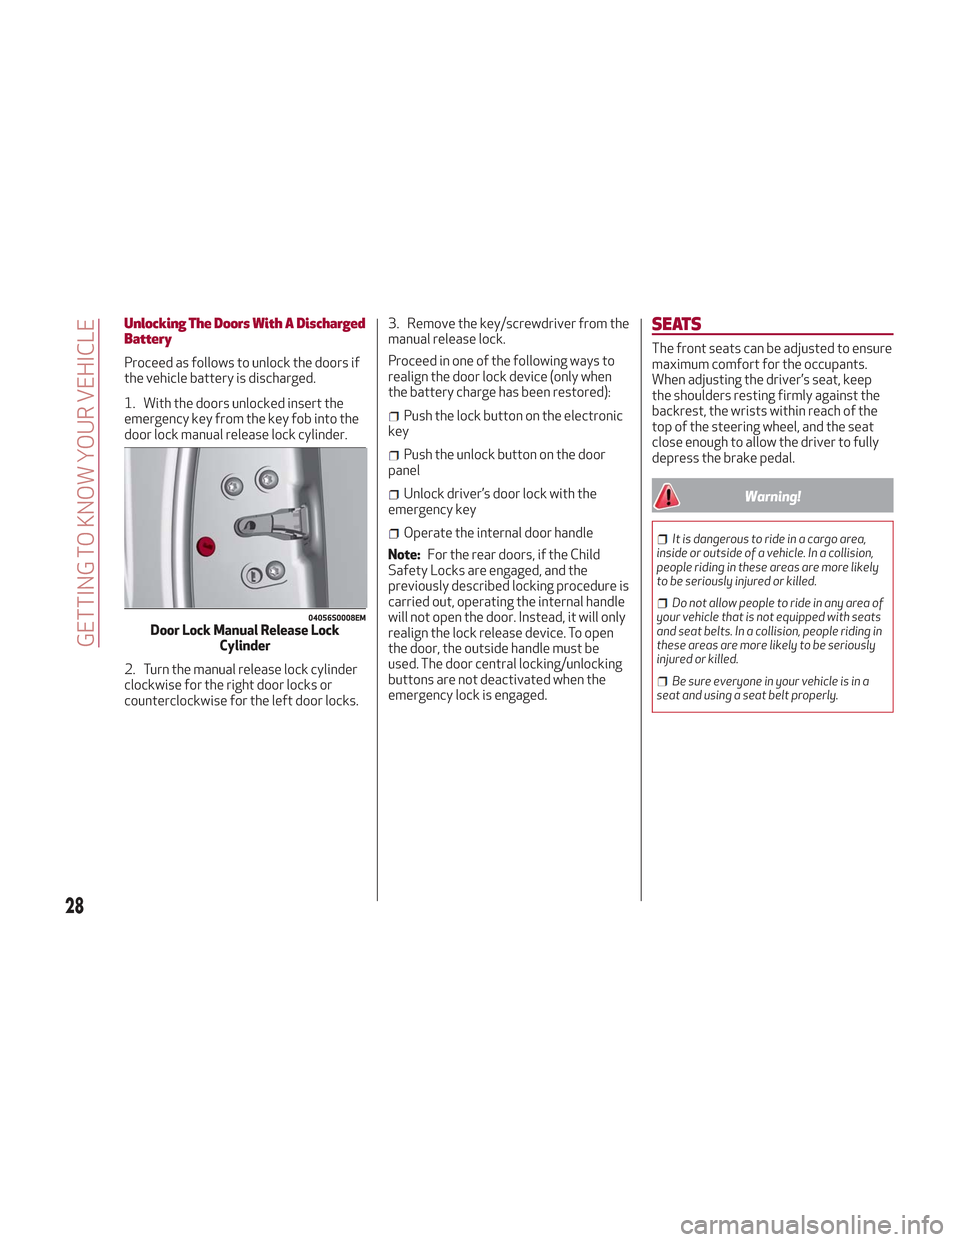
Proceed as follows to unlock the doors if
the vehicle battery is discharged.
1. With the doors unlocked insert the
emergency key from the key fob into the
door lock manual release lock cylinder.
2. Turn the manual release lock cylinder
clockwise for the right door locks or
counterclockwise for the left door locks.3. Remove the key/screwdriver from the
manual release lock.
Proceed in one of the following ways to
realign the door lock device (only when
the battery charge has been restored):
Push the lock button on the electronic
key
Push the unlock button on the door
panel
Unlock driver’s door lock with the
emergency key
Operate the internal door handle
Note: For the rear doors, if the Child
Safety Locks are engaged, and the
previously described locking procedure is
carried out, operating the internal handle
will not open the door. Instead, it will only
realign the lock release device. To open
the door, the outside handle must be
used. The door central locking/unlocking
buttons are not deactivated when the
emergency lock is engaged.
SEATS
The front seats can be adjusted to ensure
maximum comfort for the occupants.
When adjusting the driver’s seat, keep
the shoulders resting firmly against the
backrest, the wrists within reach of the
top of the steering wheel, and the seat
close enough to allow the driver to fully
depress the brake pedal.
Warning!
It is dangerous to ride in a cargo area,
inside or outside of a vehicle. In a collision,
people riding in these areas are more likely
to be seriously injured or killed.
Do not allow people to ride in any area of
your vehicle that is not equipped with seats
and seat belts. In a collision, people riding in
these areas are more likely to be seriously
injured or killed.
Be sure everyone in your vehicle is in a
seat and using a seat belt properly.
04056S0008EMDoor Lock Manual Release Lock Cylinder
28
GETTING TO KNOW YOUR VEHICLE
Page 33 of 276

Warning!
Adjusting a seat while driving may be
dangerous. Moving a seat while driving
could result in loss of control which could
cause a collision and serious injury or death.
Seats should be adjusted before
fastening the seat belts and while the
vehicle is parked. Serious injury or death
could result from a poorly adjusted seat
belt.
Do not ride with the seatback reclined so
that the shoulder belt is no longer resting
against your chest. In a collision you could
slide under the seat belt, which could result
in serious injury or death.
Heated Seats — If Equipped
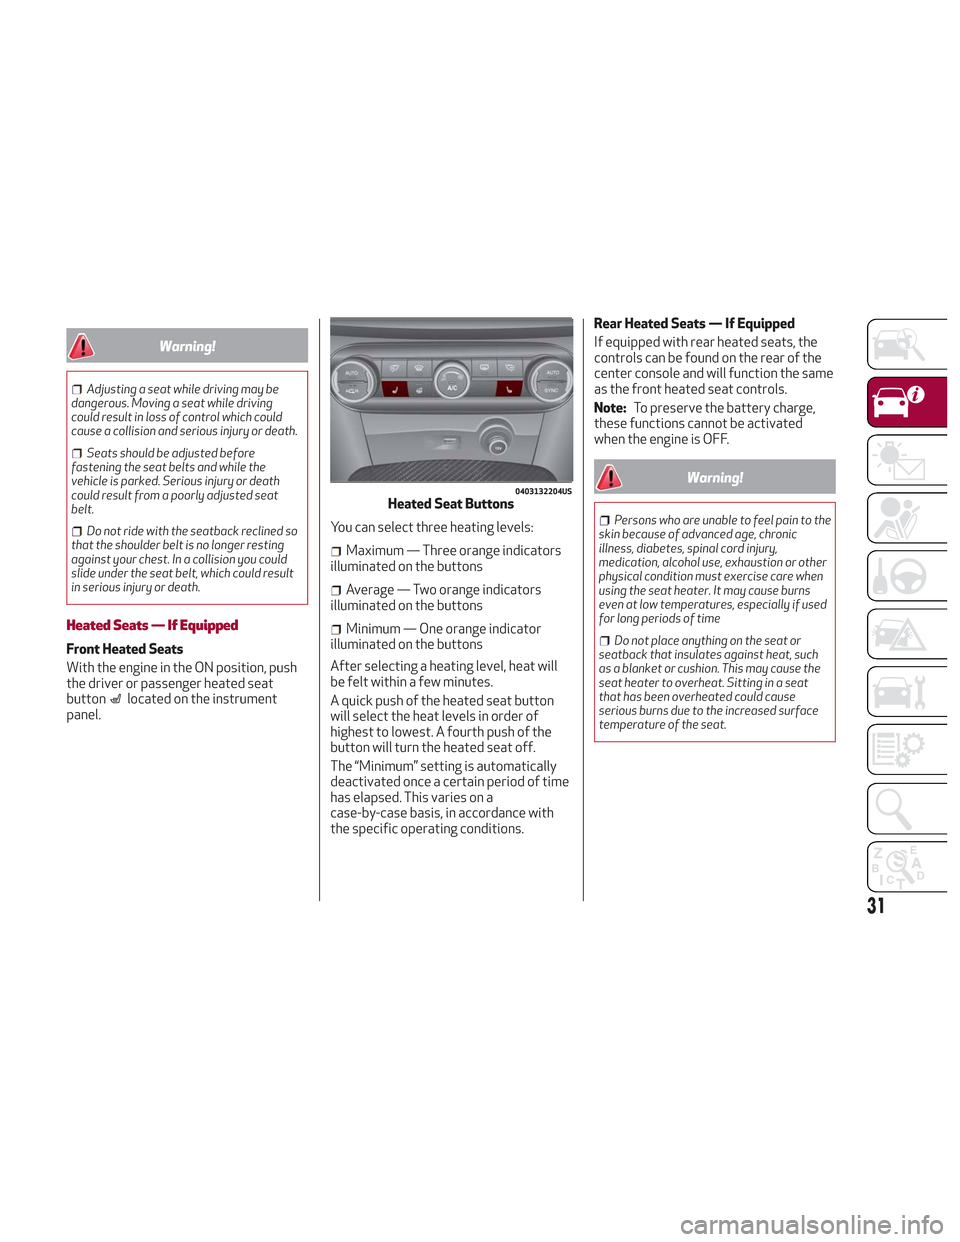
Front Heated Seats
With the engine in the ON position, push
the driver or passenger heated seat
button
located on the instrument
panel. You can select three heating levels:
Maximum — Three orange indicators
illuminated on the buttons
Average — Two orange indicators
illuminated on the buttons
Minimum — One orange indicator
illuminated on the buttons
After selecting a heating level, heat will
be felt within a few minutes.
A quick push of the heated seat button
will select the heat levels in order of
highest to lowest. A fourth push of the
button will turn the heated seat off.
The “Minimum” setting is automatically
deactivated once a certain period of time
has elapsed. This varies on a
case-by-case basis, in accordance with
the specific operating conditions. Rear Heated Seats — If Equipped
If equipped with rear heated seats, the
controls can be found on the rear of the
center console and will function the same
as the front heated seat controls.
Note:
To preserve the battery charge,
these functions cannot be activated
when the engine is OFF.
Warning!
Persons who are unable to feel pain to the
skin because of advanced age, chronic
illness, diabetes, spinal cord injury,
medication, alcohol use, exhaustion or other
physical condition must exercise care when
using the seat heater. It may cause burns
even at low temperatures, especially if used
for long periods of time
Do not place anything on the seat or
seatback that insulates against heat, such
as a blanket or cushion. This may cause the
seat heater to overheat. Sitting in a seat
that has been overheated could cause
serious burns due to the increased surface
temperature of the seat.
0403132204USHeated Seat Buttons
31
Page 35 of 276

2. Place the seat belt so that it doesn't
impede the movement of the backrest
while tilting it.
3. Pull both seat back release levers to
fold down the backrests. They will fold
forward automatically. If necessary,
assist the backrests during the initial
stage of tilting.
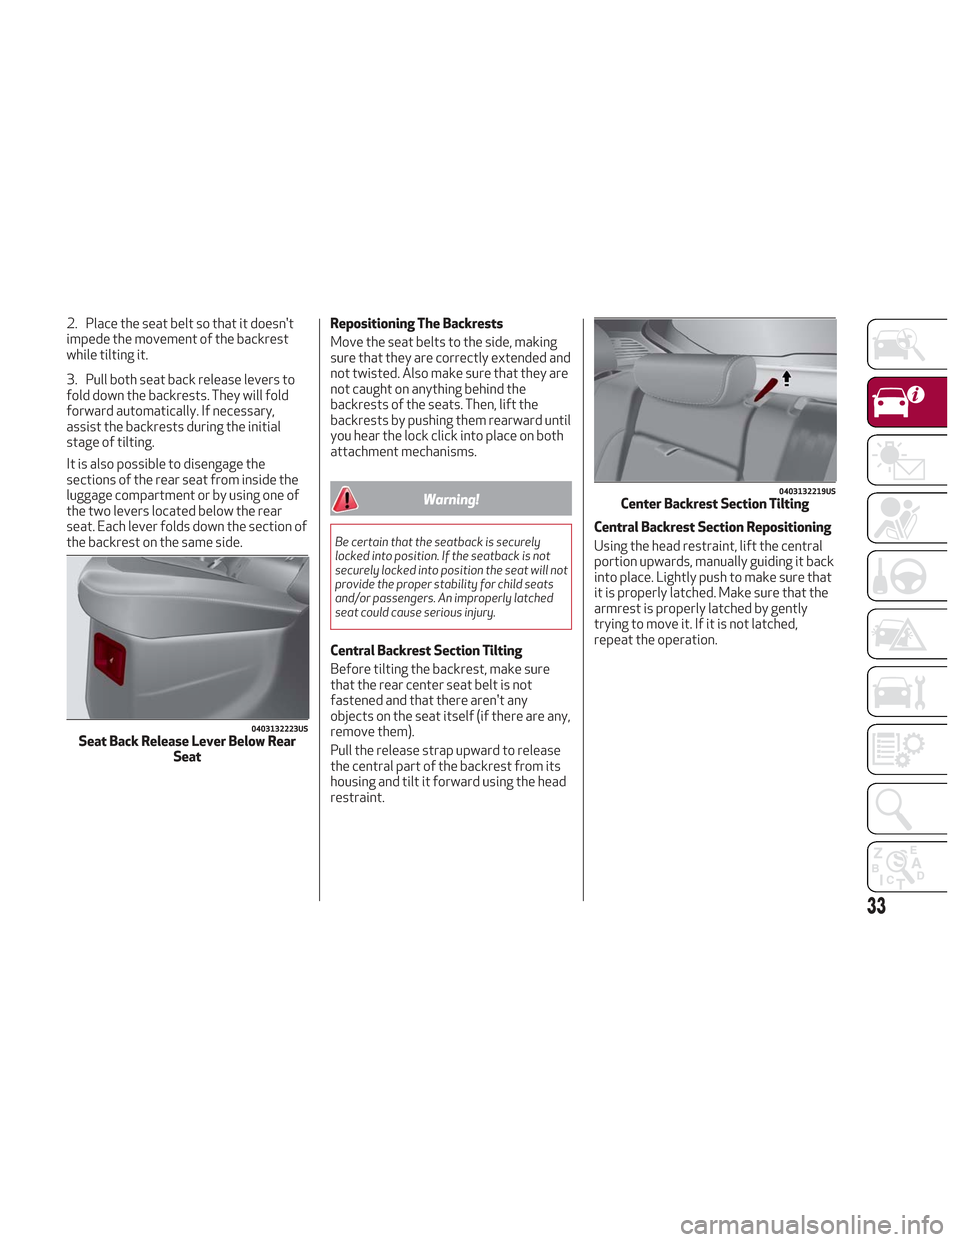
It is also possible to disengage the
sections of the rear seat from inside the
luggage compartment or by using one of
the two levers located below the rear
seat. Each lever folds down the section of
the backrest on the same side.Repositioning The Backrests
Move the seat belts to the side, making
sure that they are correctly extended and
not twisted. Also make sure that they are
not caught on anything behind the
backrests of the seats. Then, lift the
backrests by pushing them rearward until
you hear the lock click into place on both
attachment mechanisms.
Warning!
Be certain that the seatback is securely
locked into position. If the seatback is not
securely locked into position the seat will not
provide the proper stability for child seats
and/or passengers. An improperly latched
seat could cause serious injury.
Central Backrest Section Tilting
Before tilting the backrest, make sure
that the rear center seat belt is not
fastened and that there aren't any
objects on the seat itself (if there are any,
remove them).
Pull the release strap upward to release
the central part of the backrest from its
housing and tilt it forward using the head
restraint.Central Backrest Section Repositioning
Using the head restraint, lift the central
portion upwards, manually guiding it back
into place. Lightly push to make sure that
it is properly latched. Make sure that the
armrest is properly latched by gently
trying to move it. If it is not latched,
repeat the operation.
0403132223USSeat Back Release Lever Below Rear
Seat
0403132219USCenter Backrest Section Tilting
33
Page 36 of 276

HEAD RESTRAINTS
Head restraints are designed to reduce
the risk of injury by restricting head
movement in the event of a rear impact.
Head restraints should be adjusted so
that the top of the head restraint is
located above the top of your ear.
Warning!
A loose head restraint thrown forward in
a collision or hard stop could cause serious
injury or death to occupants of the vehicle.
Always securely stow removed head
restraints in a location outside the occupant
compartment.
ALL the head restraints MUST be
reinstalled in the vehicle to properly protect
the occupants. Follow the re-installation
instructions above prior to operating the
vehicle or occupying a seat.
Do not place items over the top of the
Reactive Head Restraint, such as coats,
seat covers or portable DVD players. These
items may interfere with the operation of
the Reactive Head Restraint in the event of
a collision and could result in serious injury
or death.
Front Head Restraints (Adjustments)
Note: If the vehicle is equipped with
Sparco Racing Seats, the head restraints
are not adjustable or removable.
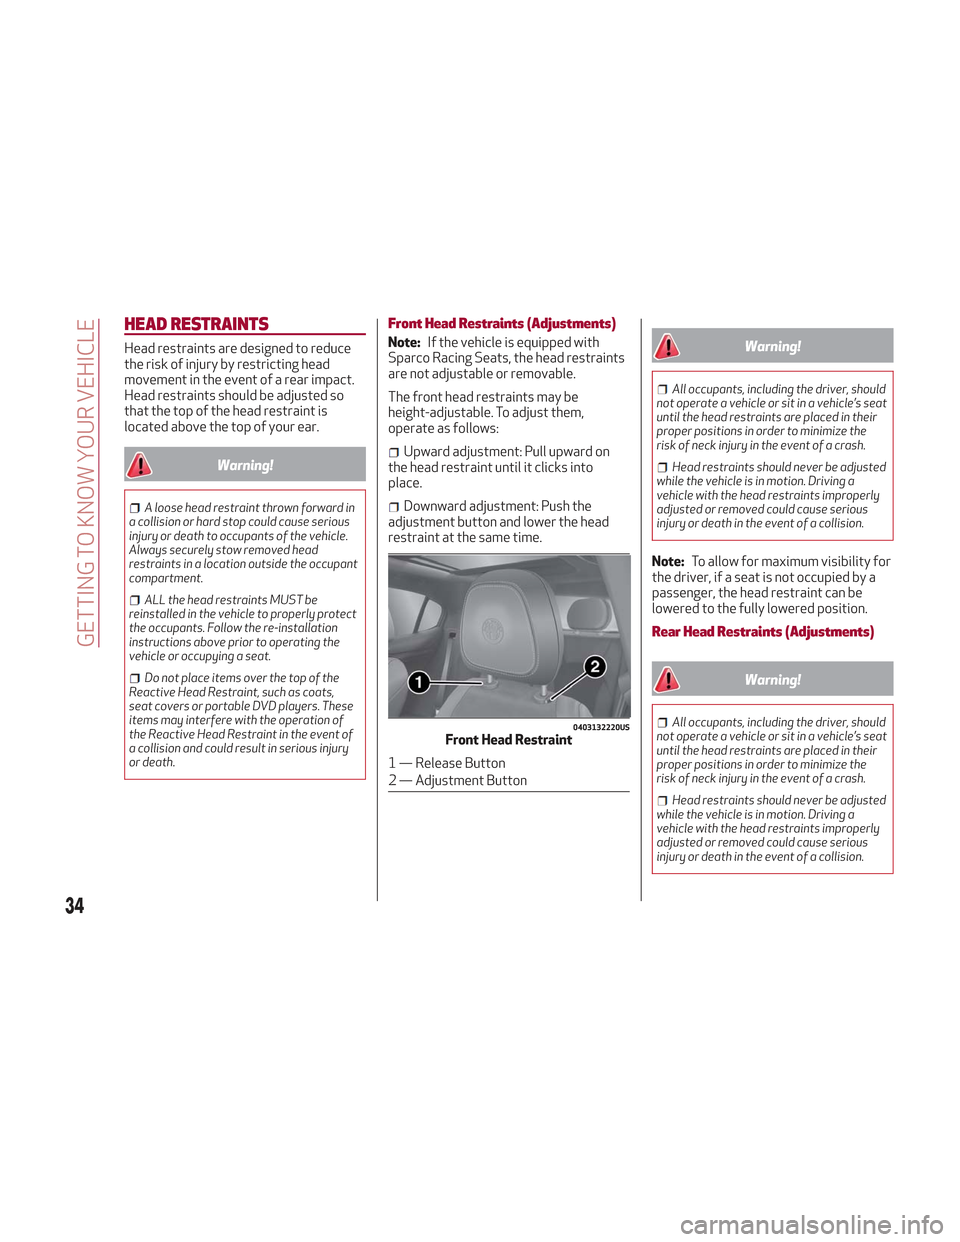
The front head restraints may be
height-adjustable. To adjust them,
operate as follows:
Upward adjustment: Pull upward on
the head restraint until it clicks into
place.
Downward adjustment: Push the
adjustment button and lower the head
restraint at the same time.
Warning!
All occupants, including the driver, should
not operate a vehicle or sit in a vehicle’s seat
until the head restraints are placed in their
proper positions in order to minimize the
risk of neck injury in the event of a crash.
Head restraints should never be adjusted
while the vehicle is in motion. Driving a
vehicle with the head restraints improperly
adjusted or removed could cause serious
injury or death in the event of a collision.
Note: To allow for maximum visibility for
the driver, if a seat is not occupied by a
passenger, the head restraint can be
lowered to the fully lowered position.
Rear Head Restraints (Adjustments)
Warning!
All occupants, including the driver, should
not operate a vehicle or sit in a vehicle’s seat
until the head restraints are placed in their
proper positions in order to minimize the
risk of neck injury in the event of a crash.
Head restraints should never be adjusted
while the vehicle is in motion. Driving a
vehicle with the head restraints improperly
adjusted or removed could cause serious
injury or death in the event of a collision.
0403132220USFront Head Restraint
1 — Release Button
2 — Adjustment Button
34
GETTING TO KNOW YOUR VEHICLE