2018 Alfa Romeo Stelvio brakes
[x] Cancel search: brakesPage 158 of 276

Deactivation
To deactivate the sequential driving
mode, bring the gear selector back in
position DRIVE (D) ("automatic" driving
mode).
Warning!
Do not downshift for additional engine
braking on a slippery surface. The drive
wheels could lose their grip and the vehicle
could skid, causing a collision or personal
injury.
Note:
To select the correct gear for
maximum deceleration (engine brake),
just keep the gear paddle pulled (–): the
transmission goes to an operating mode
in which the vehicle can slow down
easily.
The vehicle will keep the gear
selected by the driver until the safety
conditions allow it.
This means, for example, that the
system will try to prevent the engine
from switching off, automatically
downshifting if the engine speed is too
low.
Automatic Transmission Limp Home
Mode
Transmission function is monitored
electronically for abnormal conditions. If
a condition is detected that could result
in transmission damage, Transmission
Limp Home Mode is activated.
In this condition, the transmission stays
in fourth gear, regardless of the selected
gear. Positions PARK (P), REVERSE (R)
and NEUTRAL (N) still work.
The
symbol might light up in the
instrument cluster.
Temporary failure
In the event of a momentary problem, the
transmission can be reset to regain all
forward gears by performing the
following steps:
1. Stop the vehicle.
2. Shift the transmission into PARK (P),
if possible. If not, shift the transmission
to NEUTRAL (N).
3. Push and hold the ignition until the
engine turns OFF.
4. Wait for about 10 seconds, then
restart the engine.
5. Shift into the desired gear range. If
the problem is no longer detected, the
transmission will return to normal
operation.
Note: Even if the transmission can be
reset, we recommend that you visit your authorized dealer at your earliest
possible convenience. Your authorized
dealer has diagnostic equipment to
determine if the problem could reoccur. If
the transmission cannot be reset, service
is required at your authorized dealer.
Brake/Transmission Shift Interlock
System
This vehicle is equipped with a Brake
Transmission Shift Interlock system
(BTSI) that holds the gear selector in
PARK (P) unless the brakes are applied.
This system prevents you from moving
the gear selector from position PARK (P)
unless the brakes are applied.
To shift the transmission out of PARK (P),
the ignition must be cycled to the ON
position (engine running or not) and the
brake pedal must be pressed.
Brake/Transmission Shift Interlock
Disabling
Only if strictly necessary (e.g. pushing the
vehicle, conveyor vehicle washing
systems), inhibit the automatic activation
of PARK (P) mode when stopping the
engine. To do so, follow the directions
below:
1. Bring the vehicle to a standstill.
2. Place the transmission in the
NEUTRAL (N) position.
3. Push the ignition button for at least
three seconds.
156
STARTING AND OPERATING
Page 162 of 276

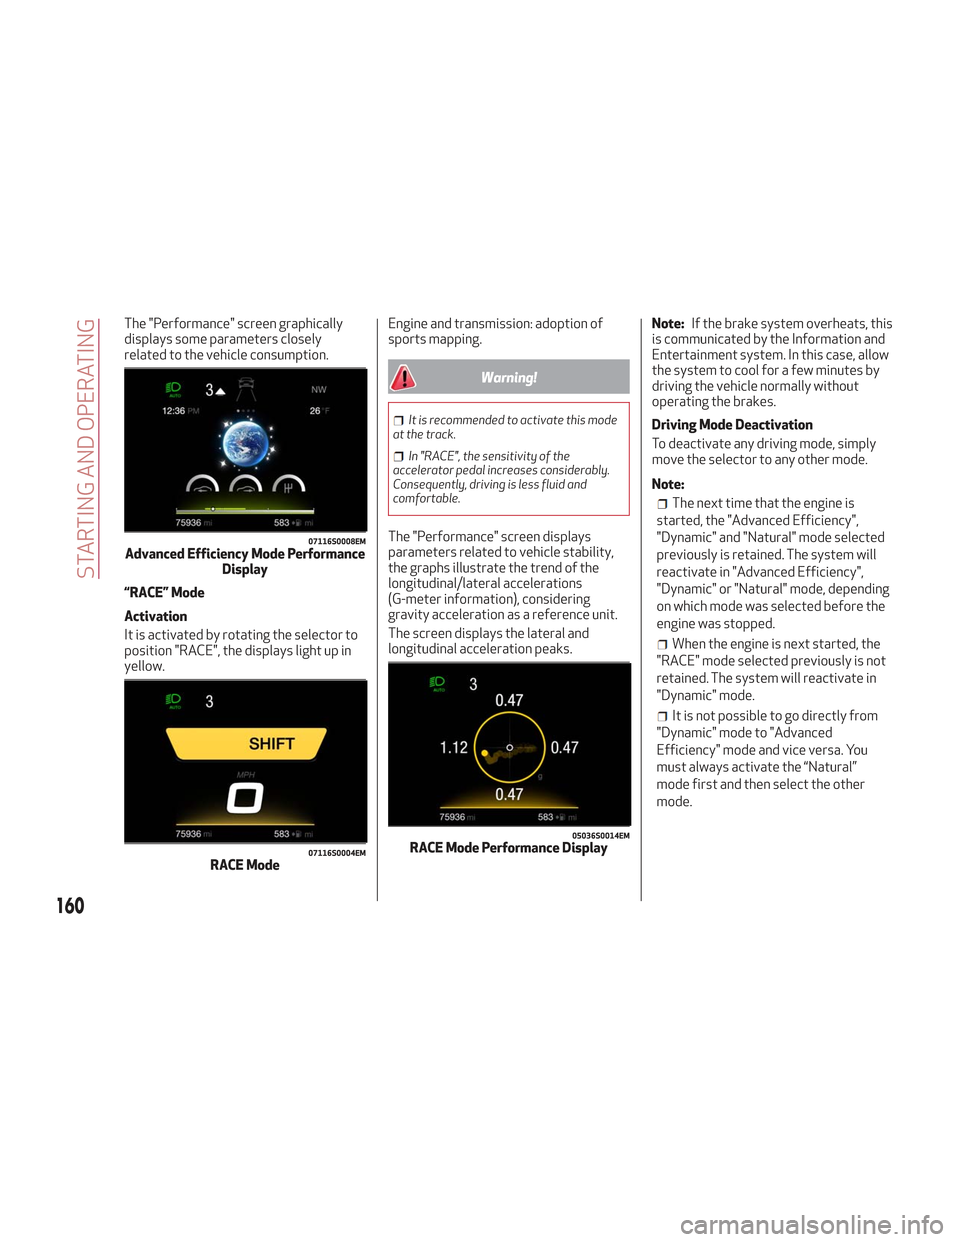
The "Performance" screen graphically
displays some parameters closely
related to the vehicle consumption.
“RACE” Mode
Activation
It is activated by rotating the selector to
position "RACE", the displays light up in
yellow.Engine and transmission: adoption of
sports mapping.
Warning!
It is recommended to activate this mode
at the track.
In "RACE", the sensitivity of the
accelerator pedal increases considerably.
Consequently, driving is less fluid and
comfortable.
The "Performance" screen displays
parameters related to vehicle stability,
the graphs illustrate the trend of the
longitudinal/lateral accelerations
(G-meter information), considering
gravity acceleration as a reference unit.
The screen displays the lateral and
longitudinal acceleration peaks. Note:
If the brake system overheats, this
is communicated by the Information and
Entertainment system. In this case, allow
the system to cool for a few minutes by
driving the vehicle normally without
operating the brakes.
Driving Mode Deactivation
To deactivate any driving mode, simply
move the selector to any other mode.
Note:
The next time that the engine is
started, the "Advanced Efficiency",
"Dynamic" and "Natural" mode selected
previously is retained. The system will
reactivate in "Advanced Efficiency",
"Dynamic" or "Natural" mode, depending
on which mode was selected before the
engine was stopped.
When the engine is next started, the
"RACE" mode selected previously is not
retained. The system will reactivate in
"Dynamic" mode.
It is not possible to go directly from
"Dynamic" mode to "Advanced
Efficiency" mode and vice versa. You
must always activate the “Natural”
mode first and then select the other
mode.
07116S0008EMAdvanced Efficiency Mode Performance Display
07116S0004EMRACE Mode
05036S0014EMRACE Mode Performance Display
160
STARTING AND OPERATING
Page 170 of 276

Setting a speed activates the system.
The display shows the icon in green with
the set speed.
Note:The system cannot be enabled
when RACE mode is active.
Warning!
Leaving the Adaptive Cruise Control (ACC)
system on when not in use is dangerous. You
could accidentally set the system or cause it
to go faster than you want. You could lose
control and have a collision. Always leave
the system off when you are not using it.
Pausing / Deactivating
With the system enabled (speed not set),
push the
(on/off) button to disable.
With the system active (speed set), push
the
(on/off) button to pause. The
display will show the icon in white with
the speed in brackets. To then deactivate
the system, push the
(on/off) button
again.
Setting The Desired Speed
The speed can be set from a minimum of
20 mph (30 km/h) to a maximum of
110 mph (180 km/h).
When the vehicle reaches the desired
speed, push the SET switch upward or
downward and release it to activate the
system. When the accelerator is released,
the vehicle will maintain the set speed
automatically. While the accelerator pedal is pressed,
the system will not be able to control the
distance between the vehicle and the one
ahead. In this case, the speed will be
determined only by the position of the
accelerator pedal.
The system will return to normal
operation as soon as the accelerator
pedal is released.
The system
cannotbe set:
When pressing the brake pedal.
When the brakes are overheated.
When the electric park brake has been
operated.
When either PARK (P), REVERSE (R) or
NEUTRAL (N) is engaged.
When the engine rpm is above a
maximum threshold.
When the vehicle speed is not within
the operational speed range.
When the ESC (or ABS or other
stability control systems) are operating
or have just operated.
When the ESC system is off.
When the Forward Collision Warning
system (if equipped) is braking
automatically.
In the event of system failure.
When the engine is OFF.
In case of obstruction of the radar
sensor (in this case the bumper area
where it is located must be cleaned).
If the system is set, the conditions
described above also cause a
cancellation or deactivation of the
system. These situations may vary
according to the conditions.
Note: The system will not be deactivated
when speeds higher than those set are
reached by pressing the accelerator
pedal above 110 mph (180 km/h). In
these situations, the system may not
work correctly and it is recommended to
deactivate it.
To Vary The Speed Setting
Increasing Speed
Once the system has been activated, you
can increase the speed by lifting the SET
switch. Each time it is operated, the
speed increases by 1 mph.
By holding the button up, the set speed
will increase in increments of 5 mph until
0403132201USSET Switch
168
STARTING AND OPERATING
Page 171 of 276

the button is released. Then, the new
speed will be set.
Decreasing Speed
Once the system has been activated, you
can decrease the speed by lowering the
SET switch. Each time it is operated, the
speed decreases by 1 mph.
By holding the button down, the set
speed will decrease in increments of
5 mph until the button is released. Then,
the new speed will be set.
Note:
Moving the SET switch allows you to
adjust the speed according to the
selected unit of measurement ("US" or
"metric") set on the Information and
Entertainment System (see dedicated
supplement).
When the unit of measurement is set
to metric, holding the SET switch the
speed will change in 10 km/h
increments.
By keeping the accelerator pedal
depressed, the vehicle can continue to
accelerate beyond the set speed. In this
case, use the SET switch to set the
speed to the vehicle’s current speed.
When you push the SET button to
reduce the speed, the braking system
intervenes automatically if the engine
brake does not slow the vehicle down
sufficiently to reach the set speed. The
device holds the set speed uphill and
downhill; however a slight variation is
entirely normal, particularly on slight
inclines.
The transmission could change to a
lower gear when driving downhill, or
when accelerating. This is normal and
necessary to maintain the set speed.
The system will disable while driving
if the brakes overheat.
Accelerating When Overtaking
When driving with ACC activated and
following a vehicle, the system will
provide an additional acceleration up to
the ACC set speed to assist in passing the
vehicle. This additional acceleration is
triggered when the driver utilizes the left
turn signal and will only be active when
passing on the left hand side.
The system detects the direction of
traffic automatically when the vehicle
passes from left-hand traffic to
right-hand traffic. In this case, the
overtaking assist function is only active
when the reference vehicle is overtaken
on the right. The additional acceleration
is deactivated when the driver uses the
right turn signal and returns to the
original lane.
Resuming The Speed
Once the system has been canceled but
not deactivated, to resume a previously
set speed, simply push the RES button
and remove your foot from the
accelerator to recall it.
The system will be set to the last stored
speed.
Before returning to the previously set
speed, bring the speed close to that
speed, then push the RES button and
release it.
0403132200USRES (Resume) Button
169
Page 172 of 276

Warning!
The Resume function should only be used if
traffic and road conditions permit. Resuming
a set speed that is too high or too low for
prevailing traffic and road conditions could
cause the vehicle to accelerate or decelerate
too sharply for safe operation. Failure to
follow these warnings can result in a collision
and death or serious personal injury.
Setting The Distance Between Vehicles
The distance between your vehicle and
the vehicle ahead may be set to one bar
(short), two bars (medium), three bars
(long), or four bars (maximum).
The distances from the vehicle ahead are
proportional to speed.
The interval of time with relation to the
vehicle ahead remains constant and
varies from one second (for the shortdistance one-bar setting) to two seconds
(for the maximum distance four-bar
setting).
The set distance is shown on the display
by a dedicated icon.
The setting is four (maximum) the first
time the system is used. After the
distance has been modified by the driver,
the new distance will be stored also after
the system is deactivated and
reactivated.
To Decrease The Distance
Push and release the distance button to
decrease the distance setting. The
distance setting decreases by one bar
(shorter) every time the button is pushed.
The set speed is held if there are no
vehicles ahead. Once the shortest
distance has been selected, the next push
of the button will set the maximum
distance.
If a slower vehicle is detected in the same
lane, the vehicle icon on the displayilluminates from grey to white. The
system automatically adjusts the
vehicle’s speed to keep the set distance,
independently of the set speed.
The vehicle holds the set distance until:
The vehicle ahead accelerates to a
speed higher than the set speed.
The vehicle ahead leaves the lane or
the detection field of the Adaptive Cruise
Control system sensor.
The distance setting is changed.
The Adaptive Cruise Control system is
deactivated/paused.
Warning!
The maximum breaking applied by the
system is limited. The driver may apply the
brakes in all cases if needed.
If the system predicts that the braking
level is insufficient to hold the set distance,
either “BRAKE!” or a dedicated message is
displayed to warn the driver of approaching
the vehicle ahead. An acoustic signal is also
emitted. In this case, it is advised to brake
immediately as necessary to hold a safe
distance from the vehicle ahead.
The driver is responsible for ensuring that
there are no pedestrians, other vehicles or
objectives along the direction of the vehicle.
Failure to comply with these precautions
may cause serious accidents and injuries.
07146S0019EMDistance Icons
0403132203USDistance Button
170
STARTING AND OPERATING
Page 174 of 276

Note:
In cases of narrow curves, the
performance of the system could be
limited. In this case, it is advisable to
deactivate the system.
The system only limits the speed
DURING a bend and not BEFORE it.
Using The System On Slopes
When driving on roads with a variable
incline, the system may not detect the
presence of a vehicle in the lane. System
performance could be limited according
to speed, load, traffic conditions and
steep slopes.
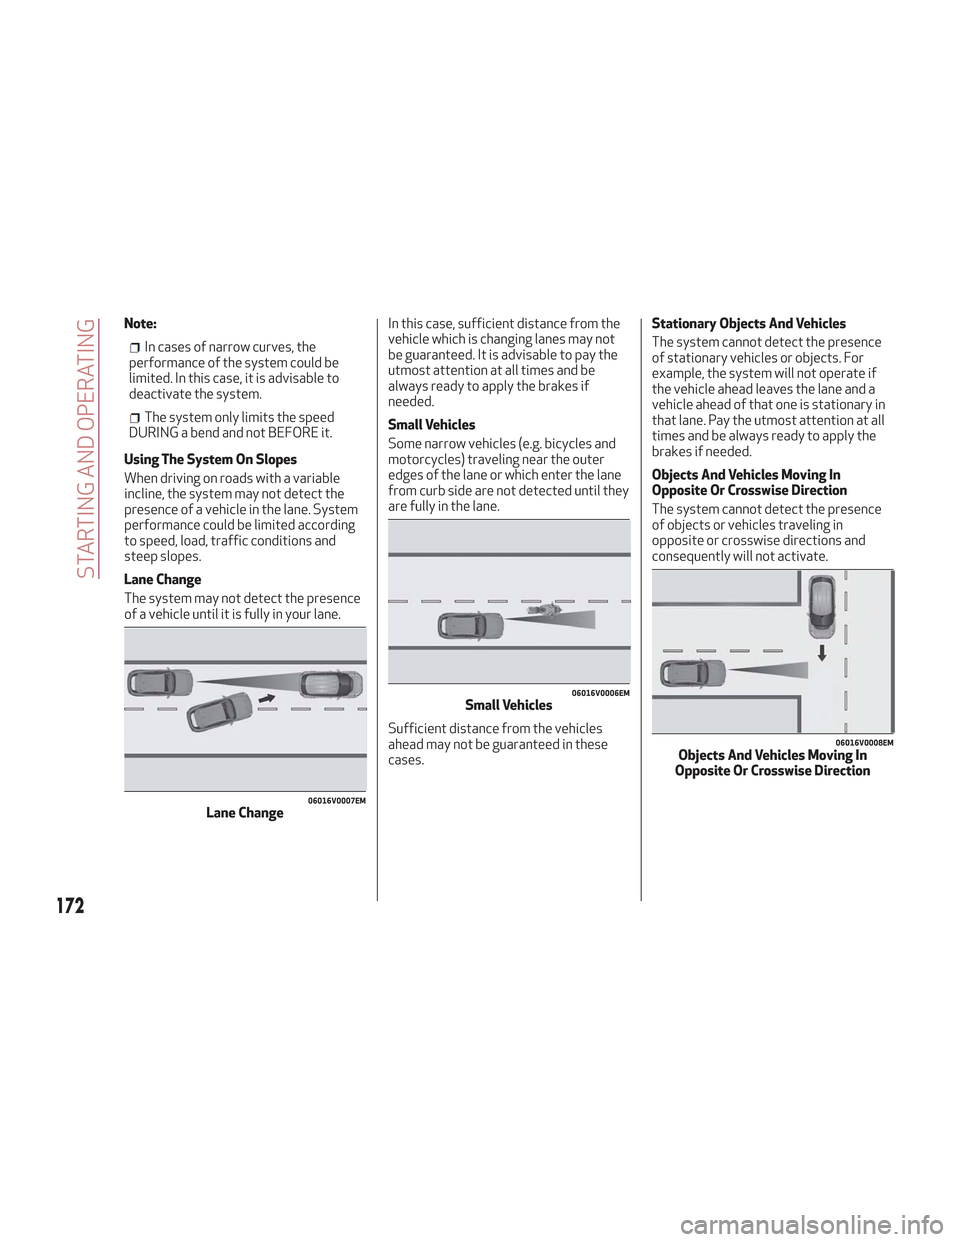
Lane Change
The system may not detect the presence
of a vehicle until it is fully in your lane. In this case, sufficient distance from the
vehicle which is changing lanes may not
be guaranteed. It is advisable to pay the
utmost attention at all times and be
always ready to apply the brakes if
needed.
Small Vehicles
Some narrow vehicles (e.g. bicycles and
motorcycles) traveling near the outer
edges of the lane or which enter the lane
from curb side are not detected until they
are fully in the lane.
Sufficient distance from the vehicles
ahead may not be guaranteed in these
cases.Stationary Objects And Vehicles
The system cannot detect the presence
of stationary vehicles or objects. For
example, the system will not operate if
the vehicle ahead leaves the lane and a
vehicle ahead of that one is stationary in
that lane. Pay the utmost attention at all
times and be always ready to apply the
brakes if needed.
Objects And Vehicles Moving In
Opposite Or Crosswise Direction
The system cannot detect the presence
of objects or vehicles traveling in
opposite or crosswise directions and
consequently will not activate.
06016V0007EMLane Change
06016V0006EMSmall Vehicles
06016V0008EMObjects And Vehicles Moving In
Opposite Or Crosswise Direction
172
STARTING AND OPERATING
Page 185 of 276

Curb Weight
The curb weight of a vehicle is defined as
the total weight of the vehicle with all
fluids, including vehicle fuel, at full
capacity conditions, and with no
occupants or cargo loaded into the
vehicle. The front and rear curb weight
values are determined by weighing your
vehicle on a commercial scale before any
occupants or cargo are added.
Loading
The actual total weight and the weight of
the front and rear of your vehicle at the
ground can best be determined by
weighing it when it is loaded and ready
for operation.The entire vehicle should first be weighed
on a commercial scale to insure that the
GVWR has not been exceeded. The
weight on the front and rear of the
vehicle should then be determined
separately to be sure that the load is
properly distributed over the front and
rear axle. Weighing the vehicle may show
that the GAWR of either the front or rear
axles has been exceeded but the total
load is within the specified GVWR. If so,
weight must be shifted from front to rear
or rear to front as appropriate until the
specified weight limitations are met.
Store the heavier items down low and be
sure that the weight is distributed
equally. Stow all loose items securely
before driving.
Improper weight distributions can have
an adverse effect on the way your vehicle
steers and handles and the way the
brakes operate.
Caution!
Do not load your vehicle any heavier than the
GVWR or the maximum front and rear
GAWR. If you do, parts on your vehicle can
break, or it can change the way your vehicle
handles. This could cause you to lose control.
Also overloading can shorten the life of your
vehicle.
SUGGESTIONS FOR DRIVING
Saving Fuel
Below are some suggestions which may
help you save fuel and lower the amount
of harmful emissions released into the
atmosphere.
Vehicle Maintenance
Checks and operations should be carried
out in accordance with the Maintenance
Plan. Refer to "Scheduled Servicing" in
"Servicing And Maintenance" for further
information.
Tires
Check the tire pressures at least once
every four weeks: if the pressure is too
low, consumption levels increase as
resistance to rolling is higher.
Note:
Tire pressure that is too high can
cause premature tire wear, reduced
control, etc.
Unnecessary Loads
Do not travel with an overloaded liftgate.
The weight of the vehicle and its
arrangement greatly affect fuel
consumption and stability.
183
Page 187 of 276

Brakes
The car braking system may be available
with four carbon-ceramic material brake
discs, one on each wheel.
In order to guarantee the maximum
braking capacity for the first use, Alfa
Romeo performs a "run-in" procedure for
discs and pads directly at the factory.
The use of carbon-ceramic material
brake discs guarantees braking features
(better deceleration/pedal load ratio,
braking distances, fading resistance)
proportional to the dynamic features of
the car in addition to considerably
decreasing the unsprung component
weight.
The materials used and the structural
features of the system could generate
unusual noises which have absolutely no
adverse effect on correct operation and
reliability of the braking system.
Greater pressure may need to be applied
to the brake pedal the first time to keep
the same braking capacities in presence
of condensation or salt on the braking
surfaces, for example after washing or if
the car is not used for a long time.
Note:Given the high technological level
of this system, any servicing on it must be
performed by your authorized dealer
which exclusively has the skills needed
for the repair operations. In case of intensive, high-performance
use of the car, have the efficiency of the
carbon-ceramic material braking system
inspected as shown on the Maintenance
Plan at your authorized dealer.
Driving On Race Tracks
Before driving on a track using a racing
style, it is necessary to:
Attend a race track driving course.
Check the liquid levels in the engine
compartment. For more information, see
the “Checking Levels” section in the
“Servicing And Maintenance” chapter.
Have the car inspected at an
authorized dealer.
Remember that the car was not designed
to be driven exclusively on the race track
and that this use increases stress and
component wear.
Note: Quadrifoglio front brakes are
equipped with NAO type pads. These
pads are NOT suitable for high termic
loads (vehicle track use). If you want to
use vehicle on a track it is necessary to
use the optional CCM (Carbon Ceramic
Brake disc). Preheating the carbon ceramic material
brake discs
The brake discs must be warmed up to
make them fully efficient. You are
advised to perform the following
procedure:
Brake nine times from 80 mph to
18 mph (130 km/h to 30 km/h) with
deceleration equal to 0.7g (the
longitudinal acceleration value is shown
on the instrument panel display by
setting RACE mode and selecting the
“Performance” page) with 20 second
intervals between brake applications;
keep the car at a speed comprised
between 37 mph and 62 mph (60 km/h
and 100 km/h) and do not brake for
4 minutes to allow the brakes to cool
down;
Then brake three times from 124 mph
to 18 mph (200 km/h to 30 km/h) with
deceleration equal to 1.1g (ABS
operation) with 30 second intervals
between brake applications; keep the car
at a speed comprised between 37 mph
and 62 mph (60 km/h and 100 km/h) and
do not brake for 5 minutes to allow the
brakes to cool down.
185