Page 311 of 432

TRANSMISSION
6-82
EAS2GBB323REMOVING THE TRANSMISSION
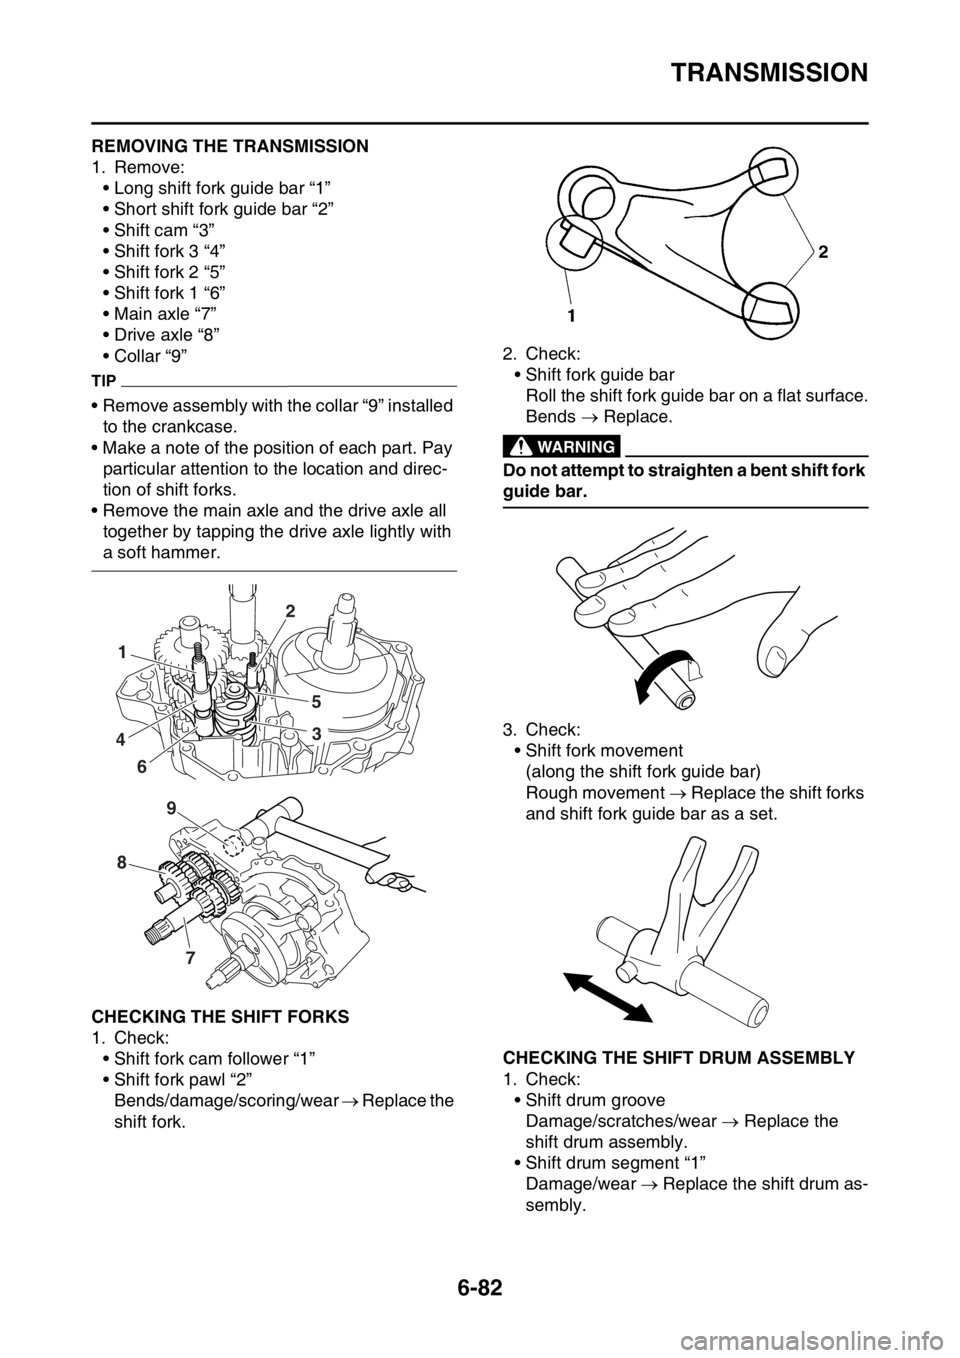
1. Remove:
• Long shift fork guide bar “1”
• Short shift fork guide bar “2”
• Shift cam “3”
• Shift fork 3 “4”
• Shift fork 2 “5”
• Shift fork 1 “6”
• Main axle “7”
• Drive axle “8”
• Collar “9”
TIP
• Remove assembly with the collar “9” installed
to the crankcase.
• Make a note of the position of each part. Pay
particular attention to the location and direc-
tion of shift forks.
• Remove the main axle and the drive axle all
together by tapping the drive axle lightly with
a soft hammer.
EAS2GBB324CHECKING THE SHIFT FORKS
1. Check:
• Shift fork cam follower “1”
• Shift fork pawl “2”
Bends/damage/scoring/wear Replace the
shift fork.2. Check:
• Shift fork guide bar
Roll the shift fork guide bar on a flat surface.
Bends Replace.
EWA
WARNING
Do not attempt to straighten a bent shift fork
guide bar.
3. Check:
• Shift fork movement
(along the shift fork guide bar)
Rough movement Replace the shift forks
and shift fork guide bar as a set.
EAS2GBB325CHECKING THE SHIFT DRUM ASSEMBLY
1. Check:
• Shift drum groove
Damage/scratches/wear Replace the
shift drum assembly.
• Shift drum segment “1”
Damage/wear Replace the shift drum as-
sembly.
1
4
62
5
3
8
7
9
Page 314 of 432
TRANSMISSION
6-85
7. Install:
• Long shift fork guide bar “1”
• Short shift fork guide bar “2”
• Spring “3”
TIP
• Screw the spring into the shift fork guide bar
lightly beforehand.
• Apply the engine oil on the shift fork guide
bars.8. Check:
• Operation of shift cam and shift fork
• Transmission operation
Unsmooth operation Repair.
3
12
6
2
4
5
3
7
1
E
E
E
2 13
E
Page 327 of 432

FUEL TANK
8-4
TIP
• Take care not to damage the installation sur-
faces of the fuel tank.
• Always use a new fuel pump gasket.
• Install the lip on the fuel pump gasket upward.
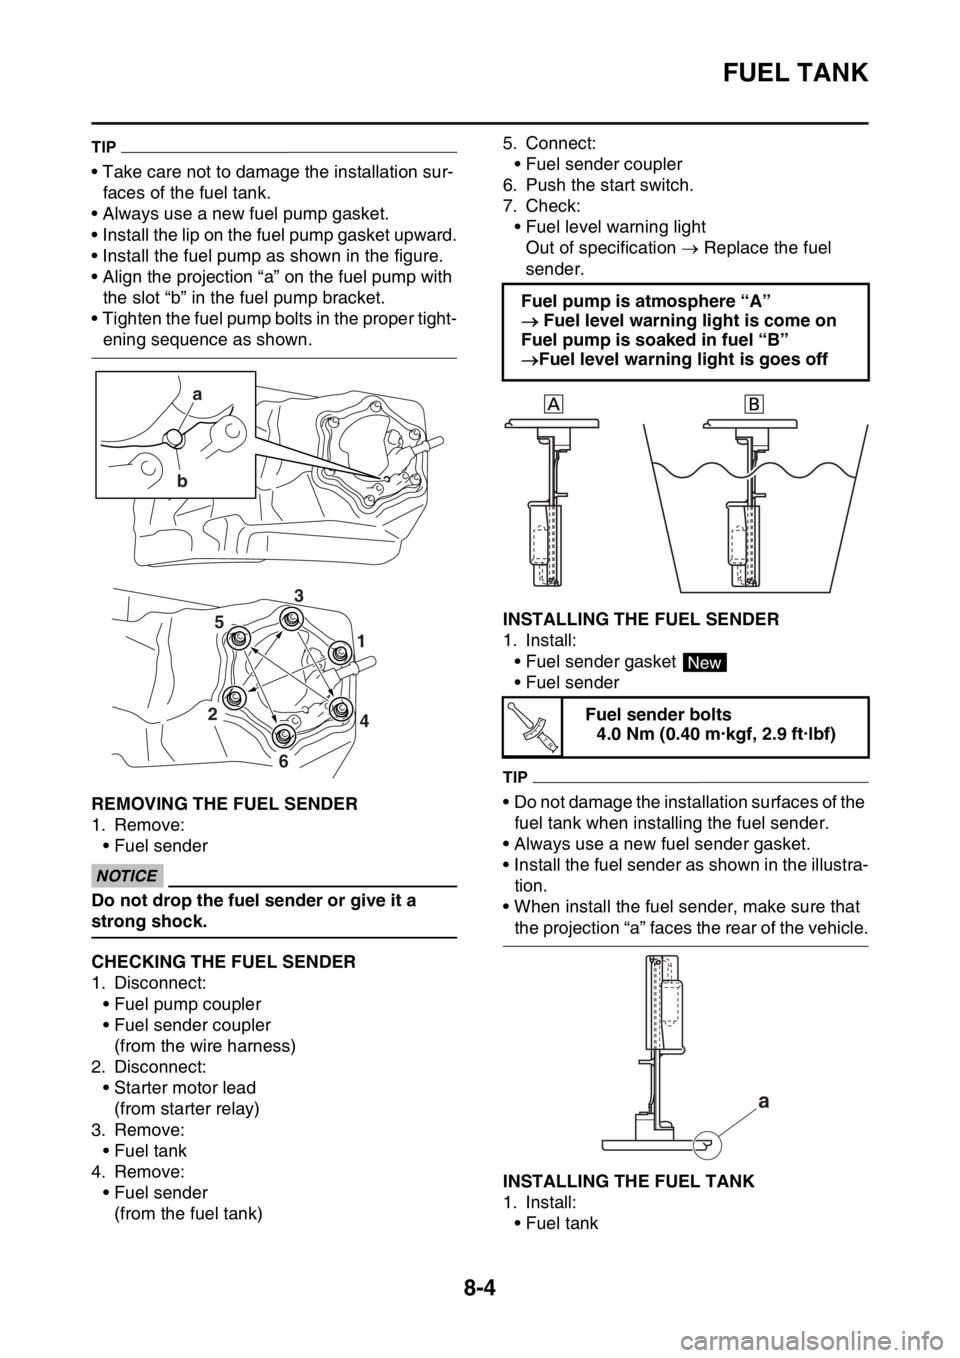
• Install the fuel pump as shown in the figure.
• Align the projection “a” on the fuel pump with
the slot “b” in the fuel pump bracket.
• Tighten the fuel pump bolts in the proper tight-
ening sequence as shown.
EAS2GBB344REMOVING THE FUEL SENDER
1. Remove:
• Fuel sender
ECA
NOTICE
Do not drop the fuel sender or give it a
strong shock.
EAS2GBB345CHECKING THE FUEL SENDER
1. Disconnect:
• Fuel pump coupler
• Fuel sender coupler
(from the wire harness)
2. Disconnect:
• Starter motor lead
(from starter relay)
3. Remove:
• Fuel tank
4. Remove:
• Fuel sender
(from the fuel tank)5. Connect:
• Fuel sender coupler
6. Push the start switch.
7. Check:
• Fuel level warning light
Out of specification Replace the fuel
sender.
EAS2GBB346INSTALLING THE FUEL SENDER
1. Install:
• Fuel sender gasket
• Fuel sender
TIP
• Do not damage the installation surfaces of the
fuel tank when installing the fuel sender.
• Always use a new fuel sender gasket.
• Install the fuel sender as shown in the illustra-
tion.
• When install the fuel sender, make sure that
the projection “a” faces the rear of the vehicle.
EAS2GBB347INSTALLING THE FUEL TANK
1. Install:
• Fuel tank
a
b
4 1
2
6
53
Fuel pump is atmosphere “A”
Fuel level warning light is come on
Fuel pump is soaked in fuel “B”
Fuel level warning light is goes off
Fuel sender bolts
4.0 Nm (0.40 m·kgf, 2.9 ft·lbf)
New
T R..
a
Page 335 of 432

9
ELECTRICAL SYSTEM
IGNITION SYSTEM.......................................................................................... 9-2
CIRCUIT DIAGRAM ................................................................................... 9-2
TROUBLESHOOTING ............................................................................... 9-4
ELECTRIC STARTING SYSTEM..................................................................... 9-6
CIRCUIT DIAGRAM ................................................................................... 9-6
STARTING CIRCUIT CUT-OFF SYSTEM OPERATION ........................... 9-8
TROUBLESHOOTING ............................................................................. 9-10
CHARGING SYSTEM..................................................................................... 9-12
CIRCUIT DIAGRAM ................................................................................. 9-12
TROUBLESHOOTING ............................................................................. 9-14
LIGHTING SYSTEM....................................................................................... 9-16
CIRCUIT DIAGRAM ................................................................................. 9-16
TROUBLESHOOTING ............................................................................. 9-18
SIGNALING SYSTEM.................................................................................... 9-20
CIRCUIT DIAGRAM ................................................................................. 9-20
TROUBLESHOOTING ............................................................................. 9-22
COOLING SYSTEM........................................................................................ 9-24
CIRCUIT DIAGRAM ................................................................................. 9-24
TROUBLESHOOTING ............................................................................. 9-26
FUEL INJECTION SYSTEM........................................................................... 9-28
CIRCUIT DIAGRAM ................................................................................. 9-28
ECU SELF-DIAGNOSTIC FUNCTION ..................................................... 9-30
TROUBLESHOOTING METHOD ............................................................. 9-31
YAMAHA DIAGNOSTIC TOOL ................................................................ 9-32
TROUBLESHOOTING DETAILS ............................................................. 9-35
FUEL PUMP SYSTEM.................................................................................... 9-56
CIRCUIT DIAGRAM ................................................................................. 9-56
TROUBLESHOOTING ............................................................................. 9-58
Page 344 of 432
ELECTRIC STARTING SYSTEM
9-8
EAS2GBB361STARTING CIRCUIT CUT-OFF SYSTEM OPERATION
If the meter light comes on, the starter motor can only operate if at least one of the following condi-
tions is met:
• The transmission is in neutral (the neutral switch is closed).
• The clutch lever is pulled to the handlebar (the clutch switch is closed).
The starting circuit cut-off relay prevents the starter motor from operating when neither of these con-
ditions has been met. In this instance, the starting circuit cut-off relay is open so current cannot reach
the starter motor. When at least one of the above conditions has been met the starting circuit cut-off
relay is closed and the engine can be started by pressing the start switch.
Page 352 of 432

LIGHTING SYSTEM
9-16
EAS27240
LIGHTING SYSTEM
EAS2GBB365CIRCUIT DIAGRAM
ONOFF
ONOFF
BBB
BBB
RRR
RRR/L
Br Br Br
Br Br
(Gy)
(Gy)B/LGyWW WB Gy
B R
WW W
BR
R,R/Y
G
R
Y/B
R,R/W
Br
RL/R
(B)R/YR/WBr/WL/G
Br/W,BrL/W
(B) (B)Br BrL/Y Y/R
G/YBrBB
BrBrL/YY/W
(B)(B)BB GG/Y
RR/L
R Lg
W/B
(B) BGyBr RW/BB/LLYP
G/WB/Y
R/BLgG/YW
Br/W
OL/RY/BB/OL/BSbY/R L/Y P/L
Y/G
(Gy)R/L R/BR/LB/Y
R/WR/L
R/W,BrP/L
R/L R/L
(B)
(B)
(B)
(L)
(L)(B) BR/LLBR/L R/L R/L R/L R/L B/L B/L B/L B/L B/L B/L B/LL L L LBBBB
Br Br Br Br
B/LBr/W
B/LG/WLYB/L
B/LPLB/LY/GL
(B)
(B)B/OBB BSbW/B
Sb
SbG/B
L/G,L/WL/BBrG/BG/BB
BB
(B)
(B)L/BBB B
Br Br
Br BrBr
BB LY
(B)
(B)
(B)
(B)
(B)
GB
Ch Dg
Y B
BRW
Br R
B W
B/WR W
Ch DgYBBrR/WBW
R O
OR/L
B
B
BBBBBB
RRRRRR/L
BrBrBrBrBr
Br
Br
BrBrBrBrR/LR/LR/LR/LR/L
B
LLLP
PL
Y
Y
RR
Br
R/LR/L
R/L
P/L
P/L
R/L
R/L
R/LR/B
R/B
L/RL/Y
L/Y
Y/R
Y/R
G/Y
G/YG/Y
G/Y
B/Y
B/Y
R/LB/LB/L
B/LB/LB/LY/G
Y/GB/L
B/OL/BY/BW/B
W/B
G/B
L/B
W/BW/B
L/BL/BL/GL/W
L/W
L/R
Br/W
Br/W
R/W
R/W
R/Y
R/Y
G/BG/B
G/B
B/O
B/LB/LB/LB/LB/LB/LB/L
G/W
G/W
Br/W
Br/W
R/WR/WBr
O
O
OR
RGy
LLLLBBBB
B
B
B
B
BBB
B
B
RRWW
Y
Y
Dg
Dg
Ch
Ch
RW
BrBrBrBr
Br
B
W
Sb
SbSb
SbBr
Br
B
Br
Lg
Lg
R/L
R
R
RR
Gy
BB
WWWWWW
R
RRGGBB
B
Y/B
RB
BB
B
B
Br
Br
Br
B
L/G
B/L
B/WB/W
B
Page 353 of 432
LIGHTING SYSTEM
9-17
1. Joint connector
2. Joint connector
6. Headlight relay
7. Main relay
9. Battery
10.Frame ground
11.Starter relay
12.Main fuse
22.ECU (engine control unit)
30.Joint connector
42.Joint connector
43.Taillight
44.Headlight
47.Multi-function display
48.Frame ground
Page 354 of 432

LIGHTING SYSTEM
9-18
EAS2GBB366TROUBLESHOOTING
Any of the following fail to light: headlight or meter light.
TIP
Before troubleshooting, remove the following part (s):
1. Seat
2. Side cover (left)
3. Air scoop (left/right)
4. Fuel tank
1. Check the each bulbs condition.
Refer to “CHECKING THE BULBS
AND BULB SOCKETS” on page 9-
67.NG
Replace the bulb (s).
OK
2. Check the fuse.
Refer to “CHECKING THE FUSES”
on page 9-68.NG
Replace the fuse(s).
OK
3. Check the battery.
Refer to “CHECKING AND
CHARGING THE BATTERY” on
page 9-69.NG
• Clean the battery terminals.
• Recharge or replace the battery.
OK
4. Check the main relay.
Refer to “CHECKING THE RE-
LAYS” on page 9-72.NG
Replace the main relay.
OK
5. Check the headlight relay.
Refer to “CHECKING THE RE-
LAYS” on page 9-72.NG
Replace the headlight relay.
OK
6. Check the entire lighting system’s
wiring.
Refer to “CIRCUIT DIAGRAM” on
page 9-16.NG
Properly connect or repair the lighting sys-
tem’s wiring.
OK
Replace the ECU, meter assembly, or
taillight.