2017 TOYOTA TACOMA ignition
[x] Cancel search: ignitionPage 445 of 640

4457-2. Maintenance
7
Maintenance and care
■Resetting the reminder light (vehic les without a multi-information dis-
play) or the message (vehicles with a multi-information display) indicat-
ing maintenance is required (U.S.A. only)
After the required maintenance is performed according to the maintenance
schedule, please reset the reminder light or the message.
To reset the reminder light or the message, follow the procedure described
below:
Turn the engine switch off.
Vehicles without a smart key system:
While pressing the “ODO/TRIP” button ( →P. 88), turn the engine switch to
the “ON” position. (do not start the engine because reset mode will be can-
celed)
Vehicles with a smart key system:
While pressing the “ODO/TRIP” button ( →P. 88), turn the engine switch to
the IGNITION ON mode. (do not start the engine because reset mode will
be canceled)
Continue to press and hold the button until the odometer displays “000000”.
■ Allow inspection and repairs to be performed by a Toyota dealer
●Toyota technicians are well-trained specialists and are kept up to date with
the latest service information. They are well informed about the operations
of all systems on your vehicle.
● Keep a copy of the repair order. It proves that the maintenance that has
been performed is under warranty cove rage. If any problem should arise
while your vehicle is under warranty, your Toyota dealer will promptly take
care of it.
WARNING
■ If your vehicle is not properly maintained
Improper maintenance could result in serious damage to the vehicle and
possible death or serious injury.
■ Handling of the battery
● Engine exhaust, some of its constituents, and a wide variety of automobile
components contain or emit chemicals known to the State of California to
cause cancer and birth defects and other reproductive harm. Work in a
well ventilated area.
● Oils, fuels and fluids contained in vehicles as well as waste produced by
component wear contain or emit chemic als known to the State of Califor-
nia to cause cancer and birth defects or other reproductive harm. Avoid
exposure and wash any affected area immediately.
● Battery posts, terminals and related accessories contain lead and lead
compounds which are known to cause brain damage. Wash your hands
after handling. ( →P. 463)
1
2
3
Page 468 of 640

4687-3. Do-it-yourself maintenance
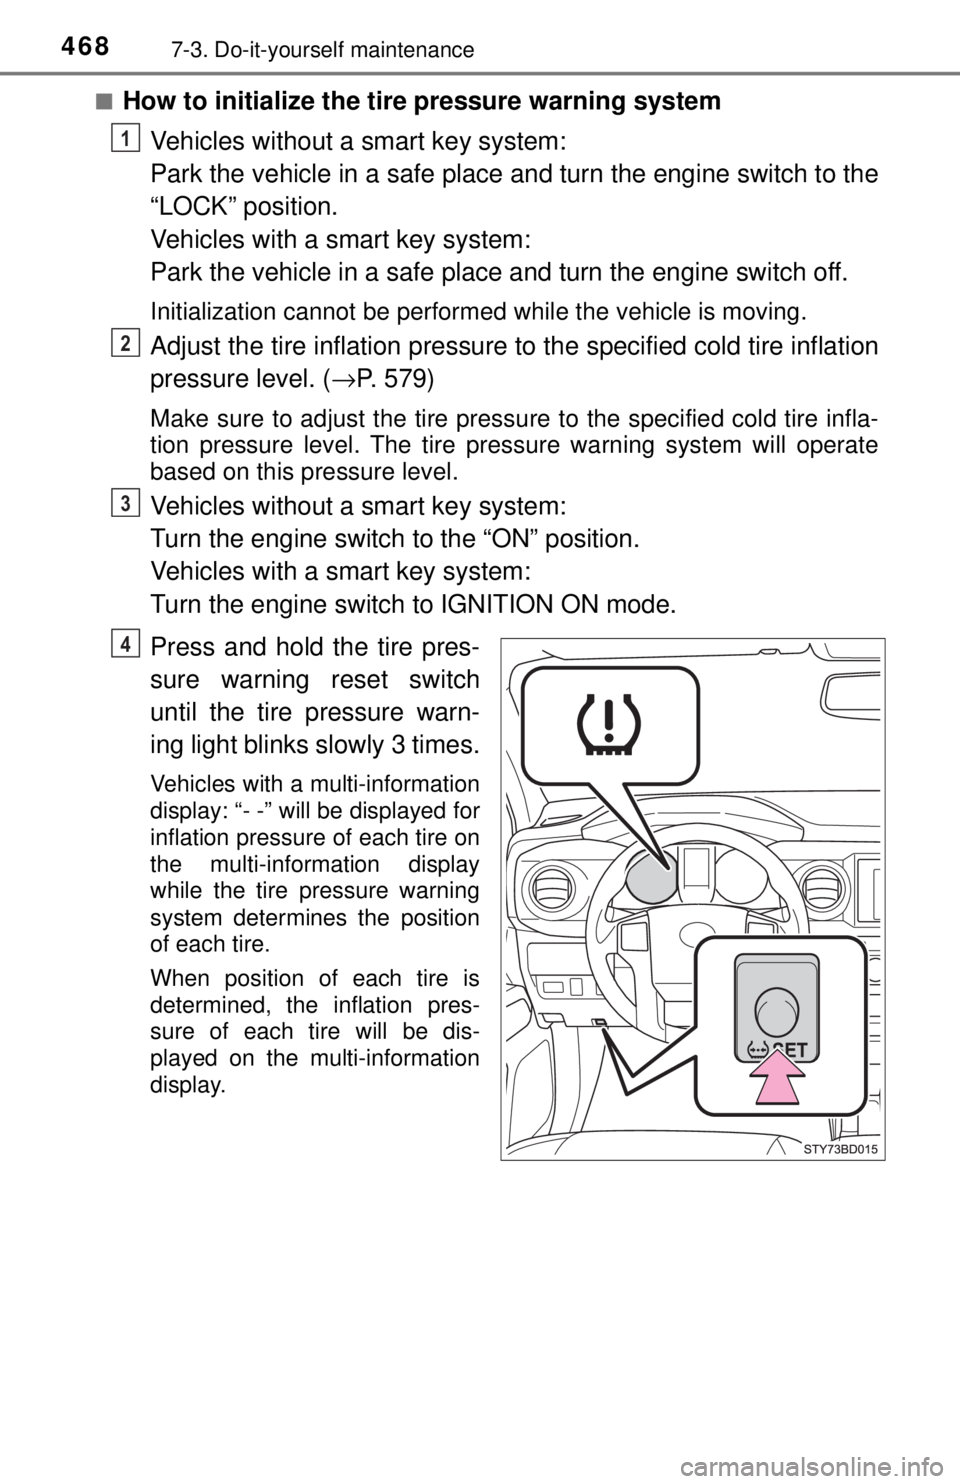
■How to initialize the tire pressure warning systemVehicles without a smart key system:
Park the vehicle in a safe place and turn the engine switch to the
“LOCK” position.
Vehicles with a smart key system:
Park the vehicle in a safe place and turn the engine switch off.
Initialization cannot be performed while the vehicle is moving.
Adjust the tire inflation pressure to the specified cold tire inflation
pressure level. ( →P. 579)
Make sure to adjust the tire pressu re to the specified cold tire infla-
tion pressure level. The tire pressure warning system will operate
based on this pressure level.
Vehicles without a smart key system:
Turn the engine switch to the “ON” position.
Vehicles with a smart key system:
Turn the engine switch to IGNITION ON mode.
Press and hold the tire pres-
sure warning reset switch
until the tire pressure warn-
ing light blinks slowly 3 times.
Vehicles with a multi-information
display: “- -” will be displayed for
inflation pressure of each tire on
the multi-information display
while the tire pressure warning
system determines the position
of each tire.
When position of each tire is
determined, the inflation pres-
sure of each tire will be dis-
played on the multi-information
display.
1
2
3
4
Page 469 of 640

4697-3. Do-it-yourself maintenance
7
Maintenance and care
Vehicles without a multi-information display
Vehicles without a smart key system:
Wait for a few minutes with the engine switch in the “ON” position
and then turn the engine switch to the “LOCK” position.
Vehicles with a smart key system:
Wait for a few minutes with the engine switch in IGNITION ON
mode and then turn the engine switch off.
Vehicles with a mult i-information display
Drive the vehicle at approximately 25 mph (40 km/h) or more for
approximately 10 minutes.
When initialization is complete, the inflation pressure of each tire
will be displayed on the mu lti-information display.
Initialization will take longer than approximate ly 10 minutes if the
vehicle is stopped for a long time, such as at traffic signals.
◆Registering ID codes
The tire pressure warning valve and transmitter is equipped with a
unique ID code. When replacing a tire pressure warning valve and
transmitter, it is necessary to register the ID code. Have the ID code
registered by your Toyota dealer.
5
5
Page 473 of 640

4737-3. Do-it-yourself maintenance
7
Maintenance and care
■The initialization operation (vehicles with the tire pressure warning
system)
●Make sure to carry out in itialization after adjusting the tire inflation pres-
sure.
Also, make sure the tires are cold be fore carrying out initialization or tire
inflation pressure adjustment.
●If you have accidentally turned the engine switch to the “LOCK” position
(vehicles without a smart key system) or off (vehicles with a smart key
system) during initialization, it is no t necessary to press the reset switch
again as initialization will restart aut omatically when the engine switch
has been turned to the “ON” position (vehicles without a smart key sys-
tem) or IGNITION ON mode (vehic les with a smart key system) for the
next time.
●If you accidentally press the reset s witch when initialization is not neces-
sary, adjust the tire inflation pressu re to the specified level when the
tires are cold, and conduct initialization again.
■Warning performance of the tire pressure warning system (vehicles
with a multi-information display)
The warning of the tire pressure warning system will change in accor-
dance with the conditions under which it was initialized. For this reason,
the system may give a warning even if the tire pressure does not reach a
low enough level, or if the pressure is higher than the pressure that was
adjusted to when the system was initialized.
■When initialization of the tire pressure warning system has failed (if
equipped)
Initialization may take longer to comp lete if the vehicle is driven on an
unpaved road. When performing initialization, drive on a paved road if
possible. Depending on the driving environment and condition of the tires,
initialization will be completed in approx imately 10 minutes. If initialization
is not complete after driving approxima tely 10 minutes, continue driving
for a while.
If the inflation pressure of each tire is not displayed after driving for
approximately 1 hour, perform the following procedure.
●Park the vehicle in a safe place for approximately 20 minutes. Then
drive straight (with occasional left and right turns) at approximately
25mph (40 km/h) or more for approximately 10 to 20 minutes.
However, in the following situations, the tire inflation pressure will not be
recorded and the system will not operate properly. Perform initialization
again.
●When operating the tire pressure wa rning reset switch, the tire pressure
warning light does not blink 3 times.
●After performing init ialization, the tire pressure warning light blinks for 1
minute then stays on while driving.
If the inflation pressure of each tire is still not displayed, have the vehicle
inspected by your Toyota dealer.
Page 509 of 640

5098-2. Steps to take in an emergency
8
When trouble arises
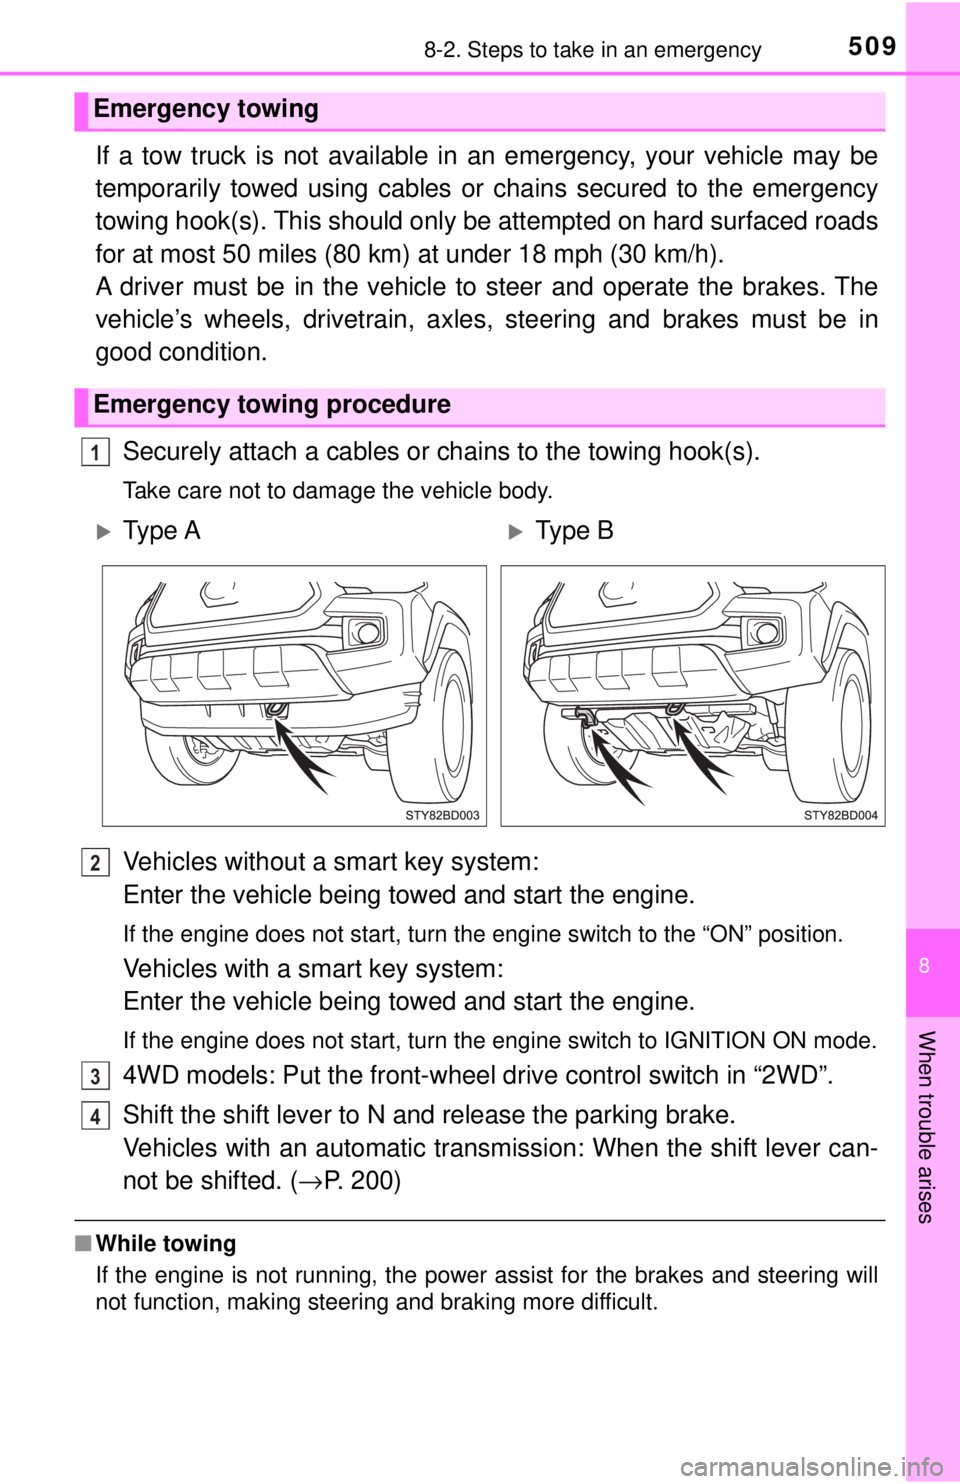
If a tow truck is not available in an emergency, your vehicle may be
temporarily towed using cables or chains secured to the emergency
towing hook(s). This should only be attempted on hard surfaced roads
for at most 50 miles (80 km) at under 18 mph (30 km/h).
A driver must be in the vehicle to steer and operate the brakes. The
vehicle’s wheels, drivetrain, axles, steering and brakes must be in
good condition.
Securely attach a cables or chains to the towing hook(s).
Take care not to damage the vehicle body.
Vehicles without a smart key system:
Enter the vehicle being towed and start the engine.
If the engine does not start, turn the engine switch to the “ON” p\
osition.
Vehicles with a smart key system:
Enter the vehicle being towed and start the engine.
If the engine does not start, turn the engine switch to IGNITION ON mode\
.
4WD models: Put the front-wheel dr ive control switch in “2WD”.
Shift the shift lever to N and release the parking brake.
Vehicles with an automatic transmission: When the shift lever can-
not be shifted. (→ P. 200)
■While towing
If the engine is not running, the power assist for the brakes and steering will
not function, making steering and braking more difficult.
Emergency towing
Emergency towing procedure
1
Ty p e AType B
2
3
4
Page 519 of 640

5198-2. Steps to take in an emergency
8
When trouble arises
*7: Driver’s seat belt buzzer:The driver’s seat belt buzzer sounds to alert the driver that his or her seat
belt is not fastened. Once the engine switch is turned to the “ON” position
(vehicles without a smart key system) or IGNITION ON mode (vehicles
with a smart key system), the buzzer sounds for 6 seconds. If the vehicle
reaches a speed of 12 mph (20 km/h), the buzzer sounds once. If the seat
belt is still unfastened after 24 seconds, the buzzer will sound intermittently
for 10 seconds. Then, if the seat belt is still unfastened, the buzzer will
sound in a different tone for 20 more seconds.
Front passenger’s seat belt buzzer:
The front passenger’s seat belt buzzer sounds to alert the front passenger
that his or her seat belt is not fastened. The buzzer sounds once if the
vehicle reaches a speed of 12 mph (20 km/h). If the seat belt is sill unfas-
tened after 24 seconds, the buzzer will sound intermittently for 10 seconds.
Then, if the seat belt is still unfastened, the buzzer will sound in a different
tone for 20 more seconds.
*8: Parking brake engaged warning buzzer:
A buzzer will sound if the vehicle is driven at a speed of approximately
3 mph (5 km/h) or more.
*9: 2GR-FKS engine only
*10: Refer to the separate “Scheduled Maintenance Guide” or “Owner’s ManualSupplement” for the maintenance interval applicable to your vehicle.
■ SRS warning light
This warning light system monitors the airbag sensor assembly, front impact
sensors, side impact sensors (front), side impact sensors (rear), driver’s seat
position sensor, driver’s seat belt buckle switch, front passenger occupant
classification system (ECU and sensors), “AIR BAG ON” indicator light, “AIR
BAG OFF” indicator light, front passenger’s seat belt buckle switch, seat belt
pretensioners assemblies, airbags, interconnecting wiring and power
sources. ( →P. 36)
■ Front passenger detection sensor, seat belt reminder and warning
buzzer
● If luggage is placed on the front passenger seat, the front passenger de\
tec-
tion sensor may cause the warning light to flash and the warning buzzer to
sound even if a passenger is not sitting in the seat.
● If a cushion is placed on the seat, the sensor may not detect a passenger,
and the warning light may not operate properly.
Page 520 of 640

5208-2. Steps to take in an emergency
■If the malfunction indicator la mp comes on while driving
First check the following:
● Is the fuel tank empty?
If it is, fill the fuel tank immediately.
● Is the fuel tank cap loose?
If it is, tighten it securely.
The light will go off after several driving trips.
If the light does not go off even after several trips, contact your Toyota dealer
as soon as possible.
■
When the tire pressure warning light comes on (if equipped)
Check the tire inflation pressure and adjust to the appropriate level. Push-
ing the tire pressure warning reset switch will not turn off the tire pressure
warning light.
■The tire pressure warning light may come on due to natural causes
(if equipped)
The tire pressure warning light may come on due to natural causes such
as natural air leaks and tire inflat ion pressure changes caused by tem-
perature. In this case, adjusting the ti re inflation pressure will turn off the
warning light (after several minutes).
■When a tire is replaced with a spare tire (vehicles with the tire pres-
sure warning system)
The temporary spare tire is not equipped with a tire pressure warning
valve and transmitter. If a tire goes flat, the tire pressure warning light will
not turn off even though the flat tire has been replaced with the temporary
spare tire. Replace the temporary spare tire with the repaired tire and
adjust the tire inflation pressure. The tire pressure warning light will go off
after several minutes.
■Conditions that the tire pressure warning system may not function
properly (if equipped)
→ P. 4 7 2
■If the tire pressure warning light frequently comes on after blinking
for 1 minute (if equipped)
If the tire pressure warning light frequently comes on after blinking for 1
minute when the engine switch is tu rned to “ON” position (vehicles with-
out a smart key system) or IGNITION ON mode (vehicles with a smart
key system), have it checked by your Toyota dealer.
■ Warning buzzer
In some cases, the buzzer may not be heard because of noisy place or an
audio sound.
Page 560 of 640

5608-2. Steps to take in an emergency
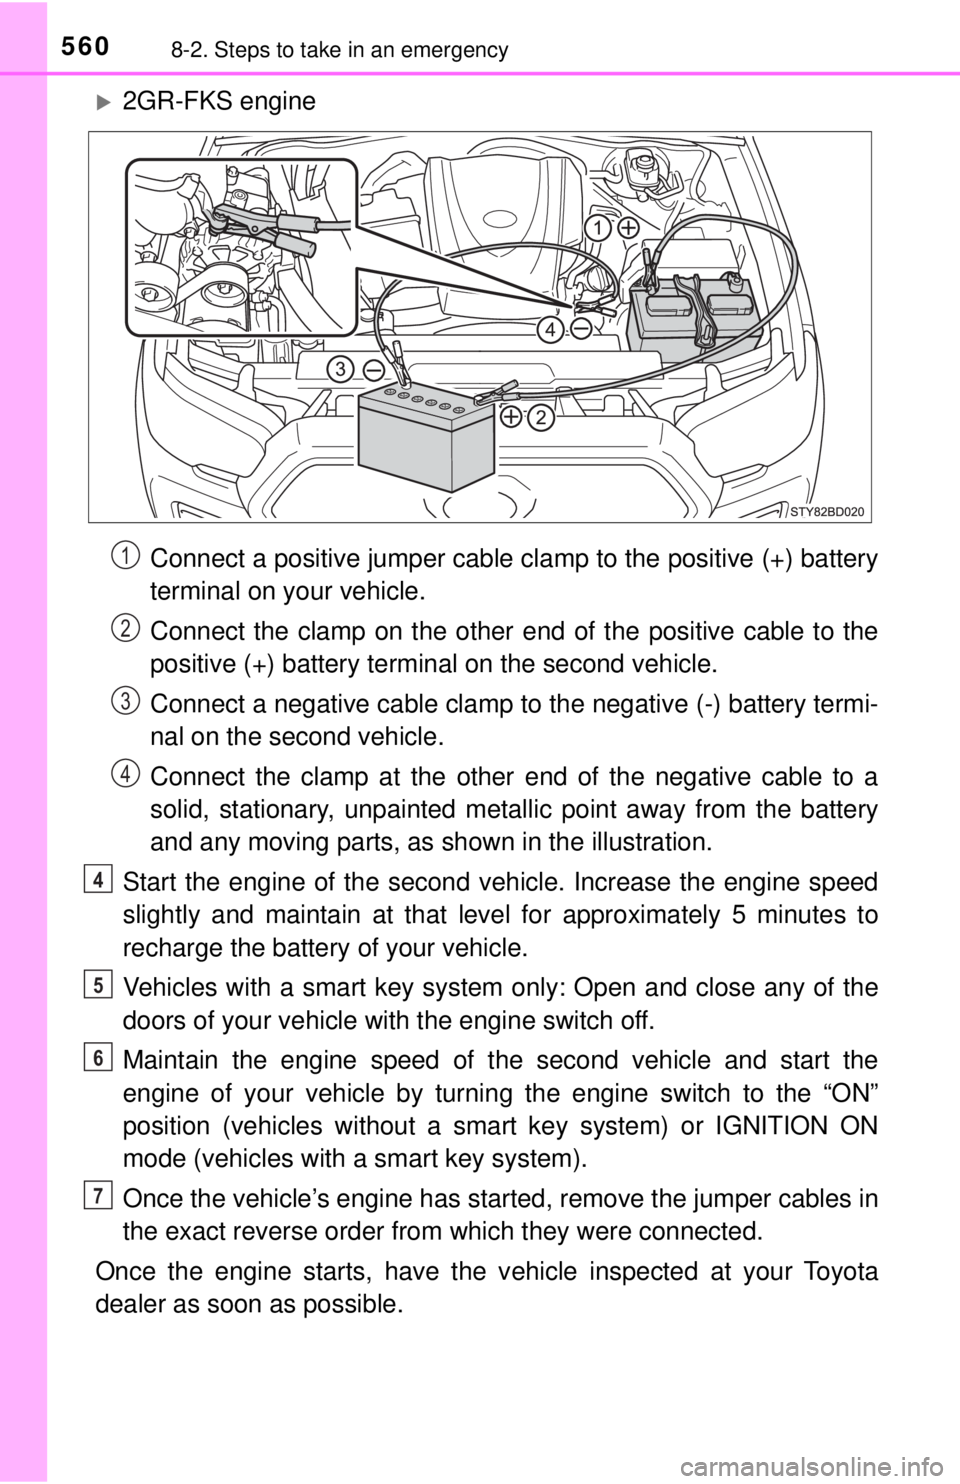
2GR-FKS engineConnect a positive jumper cable clamp to the positive (+) battery
terminal on your vehicle.
Connect the clamp on the other e nd of the positive cable to the
positive (+) battery terminal on the second vehicle.
Connect a negative cable clamp to the negative (-) battery termi-
nal on the second vehicle.
Connect the clamp at the other end of the negative cable to a
solid, stationary, unpainted metallic point away from the battery
and any moving parts, as shown in the illustration.
Start the engine of the second v ehicle. Increase the engine speed
slightly and maintain at that level for approximately 5 minutes to
recharge the batter y of your vehicle.
Vehicles with a smart key system only: Open and close any of the
doors of your vehicle with the engine switch off.
Maintain the engine speed of t he second vehicle and start the
engine of your vehicle by turni ng the engine switch to the “ON”
position (vehicles without a smart key system) or IGNITION ON
mode (vehicles with a smart key system).
Once the vehicle’s engine has star ted, remove the jumper cables in
the exact reverse order from which they were connected.
Once the engine starts, have the v ehicle inspected at your Toyota
dealer as soon as possible.
1
2
3
4
4
5
6
7