2017 TOYOTA TACOMA ignition
[x] Cancel search: ignitionPage 206 of 640
2064-3. Operating the lights and wipers
Headlight switch
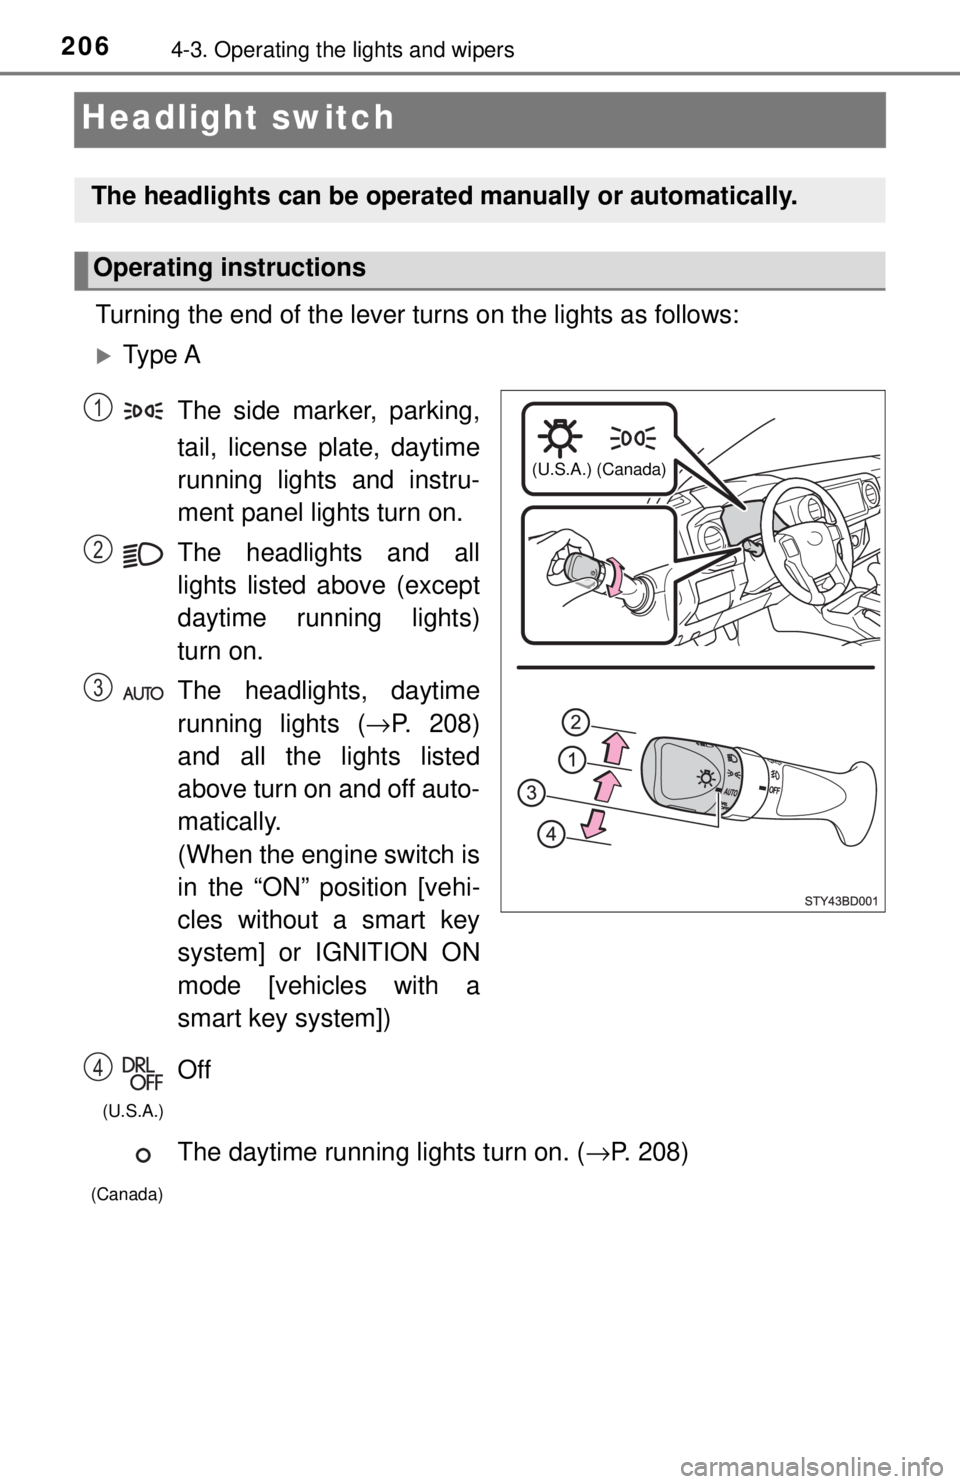
Turning the end of the lever turns on the lights as follows:
Ty p e AThe side marker, parking,
tail, license plate, daytime
running lights and instru-
ment panel lights turn on.
The headlights and all
lights listed above (except
daytime running lights)
turn on.
The headlights, daytime
running lights ( →P. 208)
and all the lights listed
above turn on and off auto-
matically.
(When the engine switch is
in the “ON” position [vehi-
cles without a smart key
system] or IGNITION ON
mode [vehicles with a
smart key system])
Off
The daytime running lights turn on. (→ P. 208)
The headlights can be operated manually or automatically.
Operating instructions
(U.S.A.) (Canada)
1
2
3
4
(U.S.A.)
(Canada)
Page 209 of 640

2094-3. Operating the lights and wipers
4
Driving
■Automatic light off system
When the light switch is in or : The lights turn off 30 seconds after the
engine switch is turned to the “LOCK” position (vehicles without a smart key
system) or off (vehicles with a smart key system) and a door is opened and all
of the doors are closed. (Vehicles with a wireless remote control function: The
lights turn off immediately if on the key is pressed while all the doors are
locked.)
When the light switch is in : The lights turn off after the engine switch is
turned to the “LOCK” position (vehicles without a smart key system) or off
(vehicles with a smart key system) and the driver’s door is opened.
To turn the lights on again, turn the engine switch to the “ON” position (vehi-
cles without a smart key system) or to IGNITION ON mode (vehicles with a
smart key system), or turn the light switch off, then turn it to or to .
If any of the doors is kept open and the engine switch is in the “LOCK” posi-
tion (vehicles without a smart key system) or off (vehicles with a smart key
system), the lights automatically turn off after 20 minutes.
■ Light reminder function (vehicles with a multi-information display)
An alarm will sound and message will be shown on the multi-information dis-
play when the driver 's door is opened with the lights are turned on and the
engine switch off.
■ Customization
Settings (e.g. light sensor sensitivity) can be changed.
(Customizable features: →P. 595)
NOTICE
■To prevent battery discharge
Do not leave the lights on longer than necessary when the engine is not
running.
Page 213 of 640
2134-3. Operating the lights and wipers
4
Driving
■The windshield wipers and washer can be operated when
Vehicles without a smart key system
The engine switch is in the “ON” position.
Vehicles with a smart key system
The engine switch is in IGNITION ON mode.
■If no windshield washer fluid sprays
Check that the washer nozzles are not blocked if there is washer fluid in the
windshield washer fluid reservoir.
WARNING
■Caution regarding the use of washer fluid
When it is cold, do not use the washer fluid until the windshield becomes
warm. The fluid may freeze on the windshield and cause low visibility. This
may lead to an accident, resulting in death or serious injury.
NOTICE
■When the windshield is dry
Do not use the wipers, as they may damage the windshield.
■ When the washer fluid tank is empty
Do not operate the switch continually as the washer fluid pump may over-
heat.
■ When a nozzle becomes blocked
In this case, contact your Toyota dealer.
Do not try to clear it with a pin or other object. The nozzle will be damaged.
Page 215 of 640
2154-4. Refueling
4
Driving
WARNING
■When refueling the vehicle
Observe the following precautions while refueling the vehicle.
Failure to do so may result in death or serious injury.
● After exiting the vehicle and before opening the fuel door, touch an
unpainted metal surface to discharge any static electricity. It is important to
discharge static electricity before refueling, because sparks resulting from
static electricity can cause fuel vapors to ignite while refueling.
● Always hold the grips on the fuel tank cap and turn it slowly to remove it.
A whooshing sound may be heard when the fuel tank cap is loosened.
Wait until the sound cannot be heard before fully removing the cap. In hot
weather, pressurized fuel may spray out the filler neck and cause injury.
● Do not allow anyone that has not discharged static electricity from their
body to come close to an open fuel tank.
● Do not inhale vaporized fuel.
Fuel contains substances that are harmful if inhaled.
● Do not smoke while refueling the vehicle.
Doing so may cause the fuel to ignite and cause a fire.
● Do not return to the vehicle or touch any person or object that is statically
charged.
This may cause static electricity to build up, resulting in a possible ignition
hazard.
■ When refueling
Observe the following precautions to prevent fuel overflowing from the fuel
tank:
● Securely insert the fuel nozzle into the fuel filler neck.
● Stop filling the tank after the fuel nozzle automatically clicks off.
● Do not top off the fuel tank.
NOTICE
■Refueling
Do not spill fuel during refueling.
Doing so may damage the vehicle, such as causing the emission control
system to operate abnormally, or dam aging fuel system components or the
vehicle’s painted surface.
Page 226 of 640

2264-5. Using the driving support systems
■The intuitive parking assist can be operated when
Vehicles without a smart key system
The engine switch is in the “ON” position and the shift lever is i\
n R.
Vehicles with a smart key system
The engine switch is in IGNITION ON mode and the shift lever is in R.
■ Sensor detection information
●The sensor’s detection areas are limited to the areas around the vehicle’s
rear bumper.
● Certain vehicle conditions and the surrounding environment may affect the
ability of the sensor to correctly detect obstacles. Particular instances where
this may occur are listed below.
• There is dirt, snow or ice on the sensor. (Wiping the sensors will resolve
this problem.)
• The sensor is frozen. (Thawing the area will resolve this problem.)
• The sensor is covered in any way.
• The vehicle is leaning considerably to one side.
• On an extremely bumpy road, on an incline, on gravel, or on grass.
• The vicinity of the vehicle is noisy due to vehicle horns, motorcycle engines, air brakes of large vehicles, or other loud noises producing ultra-
sonic waves.
• There is another vehicle equipped with parking assist sensors in the vicinity.
• The sensor is coated with a sheet of spray or heavy rain.
• The vehicle is equipped with a fender pole or radio antenna.
• The bumper or sensor receives a strong impact.
• The vehicle is approaching a tall or curved curb.
• In harsh sunlight or intense cold weather.
• The area directly under the bumpers is not detected.
• If obstacles draw too close to the sensor.
• A non-genuine Toyota suspension (lowered suspension, etc.) is installed.
• People may not be detected if they are wearing certain types of clothing.
In addition to the examples above, there are instances in which, because of
their shape, signs and other objects may be judged by the sensor to be closer
than they are.
Page 229 of 640
2294-5. Using the driving support systems
4
Driving
Rear view monitor system
Vehicles with Entune Audio Plus or Entune Premium Audio
(Audio system types: →P. 284)
Refer to the “NAVIGATION AND MULTIMEDIA SYSTEM
OWNER’S MANUAL”.
Vehicles with Entune Au dio (Audio system types: →P. 284)
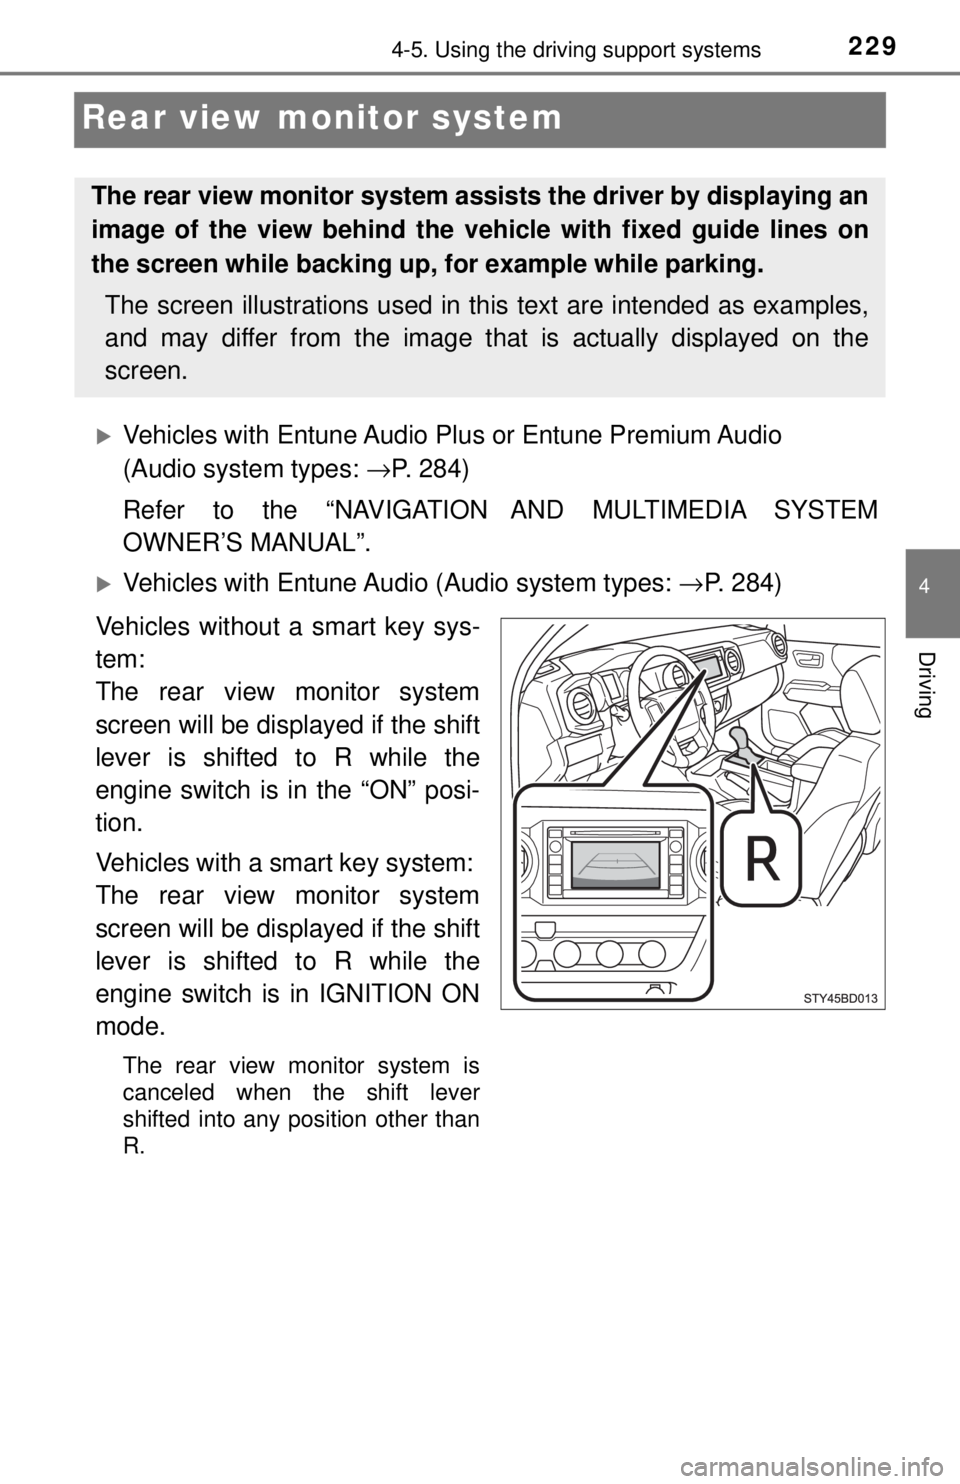
Vehicles without a smart key sys-
tem:
The rear view monitor system
screen will be displayed if the shift
lever is shifted to R while the
engine switch is in the “ON” posi-
tion.
Vehicles with a smart key system:
The rear view monitor system
screen will be displayed if the shift
lever is shifted to R while the
engine switch is in IGNITION ON
mode.
The rear view monitor system is
canceled when the shift lever
shifted into any position other than
R.
The rear view monitor system assists the driver by displaying an
image of the view behind the veh icle with fixed guide lines on
the screen while backing up, for example while parking.
The screen illustrations used in this text are intended as examples,
and may differ from the image that is actually displayed on the
screen.
Page 254 of 640

2544-5. Using the driving support systems
Manual transmission
4WD models: Before using the rear differential lock system.
Stop the vehicle or reduce your speed to less than 2 mph (3 km/h).
Depress the clutch pedal and turn the front-wheel drive control
switch in the “4L” position to see if this is sufficient. If this has no
effect, additionally use the rear differential lock system.
Be sure to stop the wheels.
Depress the clutch pedal.
Press the rear differential lock switch.
After the rear differential is locked, the indicator will come on.
Slowly release the clutch pedal.
Unlock the rear differential as soon as the vehicle moves.
To unlock the rear differential, press the switch again.
■ Locking the rear differential
●When the rear differential is locked, VSC is automatically turned off.
(The rear differential lock and VSC off indicators come on.)
● The following systems do not operate when the rear differential is locked. It
is normal operation for the ABS warning light and VSC off indicator to be on
at this time.
•ABS
• Multi Terrain ABS (if equipped)
• Brake assist system
•VSC
•TRAC
• Hill-start assist control (if equipped on 4WD models)
■ The rear differential lock is disengaged when
●Vehicles without a smart key system: When the engine switch is turned to
the “LOCK” position
● Vehicles with a smart key system: When the engine switch is turned off
● 4WD models only: Turn the front-wheel drive control switch to “2WD” or “4H”
position.
Never forget to turn off the switch after using this feature.
■ After unlocking the rear differential
Vehicles without a smart key system
To check that the indicator goes off, turn the engine switch to the “ON” posi-
tion, but do not start the engine.
Vehicles with a smart key system
To check that the indicator goes off, turn the engine switch to IGNITION ON
mode, but do not start the engine.
1
2
3
4
5
Page 328 of 640
3285-7. Connecting Bluetooth®
Connecting a Bluetooth® device
Press the “SETUP” button.
Select “Bluetooth
*”.
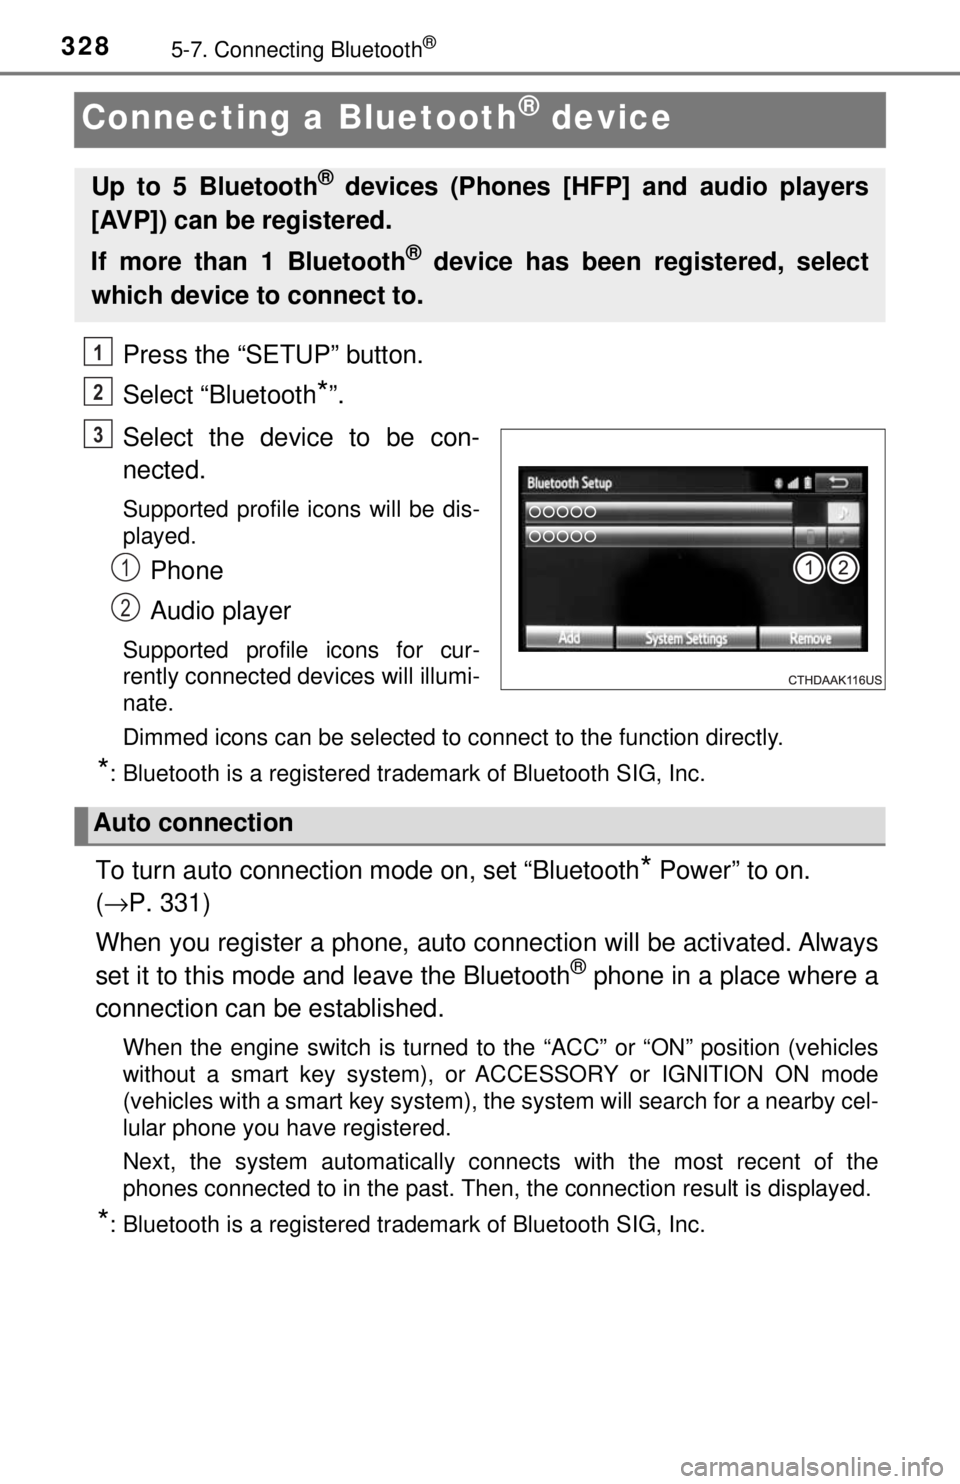
Select the device to be con-
nected.
Supported profile icons will be dis-
played.
Phone
Audio player
Supported profile icons for cur-
rently connected devices will illumi-
nate.
Dimmed icons can be selected to connect to the function directly.
*: Bluetooth is a registered trademark of Bluetooth SIG, Inc.
To turn auto connection mode on, set “Bluetooth* Power” to on.
( → P. 331)
When you register a phone, auto connection will be activated. Always
set it to this mode and leave the Bluetooth
® phone in a place where a
connection can be established.
When the engine switch is turned to the “ACC” or “ON” position (vehicles
without a smart key system), or ACCESSORY or IGNITION ON mode
(vehicles with a smart key system), the system will search for a nearby cel-
lular phone you have registered.
Next, the system automatically connects with the most recent of the
phones connected to in the past. Then, the connection result is displayed.
*: Bluetooth is a registered trademark of Bluetooth SIG, Inc.
Up to 5 Bluetooth® devices (Phones [HFP] and audio players
[AVP]) can be registered.
If more than 1 Bluetooth
® device has been registered, select
which device to connect to.
1
2
3
1
2
Auto connection