Page 234 of 672
234
SIENNA_OM_OM08007U_(U)
4-2. Driving procedures
*1: Shifting to the D position allows the system to select a gear suitable forthe driving conditions. Setting the shift lever to the D position is recom-
mended for normal driving.
*2: Selecting shift ranges using S mode restricts the upper limit of the possi-ble gear ranges, controls engine braking forces, and prevents unneces-
sary upshifting.
Use when high levels of response and feeling are desirable, such as
when driving in mountainous regions or when overtaking.
Vehicles with monochrome display
Press the “DISP” switch to display
the “ECT PWR” and press and
hold the “DISP” switch.
When power mode is on, the “ECT
PWR” indicator will come on.
Shift position purpose
Shift positionFunction
PParking the vehicle/starting the engine
RReversing
NNeutral
DNormal driving*1
SS mode driving*2 ( P. 236)
Selecting power mode
Page 236 of 672
236
SIENNA_OM_OM08007U_(U)
4-2. Driving procedures
To enter S mode, shift the shift lever to the S position. The shift ranges
can be selected by operating the shift lever. Changing the shift range
allows restriction of upper limit of the gears to be used, preventing
unnecessary upshifting and enabling the level of engine braking force
to be selected.
Upshifting
Downshifting
■Shift ranges and their functions
A lower shift range will provide grea ter engine braking forces than a
higher shift range.
Changing shift ranges in S mode
1
2
Meter displayFunction
S2 - S8
A gear in the range between 1 and the selected
gear is automatically chosen depending on vehi-
cle speed and driving conditions
S1Setting the gear at 1
Page 237 of 672

SIENNA_OM_OM08007U_(U)
2374-2. Driving procedures
4
Driving
■S mode
●When the shift range is 7 or lower, holding the shift lever toward “+” sets the
shift range to 8.
● To prevent excessive engine speed, a function was adopted that automati-
cally selects a higher shift range before the engine speed becomes too high.
● To protect the automatic transaxle, a function is adopted that automatically
selects a higher shift range when the fluid temperature is high.
■ Downshift restriction wa rning buzzer (S mode)
To help ensure safety and driving performance, downshifting operation may
sometimes be restricted. In some circumstances, downshifting may not be
possible even when the shift lever is operated. (A buzzer will sound twice.)
■ Deactivation of power mode
Power mode will be canceled if the engine is turned off after driving in power
mode.
■ When driving with the cr uise control or dynamic radar cruise control
activated (if equipped)
Even when performing the following actions with the intent of enabling engine
braking, engine braking will not activate because cruise control or dynamic
radar cruise control will not be canceled.
● While driving in S mode, downshifting to 7, 6, 5 or 4. ( P. 236)
● When switching the driving mode to power mode while driving in D.
(P. 234)
■ Shift lock system
The shift lock system is a system to prevent accidental operation of the shift
lever in starting.
The shift lever can be shifted from P only when the engine switch is in the
“ON” position (vehicles without a smart key system) or IGNITION ON mode
(vehicles with a smart key system) and the brake pedal is being depressed.
Page 238 of 672

238
SIENNA_OM_OM08007U_(U)
4-2. Driving procedures
■If the shift lever cannot be shifted from P
●First, check whether the brake pedal is being depressed.
If the shift lever cannot be shifted with your foot on the brake pedal, there
may be a problem with the shift lock system. Have the vehicle inspected by
your Toyota dealer immediately.
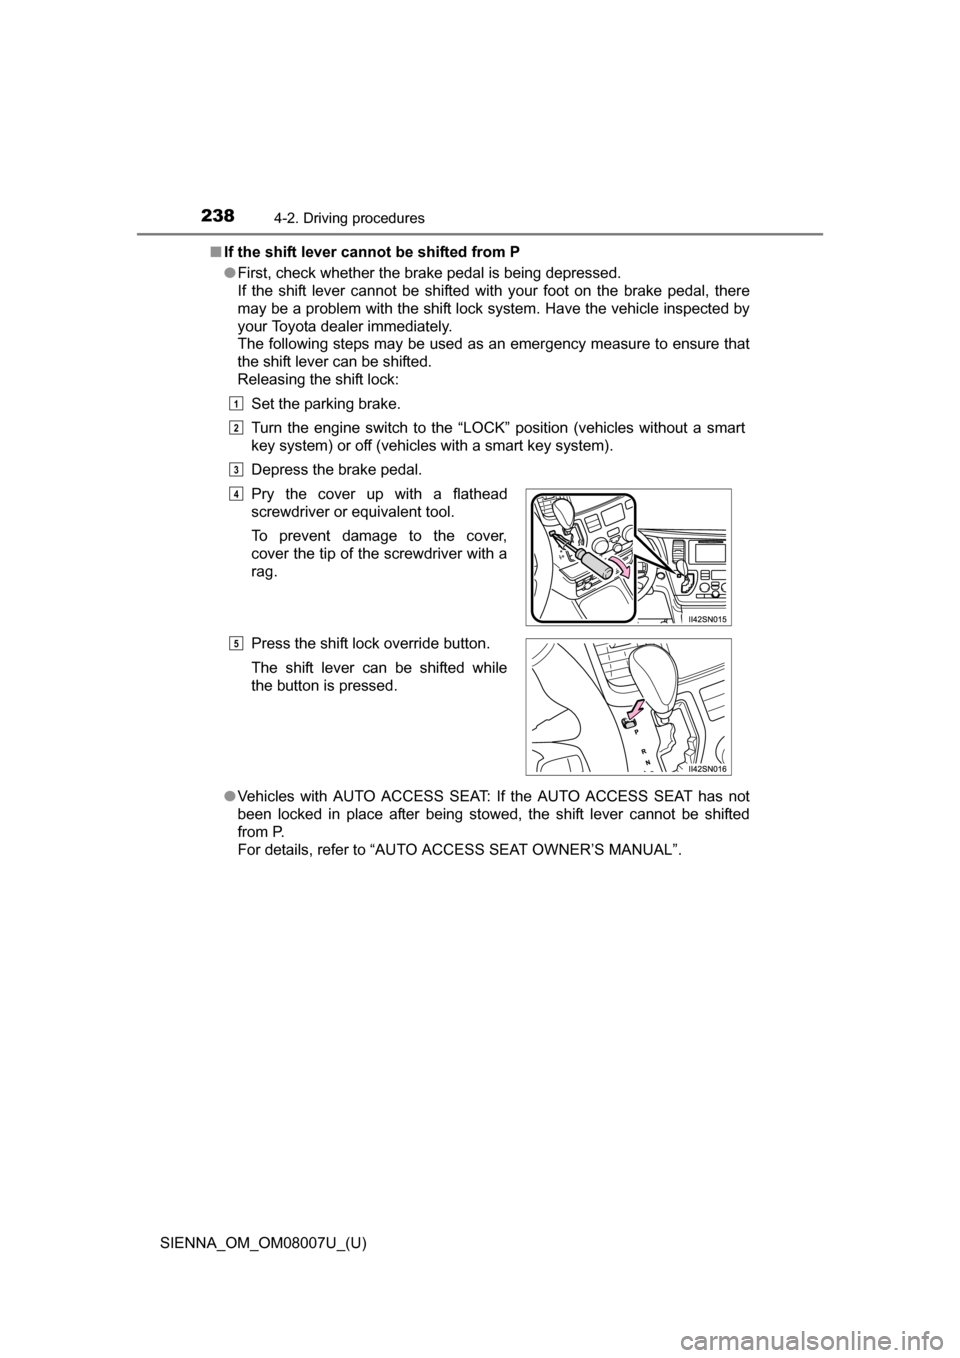
The following steps may be used as an emergency measure to ensure that
the shift lever can be shifted.
Releasing the shift lock:
Set the parking brake.
Turn the engine switch to the “LOCK” position (vehicles without a smart
key system) or off (vehicles with a smart key system).
Depress the brake pedal.
● Vehicles with AUTO ACCESS SEAT: If the AUTO ACCESS SEAT has not
been locked in place after being stowed, the shift lever cannot be shifted
from P.
For details, refer to “AUTO A CCESS SEAT OWNER’S MANUAL”.
Pry the cover up with a flathead
screwdriver or equivalent tool.
To prevent damage to the cover,
cover the tip of the screwdriver with a
rag.
Press the shift lock override button.
The shift lever can be shifted while
the button is pressed.
1
2
3
4
5
Page 239 of 672

SIENNA_OM_OM08007U_(U)
2394-2. Driving procedures
4
Driving
■If the beep sounds continuously when the shift lever is shifted from P
(vehicles with an AUTO ACCESS SEAT)
The AUTO ACCESS SEAT may not be locked in place.
For details, refer to “AUTO ACCESS SEAT OWNER’S MANUAL”.
■ If “S” does not come on even afte r shifting the shift lever to S
This may indicate a malfunction in the automatic transaxle system. Have the
vehicle inspected by your Toyota dealer immediately. (In this situation, the
transaxle will operate in the same manner as when the shift lever is in D.)
■ AI-SHIFT
AI-SHIFT automatically selects the suitable gear according to driver perfor-
mance and driving conditions.
AI-SHIFT automatically operates when the shift lever is in the D position.
(Shifting the shift lever to the S position cancels the function.)
WARNING
■When driving on slippery road surfaces
Do not accelerate or shift gears suddenly.
Sudden changes in engine braking may cause the vehicle to spin or skid,
resulting in an accident.
■ To prevent an accident when releasing the shift lock
Before pressing the shift lock override button, make sure to set the parking
brake and depress the brake pedal.
If the accelerator pedal is accidentally depressed instead of the brake pedal
when the shift lock override button is pressed and the shift lever is shifted
out of P, the vehicle may suddenly start, possibly leading to an accident
resulting in death or serious injury.
Page 240 of 672
240
SIENNA_OM_OM08007U_(U)
4-2. Driving procedures
Turn signal lever
Right turn
Left turn
Lane change to the right (move
the lever partway and release
it)
The right hand signals will flash 3
times.
Lane change to the left (move
the lever partway and release
it)
The left hand signals will flash 3
times.
■Turn signals can be operated when
The engine switch is in the “ON” position (vehicles without a smart key sys-
tem) or IGNITION ON mode (vehicles with a smart key system).
■ If the indicator flashes faster than usual
Check that a light bulb in the front or rear turn signal lights has not burned
out.
■ If the turn signals stop flashing before a lane change has been per-
formed
Operate the lever again.
■ To discontinue flashing of the turn signals during a lane change
Operate the lever in the opposite direction.
Operating instructions
1
2
3
4
Page 242 of 672
242
SIENNA_OM_OM08007U_(U)
4-3. Operating the lights and wipers
Headlight switch
Turning the end of the lever turns on the lights as follows:
The illustration is intended as an example.
The headlights can be operate d manually or automatically.
Operating instructions
U.S.A.Canada
The headlights, side marker, parking lights, daytime running
lights (if equipped) (P. 245) and so on turn on and off
automatically (when the engine switch is in the “ON” posi-
tion [vehicles without a smart key system] or IGNITION ON
mode [vehicles with a smart key system]).
The side marker, parking, ta il, license plate, daytime run-
ning lights (if equipped) ( P. 245) and instrument panel
lights turn on.
The headlights and all lights listed above (except daytime
running lights) turn on.
1
2
3
Page 245 of 672

SIENNA_OM_OM08007U_(U)
2454-3. Operating the lights and wipers
4
Driving
■Daytime running light system (if equipped)
●Bulb type: To make your vehicle more visible to other drivers during daytime
driving, the daytime running lights turn on automatically whenever the
engine is started and the parking brake is released with the headlight switch
off or in the “AUTO” position. (illuminate dimmer than the headlights) Day-
time running lights are not designed for use at night.
For the U.S.A.: Daytime running lights can be turned off by operating the
headlight switch.
LED type: To make your vehicle more visible to other drivers during daytime
driving, the daytime running lights turn on automatically whenever the
engine is started and the parking brake is released with the headlight
switch off. Daytime running lights are not designed for use at night.
For the U.S.A.: Daytime running lights can be turned off by operating the
headlight switch.
● Compared to turning on the headlights, the daytime running light system
offers greater durability and consumes less electricity, so it can help improve
fuel economy.
■ Headlight control sensor
The sensor may not function properly if an
object is placed on the sensor, or anything
that blocks the sensor is affixed to the
windshield.
Doing so interferes with the sensor
detecting the level of ambient light and
may cause the automatic headlight sys-
tem to malfunction.