Page 202 of 392
202
2. TOYOTA PARKING ASSIST MONITOR
HIGHLANDER_Navi_U
1Press the “APPS” button.
2Select “Setup” .
3Select “Vehicle” .
4Select “Back Camera Guide Line
Setting”.
5Select the display mode.
SWITCHING THE DISPLAY
MODE
When the shift lever is in any position
other than the “R” position, the display
mode can be changed in the following
procedure.No.NameDetail
Estimated
course line dis-
play mode203
Parking assist
guide line dis-
play mode
205
Distance guide
line display
modeDistance guide
lines only are
displayed.
Page 203 of 392

203
2. TOYOTA PARKING ASSIST MONITOR
HIGHLANDER_Navi_U
PERIPHERAL MONITORING SYSTEM
6
2. ESTIMATED COURSE LINE DISPLAY MODE
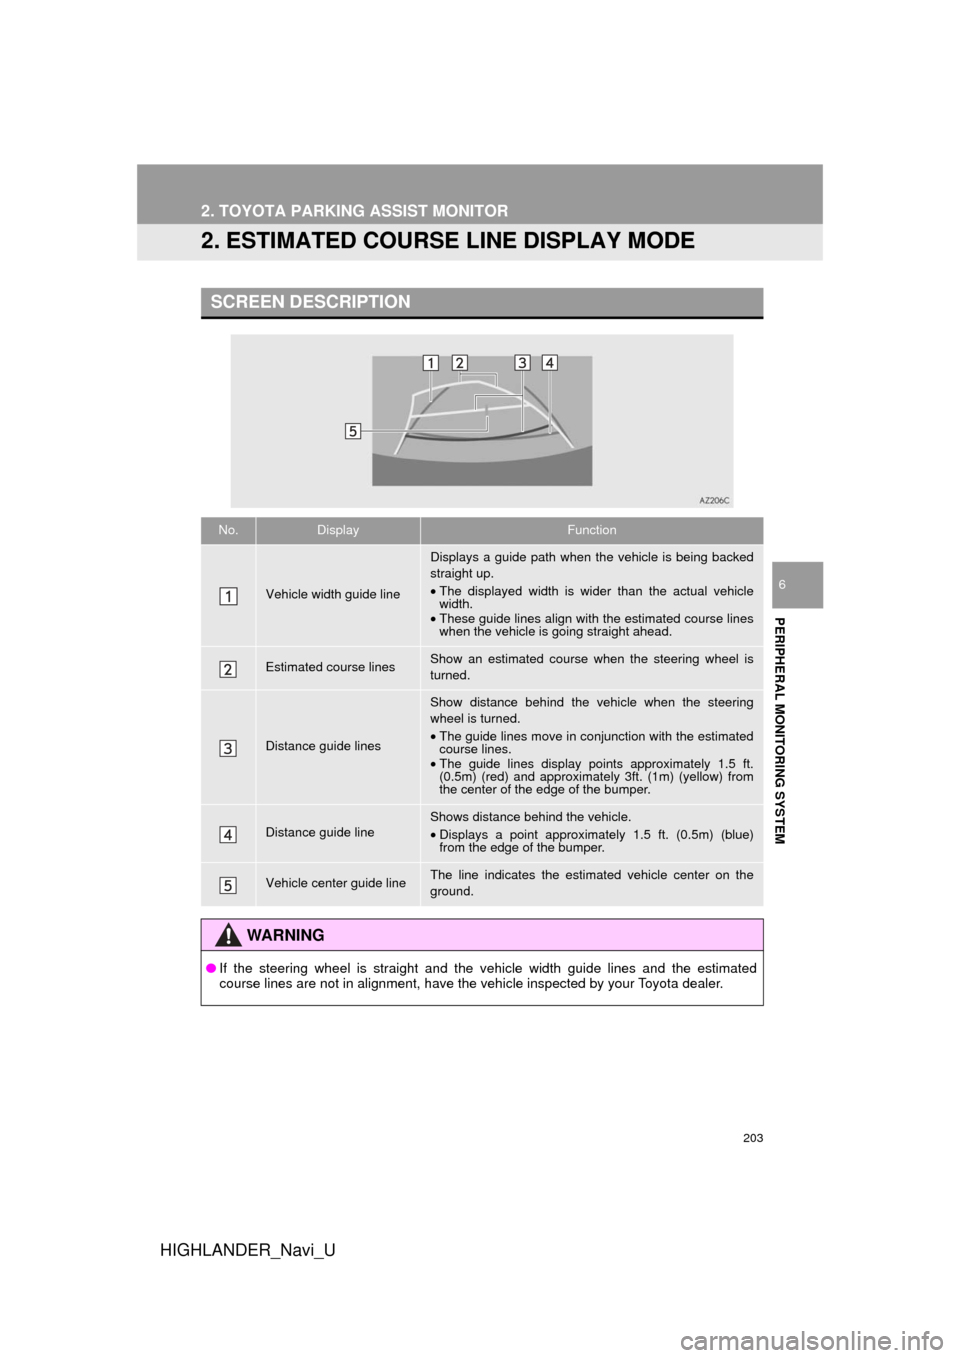
SCREEN DESCRIPTION
No.DisplayFunction
Vehicle width guide line
Displays a guide path when the vehicle is being backed
straight up.
• The displayed width is wider than the actual vehicle
width.
• These guide lines align with the estimated course lines
when the vehicle is going straight ahead.
Estimated course linesShow an estimated course when the steering wheel is
turned.
Distance guide lines
Show distance behind the vehicle when the steering
wheel is turned.
•The guide lines move in conjunction with the estimated
course lines.
• The guide lines display points approximately 1.5 ft.
(0.5m) (red) and approximately 3ft. (1m) (yellow) from
the center of the edge of the bumper.
Distance guide lineShows distance behind the vehicle.
•Displays a point approximately 1.5 ft. (0.5m) (blue)
from the edge of the bumper.
Vehicle center guide lineThe line indicates the estimated vehicle center on the
ground.
WA R N I N G
● If the steering wheel is straight and the vehicle width guide lines and the estimated
course lines are not in alignment, have the vehicle inspected by your Toyota dealer.
Page 205 of 392
205
2. TOYOTA PARKING ASSIST MONITOR
HIGHLANDER_Navi_U
PERIPHERAL MONITORING SYSTEM
6
3. PARKING ASSIST GUIDE LINE DISPLAY MODE
SCREEN DESCRIPTION
No.DisplayFunction
Vehicle width guide line
Displays a guide path when the vehicle is being backed
straight up.
• The displayed width is wider than the actual vehicle
width.
Parking assist guide lines
Show the path of the smallest turn possible behind the ve-
hicle.
• Show the approximate position of the steering wheel
when parking.
Distance guide linesShow distance behind the vehicle.
•Display points approximately 1.5 ft. (0.5m) (red) from
the edge of the bumper.
Vehicle center guide lineThe line indicates the estimated vehicle center on the
ground.
Page 207 of 392
207
2. TOYOTA PARKING ASSIST MONITOR
HIGHLANDER_Navi_U
PERIPHERAL MONITORING SYSTEM
6
4. TOYOTA PARKING ASSIST MONITOR PRECAUTIONS
The image adjustment procedure for the
parking assist monitor screen is the same
as the procedure for adjusting the naviga-
tion screen. ( →P. 4 1 )
AREA DISPLAYED ON
SCREEN
The parking assist monitor displays an
image of the view from the bumper of
the rear area of the vehicle.
Screen Displayed area
Corners of bumper
INFORMATION
●The area displayed on the screen may
vary according to vehicle orientation
conditions.
● Objects which are close to either corner
of the bumper or under the bumper can-
not be displayed.
● The camera uses a special lens. The
distance of the image that appears on
the screen differs from the actual dis-
tance.
● Items which are located higher than the
camera may not be displayed on the
monitor.
Page 212 of 392

212
2. TOYOTA PARKING ASSIST MONITOR
HIGHLANDER_Navi_U
5. THINGS YOU SHOULD KNOW
If you notice any of the following symptoms, refer to the likely cause and the
solution, and re-check.
If the symptom is not resolved by the solution, have the vehicle inspected by
your Toyota dealer.
IF YOU NOTICE ANY SYMPTOMS
SymptomLikely causeSolution
The image is difficult to see
•The vehicle is in a dark area
• The temperature around the
lens is either high or low
• The outside temperature is
low
• There are water droplets on
the camera
• It is raining or humid
• Foreign matter (mud etc.) is
adhering to the camera
• Sunlight or headlights are
shining directly into the cam-
era
• The vehicle is under fluores-
cent lights, sodium lights,
mercury lights etc.
Back up while visually check-
ing the vehicle’s surroundings.
(Use the monitor again once
conditions have been im-
proved.)
The procedure for adjusting
the picture quality of the park-
ing assist monitor is the same
as the procedure for adjusting
the navigation screen. ( →P.41)
The image is blurry
Dirt or foreign matter (such as
water droplets, snow, mud
etc.) is adhering to the camera.Flush the camera with a large
quantity of water and wipe the
camera lens clean with a soft
and wet cloth.
The image is out of
alignmentThe camera or surrounding
area has received a strong im-
pact.Have the vehicle inspected by
your Toyota dealer.
The guide lines are very far
out of alignment
The camera position is out of
alignment.Have the vehicle inspected by
your Toyota dealer.
•The vehicle is tilted. (There
is a heavy load on the vehi-
cle, tire pressure is low due
to a tire puncture, etc.)
• The vehicle is used on an
incline.If this happens due to these
causes, it does not indicate a
malfunction. Back up while vi-
sually checking the vehicle’s
surroundings.
The estimated course lines
move even though the
steering wheel is straightThere is a malfunction in the
signals being output by the
steering sensor.Have the vehicle inspected by
your Toyota dealer.
Guide lines are not
displayedThe back door is open.
Close the back door.
If this does not resolve the
symptom, have the vehicle in-
spected by your Toyota dealer.
Page 213 of 392
213
2. TOYOTA PARKING ASSIST MONITOR
HIGHLANDER_Navi_U
PERIPHERAL MONITORING SYSTEM
6
The estimated course lines
are not displayed
•The steering wheel has been
moved while the 12-volt bat-
tery was being reinstalled.
• 12-volt battery power is low.
• The steering sensor has
been reinstalled.
• There is a malfunction in the
signals being output by the
steering sensor.Stop the vehicle, and turn the
steering wheel as far as it will
go to the left and right.
If this does not resolve the
symptom, have the vehicle in-
spected by your Toyota dealer.
SymptomLikely causeSolution
Page 214 of 392

214
HIGHLANDER_Navi_U
3. PANORAMIC VIEW MONITOR
1. PANORAMIC VIEW MONITOR*
Panoramic view monitor assists the
driver in viewing the surroundings,
when operating at low speeds, by com-
bining the front, side and rear cameras
and displaying a complete vehicle
overhead image on the screen.
Vehicles without a smart key system
When you press the camera switch or
shift the shift lever to the “R” position
while the engine switch is in “ON” posi-
tion, the panoramic view monitor
operates.
Vehicles with a smart key system
When you press the camera switch or
shift the shift lever to the “R” position
while the engine switch is in
IGNITION ON mode, the pan-
oramic view monitor operates.
The monitor displays various views of
the position and surroundings of the
vehicle.
INFORMATION
● The screen illustrations used in this text
are intended as examples, and may dif-
fer from the image that is actually dis-
played on the screen.
DRIVING PRECAUTIONS
The panoramic view monitor is a sup-
plemental device intended to assist the
driver when checking around the vehi-
cle. When using, be sure to visually
check all around the vehicle both di-
rectly and using the mirrors before pro-
ceeding. If you do not, you may hit
another vehicle or possibly cause an
accident.
Pay attention to the following precau-
tions when using the panoramic view
monitor.
WA R N I N G
●Never depend on the panoramic view
monitor entirely. The image and the
position of the guide lines displayed on
the screen may differ from the actual
state. Use caution just as you would
when driving any other vehicle.
● Always make sure to check all around
the vehicle with your own eyes when
driving.
● Never drive while looking only at the
screen as the image on the screen is dif-
ferent from actual conditions. If you are
driving while looking only at the screen,
you may hit a person or an object,
resulting in an accident. When driving,
be sure to check the vehicle’s surround-
ings with your own eyes and the vehi-
cle’s mirrors.
*: If equipped
Page 215 of 392

215
3. PANORAMIC VIEW MONITOR
HIGHLANDER_Navi_U
PERIPHERAL MONITORING SYSTEM
6
WA R N I N G
●Depending on the circumstances of the
vehicle (number of passengers, amount
of luggage, etc.), the position of the
guide lines displayed on the screen may
change. Be sure to check visually
around the vehicle before proceeding.
● Do not use the panoramic view monitor
system in the following cases:
• On icy or slick road surfaces, or in
snow
• When using tire chains or emergency
tires
• When the back door is not closed com- pletely
• On roads that are not flat or straight, such as curves or slopes
● In low temperatures, the screen may
darken or the image may become faint.
The image could distort when the vehi-
cle is moving, or you may become
unable to see the image on the screen.
Be sure to visually check all around the
vehicle both directly and using the mir-
rors before proceeding.
● If the tire sizes are changed, the position
of the guide lines displayed on the
screen may change.
● The camera uses a special lens. The
distances between objects and pedestri-
ans that appear in the image displayed
on the screen will differ from the actual
distances. ( →P.241)
NOTICE
● In panoramic view/moving view/see-
through view, the system combines
images taken from the front, back, left
and right side cameras into a single
image. There are limits to the range and
content that can be displayed. Familiar-
ize yourself with the characteristics of
the panoramic view monitor system
before using it.
● Image clarity may decline at the four cor-
ners of the panoramic view/moving view/
see-through view. However, this is not a
malfunction, as these are the regions
along the border of each camera image
where the images are combined.
● Depending on lighting conditions near
each of the cameras, bright and dark
patches may appear on the panoramic
view/moving view/see-through view.
● The panoramic view/moving view/see-
through view display does not extend
higher than the installation position and
image capture range of each camera.