Page 105 of 201
 is provided on the front of the vehicle for use in emergency situa- tions and train shipping purpose")
5-9
OTHER CONTROLS AND EQUIPMENT
76MH1-74E
76MH1-74E
Frame Hooks
Front
76MH0A077
The frame hook (1) is provided on the front of the vehicle for use in emergency situa- tions and train shipping purposes only.
To tow your vehicle on the road or highway, follow the instruction of “Towing” in “EMER-GENCY SERVICE” section.
Rear
76MH0A078
The frame hook (2) is provided on the rearof the vehicle for use in emergency situa-tions and train/sea shipping purposes only.
To tow your vehicle on the road or highway, follow the instruction of “Towing” in “EMER- GENCY SERVICE” section.
WA R N I N G
Do not use the frame hooks to tow another vehicle or to have your vehi- cle towed on the road or highway. The hook (1) is designed for use inemergency situations only, such as if your vehicle or another vehicle gets stuck in deep mud or snow.
(1)
NOTICE
When you use the frame hook (1),avoid the driving that gives signifi-cant physical shock on hook. Such operation can damage the hook, or the vehicle body.Do not accelerate suddenly.
(2)EXAMPLE
WA R N I N G
Do not use the frame hooks to towanother vehicle or to have your vehi-cle towed on the road or highway. The hook (2) is designed for use in emergency situations only, such as ifyour vehicle or another vehicle gets stuck in deep mud or snow.
NOTICE
When you use the frame hook (2), avoid the driving that gives signifi-cant physical shock on hook. Such operation can damage the hook, the vehicle body or the drive system.
• Do not accelerate suddenly. • Do not tow the vehicle heavier thanyour vehicle.
94
Page 106 of 201
5-10
OTHER CONTROLS AND EQUIPMENT
76MH1-74E
76MH1-74E
Manual Heating and Air
Conditioning System (if
equipped)
Air outlet
76MH0A080
1. Windshield defroster outlet 2. Side defroster outlet 3. Side outlet 4. Center outlet5. Front floor outlet
Side outlet
76MH0A118
When “Open”, air comes out regardless of the air flow selector position.
Center outlet
76MH0A081
Move the knob (1) vertically or horizontally to adjust the direction of airflow as desired.
Description of Controls
76MH0A082
Temperature selector (1)
This is used to select the temperature by turning the selector.
Blower speed selector (2) This is used to turn on the blower and to select blower speed by turning the selec-tor.
Air flow selector (3)
61MM0A019
This is used to select one of the functions described below.
Ventilation (a)
76MH0A083
Temperature-controlled air comes out of the center and side air outlets.
1 1
22
334
55
EXAMPLE
(1) (1)
0 1 2 3 4
(3) (4) (1)
(2)(5)
(a)
(b)
(e)
(d)
(c)
95
Page 107 of 201

76MH0A084
Temperature-controlled air comes out of the floor outlets and cooler air comes out of the center and side outlets. When the")
5-11
OTHER CONTROLS AND EQUIPMENT
76MH1-74E
76MH1-74E
Bi-level (b)
76MH0A084
Temperature-controlled air comes out of the floor outlets and cooler air comes out of the center and side outlets. When thetemperature selector (1) is in the fully COLD position or fully HOT position, how- ever, the air from the floor outlets and theair from the center and side outlets will be the same temperature.
Heat (c)
76MH0A085
Temperature-controlled air comes out of the floor outlets and the side outlets, also comes out of the windshield defroster out-lets and also comes slightly out of the side defroster outlets.
Heat & defrost (d)
76MH0A087
Temperature-controlled air comes out of the floor outlets, the windshield defroster outlets, the side defroster outlets and theside outlets.
Defrost (e)
76MH0A088
Temperature-controlled air comes out of the windshield defroster outlets, the side defroster outlets and the side outlets.
Air intake selector (4)
76MH0A089
This selector is used to select the following modes.
Fresh Air (f) When this mode is selected by moving the lever to right, outside air is used.
Recirculated Air (g) When this mode is selected by moving thelever to left, outside air is shut out and inside air is recirculat ed. This mode is suit- able when driving through dusty or pollutedair such as in a tunnel, or when attempting to quickly cool down the interior.
NOTE: If you select “RECIRCULATED AIR” for an extended period of time, the air in the vehi-cle can become contam inated. Therefore, you should occasionally select “FRESH AIR”.
(g) (f)
96
Page 108 of 201
 To turn on the air conditioning system, set the blower speed selector to a positionother than “OFF” and push in th")
5-12
OTHER CONTROLS AND EQUIPMENT
76MH1-74E
76MH1-74E
Air conditioning switch (5) To turn on the air conditioning system, set the blower speed selector to a positionother than “OFF” and push in the “A/C” switch. With this “A/C” switch operation, a indicator light will come on when the airconditioning system is on. To turn off the air conditioning system, push the “A/C” switch again.
During operation of the air conditioner, you may notice slight changes in enginespeed. These changes are normal, the system is designed so that the compressor turns on or off to maintain the desired tem-perature.
Less operation of the compressor results in better fuel economy.
System Operating Instructions
Natural ventilationSelect “VENTILATION” and “FRESH AIR”, the temperature selector to the desired temperature position, and the blowerspeed selector to “OFF”. Fresh air will flow through the vehicle during driving.
Forced ventilation The control settings are the same as for natural ventilation except you set theblower speed selector to a position other than “OFF”.
Normal heating (using outside air) Select “HEAT” and “FRESH AIR”, the tem- perature selector to the desired tempera-ture position and the blower speed selector
to the desired blower speed position. Set- ting the blower speed selector to a higher blower speed position increases heatingefficiency.
Quick heating (using recirculated air) The control settings are the same as for normal heating except you select “RECIR- CULATED AIR”. If you use this heatingmethod for an extended period of time, the air in the vehicle can become contami- nated and the windows can become misty.Therefore, use this method only for quick heating and change to the normal heating method as soon as possible.
Head cooled/Feet warmed heating Select “BI-LEVEL” and “FRESH AIR”, thetemperature selector to the desired tem- perature position, and the blower speed selector to the desired blower speed posi-tion. Unless the temperature selector is in the fully COLD position or fully HOT posi- tion, the air that comes out of the centerand side outlets will be cooler than the air that comes out of the floor outlets.
Normal cooling Set the air flow selector to “VENTILA- TION”, the temperatur e selector to the desired temperature position and the blower speed selector to the desired blower speed position, and turn on the “A/C” switch. Setting the blower speed selec- tor to a higher blower speed position increases cooling efficiency.
You can switch the air intake selector to either “FRESH AIR” or “RECIRCULATED AIR” as you desire. Choosing “RECIRCU-LATED AIR” increases cooling efficiency.
Quick cooling (using recirculated air) The control settings are the same as for normal cooling except you select “RECIR- CULATED AIR” and the highest blowerspeed.
NOTE: • To turn on the air conditioning system, push in the “A/C” switch and set the blower speed selector to a position otherthan “OFF”. With this “A/C” switch opera- tion, an indicator light will come on when the air conditioning system is on. To turnoff the air conditioning system, push the “A/C” switch again. • During operation of the air conditioner,you may notice slight changes in engine speed. These changes are normal, the system is designed so that the compres-sor turns on or of f to maintain the desired temperature. Less operation of the compressor result s in better fuel economy.
NOTE: • If you select “RECIRCULATED AIR” for an extended period of time, the air in the vehicle can become contaminated.Therefore, you should occasionally select “FRESH AIR”. • If your vehicle has been left in the sunwith the windows closed, it will cool
97
Page 109 of 201

5-13
OTHER CONTROLS AND EQUIPMENT
76MH1-74E
76MH1-74E
faster if you open the windows briefly while you operate the air conditioner with the air intake selector at “FRESH AIR”and the blower at high speed.
DehumidifyingSet the air flow selector to a desired air flow selector position, the temperature selector to the desired temperature position and theblower speed selector to the desired blower speed position. Also select “FRESH AIR” and turn on the “A/C” switch.
NOTE:Because the air conditioner dehumidifiesthe air, turning it on will help keep the win- dows clear, even when blowing heated air using the “DEFROST” or “HEAT &DEFROST” functions.
76MH0A090
NOTE:If you need maximum defrosting:• set the air flow selector to “DEFROST”,
• set the blower speed selector to HIGH, • adjust the temperature selector to the HOT end, • turn on the “A/C” switch, and• adjust the side outlets so the air blows on the side windows.
MaintenanceIf you do not use the air conditioner for a long period, such as during winter, it may not give the best performance when youstart using it again. To help maintain opti- mum performance and durability of your air conditioner, it needs to be run periodically.Operate the air conditioner at least once a month for one minute with the engine idling. This circulates the refrigerant and oiland helps protect the internal components.
NOTE: Your vehicle uses the air conditioning refrigerant HFC-134a, commonly called “R-134a”. R-134a replaced R-12 around1993 for automotive applications. Other refrigerants are available, including recy- cled R-12, but only R-134a should be usedin your vehicle.
Radio Antenna
68KN028
The radio antenna on the roof is remov-able. To remove the antenna, turn it coun-terclockwise. To reinstall the antenna, turn it clockwise firmly by hand.
EXAMPLE
NOTICE
Using the wrong refrigerant may damage your air conditioning sys- tem. Use R-134a only. Do not mix or replace the R-134a with other refrig-erants.
NOTICE
To avoid damage to the radio antenna: • Remove the antenna when using anautomatic car wash. • Remove the antenna when the antenna hits anything such as alow ceiling in a parking garage or putting a car cover over your vehi- cle.
EXAMPLE
98
Page 110 of 201
Safety Information
Notes on Discs
Precautions When the inside of the vehicle is very cold and the player is used soon")
5-14
OTHER CONTROLS AND EQUIPMENT
76MH1-74E
76MH1-74E
Audio System (if equipped)Safety Information
Notes on Discs
Precautions When the inside of the vehicle is very cold and the player is used soon afterswitching on the heater, condensation may form on the disc or the optical parts of the player and proper playback maynot be possible. If condensation forms
on the disc, wipe it off with a soft cloth. If condensation forms on the optical parts of the player, do not use the player forabout one hour. This will allow the con- densation to disappear normally. Driving on extremely bumpy roads whichcause severe vibrations may cause sound to skip. This unit uses a precision mechanism.Even in the event that trouble arises, never open the case, disassemble the unit, or lubricate the rotating parts.Please bring the unit to an authorized MARUTI SUZUKI dealer.
Cautions on Handling
This unit has been designed specifically for playback of compact discs bearing mark (A) shown above. No other discs can be played.
WA R N I N G
If you pay extended attention to oper- ating the audio system or viewing the audio system display while driving,an accident can occur. If you set the sound volume too loud, it could pre- vent you from being aware of roadand traffic conditions. • Keep your eyes on the road and your mind on the drive. Avoid pay-ing extended attention to operating the audio system or viewing the audio system display.• Familiarize yourself with the audio system controls and operation of the audio system before driving.• Preset your favorite radio stations before driving so that you can quickly tune to them using the pre-sets. • Set the sound volume to a level that will allow you to continue to beaware of road and traffic conditions while driving.
(A)
Removing the discProper way to hold
99
Page 111 of 201

5-15
OTHER CONTROLS AND EQUIPMENT
76MH1-74E
76MH1-74E
To remove the compact disc from its stor- age case, press down on the center of the case and lift the disc out, holding it care-fully by the edges.
Always handle the compact disc by the edges. Never touch the surface.
To remove fingermarks and dust, use a soft cloth, and wipe in a straight line fromthe center of the compact disc to the cir- cumference.
New discs may have some roughness around the edges. The unit may not work or the sound may skip if such discs areused. Use a ball-point pen (B), etc. to remove the roughness (C) from the edges of the disc before inserting it into the unit.
Never stick labels on the surface of the compact disc or write on the surface with apencil or pen.
Do not use any solvents such as commer- cially available cleaners, anti-static spray, or thinner to clean compact discs.
Do not use compact discs that have large scratches, are misshaped, or cracked, etc. Use of such discs will cause damage or prevent the system from operating prop-erly.
Do not expose compact discs to direct sun- light or any heat source.
NOTE: • Do not use commercially available CD protection sheets or discs equipped with stabilizers, etc.These may get caught in the internal mechanism and damage the disc. • It may be impossible to play CD-R discswith this unit due to the recording condi- tions. • CD-RW discs cannot be played with thisunit.(B) (B) (C)WA R N I N G
This is a class I laser product. Use of controls or adjustments or perfor-mance of procedures other than thosespecified herein may result in hazard- ous radiation exposure. Do not open covers and do notattempt to repair this unit by yourself.Refer servicing to qualified personnel.
100
Page 112 of 201

5-16
OTHER CONTROLS AND EQUIPMENT
76MH1-74E
76MH1-74E
The Bluetooth® word mark and logo are registered trademarks and are owned by the Bluetooth SIG, Ink.
Stop using this unit and a Bluetooth®
ready device whenever requested. This unit shares the communication fre-quency with other private or public wireless communication equipment such as a wire- less LAN and other wireless communica-tion radios. You should stop using this unit whenever you are notified that your unit disturbs other wireless communication immediately.
Bluetooth® Mic (1) (if equipped)
Basic Operations
(1) VOL PUSH POWER knob (2) TUNE FOLDER PUSH SOUND knob(3) MUTE button Turning power on/off Press the VOL PUSH POWER knob (1).The unit starts in th e function mode it was in when the power was turned off last.
Adjusting the volume Turn the VOL PUSH POWER knob (1). Turning it clockwise increases the volume;turning it counterclockwise decreases the volume.
NOTE: While driving, adjust the volume to an extent that sound and/or noise comingfrom outside the vehicle can be heard.
Mute Press the MUTE button (3) to mute the sound. To cancel the mute, press the MUTE button (3) again.
Adjusting bass/treble/balance /fader 1) Press the TUNE FOLDER PUSH SOUND knob (2).Each time the knob is pressed, sound adjustment will change as follows:
2) Turn the TUNE FOLDER PUSH SOUND knob (2) to adjust the sound.
Adjusting the AVC (Auto volume con- trol) The Auto Volume C ontrol (AVC) function automatically adjusts (increases/ decreases) the sound volume in accor- dance with vehicle speed. The AVC controlis provided with three selectable levels (LEVEL OFF, 1, 2, 3). The range of volume adjustment increases together with the LEVEL number. 1) Press the TUNE FOLDER PUSHSOUND knob (2) until the AVC adjust- ment mode is selected.
(1)
(1)(2)
(3)Preset-EQ (EQ OFF)
Bass adjustment (BASS 0)
Treble adjustment (TREBLE 0)
Balance adjustment (BALANCE 0)
Fader adjustment (FADER 0)
AVC adjustment (AVC LEVEL 2)
 1
1 2
2 3
3 4
4 5
5 6
6 7
7 8
8 9
9 10
10 11
11 12
12 13
13 14
14 15
15 16
16 17
17 18
18 19
19 20
20 21
21 22
22 23
23 24
24 25
25 26
26 27
27 28
28 29
29 30
30 31
31 32
32 33
33 34
34 35
35 36
36 37
37 38
38 39
39 40
40 41
41 42
42 43
43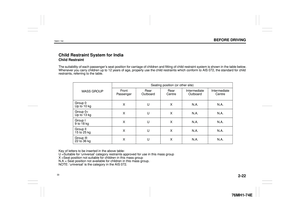 44
44 45
45 46
46 47
47 48
48 49
49 50
50 51
51 52
52 53
53 54
54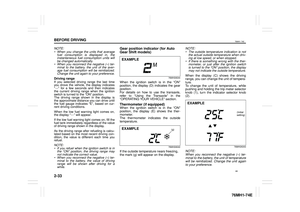 55
55 56
56 57
57 58
58 59
59 60
60 61
61 62
62 63
63 64
64 65
65 66
66 67
67 68
68 69
69 70
70 71
71 72
72 73
73 74
74 75
75 76
76 77
77 78
78 79
79 80
80 81
81 82
82 83
83 84
84 85
85 86
86 87
87 88
88 89
89 90
90 91
91 92
92 93
93 94
94 95
95 96
96 97
97 98
98 99
99 100
100 101
101 102
102 103
103 104
104 105
105 106
106 107
107 108
108 109
109 110
110 111
111 112
112 113
113 114
114 115
115 116
116 117
117 118
118 119
119 120
120 121
121 122
122 123
123 124
124 125
125 126
126 127
127 128
128 129
129 130
130 131
131 132
132 133
133 134
134 135
135 136
136 137
137 138
138 139
139 140
140 141
141 142
142 143
143 144
144 145
145 146
146 147
147 148
148 149
149 150
150 151
151 152
152 153
153 154
154 155
155 156
156 157
157 158
158 159
159 160
160 161
161 162
162 163
163 164
164 165
165 166
166 167
167 168
168 169
169 170
170 171
171 172
172 173
173 174
174 175
175 176
176 177
177 178
178 179
179 180
180 181
181 182
182 183
183 184
184 185
185 186
186 187
187 188
188 189
189 190
190 191
191 192
192 193
193 194
194 195
195 196
196 197
197 198
198 199
199 200
200
Air outlet
76MH0A080
1. Windshield defroster outlet 2. Side defroster outlet 3. Side o")