2017 SUBARU LEGACY ECU
[x] Cancel search: ECUPage 231 of 610

Instruments and controls/Mirrors
new battery be placed in the
hand-held remote (garage door
opener remote) of the device for
quicker and more accurate train-
ing.
. Turn the ignition switch to the
“ ON ”or “ACC ”position before
programming and/or operating
HomeLink
®.
. Keep the hand-held remote (gar-
age door opener remote) of the
device you are programming for
use in other vehicles as well as
for future HomeLink
®program-
ming. It is also suggested that
upon the sale of the vehicle, the
programmed HomeLink
®buttons
be erased for security purposes.
Refer to “Erasing HomeLink
®buttons ”F 3-79. !
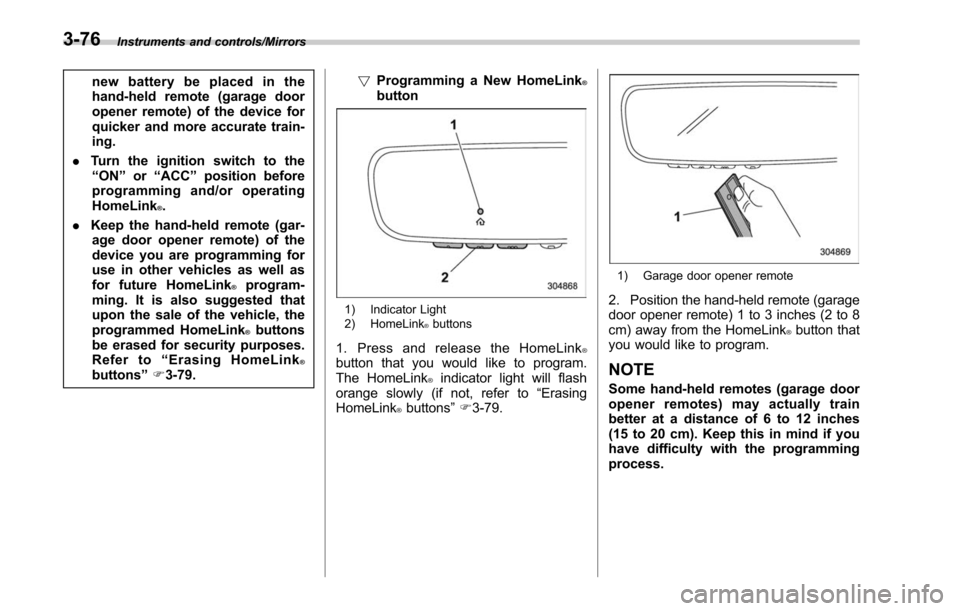
Programming a New HomeLink
®button
1) Indicator Light
2) HomeLink®buttons
1. Press and release the HomeLink®button that you would like to program.
The HomeLink®indicator light will flash
orange slowly (if not, refer to “Erasing
HomeLink
®buttons ”F 3-79.
1) Garage door opener remote
2. Position the hand-held remote (garage
door opener remote) 1 to 3 inches (2 to 8
cm) away from the HomeLink
®button that
you would like to program.
NOTE
Some hand-held remotes (garage door
opener remotes) may actually train
better at a distance of 6 to 12 inches
(15 to 20 cm). Keep this in mind if you
have difficulty with the programming
process.
3-76
Page 232 of 610

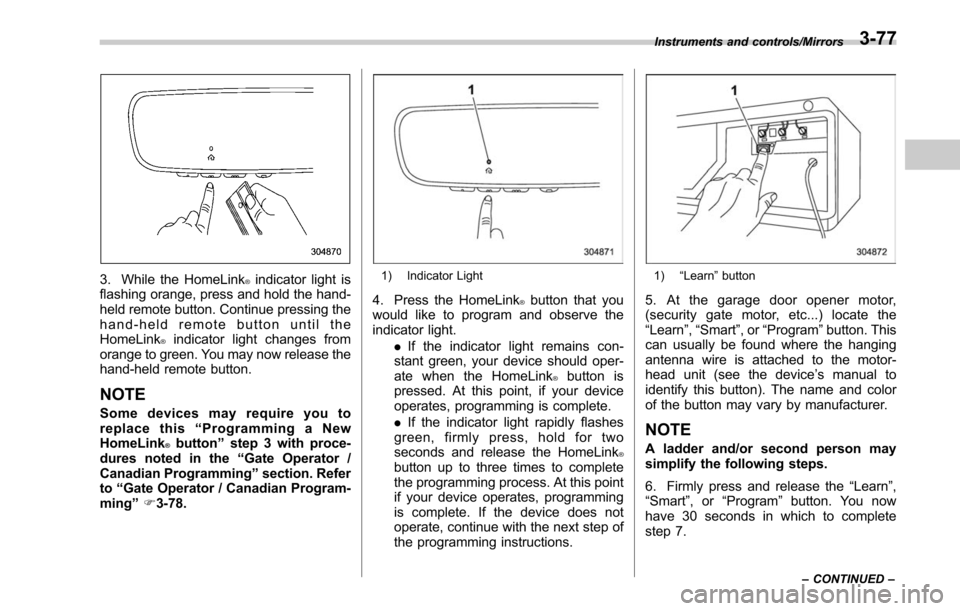
3. While the HomeLink®indicator light is
flashing orange, press and hold the hand-
held remote button. Continue pressing the
hand-held remote button until the
HomeLink
®indicator light changes from
orange to green. You may now release the
hand-held remote button.
NOTE
Some devices may require you to
replace this “Programming a New
HomeLink
®button ”step 3 with proce-
dures noted in the “Gate Operator /
Canadian Programming ”section. Refer
to “Gate Operator / Canadian Program-
ming ”F 3-78.
1) Indicator Light
4. Press the HomeLink®button that you
would like to program and observe the
indicator light.
.If the indicator light remains con-
stant green, your device should oper-
ate when the HomeLink
®button is
pressed. At this point, if your device
operates, programming is complete.
. If the indicator light rapidly flashes
green, firmly press, hold for two
seconds and release the HomeLink
®button up to three times to complete
the programming process. At this point
if your device operates, programming
is complete. If the device does not
operate, continue with the next step of
the programming instructions.
1) “Learn ”button
5. At the garage door opener motor,
(security gate motor, etc...) locate the
“Learn ”,“Smart ”,or “Program ”button. This
can usually be found where the hanging
antenna wire is attached to the motor-
head unit (see the device ’s manual to
identify this button). The name and color
of the button may vary by manufacturer.
NOTE
A ladder and/or second person may
simplify the following steps.
6. Firmly press and release the “Learn”,
“Smart ”,or“Program ”button. You now
have 30 seconds in which to complete
step 7.
Instruments and controls/Mirrors
–CONTINUED –3-77
Page 234 of 610

the device during the“cycling ”pro-
cess to prevent possible overheating.
Proceed with “Programming a New
HomeLink
®button ”step 4 to complete.
! Using HomeLink
®
To operate, simply press and release the
programmed HomeLink®button. Activa-
tion will now occur for the trained device
(i.e. garage door opener, gate operator,
security system, entry door lock, home/
office lighting, etc.). For convenience, the
hand-held remote of the device may also
be used at any time.
!Erasing HomeLink
®buttons
To erase programming from the three
buttons (individual buttons cannot be
erased but can be “reprogrammed”as
outlined below), follow the step noted:
Press and hold the two outer HomeLink
®buttons for at least 10 seconds. The LED
indicator will change from continuously lit
to rapidly flashing. Release both buttons.
Do not hold for longer than 20 seconds.
HomeLink
®is now ready to be pro-
grammed at any time beginning with
“Programming a New HomeLink
®button ”
- step 1. !
Reprogramming a Single
HomeLink
®button
To program a previously trained button,
follow these steps:
1. Press and hold the desired HomeLink
®button. DO NOT release the button.
2. The indicator light will begin to slowly
flash orange after 20 seconds. The
HomeLink
®button can be released at this
point. Proceed with “Programming a New
HomeLink
®button ”- step 3.
3. If you do not complete the program-
ming of a new device to the button, it will
revert to the previously stored program-
ming.
!Garage Door Two-Way Commu-
nication
HomeLink
®has the capability of commu-
nicating with your garage door opener.
HomeLink
®can receive and display “clos-
ing ”or “opening ”status messages from
compatible garage door opener systems.
At any time, HomeLink
®can also recall
and display the last recorded status
communicated by the garage door opener
to indicate your garage door being
“ closed ”or “opened ”.
HomeLink
®has the capability of receiving
this communication from the garage door
opener at a range up to 820 feet (250 m). Range may be reduced by obstacles such
as houses or trees. You may have to slow
your vehicle speed to successfully receive
the garage door opener communication.
!Programming Two-Way Commu-
nication
1) Status Indicators
Within 5 seconds after programming a
new HomeLink®button, both of Home-
Link ’s garage door status indicators will
flash rapidly green indicating that the
garage door two-way communication has
been enabled. If your garage door status
indicators flashed, two-way communica-
tion programming is complete.
If the garage door status indicators do not
flash, additional HomeLink
®information
and programming videos can be found
Instruments and controls/Mirrors
–CONTINUED –3-79
Page 237 of 610

Instruments and controls/Tilt/telescopic steering wheel
!Remote control mirror switch
: Select side to adjust
: Direction control
The remote control mirrors operate only
when the ignition switch is in the “ON”or
“ACC ”position.
1. Turn the control switch to the side that
you want to adjust. “L”is for the left mirror,
“R ”is for the right mirror.
2. Move the control switch in the direction
you want to move the mirror.
3. Return the control switch to the neutral
position to prevent unintentional opera-
tion.
The mirrors can also be adjusted manu-
ally.
Tilt/telescopic steering wheel
WARNING
. Do not adjust the steering wheel
tilt/telescopic position while driv-
ing. This may cause loss of
vehicle control and result in
personal injury.
. If the lever cannot be raised to
the fixed position, adjust the
steering wheel again. It is dan-
gerous to drive without locking
the steering wheel. This may
cause loss of vehicle control
and result in personal injury.
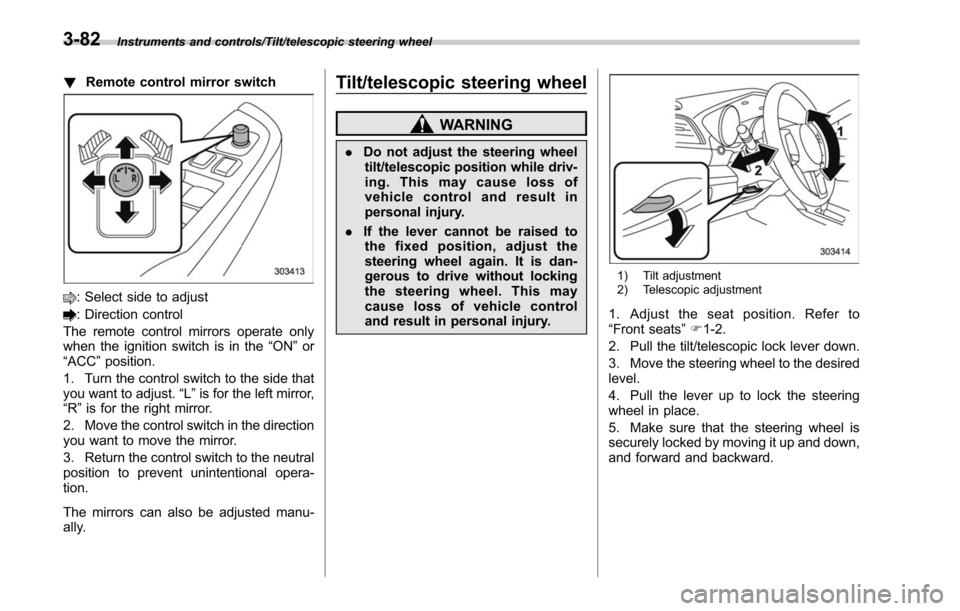
1) Tilt adjustment
2) Telescopic adjustment
1. Adjust the seat position. Refer to
“Front seats ”F 1-2.
2. Pull the tilt/telescopic lock lever down.
3. Move the steering wheel to the desired
level.
4. Pull the lever up to lock the steering
wheel in place.
5. Make sure that the steering wheel is
securely locked by moving it up and down,
and forward and backward.
3-82
Page 280 of 610

.The radio automatically blends to an
HD Radio signal (if equipped) in AM or
FM where available.
! How to change the source
Select the “AM”or “FM ”key on the source
select screen. Refer to “Selecting an audio
source” F5-18.
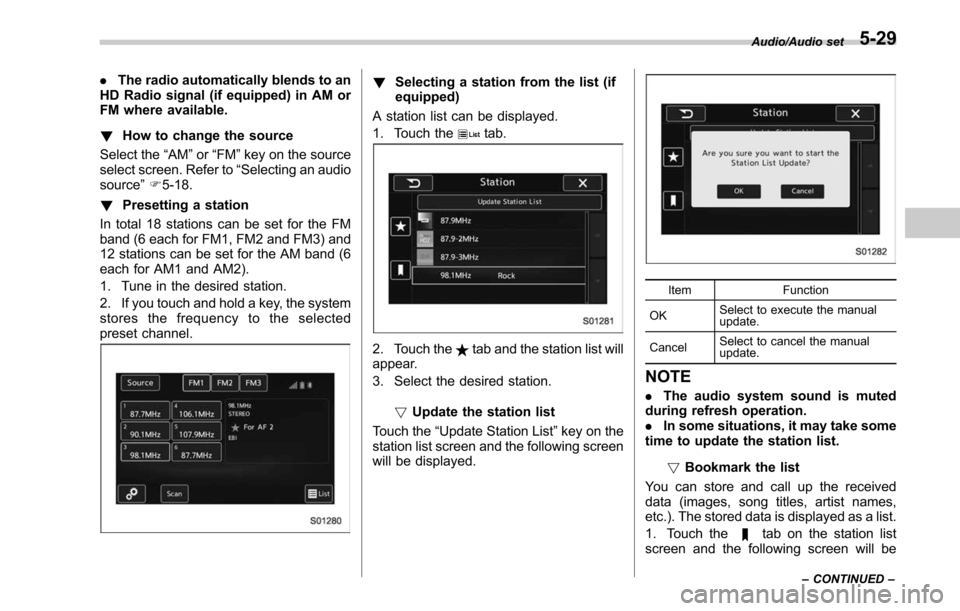
! Presetting a station
In total 18 stations can be set for the FM
band (6 each for FM1, FM2 and FM3) and
12 stations can be set for the AM band (6
each for AM1 and AM2).
1. Tune in the desired station.
2. If you touch and hold a key, the system
stores the frequency to the selected
preset channel.! Selecting a station from the list (if
equipped)
A station list can be displayed.
1. Touch the
tab.
2. Touch thetab and the station list will
appear.
3. Select the desired station.
!Update the station list
Touch the “Update Station List ”key on the
station list screen and the following screen
will be displayed.
Item Function
OK Select to execute the manual
update.
Cancel Select to cancel the manual
update.
NOTE
.
The audio system sound is muted
during refresh operation.
. In some situations, it may take some
time to update the station list.
!Bookmark the list
You can store and call up the received
data (images, song titles, artist names,
etc.). The stored data is displayed as a list.
1. Touch the
tab on the station list
screen and the following screen will be
Audio/Audio set
–CONTINUED –5-29
Page 297 of 610

Audio/Audio set
Audio panel
No. Function
&1Turn to adjust volume.
Press to turn the audio system on/off.
&2Press to display the sound setting
screen. Refer to “Unit settings ”F 5-19.
&3Press to display the station operation
screen.
Press to select an audio mode.
&4
Turn to display the next/previous con-
tent item.
Press to select an audio source. Refer
to “Selecting an audio source ”F 5-18.
&5Press to display the next/previous con-
tent item.
NOTE
. For safety reasons, certain func-
tions are not available while your
vehicle is in motion.
. In order to maximize signal recep-
tion, performance and precision of the
smartphone, please ensure the smart-
phone is placed as close to the system
as possible, while ensuring it is stowed
and secure while driving.
. When the ignition switch is in the
“ ACC ”or “ON ”position, the battery of
the connected iPhone/iPod touch is
charged.
. iPhone/iPod touch may not be re-
cognized when the ignition switch is in
the “ACC ”or “ON ”position. In this
case, remove the iPhone/iPod touch
and reconnect it.
. The accuracy of the displayed in-
formation or the signal reception per-
formance depends on the smartphone
or the connected device, and it ’s wire-
less connection.
. Since the aha application uses sig-
nals from GPS satellites and wireless
communication lines, it may not work
properly in the following locations.
–In a tunnel
– In underground parking lots
5-46
Page 318 of 610

“BT Devices Connection ”screen (At the
initial startup and when no device is
registered).
5. Touch the “Add”key.
When the “Add ”key is selected (Waiting
for the connection request from a device).
. For details about operating the Blue-
tooth device, see the manual that
comes with it.
. To cancel the registration, touch the
“Cancel” key.
6. Register the Bluetooth device using
your Bluetooth device. .A PIN-code is not required for SSP
(Secure Simple Pairing) compatible
Bluetooth devices. Depending on the
type of Bluetooth device being con-
nected, a message confirming regis-
tration may be displayed on the Blue-
tooth device ’s screen. Respond and
operate the Bluetooth device accord-
ing to the confirmation message.
7. Check that the screen is displayed
when registration is complete. .The system waits for connection
requests coming from the registered
device.
. At this stage, the Bluetooth func-
tions are not yet available.
! Registering a Bluetooth Audio de-
vice for the first time
To use the Bluetooth Audio, it is necessary
to register an audio device with the
system.
The device registration procedure is the
same for both the hands-free system and Bluetooth audio.
1. Display the
“BT Devices Connection ”
screen. Refer to “Registering a Bluetooth
phone for the first time ”F 5-66.
2. Select the “Add”key.
The “Add” key is not displayed when five
devices are already registered.
To add another device, you need to delete
one of the registered devices.
Press the
key for the device to be
deleted, and then select the “OK”key.
3. Register the Bluetooth device using
your Bluetooth device. .A PIN-code is not required for SSP
(Secure Simple Pairing) compatible
Bluetooth devices. Depending on the
type of Bluetooth device being con-
nected, a message confirming regis-
tration may be displayed on the Blue-
tooth device ’s screen. Respond and
operate the Bluetooth device accord-
ing to the confirmation message.
4. Check that the screen is displayed
when registration is complete. .The system waits for connection
requests coming from the registered
device.
. At this stage, the Bluetooth func-
tions are not yet available.
Audio/Bluetooth®settings
– CONTINUED –5-67
Page 325 of 610

Audio/Hands–free phone system
Item Function
Incoming
Calls Display the history of incoming
calls. Refer to
“By incoming
calls ”F 5-74.
Outgoing
Calls Display the history of outgoing
calls. Refer to
“By outgoing calls ”
F 5-75.
Contacts Display the phonebook. Refer to
“
By contacts list ”F 5-75.
Dialpad Dial a phone number. Refer to
“
By Dialpad ”F 5-76.
NOTE
You can also make a call by using the
following functions.
. Make a call using the off hook
switch on the steering wheel. Refer to
“ By off hook switch ”F 5-76.
. Make a call using voice operation. Refer to
“Voice command system ”F 5-
81.
! By incoming calls
On the phone (menu) screen, select the
“Incoming Calls ”key to open the “Incom-
ing Calls ”screen.
You can make a call by selecting an item
in the incoming call history list.
If there is no incoming call history, a
message appears to indicate that there
is no incoming call history data.
Incoming Calls screen
No. Function
&1Open the “Outgoing Calls ”screen.
&2Open the “Contacts ”screen. No. Function
&3Delete all incoming call history data.
The
“Delete All ”key is disabled when
there is no incoming call history.
When you select an item in the history list
on the “Incoming Calls ”screen, the out-
going call screen opens.
NOTE
. Up to 10 items in the incoming call
history are listed. Scroll the screen to
see items that are not on the screen.
. When making a call to the same
number continuously, only the most
recent call is listed in call history.
. When a phone number registered in
the contact list is received, the name is
displayed.
. Number-withheld calls are also
memorized in the system.
. International phone calls may not be
made depending on the type of cell
phone you have.
. The list should group together con-
secutive entries with the same phone
number and same call type.
5-74