Page 481 of 610

In case of emergency/Flat tires
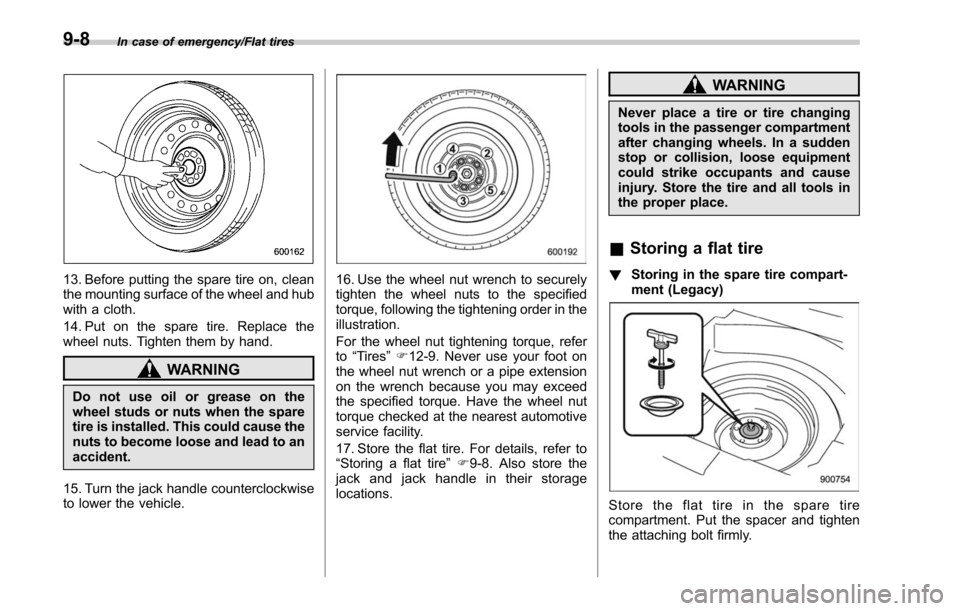
13. Before putting the spare tire on, clean
the mounting surface of the wheel and hub
with a cloth.
14. Put on the spare tire. Replace the
wheel nuts. Tighten them by hand.
WARNING
Do not use oil or grease on the
wheel studs or nuts when the spare
tire is installed. This could cause the
nuts to become loose and lead to an
accident.
15. Turn the jack handle counterclockwise
to lower the vehicle.
16. Use the wheel nut wrench to securely
tighten the wheel nuts to the specified
torque, following the tightening order in the
illustration.
For the wheel nut tightening torque, refer
to “Tires ”F 12-9. Never use your foot on
the wheel nut wrench or a pipe extension
on the wrench because you may exceed
the specified torque. Have the wheel nut
torque checked at the nearest automotive
service facility.
17. Store the flat tire. For details, refer to
“Storing a flat tire ”F 9-8. Also store the
jack and jack handle in their storage
locations.
WARNING
Never place a tire or tire changing
tools in the passenger compartment
after changing wheels. In a sudden
stop or collision, loose equipment
could strike occupants and cause
injury. Store the tire and all tools in
the proper place.
& Storing a flat tire
! Storing in the spare tire compart-
ment (Legacy)
Store the flat tire in the spare tire
compartment. Put the spacer and tighten
the attaching bolt firmly.
9-8
Page 483 of 610

In case of emergency/Flat tires
6. Fasten the tire fixing band to secure
the tire bag.
&Tire pressure monitoring
system (TPMS) (if equipped)
Low tire pressure warning light
The tire pressure monitoring system pro-
vides the driver with the warning message
indicated by sending a signal from a
sensor that is installed in each wheel
when tire pressure is severely low.
The tire pressure monitoring system will
activate only when the vehicle is driven.
Also, this system may not react immedi-
ately to a sudden drop in tire pressure (for
example, a blow-out caused running over
a sharp object).
WARNING
. If the low tire pressure warning
light illuminates while driving,
never brake suddenly. Instead,
perform the following procedure.
Otherwise an accident involving
serious vehicle damage and ser-
ious personal injury could occur.
(1) Keep driving straight ahead while gradually reducing
speed.
(2) Slowly pull off the road to a safe place.
(3) Check the pressure for all four tires and adjust the pressure
to the COLD tire pressure
shown on the vehicle placard
on the door pillar on the
driver ’s side.
If this light still illuminates while driving after adjusting the tire
pressure, a tire may have signifi-
cant damage and a fast leak that
causes the tire to lose air rapidly.
If you have a flat tire, replace it
with a spare tire as soon as
possible.
. When a spare tire is mounted or a
wheel rim is replaced without the
original pressure sensor/trans- mitter being transferred, the low
tire pressure warning light will
illuminate steadily after blinking
for approximately one minute.
This indicates the TPMS is un-
able to monitor all four road
wheels. Contact your SUBARU
dealer as soon as possible for
tire and sensor replacement and/
or system resetting.
. When a tire is repaired with liquid
sealant, the tire pressure warning
valve and transmitter may not
operate properly. If a liquid sea-
lant is used, contact your nearest
SUBARU dealer or other qualified
service shop as soon as possi-
ble. Make sure to replace the tire
pressure warning valve and
transmitter when replacing the
tire. You may reuse the wheel if
there is no damage to it and if the
sealant residue is properly
cleaned off.
If the light illuminates steadily
after blinking for approximately
one minute, promptly contact a
SUBARU dealer to have the sys-
tem inspected.
9-10
Page 487 of 610

In case of emergency/Towing
&Towing hook and tie-down
hooks/holes
The towing hook should be used only in
an emergency (e.g., to free a stuck vehicle
from mud, sand or snow).
A towing hook is supplied with Outback
only. Legacy is not supplied with a towing
hook (it is available as an accessory). On
Legacy, the towing access cover is on the
rear bumper only.
SUBARU recommends towing be done
by your SUBARU dealer or a commer-
cial towing service.
CAUTION
. Use only the specified towing
hook and tie-down hooks/holes.
Never use suspension parts or
other parts of the body for towing
or tie-down purposes.
. Never use the tie-down hole clo-
sest to the muffler under the
vehicle for towing purposes.
. To prevent deformation to the
bumper and the towing hook, do
not apply excessive lateral load
to the towing hooks. Front towing hook (Outback):
1. Take out the screwdriver, towing hook,
wheel nut wrench and jack handle from
the under-floor storage compartment.2. Pry off the towing access cover on the
front bumper using a screwdriver, and you
will find a threaded hole for attaching the
towing hook.
3. Screw the towing hook into the
threaded hole until the threads can no
longer be seen.
4. Tighten the towing hook securely
using the jack handle and wheel nut
wrench.
9-14
Page 488 of 610

After towing, remove the towing hook from
the vehicle and stow it in the under-floor
storage compartment.
Fit the towing hook cover on the bumper.
WARNING
.Do not use the towing hook for
purposes other than towing your
vehicle.
. Be sure to remove the towing
hook after towing. Leaving the
towing hook mounted on the
vehicle could interfere with prop-
er operation of the SRS airbag
system in a frontal collision.
Rear towing hook (Outback):
1. Take out the screwdriver, towing hook,
wheel nut wrench and jack handle from
the under-floor storage compartment.
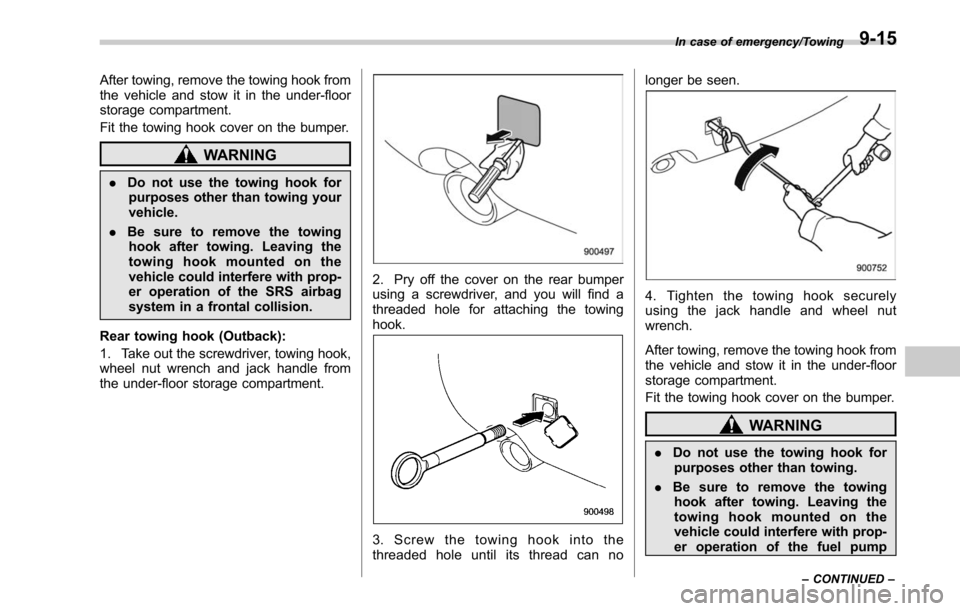
2. Pry off the cover on the rear bumper
using a screwdriver, and you will find a
threaded hole for attaching the towing
hook.
3. Screw the towing hook into the
threaded hole until its thread can no longer be seen.
4. Tighten the towing hook securely
using the jack handle and wheel nut
wrench.
After towing, remove the towing hook from
the vehicle and stow it in the under-floor
storage compartment.
Fit the towing hook cover on the bumper.
WARNING
.
Do not use the towing hook for
purposes other than towing.
. Be sure to remove the towing
hook after towing. Leaving the
towing hook mounted on the
vehicle could interfere with prop-
er operation of the fuel pump
In case of emergency/Towing
–CONTINUED –9-15
Page 490 of 610

the shift lever into the“1st”position.
2. Apply the parking brake firmly.
3. Secure the vehicle onto the carrier
properly with safety chains. Each safety
chain should be equally tightened and
care must be taken not to pull the chains
so tightly that the suspension bottoms out.
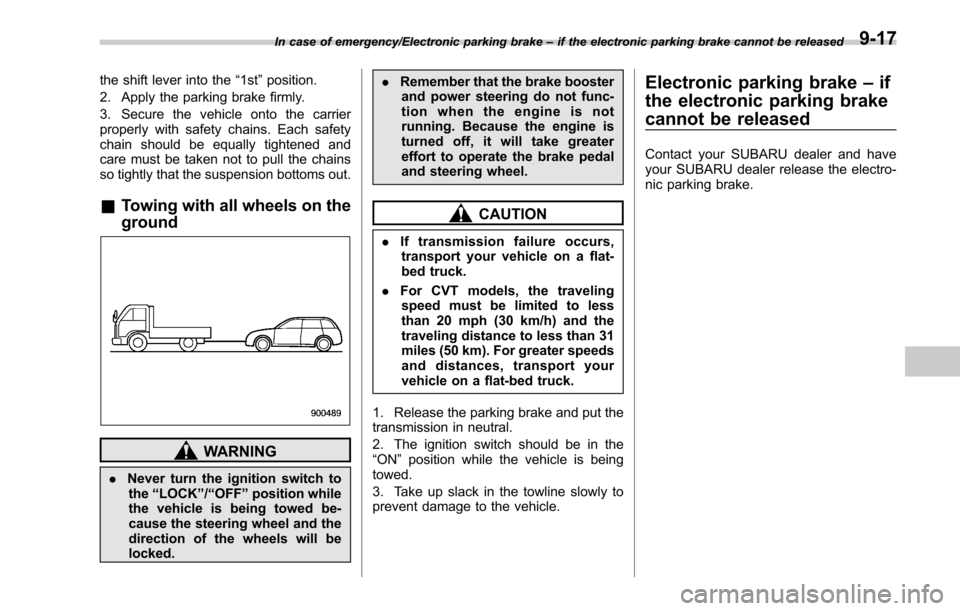
& Towing with all wheels on the
ground
WARNING
. Never turn the ignition switch to
the “LOCK ”/“ OFF ”position while
the vehicle is being towed be-
cause the steering wheel and the
direction of the wheels will be
locked. .
Remember that the brake booster
and power steering do not func-
tion when the engine is not
running. Because the engine is
turned off, it will take greater
effort to operate the brake pedal
and steering wheel.
CAUTION
. If transmission failure occurs,
transport your vehicle on a flat-
bed truck.
. For CVT models, the traveling
speed must be limited to less
than 20 mph (30 km/h) and the
traveling distance to less than 31
miles (50 km). For greater speeds
and distances, transport your
vehicle on a flat-bed truck.
1. Release the parking brake and put the
transmission in neutral.
2. The ignition switch should be in the
“ON ”position while the vehicle is being
towed.
3. Take up slack in the towline slowly to
prevent damage to the vehicle.
Electronic parking brake –if
the electronic parking brake
cannot be released
Contact your SUBARU dealer and have
your SUBARU dealer release the electro-
nic parking brake.
In case of emergency/Electronic parking brake –if the electronic parking brake cannot be released9-17
Page 511 of 610
Maintenance and service/Engine hood
To open the hood:
1. If the wiper blades are lifted off the
windshield, return them to their original
positions.
2. Pull the hood lock release knob under
the instrument panel.
3. Release the secondary hood lock by
moving the lever between the front grille
and the hood toward the left.
4. Lift up the hood.
To close the hood:
1. Lower the hood to a height of approxi-
mately 5.9 in (15 cm) above its closed
position and then throw it down.
2. After closing the hood, be sure the
hood is securely locked.
If this does not close the hood, release it
from a slightly higher position.
WARNING
Always check that the hood is
properly locked before you start
driving. If it is not, it might fly open
while the vehicle is moving and
block your view, which may cause
an accident and serious bodily in-
jury.
11-8
Page 540 of 610

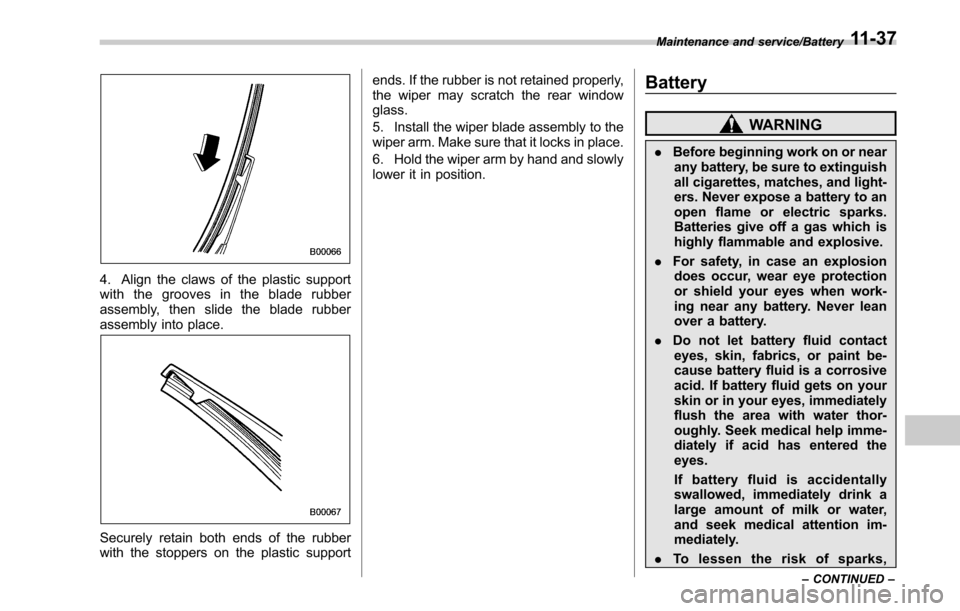
4. Align the claws of the plastic support
with the grooves in the blade rubber
assembly, then slide the blade rubber
assembly into place.
Securely retain both ends of the rubber
with the stoppers on the plastic supportends. If the rubber is not retained properly,
the wiper may scratch the rear window
glass.
5. Install the wiper blade assembly to the
wiper arm. Make sure that it locks in place.
6. Hold the wiper arm by hand and slowly
lower it in position.
Battery
WARNING
.
Before beginning work on or near
any battery, be sure to extinguish
all cigarettes, matches, and light-
ers. Never expose a battery to an
open flame or electric sparks.
Batteries give off a gas which is
highly flammable and explosive.
. For safety, in case an explosion
does occur, wear eye protection
or shield your eyes when work-
ing near any battery. Never lean
over a battery.
. Do not let battery fluid contact
eyes, skin, fabrics, or paint be-
cause battery fluid is a corrosive
acid. If battery fluid gets on your
skin or in your eyes, immediately
flush the area with water thor-
oughly. Seek medical help imme-
diately if acid has entered the
eyes.
If battery fluid is accidentally
swallowed, immediately drink a
large amount of milk or water,
and seek medical attention im-
mediately.
. To lessen the risk of sparks,
Maintenance and service/Battery
–CONTINUED –11-37
Page 547 of 610
Maintenance and service/Replacing bulbs
&Rear combination lights
! Legacy
NOTE
It may be difficult to replace the bulbs.
We recommend that you have the bulbs
replaced by your SUBARU dealer if
necessary.
1. Turn the shopping bag hook 90 de-
grees counterclockwise and pull it out.
2. Turn over the trunk trim panel.
1) Rear side marker light
2) Rear turn signal light
3. Remove the bulb holder from the rear
combination light assembly by turning it
counterclockwise. Use pliers if necessary. 4. Pull the bulb out of the bulb holder and
replace it with a new one.
5. Set the bulb holder into the rear
combination light assembly and turn it
clockwise until it locks.
6. Securely reposition the trunk trim
panel.
7. Reattach the shopping bag hook.
!
Outback
1. Undo the clips. For the method to undo
the clips, refer to “Type C clips”F 11-6.
2. Remove the cover.
11-44