2017 SUBARU FORESTER window
[x] Cancel search: windowPage 278 of 634
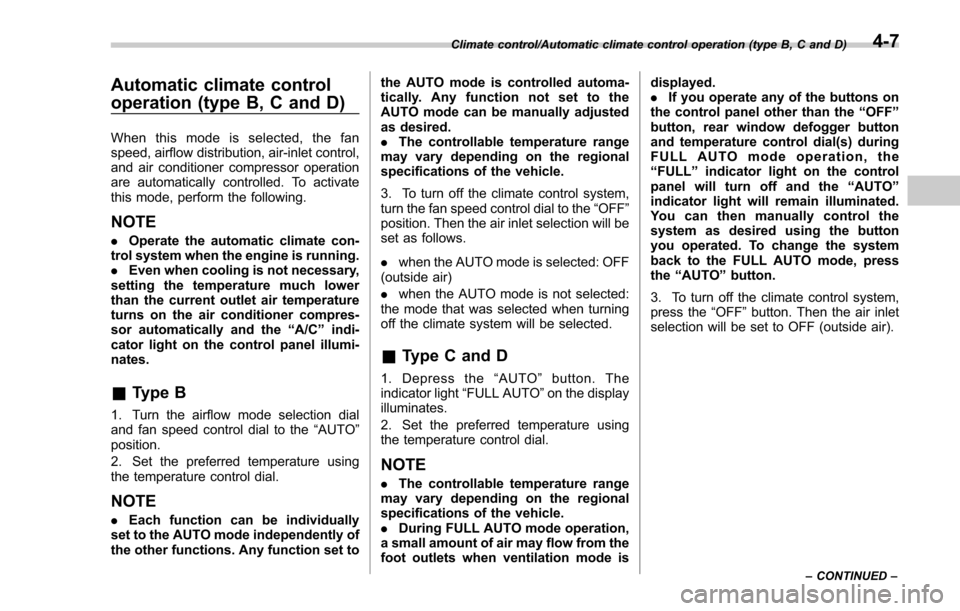
Automatic climate control
operation (type B, C and D)
When this mode is selected, the fan
speed, airflow distribution, air-inlet control,
and air conditioner compressor operation
are automatically controlled. To activate
this mode, perform the following.
NOTE
.Operate the automatic climate con-
trol system when the engine is running.
. Even when cooling is not necessary,
setting the temperature much lower
than the current outlet air temperature
turns on the air conditioner compres-
sor automatically and the “A/C ”indi-
cator light on the control panel illumi-
nates.
& Type B
1. Turn the airflow mode selection dial
and fan speed control dial to the “AUTO”
position.
2. Set the preferred temperature using
the temperature control dial.
NOTE
. Each function can be individually
set to the AUTO mode independently of
the other functions. Any function set to the AUTO mode is controlled automa-
tically. Any function not set to the
AUTO mode can be manually adjusted
as desired.
.
The controllable temperature range
may vary depending on the regional
specifications of the vehicle.
3. To turn off the climate control system,
turn the fan speed control dial to the “OFF”
position. Then the air inlet selection will be
set as follows.
. when the AUTO mode is selected: OFF
(outside air)
. when the AUTO mode is not selected:
the mode that was selected when turning
off the climate system will be selected.
& Type C and D
1. Depress the “AUTO ”button. The
indicator light “FULL AUTO ”on the display
illuminates.
2. Set the preferred temperature using
the temperature control dial.
NOTE
. The controllable temperature range
may vary depending on the regional
specifications of the vehicle.
. During FULL AUTO mode operation,
a small amount of air may flow from the
foot outlets when ventilation mode is displayed.
.
If you operate any of the buttons on
the control panel other than the “OFF ”
button, rear window defogger button
and temperature control dial(s) during
FULL AUTO mode operation, the
“ FULL ”indicator light on the control
panel will turn off and the “AUTO ”
indicator light will remain illuminated.
You can then manually control the
system as desired using the button
you operated. To change the system
back to the FULL AUTO mode, press
the “AUTO ”button.
3. To turn off the climate control system,
press the “OFF ”button. Then the air inlet
selection will be set to OFF (outside air).
Climate control/Automatic climate control operation (type B, C and D)
–CONTINUED –4-7
Page 280 of 634
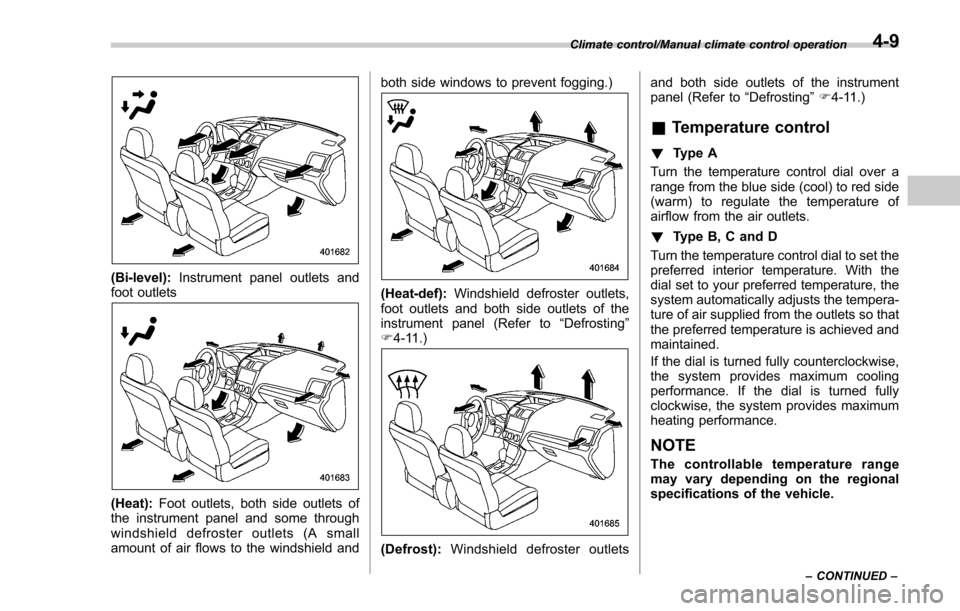
(Bi-level):Instrument panel outlets and
foot outlets
(Heat): Foot outlets, both side outlets of
the instrument panel and some through
windshield defroster outlets (A small
amount of air flows to the windshield and both side windows to prevent fogging.)
(Heat-def):
Windshield defroster outlets,
foot outlets and both side outlets of the
instrument panel (Refer to “Defrosting ”
F 4-11.)
(Defrost): Windshield defroster outlets and both side outlets of the instrument
panel (Refer to
“Defrosting”F 4-11.)
& Temperature control
! Type A
Turn the temperature control dial over a
range from the blue side (cool) to red side
(warm) to regulate the temperature of
airflow from the air outlets.
! Type B, C and D
Turn the temperature control dial to set the
preferred interior temperature. With the
dial set to your preferred temperature, the
system automatically adjusts the tempera-
ture of air supplied from the outlets so that
the preferred temperature is achieved and
maintained.
If the dial is turned fully counterclockwise,
the system provides maximum cooling
performance. If the dial is turned fully
clockwise, the system provides maximum
heating performance.
NOTE
The controllable temperature range
may vary depending on the regional
specifications of the vehicle.
Climate control/Manual climate control operation
–CONTINUED –4-9
Page 281 of 634
Climate control/Manual climate control operation
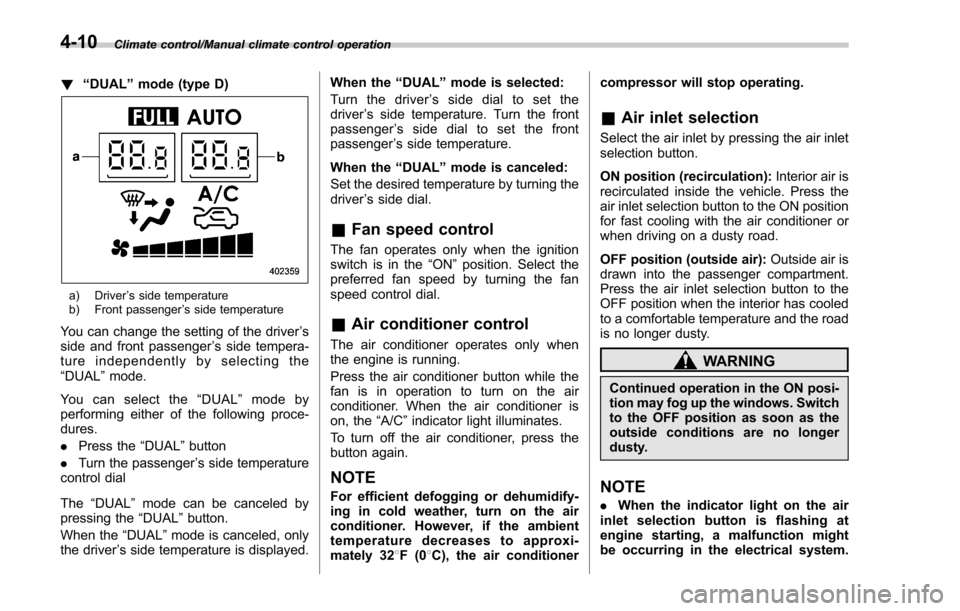
!“DUAL ”mode (type D)
a) Driver ’s side temperature
b) Front passenger ’s side temperature
You can change the setting of the driver ’s
side and front passenger ’s side tempera-
ture independently by selecting the
“DUAL ”mode.
You can select the “DUAL ”mode by
performing either of the following proce-
dures.
. Press the “DUAL”button
. Turn the passenger ’s side temperature
control dial
The “DUAL ”mode can be canceled by
pressing the “DUAL”button.
When the “DUAL”mode is canceled, only
the driver ’s side temperature is displayed. When the
“DUAL ”mode is selected:
Turn the driver ’s side dial to set the
driver ’s side temperature. Turn the front
passenger ’s side dial to set the front
passenger ’s side temperature.
When the “DUAL ”mode is canceled:
Set the desired temperature by turning the
driver ’s side dial.
& Fan speed control
The fan operates only when the ignition
switch is in the “ON”position. Select the
preferred fan speed by turning the fan
speed control dial.
& Air conditioner control
The air conditioner operates only when
the engine is running.
Press the air conditioner button while the
fan is in operation to turn on the air
conditioner. When the air conditioner is
on, the “A/C ”indicator light illuminates.
To turn off the air conditioner, press the
button again.
NOTE
For efficient defogging or dehumidify-
ing in cold weather, turn on the air
conditioner. However, if the ambient
temperature decreases to approxi-
mately 32 8F(0 8C), the air conditioner compressor will stop operating.
&
Air inlet selection
Select the air inlet by pressing the air inlet
selection button.
ON position (recirculation): Interior air is
recirculated inside the vehicle. Press the
air inlet selection button to the ON position
for fast cooling with the air conditioner or
when driving on a dusty road.
OFF position (outside air): Outside air is
drawn into the passenger compartment.
Press the air inlet selection button to the
OFF position when the interior has cooled
to a comfortable temperature and the road
is no longer dusty.
WARNING
Continued operation in the ON posi-
tion may fog up the windows. Switch
to the OFF position as soon as the
outside conditions are no longer
dusty.
NOTE
. When the indicator light on the air
inlet selection button is flashing at
engine starting, a malfunction might
be occurring in the electrical system.
4-10
Page 282 of 634
Contact your SUBARU dealer for in-
spection.
.The indicator light on the air inlet
selection button may flash in the
following cases. However, this does
not indicate a malfunction.
–After the vehicle battery has been
disconnected and reconnected.
– When the vehicle battery voltage
is low.Defrosting
& Type A and B
Select the “”or “”mode by turning the
airflow mode selection dial to defrost or to
dehumidify the windshield and front door
windows.
& Type C
Select the “”mode by pressing the
defroster button, or select the “”mode
by turning the airflow mode selection dial
to defrost or to dehumidify the windshield
and front door windows.
& Type D
Select the “”mode by pressing the
defroster button, or select the “”mode
by pressing the airflow mode selection
button to defrost or to dehumidify the
windshield and front door windows.
NOTE
. When the “”or “”mode is
selected, the air conditioner compres-
sor operates automatically regardless
of the position of the air conditioner
button to defrost the windshield more
quickly. However the indicator on the
air conditioner button will not illumi-
nate. At the same time, the air inlet selection is automatically set to the
outside air mode.
For type A climate control system, in
this state:
–You cannot stop the air condi-
tioner compressor by pressing the
air conditioner button.
– You cannot select the recircula-
tion mode by pressing the air inlet
selection button.
. For type C and D climate control
system, after defrosting the windshield
by pressing the defroster button “
”,
pressing the button again returns the
system to the setting that had been
selected before the defroster was acti-
vated.
Climate control/Defrosting4-11
Page 283 of 634

Climate control/Operating tips for heater and air conditioner
Operating tips for heater and
air conditioner
&Cleaning ventilation grille
1) Front ventilation inlet grille
Always keep the front ventilation inlet grille
free of snow, leaves, or other obstructions
to ensure efficient heating and defrosting.
Since the condenser is located in front of
the radiator, this area should be kept clean
because cooling performance is impaired
by any accumulation of insects and leaves
on the condenser.
&Efficient cooling after parking
in direct sunlight
After parking in direct sunlight, drive with
the windows open for a few minutes to allow outside air to circulate into the
heated interior. This results in quicker
cooling by the air conditioner. Keep the
windows closed during the operation of
the air conditioner for maximum cooling
efficiency.
&
Lubrication oil circulation in
the refrigerant circuit
Operate the air conditioner compressor at
a low engine speed (at idle or low driving
speeds) a few minutes each month during
the off-season to circulate its oil.
&Checking air conditioning
system before summer sea-
son
Check the air conditioner unit for refriger-
ant leaks, hose conditions, and proper
operation each spring. Have the air con-
ditioning system checked by your
SUBARU dealer.
&Cooling and dehumidifying in
high humidity and low tem-
perature weather conditions
Under certain weather conditions (high
relative humidity, low temperatures, etc.) a
small amount of water vapor emission
from the air outlets may be noticed. This
condition is normal and does not indicate any problem with the air conditioning
system.
&
Air conditioner compressor
shut-off when engine is
heavily loaded
To improve acceleration and gas mileage,
the air conditioner compressor is designed
to temporarily shut off during air condi-
tioner operation whenever the accelerator
is fully depressed such as during rapid
acceleration or when driving up a steep
incline.
&Refrigerant for your climate
control system
1) Air conditioner label
Your air conditioner uses ozone friendly
4-12
Page 297 of 634
Audio/Audio set
!File information
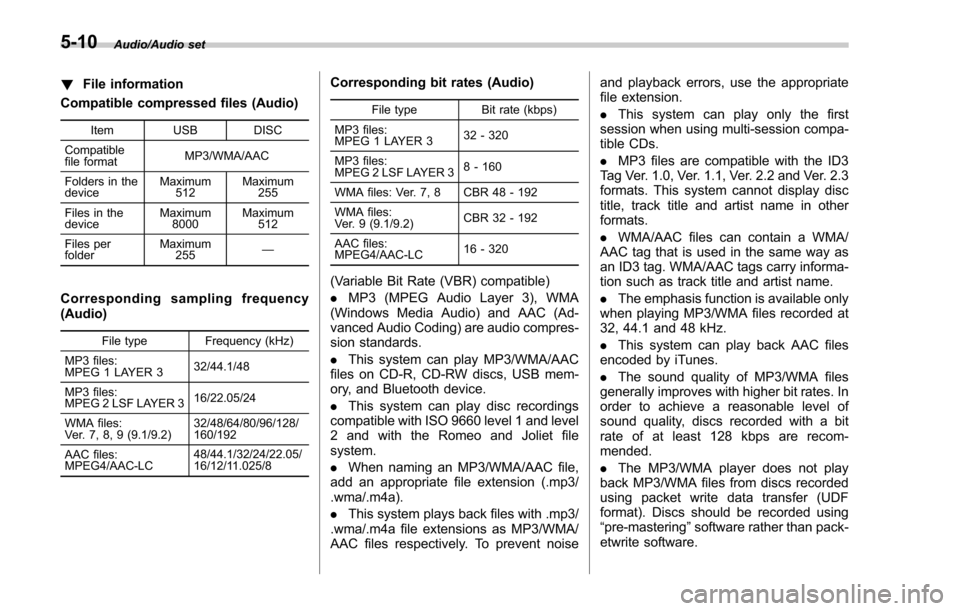
Compatible compressed files (Audio)
Item USB DISC
Compatible
file format MP3/WMA/AAC
Folders in the
device Maximum
512 Maximum
255
Files in the
device Maximum
8000 Maximum
512
Files per
folder Maximum
255 —
Corresponding sampling frequency
(Audio)
File type Frequency (kHz)
MP3 files:
MPEG 1 LAYER 3 32/44.1/48
MP3 files:
MPEG 2 LSF LAYER 3 16/22.05/24
WMA files:
Ver. 7, 8, 9 (9.1/9.2) 32/48/64/80/96/128/
160/192
AAC files:
MPEG4/AAC-LC 48/44.1/32/24/22.05/
16/12/11.025/8
Corresponding bit rates (Audio)
File type
Bit rate (kbps)
MP3 files:
MPEG 1 LAYER 3 32 - 320
MP3 files:
MPEG 2 LSF LAYER 3 8 - 160
WMA files: Ver. 7, 8 CBR 48 - 192
WMA files:
Ver. 9 (9.1/9.2) CBR 32 - 192
AAC files:
MPEG4/AAC-LC 16 - 320
(Variable Bit Rate (VBR) compatible)
.
MP3 (MPEG Audio Layer 3), WMA
(Windows Media Audio) and AAC (Ad-
vanced Audio Coding) are audio compres-
sion standards.
. This system can play MP3/WMA/AAC
files on CD-R, CD-RW discs, USB mem-
ory, and Bluetooth device.
. This system can play disc recordings
compatible with ISO 9660 level 1 and level
2 and with the Romeo and Joliet file
system.
. When naming an MP3/WMA/AAC file,
add an appropriate file extension (.mp3/
.wma/.m4a).
. This system plays back files with .mp3/
.wma/.m4a file extensions as MP3/WMA/
AAC files respectively. To prevent noise and playback errors, use the appropriate
file extension.
.
This system can play only the first
session when using multi-session compa-
tible CDs.
. MP3 files are compatible with the ID3
Tag Ver. 1.0, Ver. 1.1, Ver. 2.2 and Ver. 2.3
formats. This system cannot display disc
title, track title and artist name in other
formats.
. WMA/AAC files can contain a WMA/
AAC tag that is used in the same way as
an ID3 tag. WMA/AAC tags carry informa-
tion such as track title and artist name.
. The emphasis function is available only
when playing MP3/WMA files recorded at
32, 44.1 and 48 kHz.
. This system can play back AAC files
encoded by iTunes.
. The sound quality of MP3/WMA files
generally improves with higher bit rates. In
order to achieve a reasonable level of
sound quality, discs recorded with a bit
rate of at least 128 kbps are recom-
mended.
. The MP3/WMA player does not play
back MP3/WMA files from discs recorded
using packet write data transfer (UDF
format). Discs should be recorded using
“pre-mastering ”software rather than pack-
etwrite software.
5-10
Page 299 of 634

Audio/Audio set
.Level 2: The file name can have up to
31 characters (including the separation
mark “.” and file extension). Each folder
must contain fewer than 8 hierarchies.
!MP3
. MP3 is an audio compression standard
determined by a working group (MPEG) of
the ISO (International Standard Organiza-
tion). MP3 compresses audio data to
about 1/10 the size of that on conventional
discs.
!WMA
. WMA (Windows Media Audio) is an
audio compression format developed by
Microsoft
®. It compresses files into a size
smaller than that of MP3 files. The
decoding formats for WMA files are Ver.
7, 8 and 9.
. This product is protected by certain
intellectual property rights of Microsoft
Corporation and third parties. Use or
distribution of such technology outside of
this product is prohibited without a license
from Microsoft or an authorized Microsoft
subsidiary and third parties. !
AAC
. AAC is short for Advanced Audio
Coding and refers to an audio compres-
sion technology standard used with
MPEG2 and MPEG4.
5-12
Page 302 of 634
!Touch screen operation
This system is operated mainly by the
keys on the screen.
When a screen key is touched, a beep
sounds. You can set the beep sound.
Refer to “Unit settings” F5-18.
NOTE
. If the system does not respond to
touching a screen key, move your
finger away from the screen and touch
it again.
. Grayed-out screen keys cannot be
operated.
. The displayed image may become
darker and moving images may be
slightly distorted when the screen is
cold.
. In extremely cold conditions, the
screen may not be displayed correctly.
Also, the screen keys may be less
responsive than usual when pressed.
. When you look at the screen
through polarized material such as
polarized sunglasses, the screen may
be dark and difficult to see. If so, look at
the screen from different angles, adjust
the screen settings or take off your
sunglasses. Refer to “Unit settings ”
F 5-18. !
Entering letters and numbers/list
screen operation
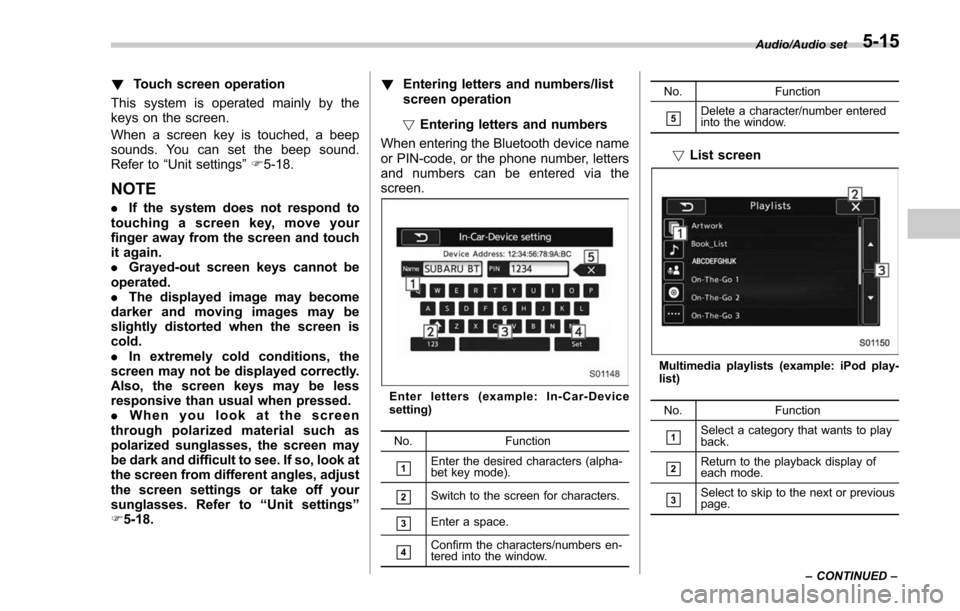
! Entering letters and numbers
When entering the Bluetooth device name
or PIN-code, or the phone number, letters
and numbers can be entered via the
screen.
Enter letters (example: In-Car-Device
setting)
No. Function
&1Enter the desired characters (alpha-
bet key mode).
&2Switch to the screen for characters.
&3Enter a space.
&4Confirm the characters/numbers en-
tered into the window. No. Function
&5Delete a character/number entered
into the window.
!
List screen
Multimedia playlists (example: iPod play-
list)
No. Function
&1Select a category that wants to play
back.
&2Return to the playback display of
each mode.
&3Select to skip to the next or previous
page. Audio/Audio set
–CONTINUED –
5-15