2017 SUBARU FORESTER odometer
[x] Cancel search: odometerPage 24 of 634

&Combination meter
! U.S.-spec. models (type A)
The illustration above is a typical example. For some models, the combination meter
may be slightly different than that shown in the illustration.
1) Tachometer (page 3-11)
2) Select lever/gear position indicator
(page 3-31)
3) Trip meter and odometer (page 3-10)
4) Speedometer (page 3-10)
5) Information display selection knob (page 3-34)
6) Fuel gauge (page 3-12)
7) X-mode (if equipped) (page 7-42)/SI- DRIVE (if equipped) (page 7-32)
8) Trip meter A/B selection and trip meter reset knob (page 3-10)
–CONTINUED –
19
Page 25 of 634

!U.S.-spec. models (type B)
The illustration above is a typical example. For some models, the combination meter
may be slightly different than that shown in the illustration.
1) Tachometer (page 3-11)
2) Multi information display (page 3-39)
3) Fuel gauge (page 3-12)
4) Select lever/gear position indicator
(page 3-31)
5) Speedometer (page 3-10)
6) Trip meter A/B selection and trip meter reset knob (page 3-10)
7) Trip meter and odometer (page 3-10)
20
Page 26 of 634

!Canada-spec. and Mexico-spec. models (type A)
The illustration above is a typical example. For some models, the combination meter
may be slightly different than that shown in the illustration.
1) Tachometer (page 3-11)
2) Trip meter and odometer (page 3-10)
3) Select lever/gear position indicator
(page 3-31)
4) Speedometer (page 3-10)
5) Information display selection knob (page 3-34)
6) ECO gauge (Mexico-spec. models) (page 3-12)
7) Fuel gauge (page 3-12)
8) Trip meter A/B selection and trip meter reset knob (page 3-10)
–CONTINUED –
21
Page 27 of 634

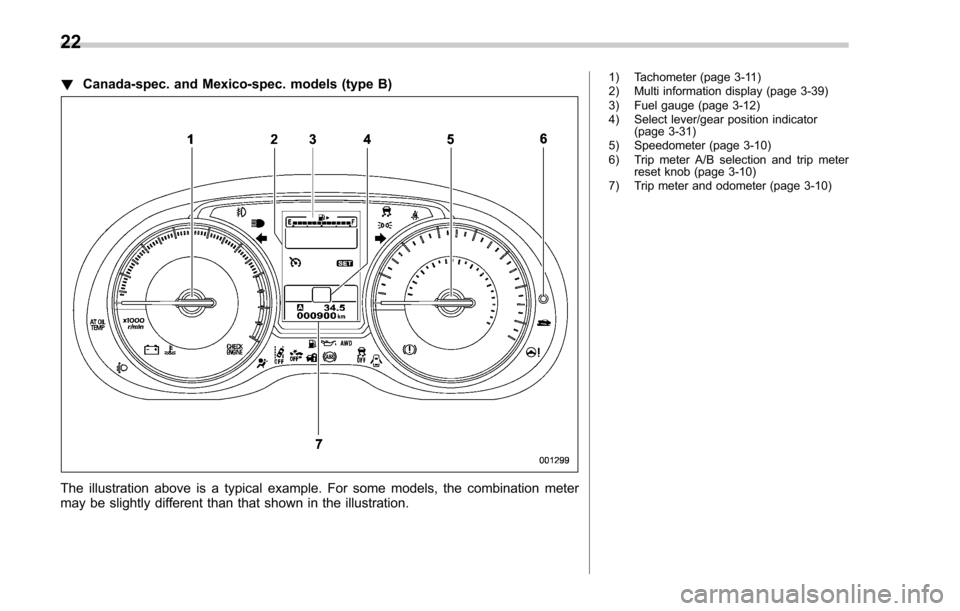
!Canada-spec. and Mexico-spec. models (type B)
The illustration above is a typical example. For some models, the combination meter
may be slightly different than that shown in the illustration.
1) Tachometer (page 3-11)
2) Multi information display (page 3-39)
3) Fuel gauge (page 3-12)
4) Select lever/gear position indicator
(page 3-31)
5) Speedometer (page 3-10)
6) Trip meter A/B selection and trip meter reset knob (page 3-10)
7) Trip meter and odometer (page 3-10)
22
Page 128 of 634

Alarm system
The alarm system helps to protect your
vehicle and valuables from theft. The horn
sounds and the hazard warning flashers
flash if someone attempts to break into
your vehicle.
For models with“keyless access with
push-button start system ”:
The system can be armed and disarmed
with the keyless access function or access
key.
The system will not be activated when the
push-button ignition switch is in the “ACC ”
or “ON ”position.
For models without “keyless access
with push-button start system ”:
The system can be armed and disarmed
with the remote transmitter.
The system will not be activated when the
key is inserted into the ignition switch.
Your vehicle’ s alarm system has been set
for activation at the time of shipment from
the factory. You can set the system for
deactivation yourself or have it done by
your SUBARU dealer.
& System operation
The alarm system will sound the following
alarms when triggered.
. The vehicle ’s horn will sound for 30
seconds.
. The hazard warning flashers will flash
for 30 seconds.
If any of the doors or the rear gate remains
open after the 30-second period, the horn
will continue to sound for a maximum of 3
minutes. If the door or the rear gate is
closed while the horn is sounding, the
horn will stop sounding with a delay of up
to 30 seconds.
The alarm is triggered by:
. Opening any of the doors or the rear
gate
. Physical impact to the vehicle, such as
forced entry (only models with shock
sensors (dealer option))
NOTE
The alarm system can be set to trigger
the illumination of the following interior
lights.
. Map lights (illuminate only when the
door interlock switch is in the “DOOR ”
position)
. Dome light (illuminates only when
the dome light switch is in the “DOOR ”position)
.
Cargo area light (illuminates only
when the cargo area light switch is in
the “ON ”position)
The notifications regarding the map
lights, dome light and cargo area light
are deactivated as the factory setting. A
SUBARU dealer can activate the sys-
tem. Contact your SUBARU dealer for
details.
& Activating and deactivating
the alarm system
To change the setting of your vehicle’ s
alarm system for activation or deactiva-
tion, do the following.
1. Disarm the alarm system. Refer to
“Disarming the system ”F 2-29.
2. Sit in the driver ’s seat and shut all
doors and the rear gate.
3. Turn the ignition switch to the “ON”
position.
4. Hold down the REAR (UNLOCK) side
of the driver ’s power door locking switch,
open the driver ’s door within the following
1 second, and wait 10 seconds without
releasing the switch. The setting will then
be changed as follows.
If the system was previously activated:
The odometer/trip meter screen displays
Keys and doors/Alarm system
–CONTINUED –2-25
Page 129 of 634

Keys and doors/Alarm system
“AL oF ”and the horn sounds twice,
indicating that the system is now deacti-
vated.
If the system was previously deacti-
vated:
The odometer/trip meter screen displays
“ AL on ”and the horn sounds once,
indicating that the system is now acti-
vated.
NOTE
You may have the above setting
change done by your SUBARU dealer.
& If you have accidentally trig-
gered the alarm system
! To stop the alarm
Perform any of the following operations.
. Press any button on the access key/
remote transmitter.
. Turn the ignition switch to the “ON ”
position (models without “keyless access
with push-button start system ”).
. Turn the push-button ignition to the
“ ACC ”position (models with “keyless
access with push-button start system ”).
NOTE
Only registered keys will stop the
alarm. If the immobilizer transponder
is not registered, the alarm will not stop.
&
Arming the system
NOTE
. The system can be armed even if the
engine hood, the windows and/or
moonroof are open. Always make sure
that they are fully closed before arming
the system.
. When arming the system, if any of
the doors (including the rear gate) is
not fully closed, an electronic chirp
sounds five times, and the hazard
warning flashers flash five times to
alert you that the doors (including the
rear gate) are not properly closed.
When you close the door, the doors
will automatically lock and the system
will automatically arm in 30 seconds.
. The 30-second standby time can be
eliminated if you prefer. Have it per-
formed by your SUBARU dealer.
. The system is in the standby mode
for a 30-second period before arming
the system. The security indicator light
will flash at short intervals during this
period.
. If any of the following actions is
done during the standby period, the
system will not switch to the surveil-
lance state. –
Doors (including the rear gate)
are unlocked using the access key/
remote transmitter.
– Doors (including the rear gate)
are unlocked using the keyless
access function (models with “key-
less access with push-button start
system ”).
– Any door (including the rear
gate) is opened.
– The ignition switch is turned to
the “ON ”position (models without
“ keyless access with push-button
start system ”).
– Push-button ignition switch is
turned to the “ACC ”position (mod-
els with “keyless access with push-
button start system ”).
! To arm the system using the access
key/remote transmitter
1. Close all windows and the moonroof (if
equipped).
2. Remove the key from the ignition
switch (models without “keyless access
with push-button start system ”)/turn the
push-button ignition switch to the “OFF”
position (models with “keyless access with
push-button start system ”).
3. Open the doors and get out of the
vehicle.
4. Make sure that the engine hood is
2-26
Page 152 of 634

Ignition switch (models without push-button start system) ......................................... 3-4
LOCK.................................................................. 3-4
ACC.................................................................... 3-5
ON...................................................................... 3-5
START ................................................................ 3-5
Key reminder chime ............................................ 3-5
Ignition switch light (if equipped) ......................... 3-6
Push-button ignition switch (models with
push-button start system) ............................... 3-6
Safety precautions.............................................. 3-6
Operating range for push-button start system ...... 3-6
Switching power status ....................................... 3-7
When access key does not operate properly ........ 3-8
Hazard warning flasher....................................... 3-8
Meters and gauges. ............................................. 3-9
Combination meter illumination ........................... 3-9
Canceling the function for meter/gauge needle movement upon turning on the ignition
switch ............................................................... 3-9
Speedometer ...................................................... 3-10
Odometer ........................................................... 3-10
Double trip meter ............................................... 3-10
Tachometer ........................................................ 3-11
Fuel gauge ......................................................... 3-12
ECO gauge (if equipped) .................................... 3-12
Warning and indicator lights ............................. 3-13Seatbelt warning light and chime ........................ 3-14
SRS airbag system warning light ........................ 3-15
Front passenger ’s frontal airbag ON and OFF
indicators ......................................................... 3-16 CHECK ENGINE warning light/Malfunction
indicator light .................................................. 3-16
Coolant temperature low indicator light/Coolant temperature high warning light ......................... 3-17
Charge warning light .......................................... 3-18
Oil pressure warning light .................................. 3-18
Engine low oil level warning light ....................... 3-18
Windshield washer fluid warning light ................ 3-19
AT OIL TEMP warning light (CVT models) ........... 3-19
Low tire pressure warning light (U.S.-spec. models) ........................................................... 3-19
ABS warning light .............................................. 3-21
Brake system warning light ................................ 3-21
Low fuel warning light ....................................... 3-22
Hill start assist warning light/Hill start assist OFF indicator light .................................................. 3-23
Door open warning light .................................... 3-23
All-Wheel Drive warning light (CVT models) ... ..... 3-23
Power steering warning light .............................. 3-23
Vehicle Dynamics Control warning light/Vehicle Dynamics Control operation indicator light .. ..... 3-24
Vehicle Dynamics Control OFF indicator light ..... 3-25
Warning chimes and warning light of the keyless access with push-button start system (if
equipped) ........................................................ 3-25
Security indicator light ....................................... 3-30
SI-DRIVE indicator light (if equipped) .................. 3-31
Select lever/gear position indicator (CVT models) ........................................................... 3-31
Turn signal indicator lights ................................. 3-32
High beam indicator light ................................... 3-32
High beam assist indicator light (if equipped) ..... 3-32
Instruments and controls
3
Page 161 of 634

Instruments and controls/Meters and gauges
!Type B combination meter
Perform the procedures described in
“Gauge Initial Movement” F3-43.
& Speedometer
The speedometer shows the vehicle
speed.
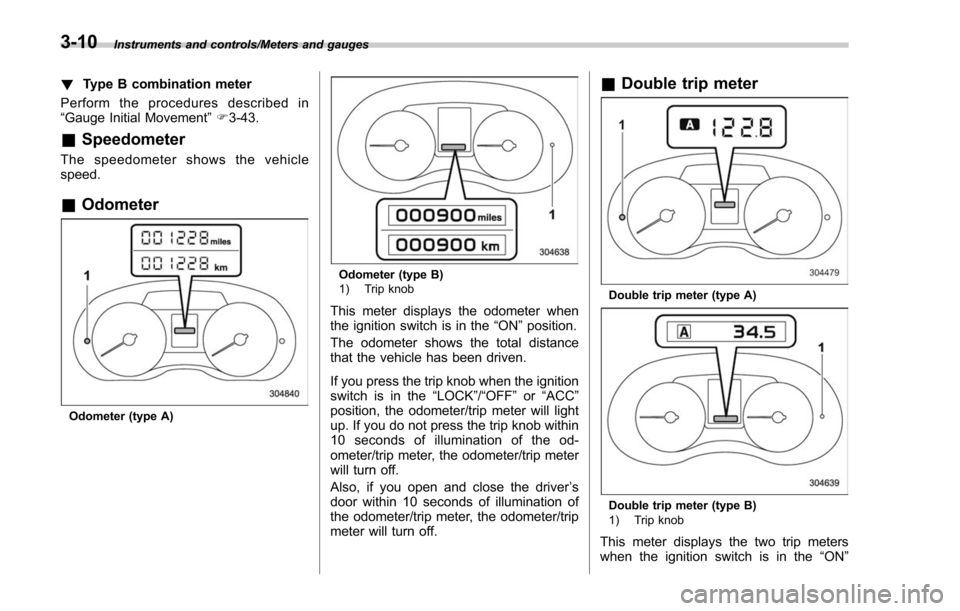
&Odometer
Odometer (type A)
Odometer (type B)
1) Trip knob
This meter displays the odometer when
the ignition switch is in the “ON”position.
The odometer shows the total distance
that the vehicle has been driven.
If you press the trip knob when the ignition
switch is in the “LOCK”/“OFF”or “ACC ”
position, the odometer/trip meter will light
up. If you do not press the trip knob within
10 seconds of illumination of the od-
ometer/trip meter, the odometer/trip meter
will turn off.
Also, if you open and close the driver ’s
door within 10 seconds of illumination of
the odometer/trip meter, the odometer/trip
meter will turn off.
& Double trip meter
Double trip meter (type A)
Double trip meter (type B)
1) Trip knob
This meter displays the two trip meters
when the ignition switch is in the “ON”
3-10