2017 SUBARU FORESTER Window
[x] Cancel search: WindowPage 139 of 634
Keys and doors/Windows
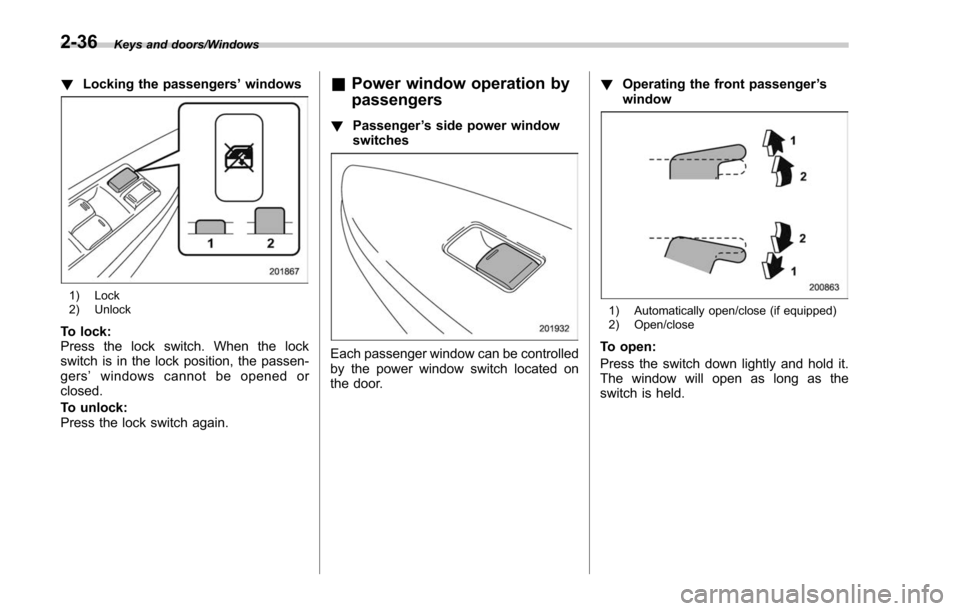
!Locking the passengers ’windows
1) Lock
2) Unlock
To lock:
Press the lock switch. When the lock
switch is in the lock position, the passen-
gers ’windows cannot be opened or
closed.
To unlock:
Press the lock switch again.
& Power window operation by
passengers
! Passenger ’s side power window
switches
Each passenger window can be controlled
by the power window switch located on
the door. !
Operating the front passenger ’s
window
1) Automatically open/close (if equipped)
2) Open/close
To open:
Press the switch down lightly and hold it.
The window will open as long as the
switch is held.
2-36
Page 140 of 634
NOTE
If you continue to hold the AUTO
switch in the down position after the
window has been fully opened, the
circuit breaker may activate for a short
time and the window may not operate.
Allow several seconds for the system
to reset without touching the switch,
and the window will begin to operate
normally on its own.
For some models, this switch is also
equipped with a one-touch auto down
feature that allows the window to be
opened fully without holding the switch.
Press the switch down until it clicks and
release it, and the window will fully open.
To stop the window halfway, pull the
switch up lightly.
To close:
Pull the switch up lightly and hold it. The
window will close as long as the switch is
held.
NOTE
If you continue to hold the AUTO
switch in the up position after the
window has fully closed, the circuit
breaker may open and the system may
not operate. After several seconds, the
window will be able to be opened by
holding the switch down until it is fullyopened. The AUTO function will not
operate. The window can be raised by
pulling up on the switch several times
until the window is fully closed.
To reset to normal operation, initialize
the power window to reactivate the
one-touch auto up/down function. Re-
fer to
“Initialization of power window ”
F 2-38.
For some models, this switch is also
equipped with a one-touch auto up feature
that allows the window to be closed fully
without holding the switch.
Press the switch up until it clicks and
release it, and the window will fully close.
To stop the window halfway, push the
switch down lightly.
NOTE
If the vehicle ’s battery is disconnected
due to situations such as battery or
fuse replacement, the one-touch auto
up/down function will be deactivated.
Initialize the power window to reacti-
vate the one-touch auto up/down func-
tion. Refer to “Initialization of power
window ”F 2-38.
! Anti-entrapment function
Refer to “Anti-entrapment function ”F 2-
35. !
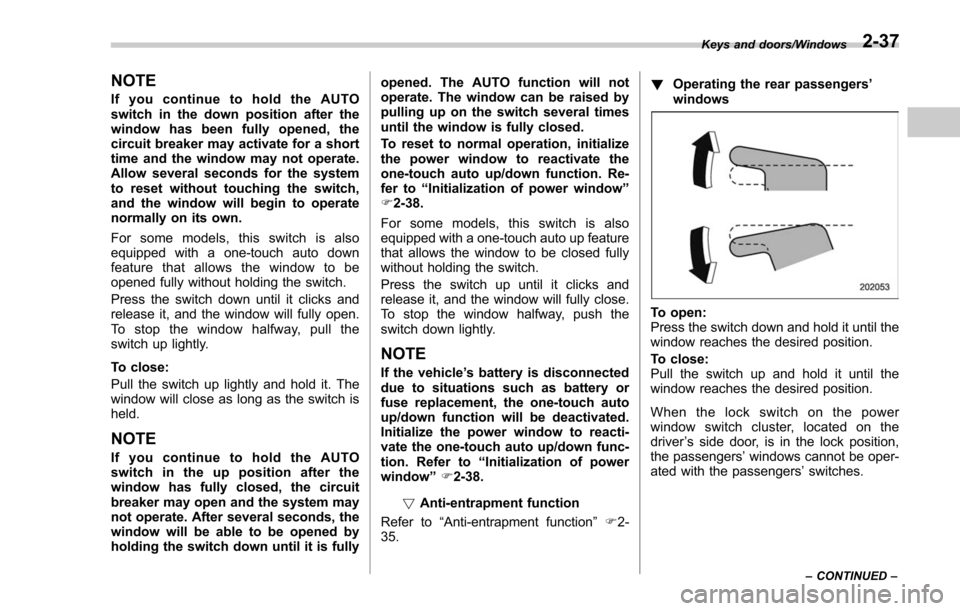
Operating the rear passengers ’
windows
To open:
Press the switch down and hold it until the
window reaches the desired position.
To close:
Pull the switch up and hold it until the
window reaches the desired position.
When the lock switch on the power
window switch cluster, located on the
driver ’s side door, is in the lock position,
the passengers’ windows cannot be oper-
ated with the passengers’ switches.
Keys and doors/Windows
–CONTINUED –2-37
Page 141 of 634
Keys and doors/Rear gate
&Initialization of power win-
dow
If the vehicle’ s battery is disconnected due
to situations such as battery or fuse
replacement, the following functions will
be deactivated.
. One-touch auto up/down function
. Anti-entrapment function
Initialize the power window using the
following procedure to reactivate these
functions.
1. Close the driver ’s door.
2. Turn the ignition switch to the “ON”
position.
3. Open the driver ’s side window halfway
by pushing down the power window
switch.
4. Pull up the power window switch and
close the window completely. Continue
pulling up the switch for approximately 1
second after the window is closed com-
pletely.
5. Open the driver ’s side window com-
pletely by fully pushing down the power
windows switch.
Rear gate
& Manual rear gate (if
equipped)
The rear gate can be locked and unlocked
using any of the following systems.
. Power door locking switch: Refer to
“Power door locking switches ”F 2-8.
. Keyless access with the push-button
start system (if equipped): Refer to “Key-
less access with push-button start system ”
F 2-9.
. Remote keyless entry system: Refer to
“Remote keyless entry system ”F 2-21.
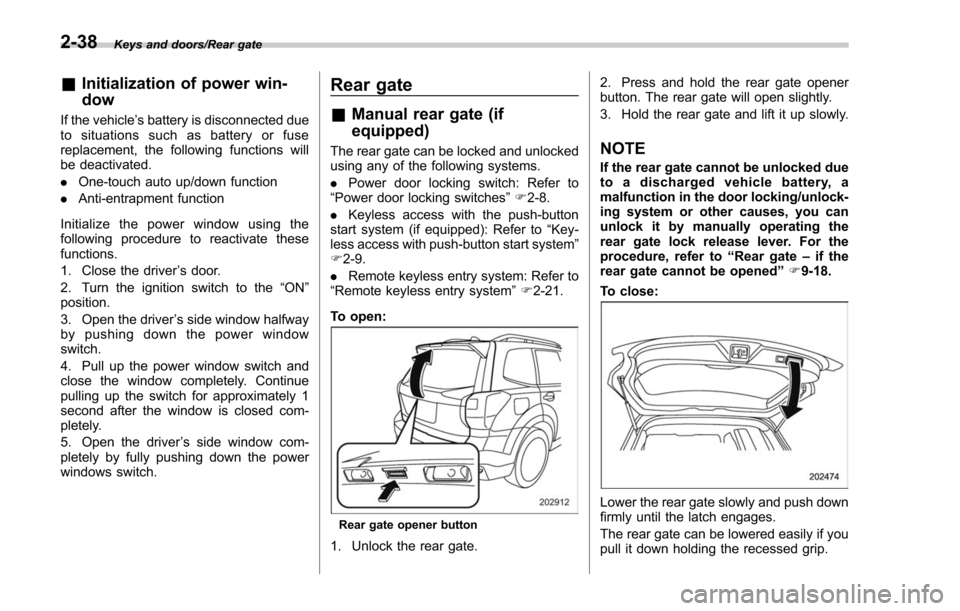
To open:
Rear gate opener button
1. Unlock the rear gate. 2. Press and hold the rear gate opener
button. The rear gate will open slightly.
3. Hold the rear gate and lift it up slowly.
NOTE
If the rear gate cannot be unlocked due
to a discharged vehicle battery, a
malfunction in the door locking/unlock-
ing system or other causes, you can
unlock it by manually operating the
rear gate lock release lever. For the
procedure, refer to
“Rear gate–if the
rear gate cannot be opened ”F 9-18.
To close:
Lower the rear gate slowly and push down
firmly until the latch engages.
The rear gate can be lowered easily if you
pull it down holding the recessed grip.
2-38
Page 154 of 634
Instruments and controls
Fog light switch (if equipped)......................... 3-102Steering responsive fog lights system (if
equipped) ....................................................... 3-103
Wiper and washer ............................................ 3-104Windshield wiper and washer switches ............. 3-105
Rear window wiper and washer switch .............. 3-106
Mirrors............................................................... 3-107Inside mirror .................................................... 3-107
Auto-dimming mirror/compass (if equipped) ...... 3-108Auto-dimming mirror/compass with HomeLink
®(if equipped)
.................................................. 3-109
Outside mirrors ............................................... 3-115
Defogger and deicer ........................................ 3-116
Tilt/telescopic steering wheel ......................... 3-118
Horn .................................................................. 3-118
Heated Steering Wheel system (if equipped) ...................................................... 3-119
Page 155 of 634

Instruments and controls/Ignition switch (models without push–button start system)
Ignition switch (models with-
out push-button start sys-
tem)
WARNING
. Never turn the ignition switch to
the “LOCK ”position while the
vehicle is being driven or towed
because that will lock the steer-
ing wheel, preventing steering
control. And when the engine is
turned off, it takes a much great-
er effort than usual to steer.
. Before leaving the vehicle, al-
ways remove the key from the
ignition switch for safety and
never allow an unattended child
to remain in the vehicle. Failure
to follow this procedure could
result in injury to a child or
others. Children could operate
the power windows, the moon-
roof or other controls or even
make the vehicle move.
CAUTION
Do not attach a large key holder or
key case to either key. If it banged
against your knees or hands while
you are driving, it could turn the
ignition switch from the “ON ”posi-
tion to the “ACC ”or “LOCK ”posi-
tion, thereby stopping the engine.
Also, if the key is attached to a
keyholder or to a large bunch of
other keys, centrifugal force may act
on it as the vehicle moves, resulting
in unwanted turning of the ignition
switch.
The ignition switch has four positions:
LOCK, ACC, ON and START.
NOTE
. Keep the ignition switch in the
“ LOCK ”position when the engine is
not running.
. Using electrical accessories for a
long time with the ignition switch in the
“ ON ”or “ACC ”position can cause the
battery to go dead.
. If the ignition switch will not move
from the “LOCK ”position to the “ACC ”
position, turn the steering wheel
slightly to the left and right as you turn
the ignition switch.
& LOCK
The key can only be inserted or removed
in this position. The ignition switch will lock
the steering wheel when you remove the
key.
If turning the key is difficult, turn the
steering wheel slightly to the right and left
as you turn the key.
3-4
Page 177 of 634

Instruments and controls/Warning and indicator lights
The keyless access with push-button start
system sounds a warning chime and
flashes the access key warning light on
the combination meter in order to minimize
improper operations and help protect your
vehicle from theft.
When the warning chime sounds and/or
the warning light flashes, take the appro-
priate action.
WARNING
Never drive the vehicle if the indi-
cator on the push-button ignition
switch is flashing in green when
starting the engine. This indicates
the status that the steering wheel is
not released and could result in an
accident involving serious injury or
death.
CAUTION
.When starting the engine again
after the operation indicator on
the push-button ignition switch
flashes in green, if the operation
indicator is still flashing in green,
there could be a steering lock
malfunction. Contact your
SUBARU dealer as soon as pos-
sible. .
When the operation indicator on
the push-button ignition switch
flashes in orange, contact a
SUBARU dealer immediately.
NOTE
. Even when the access key is within
the operating ranges inside the vehicle,
the access key warning for engine start
may be provided depending on the
status of the access key and the
environmental conditions.
. When the access key is taken out of
the vehicle through an open window,
the access key takeout warning or
passenger access key takeout warning
will not be provided.
! List of warnings
CAUTION
When any of the following warnings
occurs even if the access key warn-
ing light does not illuminate, take
the appropriate action.
3-26
Page 255 of 634
Instruments and controls/Wiper and washer
Wiper and washer
WARNING
In freezing weather, do not use the
windshield washer until the wind-
shield is sufficiently warmed by the
defroster.
Otherwise the washer fluid can
freeze on the windshield, blocking
your view.
CAUTION
.Do not operate the washer con-
tinuously for more than 10 sec-
onds, or when the washer fluid
tank is empty. This may cause
overheating of the washer motor.
Check the washer fluid level
frequently, such as at fuel stops.
. Do not operate the wipers when
the windshield or rear window is
dry. This may scratch the glass,
damage the wiper blades and
might cause the wiper motor to
fail. Before operating the wiper
on a dry windshield or rear
window, always use the wind-
shield washer. .
In freezing weather, be sure that
the wiper blades are not frozen to
the windshield or rear window
before switching on the wipers.
Attempting to operate the wiper
with the blades frozen to the
window glass could cause not
only the wiper blades to be
damaged but also might cause
the wiper motor to fail. If the
wiper blades are frozen to the
window glass, be sure to operate
the defroster, windshield wiper
deicer (if equipped) or rear win-
dow defogger before turning on
the wiper.
. If the wipers stop during opera-
tion because of ice or some other
obstruction on the window, this
might cause the wiper motor to
fail even if the wiper switch is
turned off. If this occurs,
promptly stop the vehicle in a
safe place, turn the ignition
switch to the “LOCK ”/“ OFF ”po-
sition and clean the window
glass to allow proper wiper op-
eration.
. Use clean water if windshield
washer fluid is unavailable. In
areas where water freezes in
winter, use SUBARU Windshield Washer Fluid or the equivalent.
Refer to
“Windshield washer
fluid ”F 11-30.
Also, when driving the vehicle
when there are freezing tempera-
tures, use non-freezing type wi-
per blades.
. Do not clean the wiper blades
with gasoline or a solvent, such
as paint thinner or benzine. This
will cause deterioration of the
wiper blades.
NOTE
. The windshield wiper motor is pro-
tected against overloads by a circuit
breaker. If the motor operates continu-
ously under an unusually heavy load,
the circuit breaker may trip to stop the
motor temporarily. If this happens, park
your vehicle in a safe place, turn off the
wiper switch, and wait for approxi-
mately 10 minutes. The circuit breaker
will reset itself, and the wipers will
again operate normally.
. Clean your wiper blades and win-
dow glass periodically with a washer
solution to prevent streaking, and to
remove accumulations of road salt or
road film. Operate the windshield
washer for at least 1 second so that
3-104
Page 256 of 634
washer solution will be sprinkled all
over the windshield or rear window.
.Grease, wax, insects or other mate-
rial on the windshield or the wiper
blade results in jerky wiper operation
and streaking on the glass. If you
cannot remove those streaks after
operating the washer or if the wiper
operation is jerky, clean the outer sur-
face of the windshield or rear window
and the wiper blades using a sponge or
soft cloth with a neutral detergent or
mild-abrasive cleaner. After cleaning,
rinse the window glass and wiper
blades with clean water. The glass is
clean if no beads form on the glass
when you rinse with water.
. If you cannot eliminate the streaking
even after following this procedure,
replace the wiper blades with new
ones. For replacement instructions,
refer to “Replacement of wiper blades ”
F 11-32.& Windshield wiper and washer
switches
The wiper operates only when the ignition
switch is in the “ON”position.
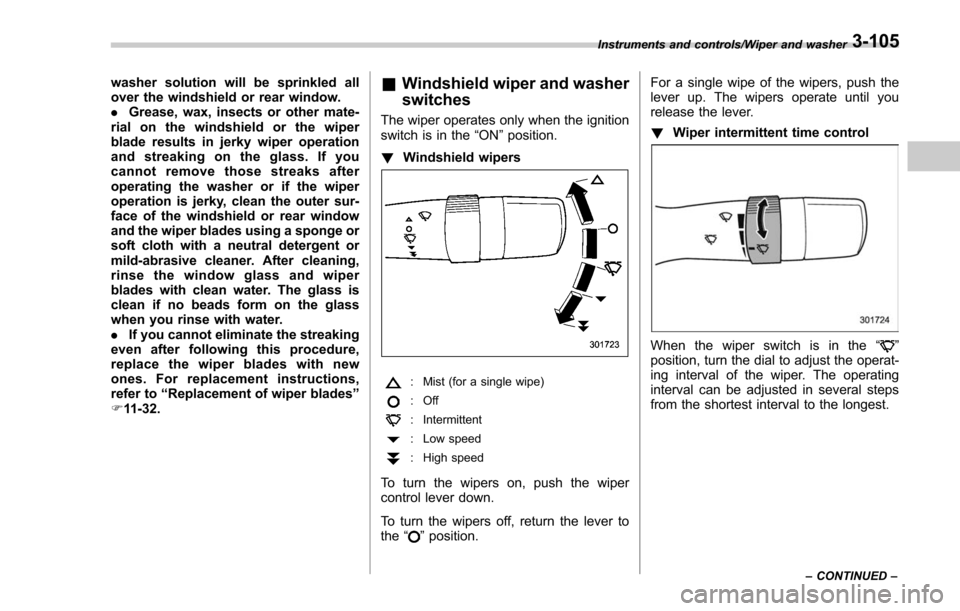
! Windshield wipers
: Mist (for a single wipe)
:Off
: Intermittent
: Low speed
:High speed
To turn the wipers on, push the wiper
control lever down.
To turn the wipers off, return the lever to
the
“
”position. For a single wipe of the wipers, push the
lever up. The wipers operate until you
release the lever.
!
Wiper intermittent time control
When the wiper switch is in the “”
position, turn the dial to adjust the operat-
ing interval of the wiper. The operating
interval can be adjusted in several steps
from the shortest interval to the longest.
Instruments and controls/Wiper and washer
–CONTINUED –3-105