Page 257 of 634
Instruments and controls/Wiper and washer
!Windshield washer
To wash the windshield, pull the wiper
control lever toward you. The washer fluid
sprays until you release the lever. The
wipers operate while you pull the lever.
NOTE
Windshield washer fluid warning light
(type A)
Windshield washer fluid warning light
(type B)
The windshield washer fluid warning
light illuminates when the washer fluid
level in the tank has dropped to the
lower limit. If the warning light illumi-
nates, refill the tank with fluid. For the
refilling procedure, refer to “Wind-
shield washer fluid ”F 11-30.
& Rear window wiper and
washer switch
:Washer (accompanied by wiper op-
eration)
: Continuous
: Intermittent
:Off
:Washer (accompanied by wiper op-
eration)
3-106
Page 258 of 634

!Rear wiper
To turn the rear wiper on, turn the knob
switch upward.
To turn the wiper off, return the knob
switch to the “
”position.
With the switch turned to the “
”posi-
tion, the rear wiper will operate intermit-
tently at intervals corresponding to the
vehicle speed. In this position, when you
move the select lever to the “R ” position
(CVT models) or the shift lever to the
reverse position (MT models), the rear
wiper will switch to continuous operation.
When you move the select lever/shift lever
from the “R”(reverse) position to another
position, the rear wiper will return to
intermittent operation.
CAUTION
Do not attach anything that disturbs
the rear wiper operation on the rear
gate. Doing so may damage the rear
wiper when it operates.
NOTE
Even if the rear wiper switch is in the
“” position, while the shift lever/
select lever is in the “R ” position with
the windshield wiper operating con-
tinuously, the rear wiper will operate intermittently.
!
Washer
To wash the rear window while the rear
wiper is operating, turn the knob switch
upward to the “
”position. The washer
fluid sprays until you release the knob.
To wash the rear window when the rear
wiper is not in use, turn the knob switch
downward to the “
”position. The washer
fluid sprays and the wiper operates until
you release the knob.
Mirrors
Always check that the inside and outside
mirrors are properly adjusted before you
start driving.
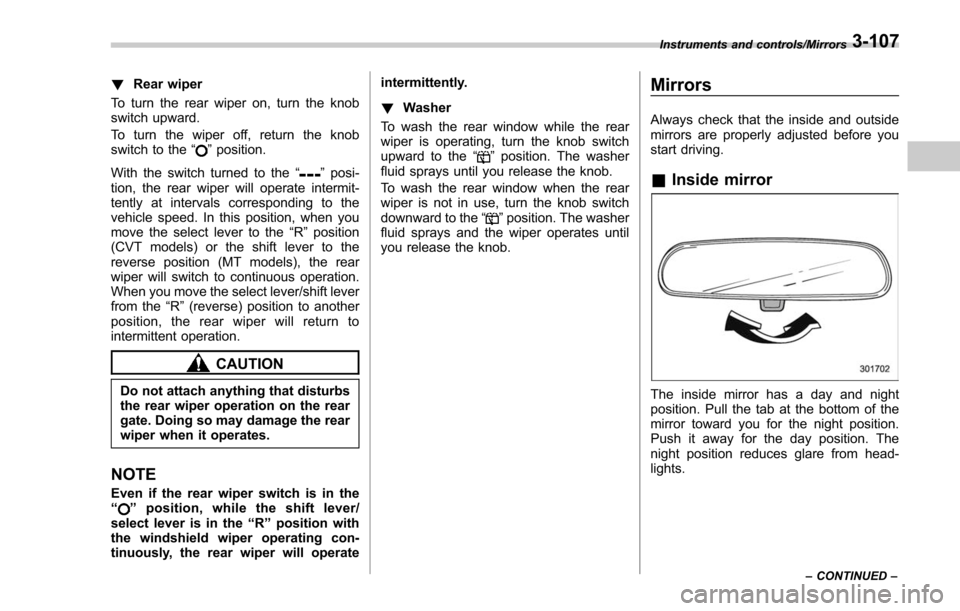
& Inside mirror
The inside mirror has a day and night
position. Pull the tab at the bottom of the
mirror toward you for the night position.
Push it away for the day position. The
night position reduces glare from head-
lights.
Instruments and controls/Mirrors
–CONTINUED –3-107
Page 267 of 634
Instruments and controls/Defogger and deicer
!Remote control mirror switch
: Select side to adjust
: Direction control
The remote control mirrors operate only
when the ignition switch is in the “ON”or
“ACC ”position.
1. Turn the control switch to the side that
you want to adjust. “L”is for the left mirror,
“R ”is for the right mirror.
2. Move the control switch in the direction
you want to move the mirror.
3. Return the control switch to the neutral
position to prevent unintentional opera-
tion.
The mirrors can also be adjusted manu-
ally.
Defogger and deicer
1) Rear window defogger
2) Outside mirror defogger (if equipped)
3) Windshield wiper deicer (if equipped)
The defogger and deicer system is acti- vated only when the ignition switch is in
the
“ON ”position.
Climate control system type A and type B
Climate control system type C and type D
To activate the defogger and deicer
system, press the control switch that is
3-116
Page 268 of 634

located on the climate control panel. The
rear window defogger, outside mirror
defogger and windshield wiper deicer are
activated simultaneously. The indicator
light on the control switch illuminates while
the defogger and deicer system is acti-
vated.
To turn them off, press the control switch
again. They also turn off when the ignition
switch is turned to the“ACC”or “LOCK” /
“ OFF ”position.
The defogger and deicer system will
automatically shut off after approximately
15 minutes. If the rear window and the
outside mirrors have been cleared and the
windshield wiper blades have been deiced
completely before that time, press the
control switch to turn them off. If defrost-
ing, defogging or deicing is not complete,
you have to press the control switch to
turn them on again.
For models with the automatic climate
control system (type B, C and D), it is
possible for the defogger and deicer
system to be set to continuous operation
mode by a SUBARU dealer. Consult your
SUBARU dealer for details. Also, for
models with a multi function display, the
setting can be changed using the display.
For details, refer to “Multi function display ”
F 3-44. If the battery voltage drops below the
permissible level, continuous operation of
the defogger and deicer system is can-
celed and the system stops operating.
CAUTION
.
To prevent the battery from being
discharged, do not operate the
defogger and deicer system con-
tinuously for any longer than
necessary.
. Do not use sharp instruments or
window cleaner containing abra-
sives to clean the inner surface
of the rear window. They may
damage the conductors printed
on the window.
NOTE
. Turn on the defogger and deicer
system if the wipers are frozen to the
windshield.
. If the windshield is covered with
snow, remove the snow so that the
windshield wiper deicer works effec-
tively.
. While the defogger and deicer sys-
tem is in the continuous operation
mode, if the vehicle speed remains at
9 mph (15 km/h) or lower for 15
minutes, the windshield wiper deicer automatically stops operating, though
the rear window defogger and outside
mirror defogger maintain continuous
operation in this condition.
.
While the defogger and deicer sys-
tem is in the continuous operation
mode, if the battery voltage drops
below the permissible level, continu-
ous operation of the defogger and
deicer system is canceled and the
system stops operating.
Instruments and controls/Defogger and deicer3-117
Page 274 of 634
Climate control panel
&Type A
1) Temperature control dial (Refer to “Tem-
perature control ”F 4-9.)
2) Air conditioner button (Refer to “Air
conditioner control ”F 4-10.)
3) Fan speed control dial (Refer to “Fan
speed control ”F 4-10.)
4) Air inlet selection button (Refer to “Air
inlet selection ”F 4-10.)
5) Airflow mode selection dial (Refer to “Airflow mode selection ”F 4-8.)
6) Rear window defogger button (Refer to “Defogger and deicer” F3-116.)
Climate control/Climate control panel
–CONTINUED –
4-3
Page 275 of 634
Climate control/Climate control panel
&Type B1) Temperature control dial (Refer to “Auto-
matic climate control operation (type B, C
and D) ”F 4-7 and/or “Temperature con-
trol ”F 4-9.)
2) Air conditioner button (Refer to “Air
conditioner control ”F 4-10.)
3) Fan speed control dial (Refer to “Auto-
matic climate control operation (type B, C
and D) ”F 4-7 and/or “Fan speed control ”
F 4-10.)
4) Air inlet selection button (Refer to “Air
inlet selection ”F 4-10.)
5) Airflow mode selection dial (Refer to “Automatic climate control operation
(type B, C and D) ”F 4-7 and/or “Airflow
mode selection ”F 4-8.)
6) Rear window defogger button (Refer to “Defogger and deicer” F3-116.)
NOTE
The controllable temperature range
may vary depending on the regional
specifications of the vehicle.
4-4
Page 276 of 634
&Type C1) Airflow mode selection dial (Refer to
“Airflow mode selection ”F 4-8.)
2) Defroster button (Refer to “Airflow mode
selection ”F 4-8.)
3) Rear window defogger button (Refer to “Defogger and deicer” F3-116.)
4) Fan speed control dial (Refer to “Fan
speed control ”F 4-10.)
5) Air conditioner button (Refer to “Air
conditioner control ”F 4-10.)
6) Air inlet selection button (Refer to “Air
inlet selection ”F 4-10.)
7) Temperature control dial (Refer to “Auto-
matic climate control operation (type B, C
and D) ”F 4-7 and/or “Temperature con-
trol ”F 4-9.)
8) AUTO button (Refer to “Automatic cli-
mate control operation (type B, C and D) ”
F 4-7.)
9) OFF button (Refer to “Automatic climate
control operation (type B, C and D) ”F 4-
7.)
Climate control/Climate control panel
–CONTINUED –
4-5
Page 277 of 634

Climate control/Climate control panel
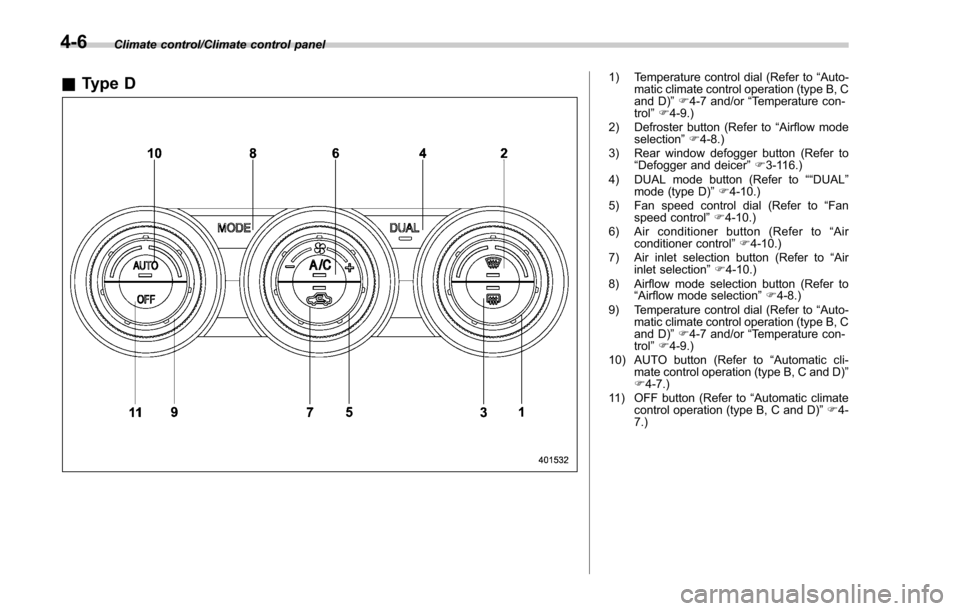
&Type D1) Temperature control dial (Refer to “Auto-
matic climate control operation (type B, C
and D) ”F 4-7 and/or “Temperature con-
trol ”F 4-9.)
2) Defroster button (Refer to “Airflow mode
selection ”F 4-8.)
3) Rear window defogger button (Refer to “Defogger and deicer” F3-116.)
4) DUAL mode button (Refer to ““DUAL”
mode (type D) ”F 4-10.)
5) Fan speed control dial (Refer to “Fan
speed control ”F 4-10.)
6) Air conditioner button (Refer to “Air
conditioner control ”F 4-10.)
7) Air inlet selection button (Refer to “Air
inlet selection ”F 4-10.)
8) Airflow mode selection button (Refer to “Airflow mode selection ”F 4-8.)
9) Temperature control dial (Refer to “Auto-
matic climate control operation (type B, C
and D) ”F 4-7 and/or “Temperature con-
trol ”F 4-9.)
10) AUTO button (Refer to “Automatic cli-
mate control operation (type B, C and D) ”
F 4-7.)
11) OFF button (Refer to “Automatic climate
control operation (type B, C and D) ”F 4-
7.)
4-6