2017 SUBARU FORESTER lock
[x] Cancel search: lockPage 487 of 634
Driving tips/Winter driving
frost or snow etc. on the power rear
gate, remove it. If you forcibly
operate the power rear gate with
frost or snow, it may cause a mal-
function.
&Driving on snowy and icy
roads
To prevent skidding and slipping, avoid
sudden braking, abrupt acceleration, high-
speed driving, and sharp turning when
driving on snowy or icy roads.
Always maintain ample distance between
your vehicle and the vehicle ahead of you
to avoid the need for sudden braking.
To supplement the foot brake, use the
engine brake effectively to control the
vehicle speed. (Shift into a lower gear
when necessary.)
Avoid shifting down abruptly. Such beha-
vior can cause the wheels to lock, possibly
leading to loss of vehicle control.
An anti-lock brake system (ABS) en-
hances your vehicle’ s braking perfor-
mance on snowy and icy roads. For
information on braking on slippery sur-
faces, refer to “ABS (Anti-lock Brake
System) ”F 7-37 and “Vehicle Dynamics
Control system ”F 7-39.
WARNING
Do not use the cruise control on
slippery roads such as snowy or icy
roads. This may cause loss of
vehicle control.
CAUTION
Avoid prolonged continuous driving
in snowstorms. Snow will enter the
engine ’sintakesystemandmay
hinder the airflow, which could re-
sult in engine shutdown or even
breakdown.
! Wiper operation when snowing
Before driving in cold weather, make sure
the wiper blades are not frozen to the
windshield or rear window.
If the wiper blades are frozen to the
windshield or rear window, perform the
following procedure.
. To thaw the windshield wiper blades,
use the defroster with the airflow selection
in “
”and the temperature set for
maximum warmth until the wiper blades
are completely thawed. Refer to “Climate
control ”F 4-1.
. If your vehicle is equipped with a wiper deicer, use it. It is helpful to thaw the
windshield wiper blades. Refer to
“Defog-
ger and deicer ”F 3-116.
. To thaw the rear wiper blade, use the
rear window defogger. Refer to “Defogger
and deicer ”F 3-116.
When driving in snow, if frozen snow starts
to stick on the surface of the windshield
despite wiper operation, use the defroster
with the airflow selection in “
”and the
temperature set for maximum warmth.
After the windshield gets warmed enough
to melt the frozen snow on it, wash it away
using the windshield washer. Refer to
“Windshield washer ”F 3-106.
Snow stuck on the wiper arm prevents the
wiper from working effectively. If snow is
stuck on the wiper arm, pull off the road to
a safe place, then remove it. If you stop
the vehicle at road side, use the hazard
warning flasher to alert other drivers.
Refer to “Hazard warning flasher ”F 3-8.
We recommend use of non-freezing type
wiper blades (winter blades) during the
seasons you could have snow and freez-
ing temperatures. Blades of this type give
superior wiping performance in snowy
conditions. Be sure to use blades that
are suitable for your vehicle.
8-10
Page 493 of 634
Driving tips/Trailer hitch (dealer option)
!Installing carrying attachments on
the crossbars
When installing any carrying attachment
such as a bike carrier, ski carrier, kayak
carrier, cargo basket, etc. on the cross-
bars, follow the manufacturer ’s instruc-
tions and make sure that the attachment is
securely fixed to the crossbars. Use only
attachments designed specifically for the
crossbars. A set of the crossbars is
designed to carry loads (cargo and attach-
ment) of not more than 165 lbs (75 kg).
Before operating the vehicle, make sure
that the cargo is properly secured on the
attachment.
NOTE
Remember that the vehicle ’s center of
gravity is altered with the weight of the
load on the roof, thus affecting the
driving characteristics.
Drive carefully. Avoid rapid starts, hard
cornering and abrupt stops. Crosswind
effects will be increased. !
Removal and installation of the
crossbars
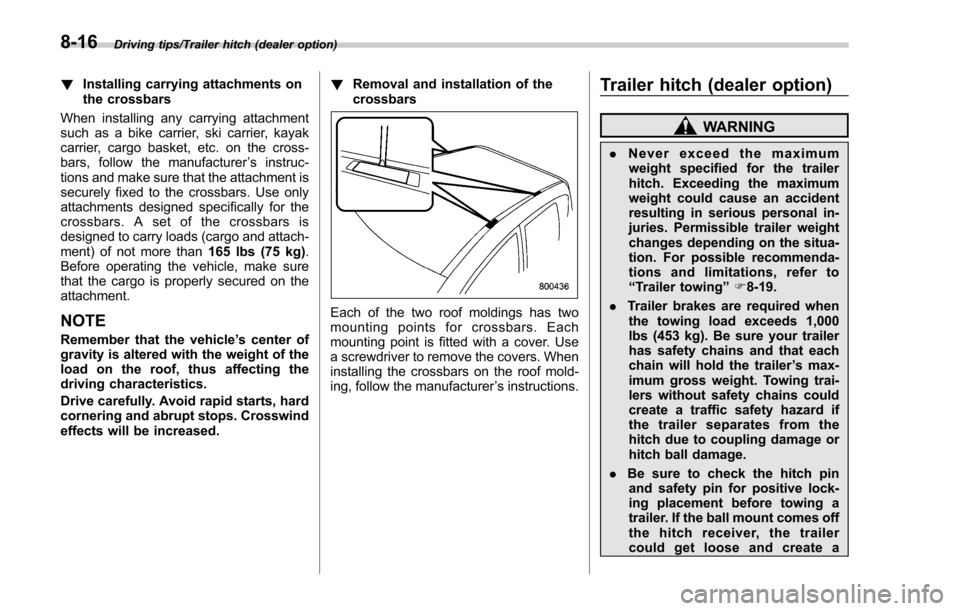
Each of the two roof moldings has two
mounting points for crossbars. Each
mounting point is fitted with a cover. Use
a screwdriver to remove the covers. When
installing the crossbars on the roof mold-
ing, follow the manufacturer ’s instructions.
Trailer hitch (dealer option)
WARNING
. Never exceed the maximum
weight specified for the trailer
hitch. Exceeding the maximum
weight could cause an accident
resulting in serious personal in-
juries. Permissible trailer weight
changes depending on the situa-
tion. For possible recommenda-
tions and limitations, refer to
“ Trailer towing” F8-19.
. Trailer brakes are required when
the towing load exceeds 1,000
lbs (453 kg). Be sure your trailer
has safety chains and that each
chain will hold the trailer ’s max-
imum gross weight. Towing trai-
lers without safety chains could
create a traffic safety hazard if
the trailer separates from the
hitch due to coupling damage or
hitch ball damage.
. Be sure to check the hitch pin
and safety pin for positive lock-
ing placement before towing a
trailer. If the ball mount comes off
the hitch receiver, the trailer
could get loose and create a
8-16
Page 500 of 634

total, one to the right side and the other to
the left side trailer tongue. Pass the chains
crossing each other under the trailer
tongue to prevent the trailer from dropping
onto the ground in case the trailer tongue
should disconnect from the hitch ball.
Allow sufficient slack in the chains taking
tight turn situations into account; however,
be careful not to let them drag on the
ground.
!Side mirrors
After hitching a trailer to your vehicle,
check that the standard side mirrors
provide a good rearward field of view
without significant blind spots. If significant
blind spots occur with the vehicle’ s stan-
dard side mirrors, use towing mirrors that
conform with Federal, state/province and/
or other applicable regulations. !
Trailer lights
CAUTION
Direct splicing or other improper
connection of trailer lights may
damage your vehicle’ s electrical
system and cause a malfunction of
your vehicle ’s lighting system.
Connection of trailer lights to your vehi-
cle ’s electrical system requires modifica-
tions to the vehicle ’s lighting circuit to
increase its capacity and accommodate
wiring changes. To ensure the trailer lights
are connected properly, please consult
your SUBARU dealer. Check for proper
operation of the turn signals and the brake
lights each time you connect a trailer to
your vehicle.
! Tires
WARNING
Never tow a trailer when the tem-
porary spare tire is used. The tem-
porary spare tire is not designed to
sustain the towing load. Use of the
temporary spare tire when towing
can result in failure of the spare tire
and/or less stability of the vehicle.
Make sure that all the tires on your vehicle are properly inflated. Refer to
“Tires”F 12-
10.
Trailer tire condition, size, load rating and
proper inflation pressure should be in
accordance with the trailer manufacturer ’s
specifications. Also check federal, state,
province and/or other applicable regula-
tions.
In the event your vehicle gets a flat tire
when towing a trailer, ask a commercial
road service representative or profes-
sional to repair the flat tire.
If you carry a regular size spare tire in your
vehicle or trailer as a precaution against
getting a flat tire, be sure that the spare
tire is firmly secured.
& Trailer towing tips
CAUTION
. For models equipped with the
BSD (Blind Spot Detection) and
RCTA (Rear Cross Traffic Alert)
driving support systems, when
towing a trailer, press the BSD/
RCTA OFF switch to deactivate
the system. The system may not
operate properly due to the
blocked radar waves. For details
about the BSD/RCTA OFF switch,
Driving tips/Trailer towing
–CONTINUED –8-23
Page 502 of 634
1) Left turn
2) Right turn
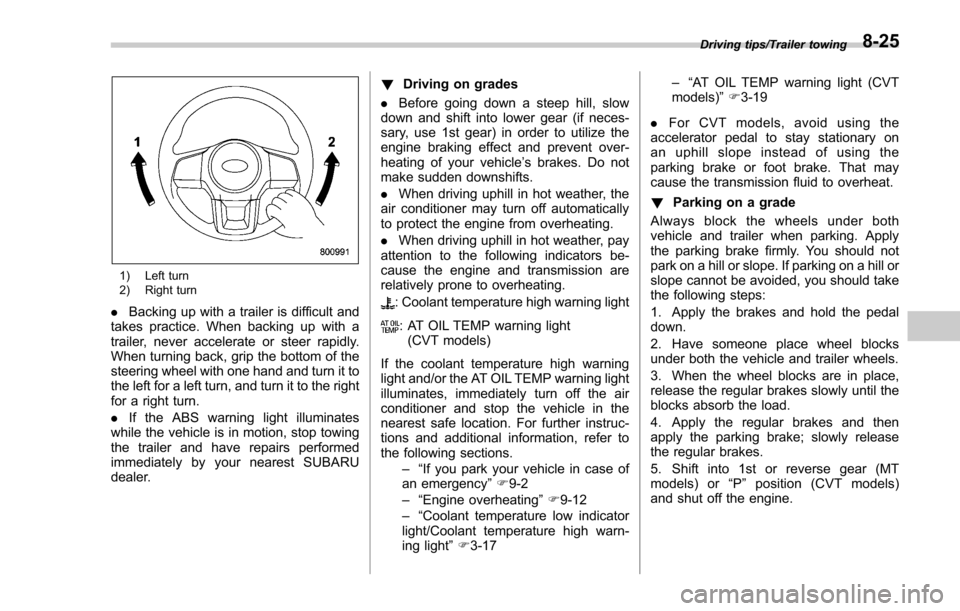
.Backing up with a trailer is difficult and
takes practice. When backing up with a
trailer, never accelerate or steer rapidly.
When turning back, grip the bottom of the
steering wheel with one hand and turn it to
the left for a left turn, and turn it to the right
for a right turn.
. If the ABS warning light illuminates
while the vehicle is in motion, stop towing
the trailer and have repairs performed
immediately by your nearest SUBARU
dealer. !
Driving on grades
. Before going down a steep hill, slow
down and shift into lower gear (if neces-
sary, use 1st gear) in order to utilize the
engine braking effect and prevent over-
heating of your vehicle’ s brakes. Do not
make sudden downshifts.
. When driving uphill in hot weather, the
air conditioner may turn off automatically
to protect the engine from overheating.
. When driving uphill in hot weather, pay
attention to the following indicators be-
cause the engine and transmission are
relatively prone to overheating.: Coolant temperature high warning light
: AT OIL TEMP warning light (CVT models)
If the coolant temperature high warning
light and/or the AT OIL TEMP warning light
illuminates, immediately turn off the air
conditioner and stop the vehicle in the
nearest safe location. For further instruc-
tions and additional information, refer to
the following sections. –“If you park your vehicle in case of
an emergency ”F 9-2
–“ Engine overheating ”F 9-12
–“ Coolant temperature low indicator
light/Coolant temperature high warn-
ing light ”F 3-17 –“
AT OIL TEMP warning light (CVT
models) ”F 3-19
. For CVT models, avoid using the
accelerator pedal to stay stationary on
an uphill slope instead of using the
parking brake or foot brake. That may
cause the transmission fluid to overheat.
! Parking on a grade
Always block the wheels under both
vehicle and trailer when parking. Apply
the parking brake firmly. You should not
park on a hill or slope. If parking on a hill or
slope cannot be avoided, you should take
the following steps:
1. Apply the brakes and hold the pedal
down.
2. Have someone place wheel blocks
under both the vehicle and trailer wheels.
3. When the wheel blocks are in place,
release the regular brakes slowly until the
blocks absorb the load.
4. Apply the regular brakes and then
apply the parking brake; slowly release
the regular brakes.
5. Shift into 1st or reverse gear (MT
models) or “P ” position (CVT models)
and shut off the engine.
Driving tips/Trailer towing8-25
Page 504 of 634
If you park your vehicle in case of anemergency ........................................................ 9-2
Temporary spare tire ........................................... 9-2
Maintenance tools ............................................... 9-3
Screwdriver and wheel nut wrench ...................... 9-4
Under the rear floor ............................................. 9-4
Flat tires............................................................... 9-5Changing a flat tire .............................................. 9-5
Tire pressure monitoring system (TPMS) (U.S.-spec. models) ........................................... 9-8
Jump starting...................................................... 9-9How to jump start ............................................... 9-10
Engine overheating ............................................ 9-12If steam is coming from the engine
compartment .................................................... 9-12
If no steam is coming from the engine compartment .................................................... 9-12
Towing................................................................ 9-13Towing and tie-down hooks. ............................... 9-13
Using a flat-bed truck. ........................................ 9-15
Towing with all wheels on the ground ................. 9-16
Access key–if access key does not
operate properly ............................................. 9-17
Locking and unlocking ....................................... 9-17
Switching power status ...................................... 9-17
Starting engine .................................................. 9-18
Rear gate–if the rear gate cannot be
opened ............................................................. 9-18
Power rear gate - if power rear gate does not operate properly ....................................... 9-19
When the power rear gate is deactivated ............ 9-19
When the rear gate cannot be unlocked ............. 9-20
When the rear gate cannot be closed ................. 9-20
If your vehicle is involved in an accident ........ 9-21
In case of emergency
9
Page 508 of 634
Flat tires
If you have a flat tire while driving, never
brake suddenly; keep driving straight
ahead while gradually reducing speed.
Then slowly pull off the road to a safe
place.
&Changing a flat tire
WARNING
. Do not jack up the vehicle on an
incline or a loose road surface.
The jack can come out of the
jacking point or sink into the
ground and this can result in a
severe accident.
. Use only the jack provided with
your vehicle. The jack supplied
with the vehicle is designed only
for changing a tire. Never get
under the vehicle while support-
ing the vehicle with this jack.
. Before using the jack, be sure
that there are no occupants or
cargo in the vehicle.
. Always turn off the engine before
raising the flat tire off the ground
using the jack. Never swing or
push the vehicle supported with the jack. The jack can come out
of the jacking point due to a jolt
and this can result in a severe
accident.
1. Park on a hard, level surface, when-
ever possible, then stop the engine.
2. Apply the parking brake securely and
shift the shift lever in reverse (MT models)
or the select lever to the “P ” (Park)
position (CVT models).
3. Turn on the hazard warning flasher
and have everyone get out of the vehicle.
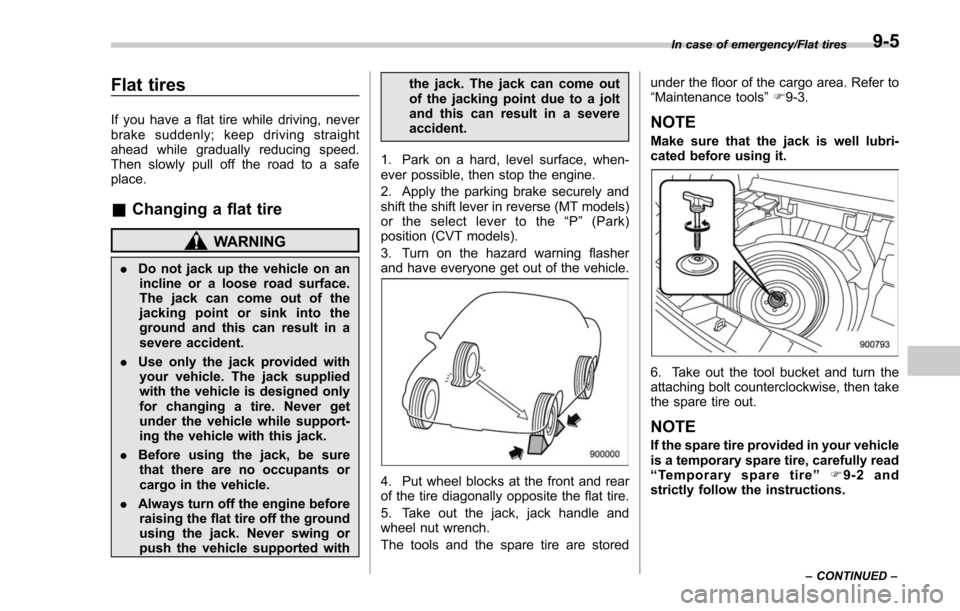
4. Put wheel blocks at the front and rear
of the tire diagonally opposite the flat tire.
5. Take out the jack, jack handle and
wheel nut wrench.
The tools and the spare tire are stored under the floor of the cargo area. Refer to
“Maintenance tools
”F 9-3.
NOTE
Make sure that the jack is well lubri-
cated before using it.
6. Take out the tool bucket and turn the
attaching bolt counterclockwise, then take
the spare tire out.
NOTE
If the spare tire provided in your vehicle
is a temporary spare tire, carefully read
“Temporary spare tire ”F9-2 and
strictly follow the instructions.
In case of emergency/Flat tires
–CONTINUED –9-5
Page 510 of 634

12. Before putting the spare tire on, clean
the mounting surface of the wheel and hub
with a cloth.
13. Put on the spare tire. Replace the
wheel nuts. Tighten them by hand.
WARNING
Do not use oil or grease on the
wheel studs or nuts when the spare
tire is installed. This could cause the
nuts to become loose and lead to an
accident.
14. Turn the jack handle counterclockwise
to lower the vehicle.
15. Use the wheel nut wrench to securely
tighten the wheel nuts to the specified
torque, following the tightening order in the
illustration.
For the wheel nut tightening torque, refer
to “Tires ”F 12-10. Never use your foot on
the wheel nut wrench or a pipe extension
on the wrench because you may exceed
the specified torque. Have the wheel nut torque checked at the nearest automotive
service facility.
16. Store the flat tire in the spare tire
compartment. Be sure to place the spacer
in the manner shown in the illustration,
and then tighten the bolt in the front side of
the bracket.
In case of emergency/Flat tires
–CONTINUED –9-7
Page 515 of 634

In case of emergency/Engine overheating
Engine overheating
WARNING
Never attempt to remove the radia-
tor cap until the engine has been
shut off and has fully cooled down.
When the engine is hot, the coolant
is under pressure. Removing the
cap while the engine is still hot
could release a spray of boiling hot
coolant, which could burn you very
seriously.
If the engine overheats, safely pull off the
road and stop the vehicle in a safe
location.
& If steam is coming from the
engine compartment
. Turn off the engine and get everyone
away from the vehicle until it cools down.
. Contact an authorized SUBARU deal-
er.
& If no steam is coming from
the engine compartment
1. Keep the engine running at idling
speed.
2. Open the engine hood to ventilate the engine compartment. Refer to
“Engine
hood ”F 11-7.
Confirm that the cooling fan is turning. If
the fan is not turning, immediately turn off
the engine and contact an authorized
SUBARU dealer for repair.
3. After the coolant temperature high
warning light that has blinked or illumi-
nated in REDturns off, turn off the engine.
For details about the warning light, refer to
“Coolant temperature low indicator light/
Coolant temperature high warning light ”
F 3-17.
4. After the engine has fully cooled down,
check the coolant level in the reserve
tank. If the coolant level is below the
“LOW ”mark, add coolant up to the “FULL ”
mark.
NOTE
For details about how to check the
coolant level or how to add coolant,
refer to “Engine coolant ”F 11-13.
5. If there is no coolant in the reserve
tank, add coolant to the reserve tank.
Then remove the radiator cap and fill the
radiator with coolant.
If you remove the radiator cap from a hot
radiator, first wrap a thick cloth around the
radiator cap, then turn the cap counter-
clockwise slowly without pressing down until it stops. Release the pressure from
the radiator. After the pressure has been
fully released, remove the cap by pressing
down and turning it.
9-12